
Powder Coating: "Powder for the People"
This article appeared in The British V8 Newsletter - Volume XII, Issue 3 - September 2004by: James Jewell
No, I'm not revolutionary, but Powder Coating is! Let me clarify that statement: Affordable DIY powder-coating is a revolutionary method for the hobbyist to protect and beautify any conductive material that won't melt at or below 400°F. If you keep reading, you'll learn how powder coating works, what affordable systems are on the market and how I've developed my personal operating procedure.
We've all had to paint things in our lives, sometimes to protect the item from corrosion, and other times to improve the item's appearance. Finally, it is often done for both reasons at the same time. So what are the traits we are looking for when we paint? Well, we want something that adheres well to the substrate (the item we're painting), is non-porous (doesn't let the elements through) and is tough (resistant to impact and other stresses and strains). Beyond these basic traits, we want a wide color selection and possibly a texture selection and we may want the material to resist high temperatures and possibly UV radiation. Many of the modern urethane paints have these properties, but there are times when another tool may better suit the job at hand. Don't get me wrong, I am a BIG fan of modern automotive paints for covering large body panels. They are so much better than the lacquers of a decade ago. However they have their drawbacks. They are expensive, toxic and messy! It can be a real pain to mix up a small batch for some bracket or widget, and then have to clean up your gun and other spraying equipment as if you had just done a big job. Rattle-can paint is acceptable for many jobs, but there is a certain skill required to do the job right without runs, and frankly, I just don't think they are that tough, nor do they adhere as well as I'd like them to do in the tough automotive environment. Finally, all paints produce a certain amount of overspray, including the best HVLP guns. This overspray is messy, wasteful and often needs to be cleaned up, if for no other reason than preserving domestic tranquility.
So this is where powder coating comes in. Powder coating (referred to as PC for the
remainder of the article) is sometime referred to as electro-static powder painting
and non-solvent painting. All of these names give you clues as to the nature of the
process. The general process is to create a large voltage differential between the
powder at the gun and the part to be coated and to then use this voltage to attract
and loosely adhere charged powder to the part. The part (and its thin powder coating)
is then heated to the temperature where the powder melts, flows and ultimately cures
into a coating that possesses many of the desirable traits mentioned at the beginning
of the article.
That is the generic process, but it won't help you, the reader, coat that freshly sandblasted oil pan you are holding in your hand (by the way, you can put the sump down until you are finished reading the article).
That is the generic process, but it won't help you, the reader, coat that freshly sandblasted oil pan you are holding in your hand (by the way, you can put the sump down until you are finished reading the article).
In a real system, you have the "gun", the power supply, the ground lead and the
activation switch.
The power-supply is a device that creates a huge voltage differential between the tip of the gun and the ground lead on the order of one- to three-thousand volts. The gun looks very similar to a gravity-feed paint gun, except that the reservoir holds powder and it has a big orifice where the powder leaves the gun after passing over electrically charged metal rods. It is also operated at a lower air pressure than most spray guns. The ground lead is an insulated wire with an alligator clip on the end which connects to the metal part you are painting and ensures that the voltage at the gun is properly referenced to that part.
The activation switch is either a hand or foot operated switch that allows the painter to establish the voltage field just before the powder is applied and keep it active for a few seconds after the powder is sprayed so that the residual powder cloud is pulled to the work piece.
For the average part to be coated, it must first be prepared like any other metal part prior to painting, it is then suspended from a hook while the ground lead is attached to a section that won't need coating. The gun is filled with the powder of choice, and the painter holds down the activation switch. At this point the painter can begin to shoot powder towards the part. Once the part is done and the trigger on the powder gun is released, the painter should hold the activation switch down for a few seconds so the powder cloud still in the air will be attracted to the part. You see, unlike regular paint that moves from the gun to the part with enough velocity to travel in what appears to be a straight line, the powder wafts from the gun to the part in a cloud that looks like smoke from a lit cigarette or steam leaving a boiling teakettle.
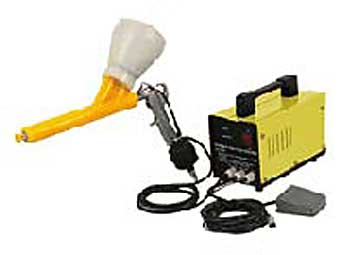
There are three systems that I know of in the "reasonable" price range: One from Harbor Freight and two from The Eastwood Company. The least expensive is the Chicago Electric brand sold by Harbor Freight and a few other places. This model runs about $90.00, but if you get their catalogs and browse them, you can find it usually once a month for $59.00. Keep in mind, though, if you request their catalogs, you will get about 6 catalogs a week which are approximately 99.99543% identical. To make things even more confusing, they often list what appears to be the same item twice on different pages with two different part numbers and prices.
The easiest way to find it is to go to their web-page (www.harborfreight.com) and do a search for "powder." In general their catalogs have great deals on a lot of automotive tools, if you don't mind overtly supporting the totalitarian Chinese regime with your hard-earned capitalist cash. The Eastwood company sells two models, and you all should subscribe to their catalog. You'll get no more than one issue a month, and they are probably the best one-stop restoration supply store in the Nation! Trust me, if you have never seen their catalog, you are in for a treat! Also, if you are doing a major restoration/conversion, you can join their "club" and get free shipping for a year. Because I'm doing a full restoration, I've saved a lot of money on shipping this way.
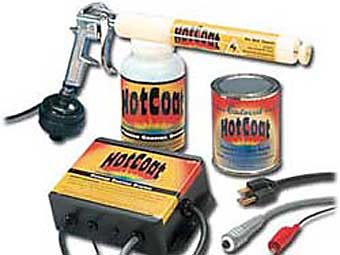
At the entry-level, Eastwood markets the "HotCoat" standard gun for around $100.00. I can only suspect that it, too, is an off-shore product, but most electronic products are. The only drawback to this system is that the activation switch is hand activated, which means that you'll need two hands to paint, unlike both other models mentioned here, which use a foot-switch, freeing up the other hand to untangle hoses or rotate parts.
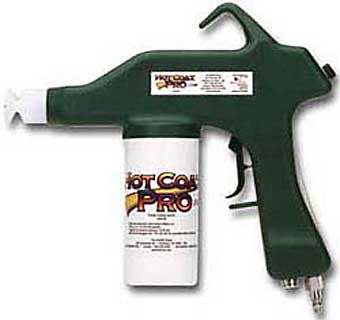
Eastwood's flagship model is the "Hot Coat - Pro" which sells for about $700.00. This one is a real beauty with much more rugged construction than the other two, and it creates an adjustable voltage potential from between 10,000V and 25,000V, which is much higher than the other two models I mentioned. This means that the gun can be held a little further away, leading to faster coverage and higher transfer efficiency. I would love to have this one, especially if I were going to coat something large like a frame, or entire body panels, but I can't justify the expense for the pulleys and brackets that I'm coating. I suspect that there are more models available in this price range, but after I got my $59.00 Harbor Freight special, I stopped looking.
Now that you know what hardware is out there, how about the powder itself? There are a variety of powder types available on the market. In general, they are all considered thermosets, because they cure above a certain temperature, as opposed to just melting. They will not "re-melt" if heated above that temperature again, and will remain stable until they are heated to a much higher temperature at which they burn. This temperature is dependent on the makeup of the individual powder in use, and as with regular paints, some are formulated to work at extremely high temperatures. Powders are typically categorized into five groups: epoxy, epoxy-polyester, often called hybrid powder, polyester-urethanes, TGIC-polyester, and acrylic. Each type has its strong and weak points. There also appear to be some pure polyester powders on the market, but I was unable to find much information on them.
Epoxies are tough, yet flexible, and have outstanding chemical and corrosion resistance. They are, however, not UV resistant, and can fade and break down when exposed to sunlight. By adding polyester to the mix, the transfer efficiency increases but these hybrids lose some of the pure epoxy's resistance to the elements. Polyester-urethanes produce smooth finishes and are UV resistant, but tend to outgas during the curing process, so thin applications must be applied if pinholes are to be avoided. TGIC polyesters may be the best of the lot, because they have nearly all of the positive benefits (UV resistance, toughness, flexible, etc.) and few of the negatives (no out-gassing, etc.). Acrylics can produce a beautiful finish, but there are few manufacturers of the needed resins, and the chemistries can sometimes be incompatible.
Now that I've dumped this arcane information on you, I'll have to say that many suppliers don't clearly advertise from what chemical compounds their powders are made. Many will list their powders simply as Interior Grade, or Exterior Grade. That is usually enough information for me, as long as I'm buying from a reputable dealer. The colors available are numerous and "special-effect" powders can be had, too. Powders come in all gloss-levels, and can be had in textured, metallic, candy and pearlescent finishes. Some finishes require two different powders to be applied, and there are even zinc-based primer powders that add a sacrificial corrosion element for extra protection. Clear-coat powders can be added over basecoat powder, and can also be added over polished metal for resistance to tarnish. This is a nice touch for wheels and intake manifolds.
There are hi-temp powders that can be used on the engine block and heads and are good up to 1000 degrees F, but the color choices are limited, and they won't work on headers, which usually get into the 1200 to 1500 degree F range. Before we get into the powder coating process, we need to go over the preparatory work. Just as with conventional paint, we need to be working on a clean, grease-and-oil free surface. The surface also needs to be free from rust. Without these conditions being met, we'll have adhesion problems. The best way to prepare a part is to sand-blast it. This will remove any rust or old finish, and will effectively etch the surface, which will aid adhesion by giving the powder an irregular surface in which to bite. If the part is small enough, and you have access to stainless steel tanks, you should then give it a zinc phosphate or manganese phosphate coating. This coating is often known by its trade name: Parkerizing.
Those of you who served in the military back when we had REAL main battle rifles made from steel like the M14 and the M1 Garand will be familiar with the gray-green/black granular finish that Parkerizing produces. The zinc-phosphate itself doesn't offer the full level of rust protection, but rather its porous, granular surface absorbs and holds oil which, together with the zinc, prevents the rust. With powder-coating, the phosphated surface absorbs and holds the powder as it is cured. Since Parkerizing is time-consuming (and smelly), we have ready access at most auto parts stores to a simple spray-and-wipe product that produces similar results.
By whatever name it goes, we're talking about a green, phosphoric acid based product that contains zinc. When you spray it on your steel-based part, the phosphoric acid etches the metal which removes rust and gives a good rough surface. While I'm no chemist, it's my understanding that the phosphate released as the phosphoric acid does its work mixes with the free zinc in the liquid and produces a thin zinc-phosphate coating, just like Parkerizing, only less so. The parts should be rinsed with de-ionized water after the etching is complete and dried. I should also mention that zinc actually does protect the metal a little, by oxidizing more easily than iron and acting as a sacrificial anode. That is why most traditional corrosion-proofing methods involve zinc: galvanizing, Parkerizing, and good old zinc-chromate paint. Are all of these steps necessary for powder coating (or paint for that matter) to work? No, but the life of your final coat will be proportional to the preparatory work you perform.
Now that you have prepared your part, you can begin the powder coating. Find a nice place, out of the wind, and hang your part from a thin wire. Run the hose from your air compressor to the gun and set the air-pressure between 10 and 30 psi. With a little practice, you'll find the setting that works best for you. I prefer to keep the pressure high at the compressor, and use a small regulator at the gun, so I don't have to hike back and forth every time I want to adjust the pressure. I also recommend using a desiccant filter just before the gun to keep the powder dry and clean. Fill the cup on the gun with the powder of your choice, and find a good place on the work piece to attach the grounding clip. You can also attach the clip to the wire from which you are hanging the piece as long as the wire isn't insulated. Put on goggles and a good respirator, flip on the power, depress the voltage-activating thumb-or-foot switch and pull the trigger. With the basic system I own, I found that it works best if the tip of the gun is just a few inches (2" or 3") away from the piece. I can actually hear a little hissing sound produced by the electric field when I'm at the right distance. You can actually see the powder drift towards the part, even if the gun isn't pointed directly at the part. I don't think that the Chicago-Electric gun properly charges as many of the powder particles as do the more expensive units.
In other words, it's my gut feeling that only a certain percent of the particles that get shot out of any powder gun actually get charged. These particles will drift towards the work piece even if the gun isn't pointed directly at it whereas the uncharged powder will travel in the direction in which it was blown, and will miss the target if not pointed at it. When the tip of the gun gets further away, with this low-end system, I don't believe the field is strong enough to overcome the inertia of the air that is carrying the powder, unless you are pointed right at the work piece. This also means that if you are trying to coat a part with lots of nooks and crannies, like an engine block or transmission, the turbulence caused by the air hitting the nooks will prevent the powder from depositing into the nooks. All the more reason to keep the air pressure (and therefore powder velocity) to a minimum, keep the gun very close to the work, and let the electric field do all the work. Again, the pressure should just be high enough to waft powder out the end of the gun like smoke. Still, if uncharged powder hits the work, it will still stick and cure properly. So if you are coating a large, open piece, you don't have to worry so much about the field and your distance. Just point and shoot like you would with HVLP gear. One of the neat things about powder is that "overspray" can just be brushed or blown off of whatever it hit. By that same token, if you were working in a clean enough environment you could collect the "over-sprayed" powder and reuse it! This is common practice in production shops that use one color in a special powder-coating "paint" booth. If you make any mistakes, you can just blow them away up until the curing process begins. If you are going to coat with just a single powder you can start the full curing right away. If you are going to use multiple powders, such as a primer and top-coat, or color-coat and clear coat, or all three (primer/base/clear) you must partially cure each coat before applying the next, otherwise the next coat would blow off the powder from the previous coat. Once powder is fully cured, it has such a smooth, non-porous surface that it is almost impossible for a top-coat to stick to it. However, if you just heat it enough that it just starts to flow out (read: melt), it will still allow a top-coat to bite into it, or even cross-link if they are made from the same polymer. Here is where I'm going to share my best little secret with you. I use my heat gun (normally used for stripping old house paint and applying second degree burns to my extremities) to heat the part up just enough to melt the powder, and no more. This can be done while the part is still hanging on its wire.
It's actually kind of fun to watch the dull powder melt into a shiny smooth liquid. Once the part has cooled down, go ahead and apply your next coat. Here's the best part, though. Even if I'm only putting on one coat, I still melt it with the heat gun before taking it off the hook. This way, I eliminate the risk of messing up the powder en-route to the location where I do the full curing. I was inspired to try this after I spent some time powder coating my Buick manual transmission bell-housing a beautiful gloss yellow. I wasn't going to cure it that day, so I gingerly placed it up on a shelf until the weekend arrived. The next day I came home to find yellow paw prints all over it and a house cat with a matching yellow butt. If I'd just used the heat-gun, that damn cat could have done the forbidden Lambada all over my bell-housing and I'd never have known!
The power-supply is a device that creates a huge voltage differential between the tip of the gun and the ground lead on the order of one- to three-thousand volts. The gun looks very similar to a gravity-feed paint gun, except that the reservoir holds powder and it has a big orifice where the powder leaves the gun after passing over electrically charged metal rods. It is also operated at a lower air pressure than most spray guns. The ground lead is an insulated wire with an alligator clip on the end which connects to the metal part you are painting and ensures that the voltage at the gun is properly referenced to that part.
The activation switch is either a hand or foot operated switch that allows the painter to establish the voltage field just before the powder is applied and keep it active for a few seconds after the powder is sprayed so that the residual powder cloud is pulled to the work piece.
|
Enjoying this article? Our magazine is funded through the generous support of readers like you! To contribute to our operating budget, please click here and follow the instructions. (Suggested contribution is twenty bucks per year. Feel free to give more!) |
For the average part to be coated, it must first be prepared like any other metal part prior to painting, it is then suspended from a hook while the ground lead is attached to a section that won't need coating. The gun is filled with the powder of choice, and the painter holds down the activation switch. At this point the painter can begin to shoot powder towards the part. Once the part is done and the trigger on the powder gun is released, the painter should hold the activation switch down for a few seconds so the powder cloud still in the air will be attracted to the part. You see, unlike regular paint that moves from the gun to the part with enough velocity to travel in what appears to be a straight line, the powder wafts from the gun to the part in a cloud that looks like smoke from a lit cigarette or steam leaving a boiling teakettle.
There are three systems that I know of in the "reasonable" price range: One from Harbor Freight and two from The Eastwood Company. The least expensive is the Chicago Electric brand sold by Harbor Freight and a few other places. This model runs about $90.00, but if you get their catalogs and browse them, you can find it usually once a month for $59.00. Keep in mind, though, if you request their catalogs, you will get about 6 catalogs a week which are approximately 99.99543% identical. To make things even more confusing, they often list what appears to be the same item twice on different pages with two different part numbers and prices.
The easiest way to find it is to go to their web-page (www.harborfreight.com) and do a search for "powder." In general their catalogs have great deals on a lot of automotive tools, if you don't mind overtly supporting the totalitarian Chinese regime with your hard-earned capitalist cash. The Eastwood company sells two models, and you all should subscribe to their catalog. You'll get no more than one issue a month, and they are probably the best one-stop restoration supply store in the Nation! Trust me, if you have never seen their catalog, you are in for a treat! Also, if you are doing a major restoration/conversion, you can join their "club" and get free shipping for a year. Because I'm doing a full restoration, I've saved a lot of money on shipping this way.
At the entry-level, Eastwood markets the "HotCoat" standard gun for around $100.00. I can only suspect that it, too, is an off-shore product, but most electronic products are. The only drawback to this system is that the activation switch is hand activated, which means that you'll need two hands to paint, unlike both other models mentioned here, which use a foot-switch, freeing up the other hand to untangle hoses or rotate parts.
Eastwood's flagship model is the "Hot Coat - Pro" which sells for about $700.00. This one is a real beauty with much more rugged construction than the other two, and it creates an adjustable voltage potential from between 10,000V and 25,000V, which is much higher than the other two models I mentioned. This means that the gun can be held a little further away, leading to faster coverage and higher transfer efficiency. I would love to have this one, especially if I were going to coat something large like a frame, or entire body panels, but I can't justify the expense for the pulleys and brackets that I'm coating. I suspect that there are more models available in this price range, but after I got my $59.00 Harbor Freight special, I stopped looking.
Now that you know what hardware is out there, how about the powder itself? There are a variety of powder types available on the market. In general, they are all considered thermosets, because they cure above a certain temperature, as opposed to just melting. They will not "re-melt" if heated above that temperature again, and will remain stable until they are heated to a much higher temperature at which they burn. This temperature is dependent on the makeup of the individual powder in use, and as with regular paints, some are formulated to work at extremely high temperatures. Powders are typically categorized into five groups: epoxy, epoxy-polyester, often called hybrid powder, polyester-urethanes, TGIC-polyester, and acrylic. Each type has its strong and weak points. There also appear to be some pure polyester powders on the market, but I was unable to find much information on them.
Epoxies are tough, yet flexible, and have outstanding chemical and corrosion resistance. They are, however, not UV resistant, and can fade and break down when exposed to sunlight. By adding polyester to the mix, the transfer efficiency increases but these hybrids lose some of the pure epoxy's resistance to the elements. Polyester-urethanes produce smooth finishes and are UV resistant, but tend to outgas during the curing process, so thin applications must be applied if pinholes are to be avoided. TGIC polyesters may be the best of the lot, because they have nearly all of the positive benefits (UV resistance, toughness, flexible, etc.) and few of the negatives (no out-gassing, etc.). Acrylics can produce a beautiful finish, but there are few manufacturers of the needed resins, and the chemistries can sometimes be incompatible.
Now that I've dumped this arcane information on you, I'll have to say that many suppliers don't clearly advertise from what chemical compounds their powders are made. Many will list their powders simply as Interior Grade, or Exterior Grade. That is usually enough information for me, as long as I'm buying from a reputable dealer. The colors available are numerous and "special-effect" powders can be had, too. Powders come in all gloss-levels, and can be had in textured, metallic, candy and pearlescent finishes. Some finishes require two different powders to be applied, and there are even zinc-based primer powders that add a sacrificial corrosion element for extra protection. Clear-coat powders can be added over basecoat powder, and can also be added over polished metal for resistance to tarnish. This is a nice touch for wheels and intake manifolds.
There are hi-temp powders that can be used on the engine block and heads and are good up to 1000 degrees F, but the color choices are limited, and they won't work on headers, which usually get into the 1200 to 1500 degree F range. Before we get into the powder coating process, we need to go over the preparatory work. Just as with conventional paint, we need to be working on a clean, grease-and-oil free surface. The surface also needs to be free from rust. Without these conditions being met, we'll have adhesion problems. The best way to prepare a part is to sand-blast it. This will remove any rust or old finish, and will effectively etch the surface, which will aid adhesion by giving the powder an irregular surface in which to bite. If the part is small enough, and you have access to stainless steel tanks, you should then give it a zinc phosphate or manganese phosphate coating. This coating is often known by its trade name: Parkerizing.
Those of you who served in the military back when we had REAL main battle rifles made from steel like the M14 and the M1 Garand will be familiar with the gray-green/black granular finish that Parkerizing produces. The zinc-phosphate itself doesn't offer the full level of rust protection, but rather its porous, granular surface absorbs and holds oil which, together with the zinc, prevents the rust. With powder-coating, the phosphated surface absorbs and holds the powder as it is cured. Since Parkerizing is time-consuming (and smelly), we have ready access at most auto parts stores to a simple spray-and-wipe product that produces similar results.
By whatever name it goes, we're talking about a green, phosphoric acid based product that contains zinc. When you spray it on your steel-based part, the phosphoric acid etches the metal which removes rust and gives a good rough surface. While I'm no chemist, it's my understanding that the phosphate released as the phosphoric acid does its work mixes with the free zinc in the liquid and produces a thin zinc-phosphate coating, just like Parkerizing, only less so. The parts should be rinsed with de-ionized water after the etching is complete and dried. I should also mention that zinc actually does protect the metal a little, by oxidizing more easily than iron and acting as a sacrificial anode. That is why most traditional corrosion-proofing methods involve zinc: galvanizing, Parkerizing, and good old zinc-chromate paint. Are all of these steps necessary for powder coating (or paint for that matter) to work? No, but the life of your final coat will be proportional to the preparatory work you perform.
Now that you have prepared your part, you can begin the powder coating. Find a nice place, out of the wind, and hang your part from a thin wire. Run the hose from your air compressor to the gun and set the air-pressure between 10 and 30 psi. With a little practice, you'll find the setting that works best for you. I prefer to keep the pressure high at the compressor, and use a small regulator at the gun, so I don't have to hike back and forth every time I want to adjust the pressure. I also recommend using a desiccant filter just before the gun to keep the powder dry and clean. Fill the cup on the gun with the powder of your choice, and find a good place on the work piece to attach the grounding clip. You can also attach the clip to the wire from which you are hanging the piece as long as the wire isn't insulated. Put on goggles and a good respirator, flip on the power, depress the voltage-activating thumb-or-foot switch and pull the trigger. With the basic system I own, I found that it works best if the tip of the gun is just a few inches (2" or 3") away from the piece. I can actually hear a little hissing sound produced by the electric field when I'm at the right distance. You can actually see the powder drift towards the part, even if the gun isn't pointed directly at the part. I don't think that the Chicago-Electric gun properly charges as many of the powder particles as do the more expensive units.
In other words, it's my gut feeling that only a certain percent of the particles that get shot out of any powder gun actually get charged. These particles will drift towards the work piece even if the gun isn't pointed directly at it whereas the uncharged powder will travel in the direction in which it was blown, and will miss the target if not pointed at it. When the tip of the gun gets further away, with this low-end system, I don't believe the field is strong enough to overcome the inertia of the air that is carrying the powder, unless you are pointed right at the work piece. This also means that if you are trying to coat a part with lots of nooks and crannies, like an engine block or transmission, the turbulence caused by the air hitting the nooks will prevent the powder from depositing into the nooks. All the more reason to keep the air pressure (and therefore powder velocity) to a minimum, keep the gun very close to the work, and let the electric field do all the work. Again, the pressure should just be high enough to waft powder out the end of the gun like smoke. Still, if uncharged powder hits the work, it will still stick and cure properly. So if you are coating a large, open piece, you don't have to worry so much about the field and your distance. Just point and shoot like you would with HVLP gear. One of the neat things about powder is that "overspray" can just be brushed or blown off of whatever it hit. By that same token, if you were working in a clean enough environment you could collect the "over-sprayed" powder and reuse it! This is common practice in production shops that use one color in a special powder-coating "paint" booth. If you make any mistakes, you can just blow them away up until the curing process begins. If you are going to coat with just a single powder you can start the full curing right away. If you are going to use multiple powders, such as a primer and top-coat, or color-coat and clear coat, or all three (primer/base/clear) you must partially cure each coat before applying the next, otherwise the next coat would blow off the powder from the previous coat. Once powder is fully cured, it has such a smooth, non-porous surface that it is almost impossible for a top-coat to stick to it. However, if you just heat it enough that it just starts to flow out (read: melt), it will still allow a top-coat to bite into it, or even cross-link if they are made from the same polymer. Here is where I'm going to share my best little secret with you. I use my heat gun (normally used for stripping old house paint and applying second degree burns to my extremities) to heat the part up just enough to melt the powder, and no more. This can be done while the part is still hanging on its wire.
It's actually kind of fun to watch the dull powder melt into a shiny smooth liquid. Once the part has cooled down, go ahead and apply your next coat. Here's the best part, though. Even if I'm only putting on one coat, I still melt it with the heat gun before taking it off the hook. This way, I eliminate the risk of messing up the powder en-route to the location where I do the full curing. I was inspired to try this after I spent some time powder coating my Buick manual transmission bell-housing a beautiful gloss yellow. I wasn't going to cure it that day, so I gingerly placed it up on a shelf until the weekend arrived. The next day I came home to find yellow paw prints all over it and a house cat with a matching yellow butt. If I'd just used the heat-gun, that damn cat could have done the forbidden Lambada all over my bell-housing and I'd never have known!
For the actual final curing, you have a few options. While you should RTFM or ask the
powder seller for specifics, most powders will cure when held between 350 and 400 degrees
F for a time period of 20 minutes. The metal beneath the powder needs to be at this
temperature, not just the powder itself. There are several different ways of achieving
this, but let me first provide a warning: When the powders melt, they release solvents
into the air. These are bad to breathe, and can also contaminate surfaces to which they
adhere. So wear a respirator (NOT just a paper filter) and DON'T use the kitchen oven! Now
if you have an old kitchen oven that you can move outside the house and into a
well-ventilated shop, then by all means do! If you are only doing small parts, then a
toaster oven may work. In general, electric ovens work very well! I've even seen electric
"smokers" that my fellow rednecks, um, I mean "sons of the soil" use to cure their venison
or possum that would be big enough to hold an alloy wheel.
They seem reasonably priced, too. The other method is to use Infra-Red (IR) radiation to cure the powder, which is my current method. Many auto manufacturers cure their OEM paint jobs by putting the cars in a booth illuminated by IR sources. IR is the portion of the light spectrum with a wavelength just a bit longer than red, just outside the ability of the human eye to see, and used by fast food dives around the world to keep fries and burgers warm for hours or days. Unlike most of the visible spectrum, which reflects off of materials without losing much of its energy, IR energy has the ability to efficiently heat the object at which it's pointed, without losses to the air through which it passes. It's an efficient method of heating large areas as the air itself doesn't need to be heated for people to feel warm. Most space heaters work by IR radiation, as do "heat lamps." If you have convenient access to 240V or higher, there is no reason not to use an electric IR source, but most domestic wiring cannot support the amperage required at 120V to provide the necessary wattage. I have been using a propane powered source. A quick look through any industrial or builder supply catalog will list a variety of propane powered IR heaters. I bought the El-Cheapo match-light version for $50 which clamps right on the top of a portable propane tank. I take everything outside, hang the coated part in front of the IR source and light it. I also have a non-contact thermometer (w/laser pointer) that I use (on the back of the part to be cured) to tell when the part is up to temperature. Once the part gets near 400°F, I start the clock. With an IR source, the only difficulty is in keeping track of where you have cured, vs. where you haven't. With an oven, you know that the entire part has been cured, but you have to have parts small enough to fit in said oven. With the IR, you have to develop a mental system for tracking where you have cured. The advantage is that you can cure entire body panels this way. When all is said and done, you can sit back and admire your work, or buff your parts to an even higher shine. There are some neat "black-chrome" effects you can get with a little elbow grease and a buffer. It's all up to you! Powder-coating, especially with the low-end gear, is fantastic for coating the parts that will get a lot of abuse that regular paint couldn't handle, but don't need to be beautiful.
Suspension components and anything on the underbody or under the hood are well suited for the first-timer.
The headlight bowls inside the fenders of many LBC's are a perfect choice for a primer/topcoat powdercoat project that can stand up to all the road crud that will get thrown its way! Just make sure that the part is all metal, or the curing temperature could ruin it. A vacuum-booster for your brake system would be a tempting project and it's all metal on the outside however the curing temperatures would destroy the internal diaphragm faster than you can say "fender-bender." Below are a bunch of links that are well worth your time to visit. So be safe and have fun!
Helpful Web Links for Powder Coating:
Disclaimer: This page was researched and written by James Jewell. Views expressed are those of the author, and are provided without warrantee or guarantee. Apply at your own risk.
They seem reasonably priced, too. The other method is to use Infra-Red (IR) radiation to cure the powder, which is my current method. Many auto manufacturers cure their OEM paint jobs by putting the cars in a booth illuminated by IR sources. IR is the portion of the light spectrum with a wavelength just a bit longer than red, just outside the ability of the human eye to see, and used by fast food dives around the world to keep fries and burgers warm for hours or days. Unlike most of the visible spectrum, which reflects off of materials without losing much of its energy, IR energy has the ability to efficiently heat the object at which it's pointed, without losses to the air through which it passes. It's an efficient method of heating large areas as the air itself doesn't need to be heated for people to feel warm. Most space heaters work by IR radiation, as do "heat lamps." If you have convenient access to 240V or higher, there is no reason not to use an electric IR source, but most domestic wiring cannot support the amperage required at 120V to provide the necessary wattage. I have been using a propane powered source. A quick look through any industrial or builder supply catalog will list a variety of propane powered IR heaters. I bought the El-Cheapo match-light version for $50 which clamps right on the top of a portable propane tank. I take everything outside, hang the coated part in front of the IR source and light it. I also have a non-contact thermometer (w/laser pointer) that I use (on the back of the part to be cured) to tell when the part is up to temperature. Once the part gets near 400°F, I start the clock. With an IR source, the only difficulty is in keeping track of where you have cured, vs. where you haven't. With an oven, you know that the entire part has been cured, but you have to have parts small enough to fit in said oven. With the IR, you have to develop a mental system for tracking where you have cured. The advantage is that you can cure entire body panels this way. When all is said and done, you can sit back and admire your work, or buff your parts to an even higher shine. There are some neat "black-chrome" effects you can get with a little elbow grease and a buffer. It's all up to you! Powder-coating, especially with the low-end gear, is fantastic for coating the parts that will get a lot of abuse that regular paint couldn't handle, but don't need to be beautiful.
Suspension components and anything on the underbody or under the hood are well suited for the first-timer.
The headlight bowls inside the fenders of many LBC's are a perfect choice for a primer/topcoat powdercoat project that can stand up to all the road crud that will get thrown its way! Just make sure that the part is all metal, or the curing temperature could ruin it. A vacuum-booster for your brake system would be a tempting project and it's all metal on the outside however the curing temperatures would destroy the internal diaphragm faster than you can say "fender-bender." Below are a bunch of links that are well worth your time to visit. So be safe and have fun!
Helpful Web Links for Powder Coating:
| Harbor Freight Tools: | www.harborfreight.com |
| Eastwood Co: | www.eastwoodcompany.com |
| Columbia Coatings: | www.columbiacoatings.com |
| Caswell Plating: | www.caswellplating.com |
| Powder Coating Online: | www.powdercoatingonline.com |
| Tiger Drylac: | www.tigerdrylac.com |
Disclaimer: This page was researched and written by James Jewell. Views expressed are those of the author, and are provided without warrantee or guarantee. Apply at your own risk.
