
�
�
�
Continuing Education: BritishV8 2010 Tech Sessions
� as published in BritishV8 Magazine, Volume XVIII Issue 1, December 2010�� by: Curtis Jacobson�
�
�
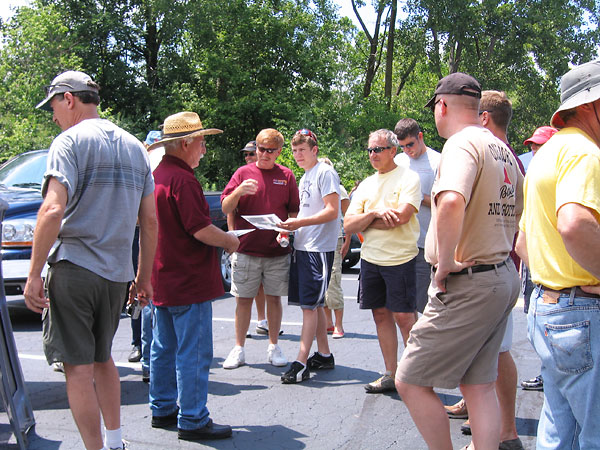
BritishV8 tech sessions are always a highlight of our annual meets. At the 2010 meet, participants had�
an opportunity to learn some English Wheel metal forming techniques from Gary Walker and Jim Blackwood,�
some ignition system tuning and troubleshooting techniques from Max Fulton of Flying Circus English Cars,�
and we learned about the range of superior quality composite body parts available from Dave Craddock and�
his company, Preform Composites. We also enjoyed learning about latest offerings from familiar vendors:�
Steve Carrick of Advance Auto-Wire, Ted Lathrop of Fast Cars Inc., and Pete Mantell of Mantell Motorsport.�
This article includes my photos and notes from the 2010 BritishV8 tech sessions.�
�
How to Use an English Wheel
��
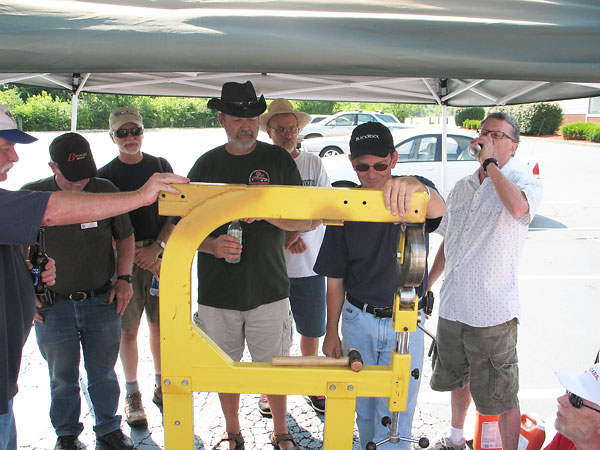
Jim Blackwood brought a new (used) English Wheel to BritishV8 2010 so that Gary Walker could give�
us all a first basic lesson in how to use it. One of the first projects planned for the wheel was the�
creation of custom steel fender flares for the Roadmaster MGB, so a trial fender flare was chosen�
as their example project.�
�
Gary started his brief talk by pointing out that metal-shaping boils down to just three basic processes:�
stretching, shrinking and bending. Other processes like cutting, welding or annealing lay just outside�
the realm of shaping. Gary then pointed out that as a sheetmetal part grows in surface area, it must�
inevitably grow thinner. An English Wheel will cause a part to transform in this manner - it's a stretching�
tool - but the process is slow and gradual. (At this point, Gary showed us that sometimes a great deal�
of time can be saved by hammering a sheetmetal blank to rough shape, and then using the English Wheel to�
refine and smooth the shape.)�
�
Gary next explained that the clamping pressure between the relatively large top�
wheel and the relatively small, crowned bottom roller will need adjustment as work progresses, but the�
metal should always roll back and forth between the wheel the roller without much resistance. Although�
Jim's (used) English Wheel only came with one crowned roller, Gary advised that a selection of bottom�
rollers with varying surface profiles are generally used, one after another, as the lower surface of the�
work becomes more concave. A roller with the least curved profile possible should always be used because�
having too much curve overstretches and leaves roller marks in the workpiece. (Jim knows where to order�
a complete set of rollers for his English Wheel.)�
�
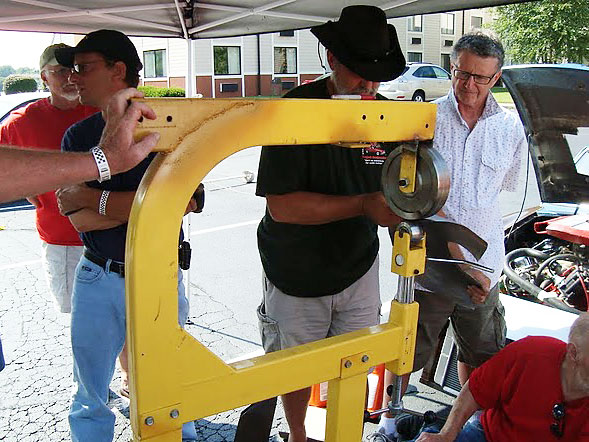
While working the center of a panel with an English Wheel, passes need to be basically parallel and close�
together to keep the stretching of the metal progressing evenly. We also learned that the wheel's quick-release�
should be used for removing and replacing the workpiece in the machine because any stretching near the�
edge of the panel is usually undesirable, and shrinking the edge back to size takes a lot of work. Most�
parts made on an English Wheel require some shrinking with another piece of equipment. �
�
�
�
Gary Walker explains the basic theory of English Wheel use.
�
�
Jim Blackwood takes a turn at transforming a blank of thin flat steel into a smooth compound curve.
�
Composite Body Parts for MGB, Midget, and Sprite from Preform Resources
��
Dave Craddock already had over twenty-five years of fiberglass fabrication and racing experience�
before he started Preform Resources seventeen years ago. Now, after seventeen years of business�
in one location and after serving countless racers, Dave is expanding Preform Resources and�
introducing products that will surely please many MGB and Spridget performance enthusiasts.�
�
Okay, it's no secret that our market hasn't been particularly well served by the old fiberglass�
shops back in the old country. The quality of British fiberglass parts, as a rule, has not only�
failed to keep up with rising quality expectations but has noticeably declined over many years.�
It's time for a new fiberglass fabricator with new ideas, new designs, new molds, and modern resins�
to come along and shake things up, and we're fortunate that the new ideas are coming from someone�
who knows and loves British sportscars as much as we do. Dave Craddock has owned a number of�
British cars, and is currently completing an MGB V6 conversion for himself.�
�
�
�
�
Dave Craddock shows photos of his MGB "Speedster" aerodynamic body kit to Max Fulton.
�
Will this kit appear on Max's B-Stingers Racing Team MGB? Probably not, because the speedster
�
kit is far too radical and aerodynamic for current vintage racing rules - it does comply with SCCA rules -
�
but perhaps it might be just the thing for Max's long-planned personal MGB V8 project.
�
�
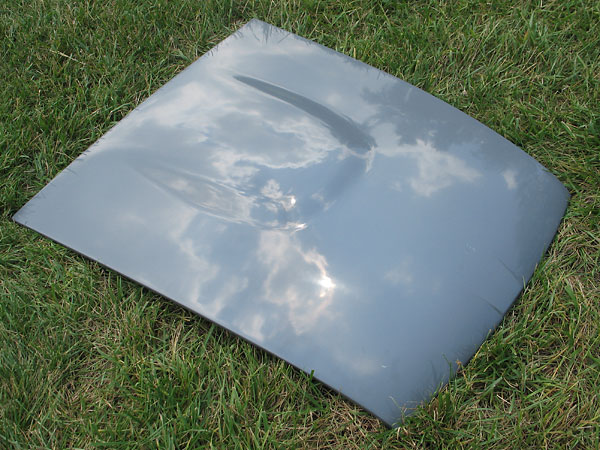
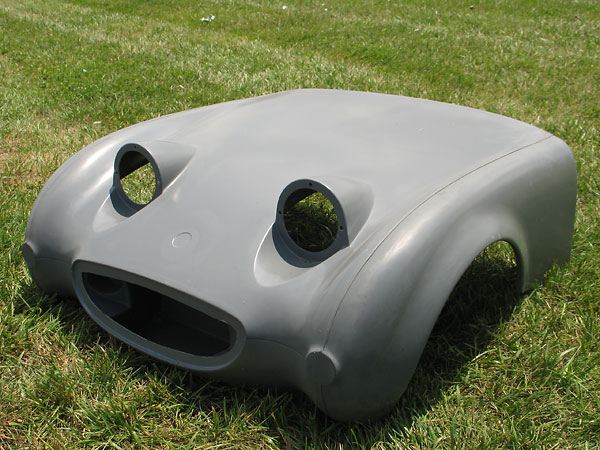
Preform Resources newest offerings are MG RV8 style hoods. They don't just look cool, they add
�
well over an inch of headroom over the engine compartment. The standard model RV8 hoods come
�
complete and ready to bolt-on, priced at just $395. The hoods are finished in smooth, sandable gray
�
gelcoat. Under the gelcoat, Preform Resources fiberglass parts are fabricated from E-glass mat with
�
an isophthalic polyester resin instead of a orthophthalic polyester resin some vendors evidently usually
�
use. (This is a key difference: "iso" resin is more tolerant of exposure to high heat, and it won't distort
�
significantly until over 220F, whilst "ortho" resin generally begins sagging at about 160F. Isophthalic
�
resin also produces generally stronger and more durable parts.) For weight obsessive customers and
�
especially racers, the RV8-style hood skin is also available without reinforcements for $185.
�
�
�
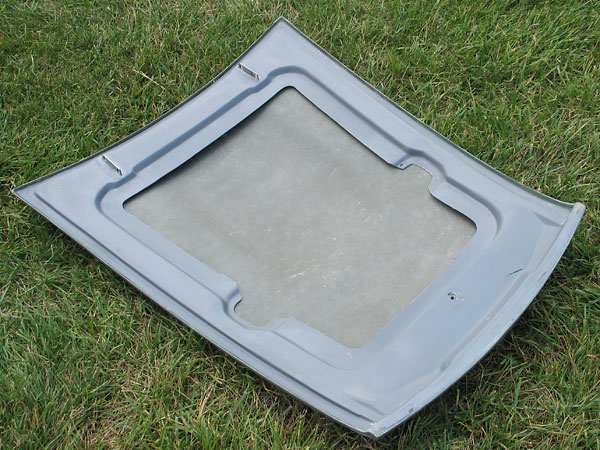
18 gauge steel reinforcements are bonded in for the hinges, for gas strut installation (both sides)
�
and for attaching the hood latch. (A 3/8" welded-in nut is provided for hood release attachment.)
�
�
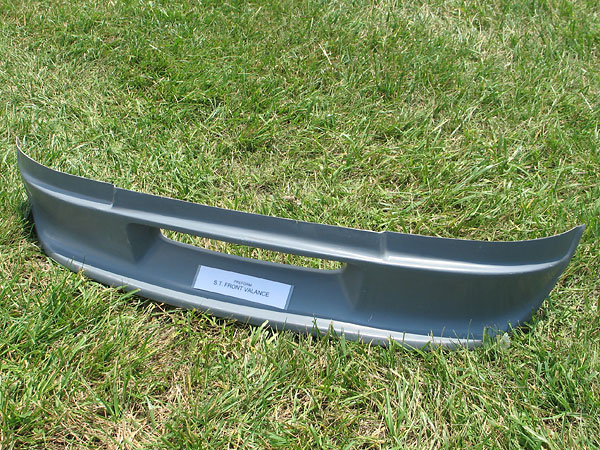
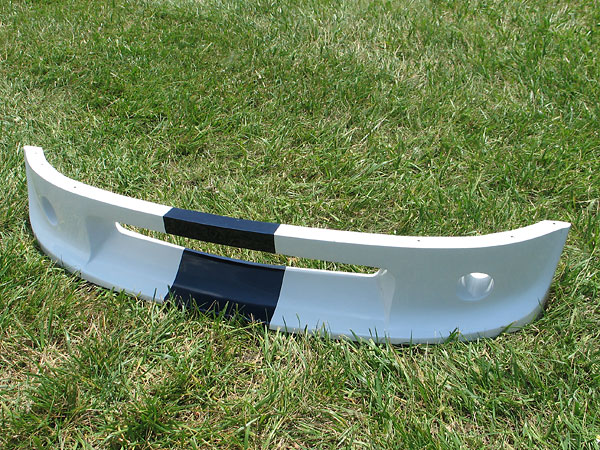
MG's "Special Tuning" department offered fiberglass air dams in this basic shape from the early 1970s.
�
Preform Resources take on the Special Tuning style differs in one especially noticeable area: they've
�
added a bumped-out area in the center/front so it fits better on later-model rubber-bumper MGBs.
�
The part comes complete and ready to install for $137. (Note: all prices quoted in this article have been
�
verified correct as of 01/01/11. Please call Preform Resources to get a shipping/packaging quote.)
�
�
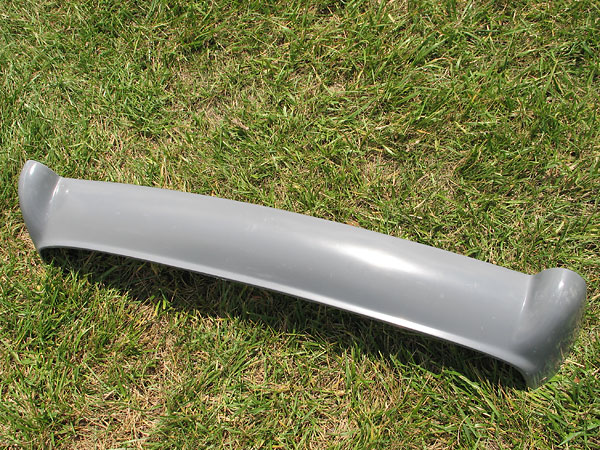
Sebring-style MGB rear valances are especially popular on MGBs with removed rear bumpers.
�
Other company's offer these, but before you purchase you should note that there are several key
�
differences. In the areas directly under the tail lamps, the Preform Resources valance continues
�
further downward rather than turning inward. It also fits better. Price: $160.
�
�
Due to limited trailer space, Dave couldn't bring a complete "Speedster" body kit to our meet, so instead he
�
brought color photos and an example air dam as shown here. In fact, two versions of the air dam are being
�
made, one nominally for street use and the other for SCCA racing. As shown here, the street air dam has a
�
smaller oil cooler opening and brake duct openings are located closer to the center compared to the racing
�
version (not shown.) The Speedster kit provides a very wide, low and aerodynamic appearance, as one
�
might expect on a current SCCA race car, and Dave has already shipped fifteen Speedster kits to racers.
�
$1900 gets you four fenders, a front valance, a rear valance, custom fiberglass rear wheel-arch inner panels
�
(you don't have to make your own!), bonding agent, and installation instructions.
�
�
Preform Resources fabricates superior quality Austin Healey Bugeye Sprite bonnets plus a very diverse range
�
of other Spridget panels, which are offered for retail sale exclusively through Rod Hahnemann of Spridgetech Inc.
�
Please contact Rod for pricing, etc. (Note: Mk1 Sprites are commonly called "Frogeye" Sprites in Britain. Except
�
for minor cosmetic and trim differences, Mk2 and later Sprites are almost indistinguishable from MG Midgets.
�
Hence, the two models are often collectively referred to as Spridgets.
�

�
Three versions of Mk1 Sprite bonnets are offered, differentiated by wheel opening shape: stock, "vintage flare"
�
(as shown), and super-wide "SCCA flare." (Preform Resources also fabricates Sprite rear fender flares in vintage
�
and SCCA sizes respectively.) One feature that makes the Preform Resources Sprite Mk1 fiberglass bonnet
�
assembly unique in the marketplace is its molded in radiator box. Users can easily cut the box to match the exact
�
dimensions of their radiator, and thus eliminate the hassle of creating their own cooling system ductwork. A fresh
�
air port is provided on one side of the radiator box for easy connection to a cold-air box for the induction system.
�
 �
�
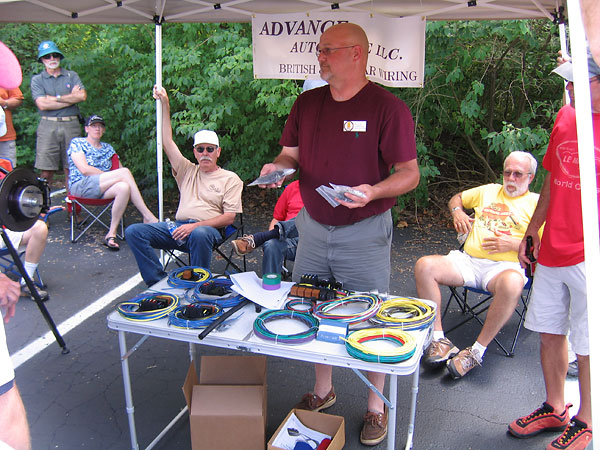
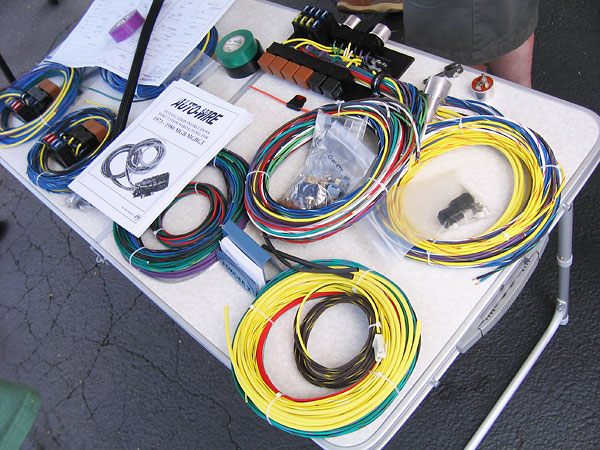
Wiring Kits for British Sportscars from Advance Auto-Wire
��
�
Steve Carrick of Advance Auto-Wire explains the features and benefits of his exceptional wiring kits.
�
Read more here: BritishV8 2006 Tech Session: Installing an Advance Auto-Wire Wiring Kit
�
and here: BritishV8 2007 Tech Session: Installing an Advance Auto-Wire Wiring Kit
�
�
In addition to complete-car wiring kits, Advance Auto-Wire also offers wiring kits for specific
�
functions such as relay-switched headlamps or electric cooling fans (as shown at far left).
�
�
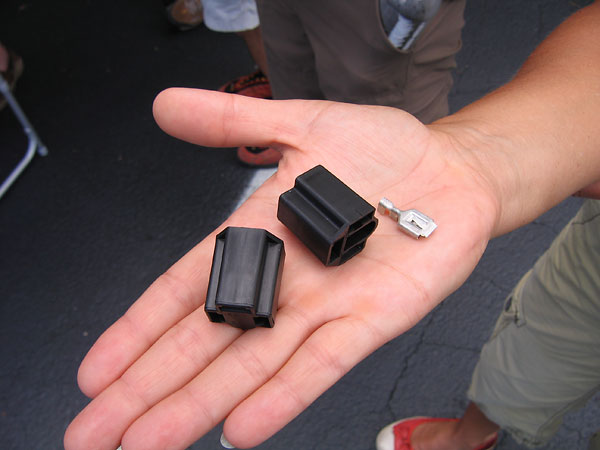
All headlamp connectors aren't created equal! The headlamps transfer quite a lot of heat through their
�
terminals. Inferior connectors will age and crumble prematurely. These Packard connectors are made from
�
from much better quality plastic. Their terminals feature separate crimp wings for conductor and insulator.
�
�
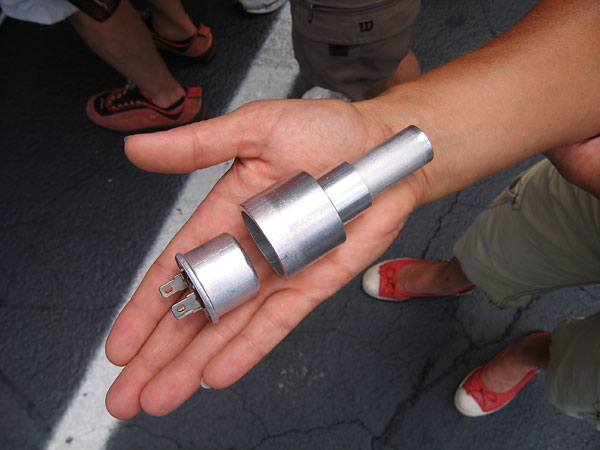
Metal-can flasher relays are fragile. To avoid compressing the back of the can during installation,
�
which would ruin the relay, Steve uses this nifty little shop-made turned aluminum tool.
�
�
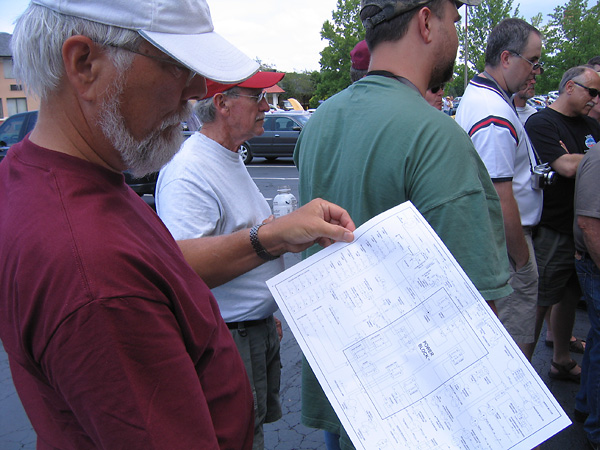
Advance Auto-Wire wiring kits come with exceptional detailed installation instructions and advice,
�
clear and detailed schematic drawings (as shown here), and friendly customer support. Other companies
�
know hot-rods, but Advance Auto-Wire is uniquely knowledgeable about wiring modified British sports cars.
�
| �
Enjoying this article? Our magazine is funded through the generous support of readers like you! � To contribute to our operating budget, please click here and follow the instructions. � (Suggested contribution is twenty bucks per year. Feel free to give more!)� |
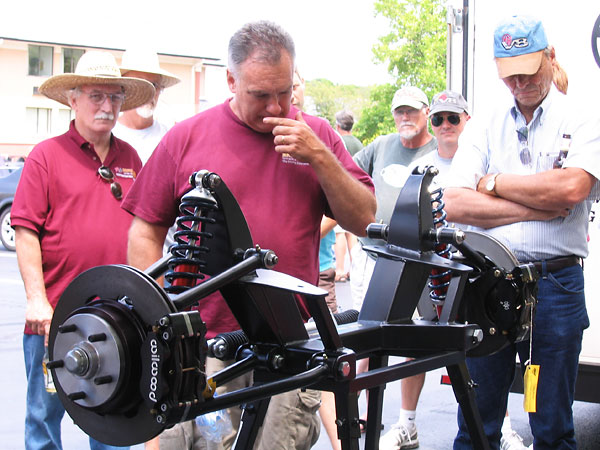
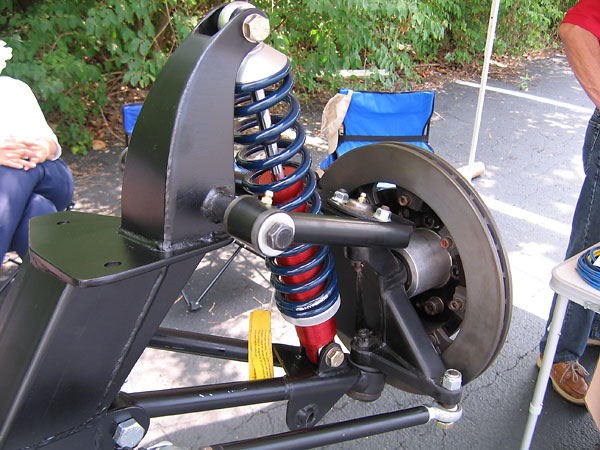
Upgraded Suspensions and Brakes for MGs & Triumphs from Fast Cars Inc.
� �
�
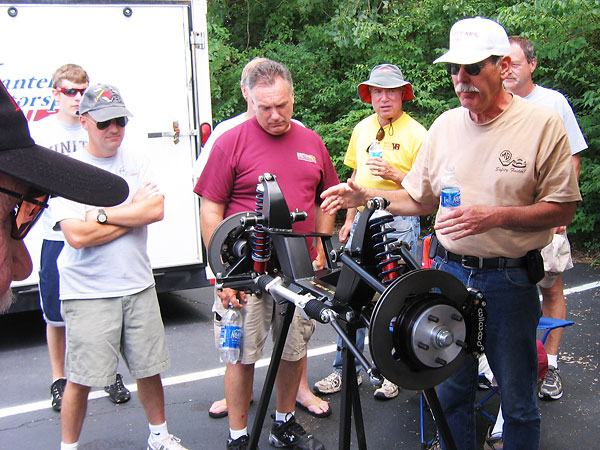
Ted Lathrop of Fast Cars explains the features and benefits of his exceptional front suspension.
�
Read more here: BritishV8 2006 Tech Session: MGB Front Suspension Upgrade
�
here: BritishV8 2007 Tech Session: Fast Cars MGB Front & Rear Suspensions
�
and here New and Improved Chassis for Triumph TR6.
�
�
The Fast Cars MGB front suspension is available with whatever lug pattern the customer desires.
�
Customer may also select color, and whether Ford 302 V8 motor mounts should be preinstalled.
�
�
Install this suspension on your MGB and you'll notice a much smoother ride quality, better road holding,
�
more precise steering, easier steering at low speed, exceptional brakes, and less brake fade. Adjusting
�
ride height precisely becomes an easy task. This suspension facilitates easy spring rate changes too.
�
At least sixteen of the cars in our BritishV8 gallery already have this suspension!
�
�
�
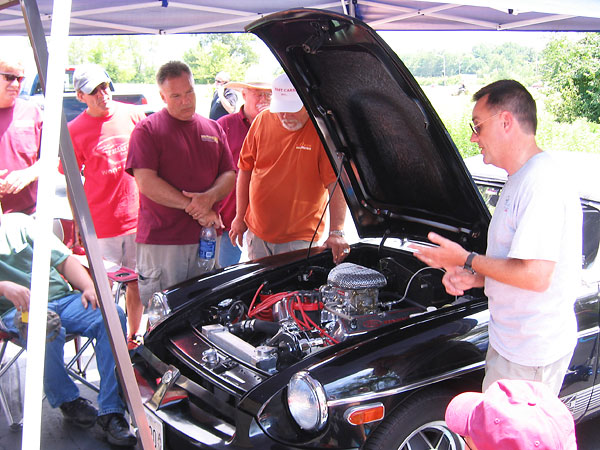
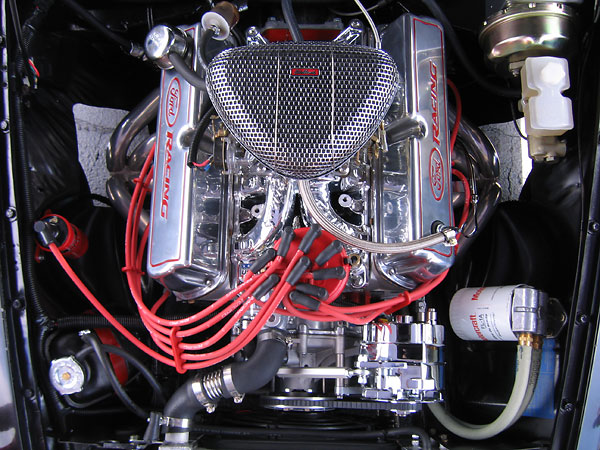
Pete Mantell of Mantell Motorsports introduces his new Ford 302 engine installation kit for MGB.
�
Mantell Motorsports Introduces New MGB-302 Engine Installation Kit
��
At past BritishV8 meets, Pete Mantell has walked us through the basics of installing a small�
block Ford V8 in an MGB. At this year's meet, Pete unveiled his new kit which will make the�
installation much simpler and quicker.�
�
The Mantell Motorsport MGB 302 V8 Kit will enable home mechanics to bolt Ford "302" (5 liter) V8�
engines into their rubber-bumper (1974.5-1980) MGBs with minimal modification, and even close�
the stock hood without need for a hood scoop or power bulge! The kit has been designed around a�
modified rubber-bumper MGB crossmember. A core charge is included in the kit price and refunded�
when a usable crossmember is returned. What specific modifications have been made to the�
crossmember? It's been channeled in the middle for clearance to the Ford oil pan and stout�
motor mounts have been welded onto the crossmember. Installers won't have to guess about exactly�
where to locate their engines. No welding is required.�
�
In addition to the modified crossmember, the kit includes a transmission crossmember and mounts�
for a Ford-spec Borg-Warner T5 5-speed gearbox, RV8-style (through the inner fender) four-into-one�
exhaust headers, exhaust gaskets and header bolts, a remote oil filter adapter, an oil filter�
bracket, a set of black polyurethane crossmember mounting pads, paper templates for header holes,�
and comprehensive written instructions. Steel parts will be painted black, unless otherwise�
requested. Powdercoat options are also available.�
�
To install the kit, you must of course first remove all the original suspension components and�
the associated front brake components. These will be re-installed on the new (modified) crossmember�
unless you decide to make other upgrades at this time (such as installing polyurethane bushings,�
lowered springs, or a "big brake" kit. �
�
This 302 V8 kit's engine mounts are adjustable to enable installers to overcome MG manufacturing�
variance and Ford 302 engine revisions (for example, to ensure harmonic balancer clearance near�
the steering rack.)�
�
Radiator installation modifications are required, and they vary with the customer's installation.�
The kit includes information and tips about whether and how-to relocate the radiator bracket�
when necessary. In all cases, the lower radiator panel must be trimmed for clearance.�
Some modifications are also required to the firewall next to the accelerator pedal, and above�
the transmission. These are relatively minor and can be best accomplished with a hammer.�
�
The Mantell Motorsport MGB 302 V8 engine installation kit (for rubber bumper models) is priced�
at $1325, plus $125 core charge and shipping. Please call for a shipping quote, or if you have�
any questions. A "chrome bumper" (1962-1974.5) MGB 302 V8 kit will be offered in the future.�
�
�
�
This could be yours! Mantell Motorsports' new kit will make 302 conversions much simpler and quicker.
�
Troubleshoot and Fine Tune Your Ignition System
��
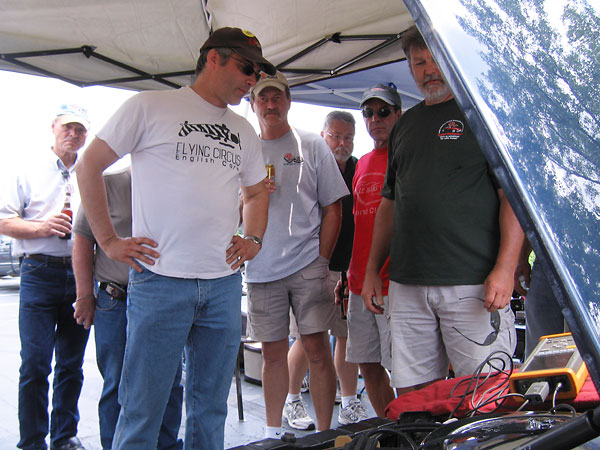
Max Fulton of Flying Circus British Cars in Raleigh North Carolina and of the�
B-Stingers Racing Team�
volunteered to give a tech session on ignition system troubleshooting and optimization. In advance�
of the tech session, Max arranged to borrow two cars: Tim Duhamel's MGB V8 which had performed very�
impressively in our autocross two days previously and Rick Ingram's impressively stock MGC.
�
�

�
Max started by discussing Tim's ignition system and the systems he'd seen on other V8s at the meet. Max
�
pointed out the components Tim was running: Lucas Gold Coil, Mallory Unilite distributor, Accel HI-PO wires,
�
and NGK plugs. Many of us use relatively hot aftermarket ignition coils. These coils produce such a strong
�
spark that it can disguise downstream deficiencies in the ignition system that really deserve more attention.
�
Cars with high power coils will often start easily and idle well, but they may be giving up performance at
�
high rpm or under heavy load due to unrecognized problems.
�
�
From Max's experience, the quality of aftermarket spark plug cables varies widely from brand to brand.
�
He likes to achieve a balanced ignition system; all eight plugs should deliver an equally strong spark.
�

�
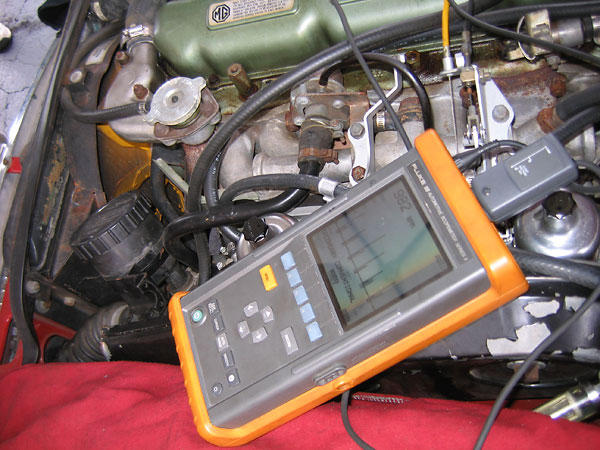
Fluke 98 Automotive Scopemeter Series II in secondary ignition test mode. Simply pressing a button on the meter
�
toggles the display from all eight cylinders in secession to one specific cylinder as shown here. Max explained
�
that "Tim's car gave an absolutely perfect graph, with nothing to investigate." If you look close: the meter reads
�
20.6kV spark voltage, 1020rpm engine speed, 1.70ms burn time, and 1.60kV burn voltage. As we watched,
�
spikes appeared to parade across the screen from right to left. On the screen, the vertical axis shows voltage
�
and the horizontal axis shows time. The coil delivers a strong initial spike of voltage; specifically it equals
�
the voltage required to bridge plug and rotor gaps. Once the gaps are bridged, the spark plug continues to arc
�
until extinguished at a relatively constant burn voltage. Burn time and burn voltage can be visualized by the
�
length and the height of the "chair seat" (i.e. spark line) respectively. Burn time and burn voltage directly affect
�
engine performance. (We want a relatively long, flat spark line. The burn voltage should be below 2kV because
�
a higher burn voltage indicates resistance in the circuit and results in a shorter line.) By observing the shapes
�
of pulses and comparing cylinders we can diagnose problems (e.g. a damaged spark plug cable) and then
�
measure progress as we optimize the ignition system's performance.
�
�
With the scope moved from Tim's V8 to Rick's MGC we see a lot more variation in spark voltage, burn voltage,
�
and burn time from cylinder to cylinder. Abnormally high and uneven spark voltages might indicate one or more
�
of the following: worn spark plugs, breaks in spark plug wires, a worn distributor cap, or an uneven (possibly lean)
�
fuel mixture. Abnormally low and uneven spark voltages might indicate low/uneven compression, one or more fouled
�
spark plugs, improperly gapped spark plugs, or a cracked spark plug insulator. Max showed us that a variety of
�
tests are used to isolate and i.d. problems more specifically, but we won't go into detail about that here.
�
�
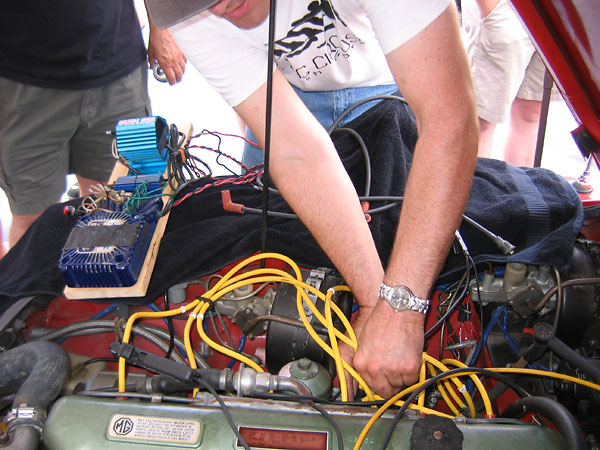
Max came prepared for the tech session with a complete Jacobs capacitive discharge ignition system mounted
�
on a board and ready to temporarily hook-up. With it, he was prepared to demonstrate the improvement in burn
�
voltage and burn time these systems promise. In the parking lot, that should translate into a smoother idle and
�
probably the ability to set idle speed lower. More power and better fuel economy on the road are also expected.
�
Unfortunately, Rick's condenser was on its last legs so the demo wasn't as impressive as it might have been.
�
Poor condition spark plugs and higher than desirable spark plug wire resistance were also hampering performance.
�
The Jacobs system did smooth out Rick's idle a little, just not as much as Max hoped. We could however see that
�
the Jacobs controller produced multi-spark up to around 3000rpm, with three sparks at idle shifting to two sparks
�
at about 2000rpm. Despite Max's frustration, this was an especially interesting and insightful tech session.
�
� Disclaimer: This page was researched and written by Curtis Jacobson. Views expressed � are those of the author, and are provided without warranty or guarantee. Apply at your � own risk.�
� Photos by Curtis Jacobson for BritishV8 Magazine. All rights reserved.�
