
�

�
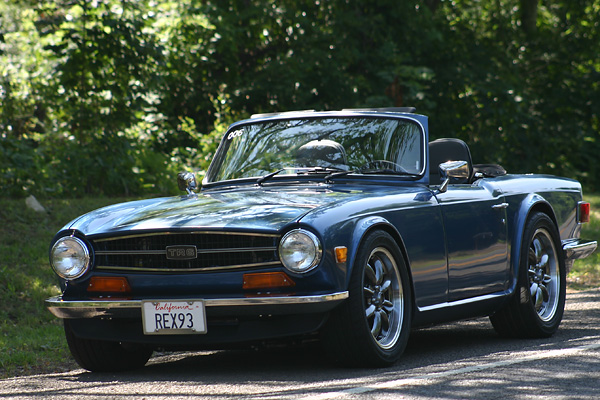
Calvin Grannis' Chevy LS1 V8 powered 1974 Triumph TR6
� as published in BritishV8 Magazine, Volume XX Issue 1, July 2012�� �
�
Owner: Calvin and Brenda Grannis
�
BritishV8 UserID: 74ls1tr6
�
City: Elk Grove, California
�
Model: 1974 (April) Triumph TR6
�
Engine: 2002 Chevrolet LS1 5.7L (EFI)
�
Conversion performed by: owner
�
Today's Triumph
��
Calvin Grannis' interest in British sports cars started in his high school years,�
in the late 1970s, with a 1968 Triumph TR250. The TR250 model was the American-market�
equivalent of Triumph's TR5 model. The two featured similar specs, except the TR250�
came with twin Stromberg carbs in lieu of fuel injection. Those carburetors restricted�
power, and with them the 2.5L six cylinder engine was only rated 111 brake horsepower.�
Calvin wasn't content with that, so he carefully balanced the engine's internals to support�
high RPM use. Next, he boldly shaved the cylinder head an aggressive 0.087" for a dramatic�
increase in compression ratio. Finally, he put the engine together with triple Weber carburetors.�
The combined effect was a Triumph that could keep up with almost any stock Mustang or Camaro�
to the edge of town, then outbrake and pass them in the twisties. A fancy highly-polished�
lacquer paint job completed the project. �
�
Fast forward to 2007, when Calvin discovered the BritishV8 website and its message board.�
Calvin says our website inspired him to build another Triumph: similar fun, but updated to�
meet all of today's performance expectations. Smooth. Comfortable. Confidence inspiring.�
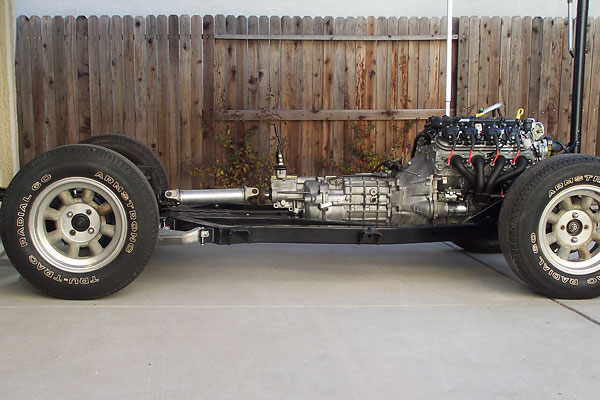
Calvin chose to use a Chevrolet LS1 engine and a T56 six speed transmission from a 2002�
Chevrolet Camaro Z28, but he didn't stop there. His 1974 Triumph TR6 represents a complete�
and coherent vision. It seems that every aspect of the car has been updated, and that a�
careful balance has been struck. No single thing stands out as "too much." �
�
The most understated thing about Calvin's TR6 is its exterior bodywork. Its "ghost stripes"�
are so subtle that from some angles you might wonder if you're imagining them. You might�
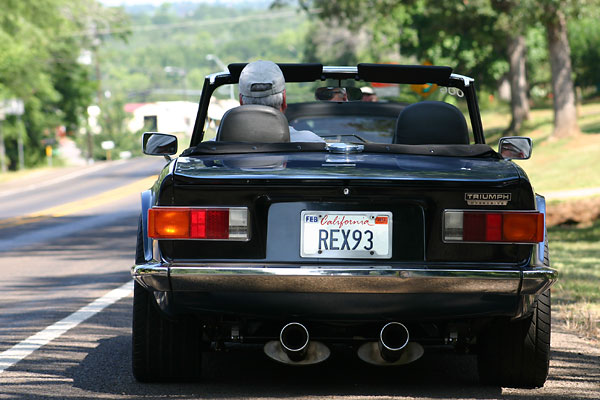
or might not notice the whopping huge dual Monza glass-pack exhaust tips that peak out�
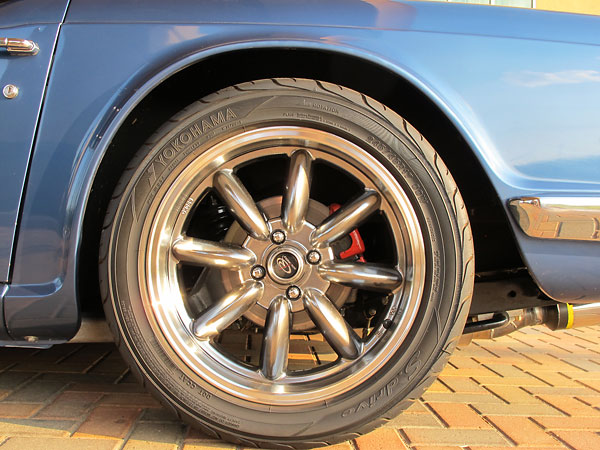
from under the Kamm tail. You might just barely catch a glimpse of the Wilwood brake calipers�
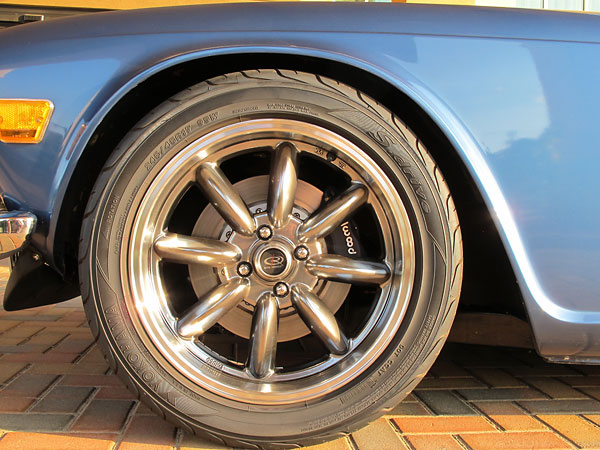
through the wheels. Okay... I'll concede that the seventeen inch wheels would be hard�
for anyone to miss, but they're obviously Minilite inspired. Wrapped around all that though,�
I'd challenge any casual observer to identify a detail of the exterior sheetmetal that doesn't�
look bone stock. My personal impression is that this car is nothing if not subtle.�
�
Until someone pushes the loud pedal to the floor! As the car accelerates, the skin of your�
face gets really tight against your cheekbones. The skin behind your ears starts to flap�
excitedly in the wind. Fighting such great g-force, you can't keep your mouth closed. I've�
been in cars that made me smile, but never in this particular way. (Meanwhile, I was�
thinking: "Uh. Ummm. Calvin? I forgot my helmet...")�
�
Calvin and Brenda celebrated the triumphant completion of their project by making the �
2000 mile round-trip trek to attend BritishV8 2012, and that's where I got to experience�
their LS1 powered TR6 in person. Four hundred brake horsepower in a Triumph TR6 is indeed�
impressive. But Calvin Grannis is as cool as a cucumber. He thinks he's just tooling around.�
This is a Sunday drive to him, and we're taking things easy. Indeed we are. But Standards�
have changed. This isn't yesteryear's hot-rod - it's faster but it's much more refined - it's�
Today's Triumph.�
�
Features and Specifications
�| Engine: | �Chevrolet LS1 V8 engine from a 2002 Camaro Z28.�
(The engine came standard with aluminum block and cylinder heads,�
electronic fuel injection,�
coil-on-plug electronic ignition,�
and six-bolt main bearing caps.�
5.7L equals 346ci.)�
Texas Speed & Performance (TSP) / Precision Race Components (PRC) LS6-style cylinder heads.�
62cc combustion chambers.�
10.8:1 static compression ratio.�
CNC-ported and fitted with oversized valves (2.02" intake and 1.575" exhaust).�
Dual 0.650" lift valve springs.�
Chromaloy push rods.�
LS2 timing chain and gears.�
FAST 90mm intake, hand ported by Tony Mamo from AFR.�
90mm throttle body from Nick Williams.�
K&N gauze air filter.�
Ported LS6 oil pump.�
Stock 28# fuel injectors (for now).�
TSP-sourced Comp Cams camshaft (228° duration, 0.588" lift, 112° lobe separation angle.)�
Stock rocker arms with Comp Cams sealed-needle bearing trunion upgrade.�
LS7 lifters.�
Stock PCM, tuned with HP Tuners software.�
Street & Performance Front Runner accessory bracket / pulley / serpentine belt drive system.�
| �
| Cooling: | �Griffin aluminum crossflow radiator (24" x 19" x 3") with 2-row (1.25" tube) core.�
16" 2250cfm electric fan with matching shroud. | �
| Exhaust: | �Hooker Super Competition four-into-one headers with 1.625" diameter primaries.�
2.5" pipes.�
Magnaflow X-pipe mounted inside the frame.�
Dual 2.5" Borla Pro XS mufflers.�
Monza 2.5"-to-4" glass-pack exhaust tips. | �
| Transmission: | �Tremec T56 6-speed with normal F-body gearing.�
(6th gear: 1700rpm at 70mph & 2000rpm at 80mph. Great for gas mileage!)�
Fidanza 12.5 pound aluminum flywheel with changable clutch surface.�
SPEC Stage 2+ pressure plate and clutch disc.�
Stock TR6 master cylinder.�
Stainless steel braided line.�
Chevy Camaro 3" aluminum prop shaft, shortened to 25".�
(Camaro-spec U-joint at transmission. Nissan Infiniti Q45 U-joint at differential.)�
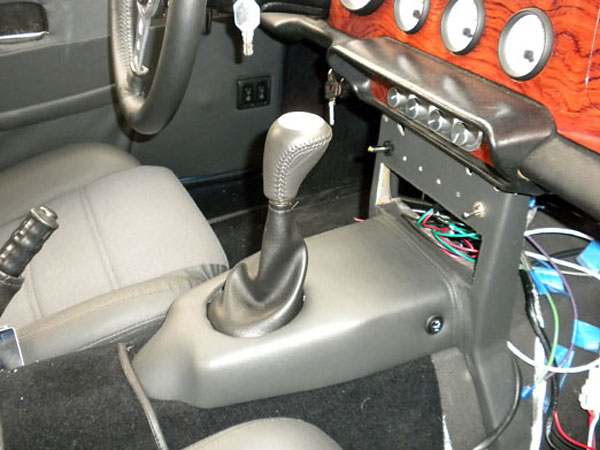
Street & Performance Inc. gear shifter ("shifter handle relocator").�
Ford Mustang shifter knob, reamed out to fit. | �
| Rear End: | �Nissan Infiniti Q45 (R200) viscous limited-slip differential and 3.54:1 final drive ratio.�
Good Parts constant velocity joint axles and uprated hubs. | �
| Front Suspension: | �quick ratio steering rack.�
Woodward Precision Power Steering universal joints.�
Uncle Jack's uprated spindles.�
Good Parts lowering springs.�
Spax adjustable shock absorbers.�
Nylatron bushings.�
Good Parts anti-sway bar. | �
| Rear Suspension: | �Good Parts 600#/inch lowering springs.�
Roadster Factory coilover conversion kit, featuring AVO shock absorbers.�
Good Parts adjustable anti-sway bar, re-located rearward.�
Good Parts adjustable trailing arm attachment brackets and Nylatron bushings.�
Rear trailing arms upgraded from 5/16" to 3/8" studs, with Helicoil inserts.�
| �
| Brakes: | �(master) Wilwood 1.125" tandem master cylinder. Wilwood proportioning valve on rear circuit. � (front) Wilwood 4-pot calipers and 12.19" rotors. Custom aluminum hats. Stainless braided lines. � (rear) '97 Nissan Maxima calipers on Don Watson brackets. '92 Nissan 240SX rotors and e-brake cables. | �
| Wheels/Tires: | �Rota RB Hyper Black aluminum wheels (17x7.5, 4-100mm lug spacing, +45mm offset).�
Yokohama S-drive w-rated 245/45R17 tires (~10" wide).�
One inch spacers/adapters to convert from 4-4.25 hubs to 4-100mm wheels. | �
| Electrical: | �Advance Auto-Wire wiring harness.�
Stinger distribution block and main fuse.�
Odyssey Extreme Racing (ER40, nine pound) battery, mounted in trunk.�
140 amp Delco style alternator, with polished finish.�
LED rear running and brake lights. | �
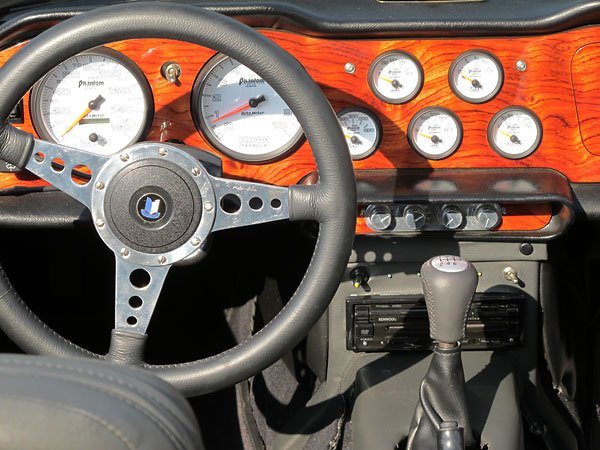
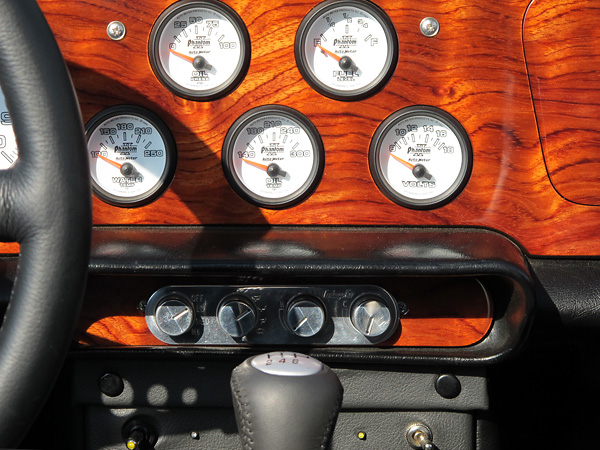
| Interior Mods: | �custom dashboard made from Kewazinga African rosewood by Randy Keller / Prestige Autowood.�
AutoMeter Phantom II digital gauges (set of 7).�
Leather wrapped Moto-Lita steering wheel. �
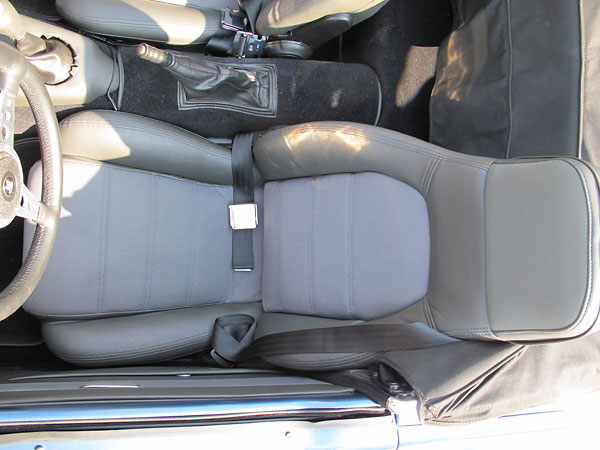
Early-style Mazda Miata seats, with upgraded speakers in headrests.�
Upper and lower electric seat heaters.�
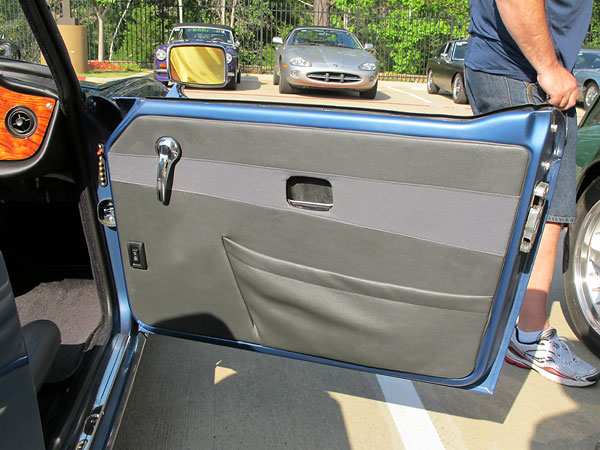
SPAL power windows, installed with four-pin contact strips at door jams.�
Vintage Air Mini Air/Heat/Defrost, with controls in center panel.�
(Sanden 508 a/c compressor.)�
LED footbox lighting, both sides.�
Wool carpet. | �
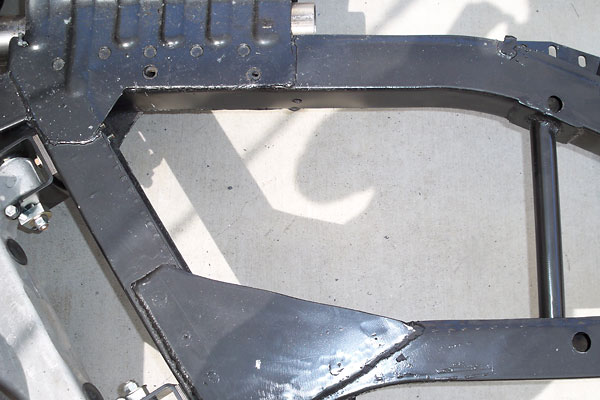
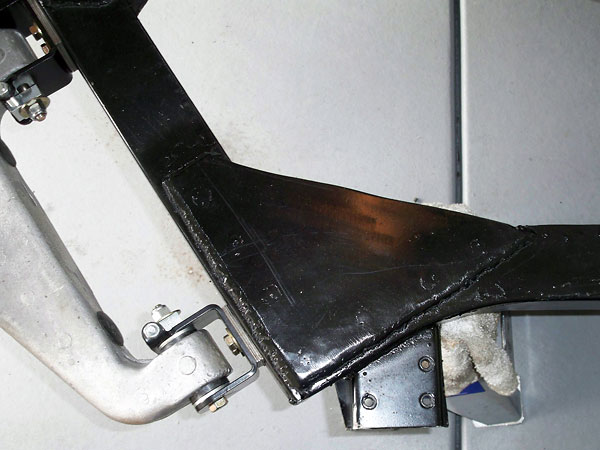
| Chassis Mods: | �welded metal plate in front lower suspension attachment areas.�
Plates were welded-in on top of frame under outer footwell area.�
1" steel tube welded in between frame rails by the transmission mount.�
Re-welded transmission mounting area for enhanced strength.�
Added reinforcement around rear suspension area (i.e. both tower sections.)�
Tied both rear suspension towers together with 1" steel tube.�
Moved front sway bar to above skid pan and extended front frame to strengthen sway bar attachment points.�
| �
| Body Mods: | �no sheetmetal modifications on the outside of the car.�
PPG Atlantic Pearl Blue two stage paint with white pearl ghost stripes.�
Lizard Skin sound and heat control products. | �
| Fuel System: | �Racers Choice Inc. 19 gallon aluminum fuel tank.�
Aeromotive inline fuel pump.�
Corvette fuel filter / regulator. | �
| Performance: | �28mpg highway, 25mph city.�
0 to 60 in ~3.5s.�
~408 horsepower from 5800 through 6100rpm and�
~390ft-lbs torque from 4500 through 5200rpm�
at the wheels. | �
| Completed: | �road-worthy in April 2011. (First engine start on June 17, 2009.) | �
 �
�
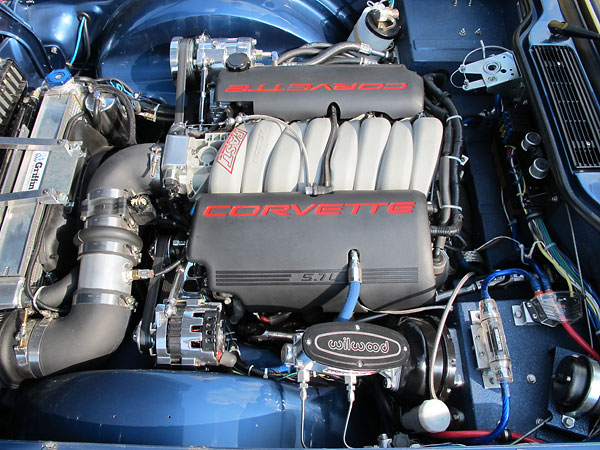
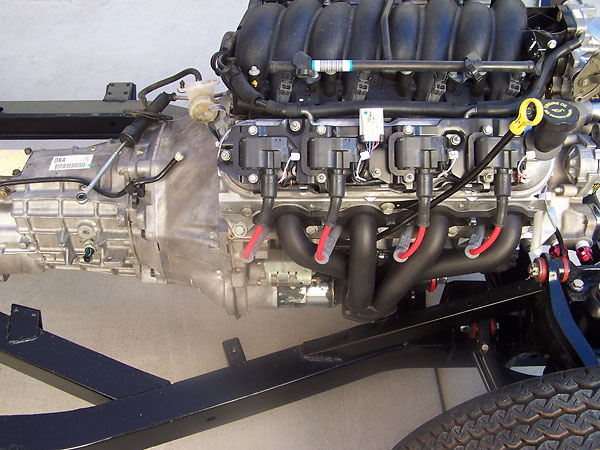
Engine Installation
��

�
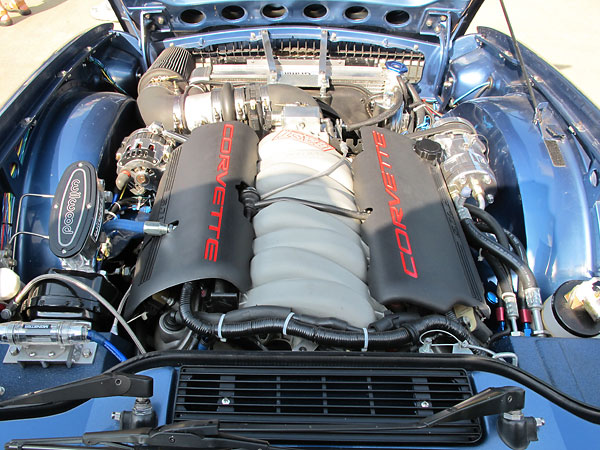
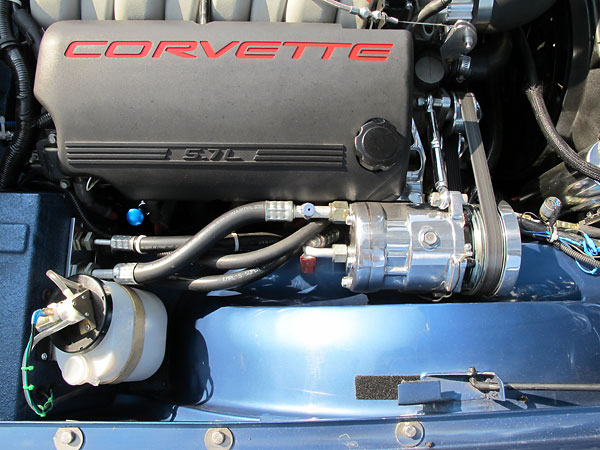
Chevrolet LS1 V8 engine: 350 cubic inches, aluminum engine block and cylinder heads,
�
six-bolt main bearing caps, electronic fuel injection, and coil-on-plug ignition.
�
�
At the wheels? 408 horsepower from 5800 to 6100rpm. 390ft-lbs from 4500 to 5200rpm.
�
�
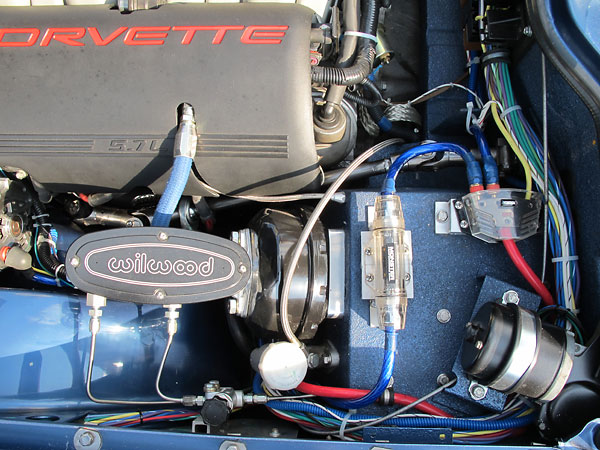
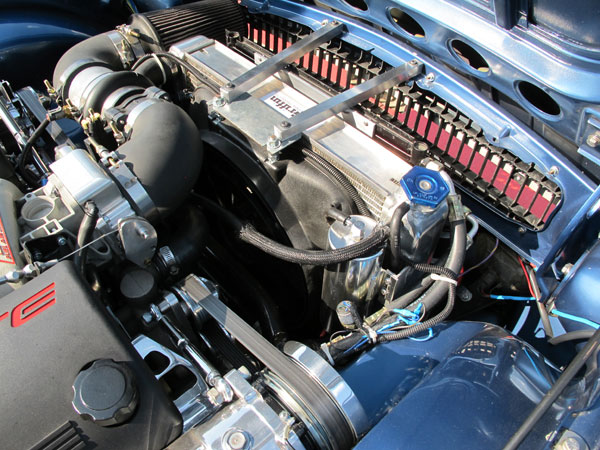
Stinger distribution block and main fuse.
�
�
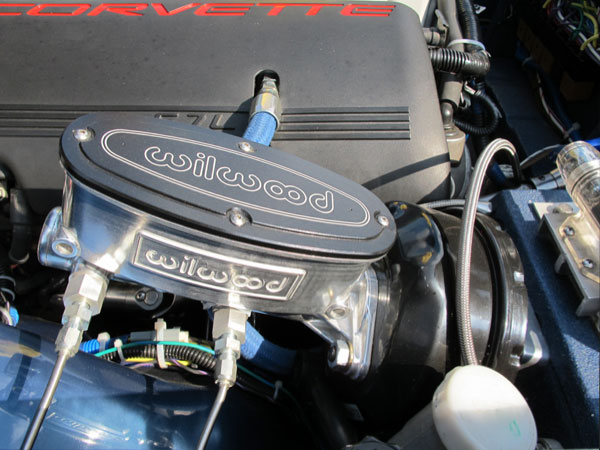
Wilwood 1.125" bore tandem brake master cylinder.
�
�
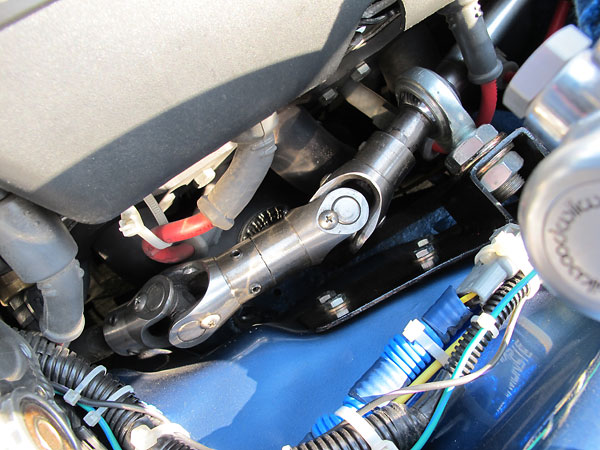
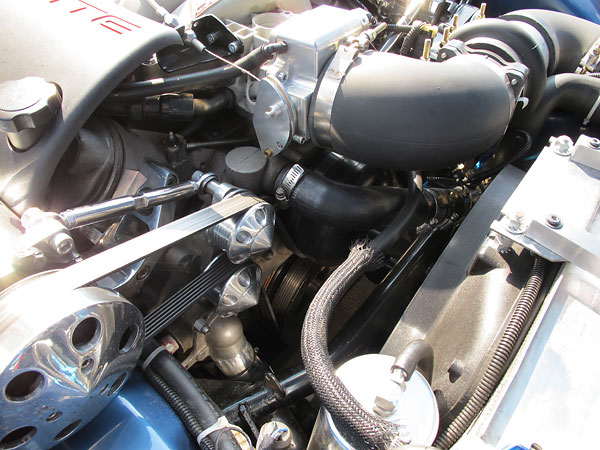
Woodward Precision Power Steering universal joints.
�
�
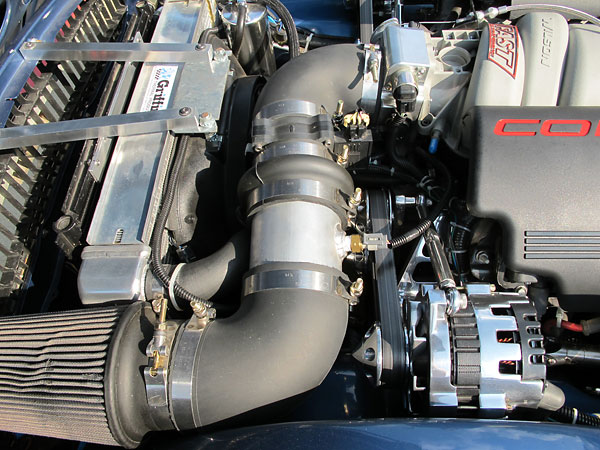
FAST 90mm intake, hand ported by Tony Mamo from AFR.
�
�
K&N gauze air filter, intake air temperature sensor, and mass airflow sensor.
�
�
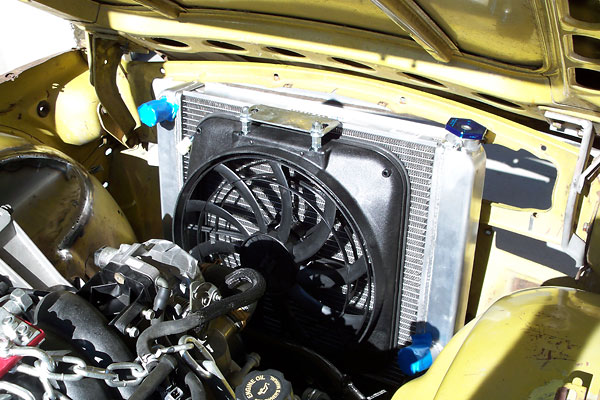
Custom aluminum brackets secure the radiator and AC condenser.
�
�
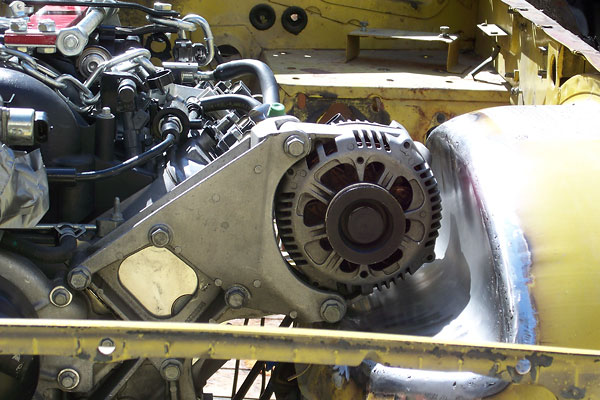
Street & Performance Front Runner accessory bracket / pulley / serpentine belt drive system.
�
�
Sanden 508 air conditioning compressor.
�

�
Advance Auto-Wire fuse and relay block.
�
 �
�
�
�
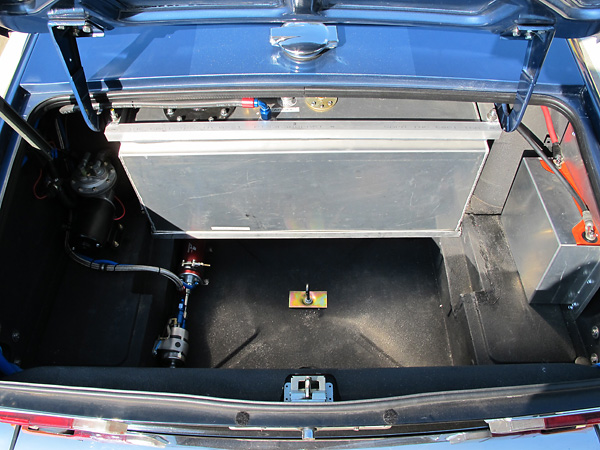
19 gallon fabricated aluminum fuel tank.
�
�
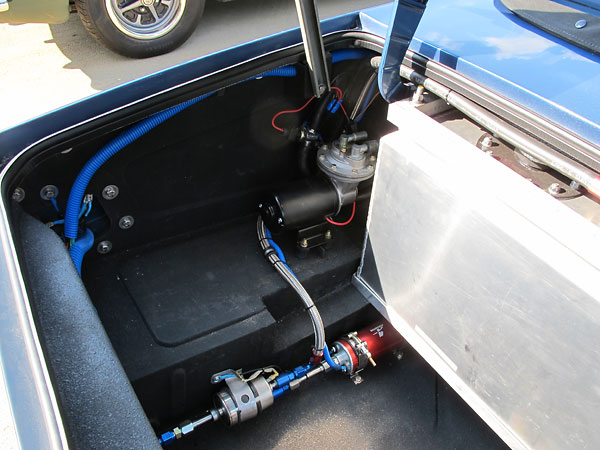
Left: Corvette fuel filter and regulator (1999-2004). Right: Aeromotive inline fuel pump.
�
�
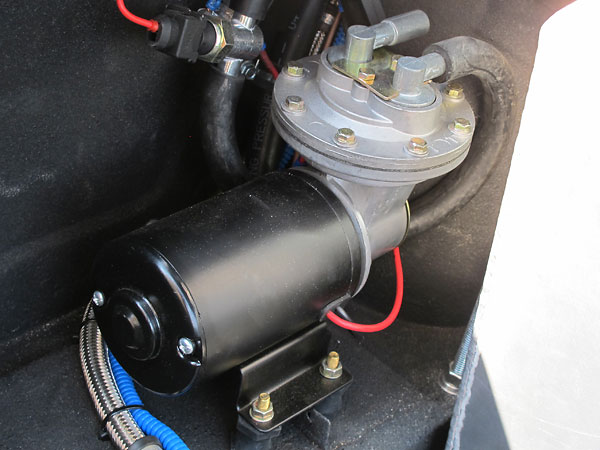
This vacuum pump is connected to the power brake booster. It provides 20psi of vacuum regardless
�
of engine load and speed. With its own inline pressure switch, it only runs when needed.
�
�
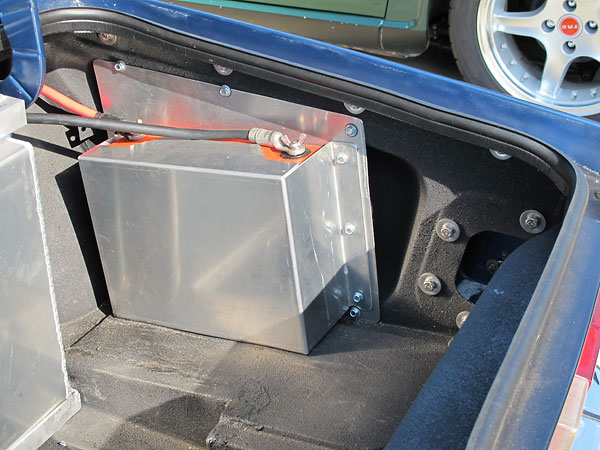
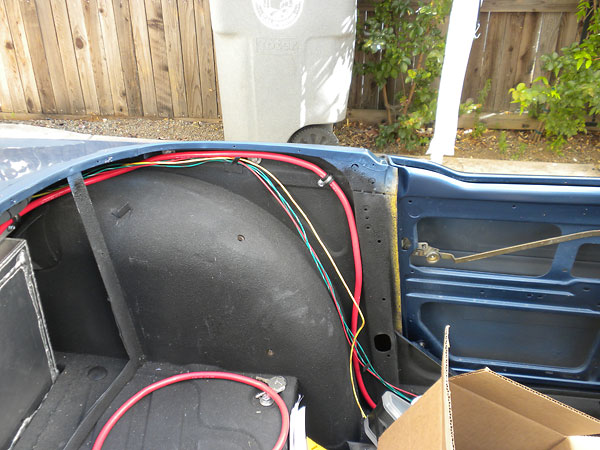
Odyssey Extreme Racing (ER40, nine pound) battery, mounted in trunk.
�
How It Was Done
�Engine Build
��
�
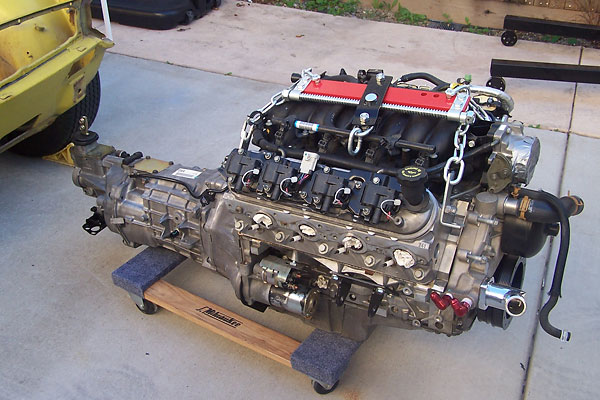
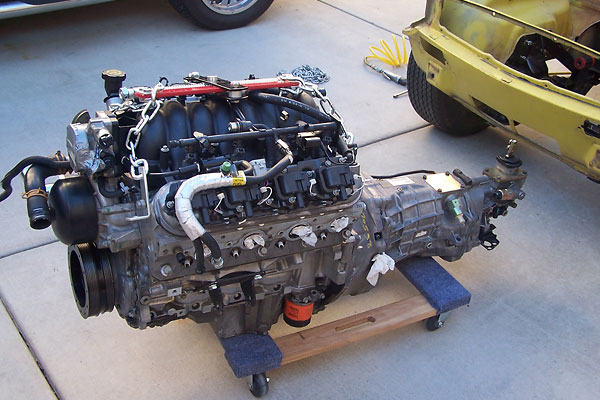
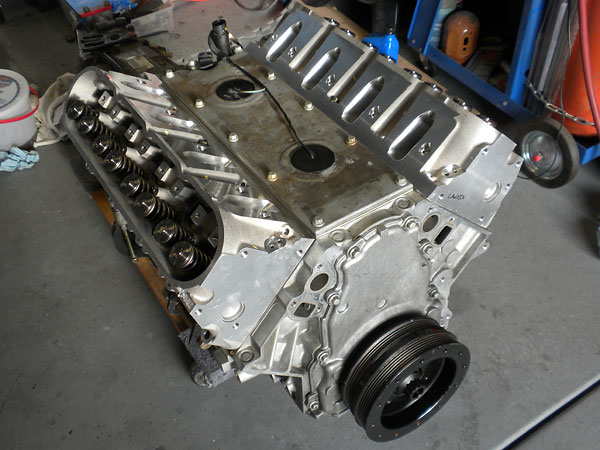
Chevrolet LS1 V8 engine from a 2002 Camaro Z28.
�
�
This engine came standard with aluminum block and cylinder heads, electronic fuel injection,
�
coil-on-plug electronic ignition, and six-bolt main bearing caps.
�
�
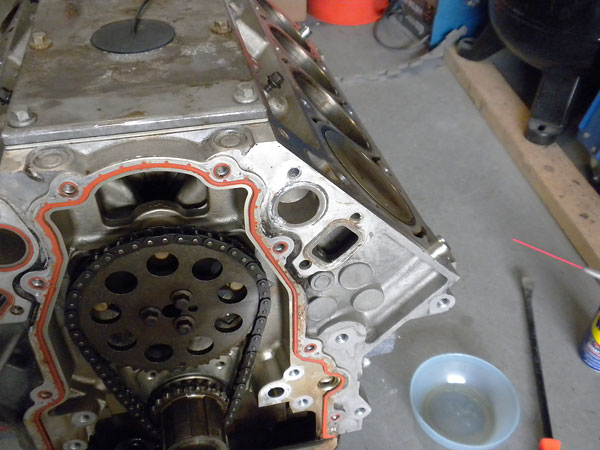
Modern gaskets that don't leak are one of the subtle charms of the LS1 engine.
�
�
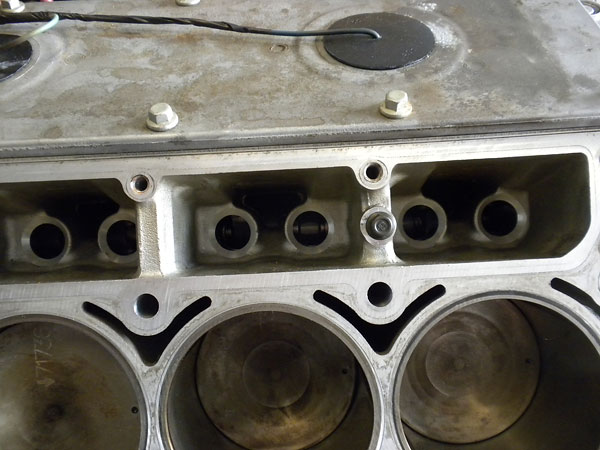
These holes are where roller lifters go, but if you look ahead one photo you'll see the top of
�
nifty plastic guides (sometimes called "trays") that get inserted here too. The guides keep
�
the axis of the rollers parallel to the camshaft bore. Surprisingly, they grip the lifters
�
just firmly enough to facilitate heads-on camshaft swaps.
�
�
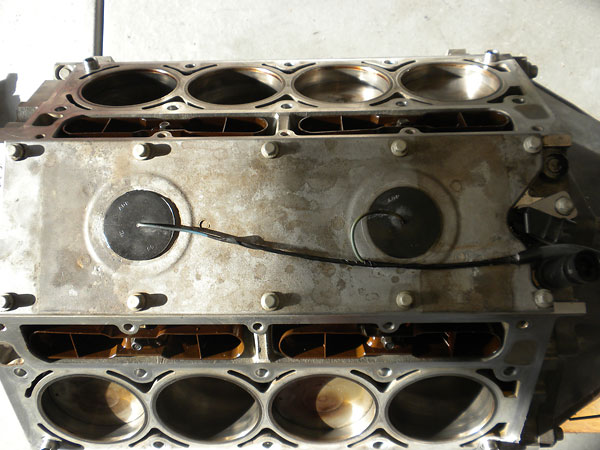
Twin knock sensors mounted on the LS1 valley cover.
�
�
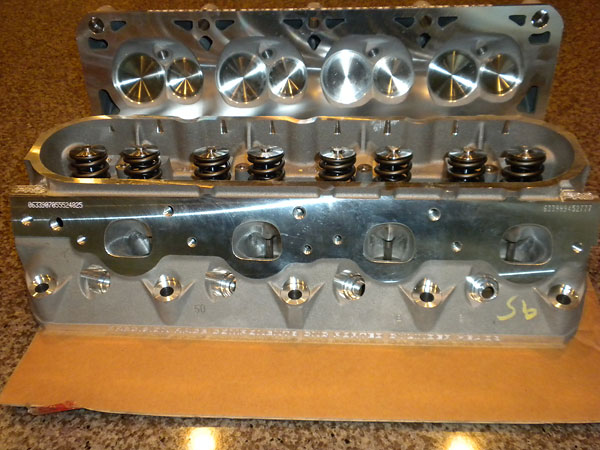
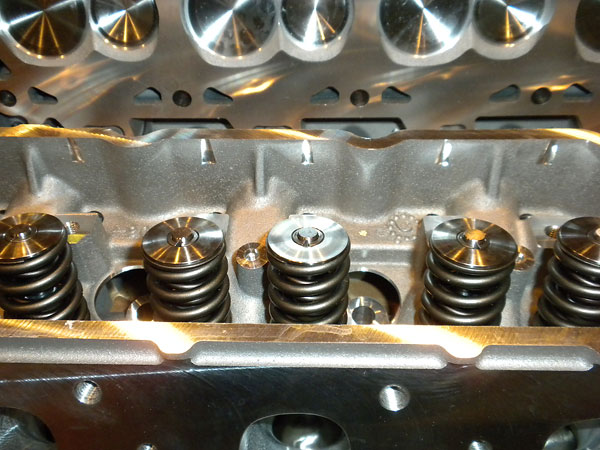
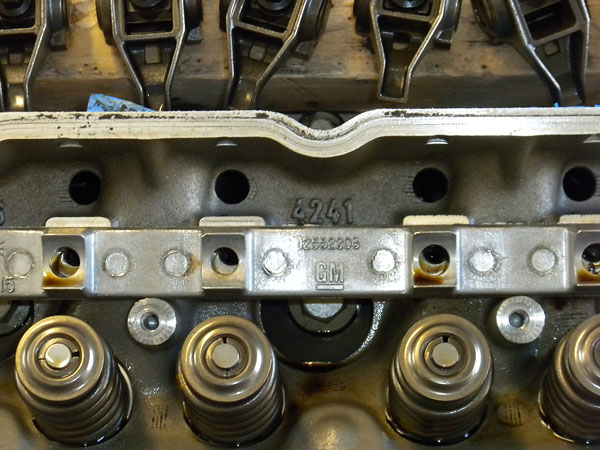
Texas Speed & Performance (TSP) / Precision Race Components (PRC) LS6-style cylinder heads.
�
�
Oversized valves: 2.02" intake and 1.575" exhaust.
�
62cc combustion chambers for a 10.8:1 static compression ratio.
�
�
Dual 0.650" lift valve springs.
�
�
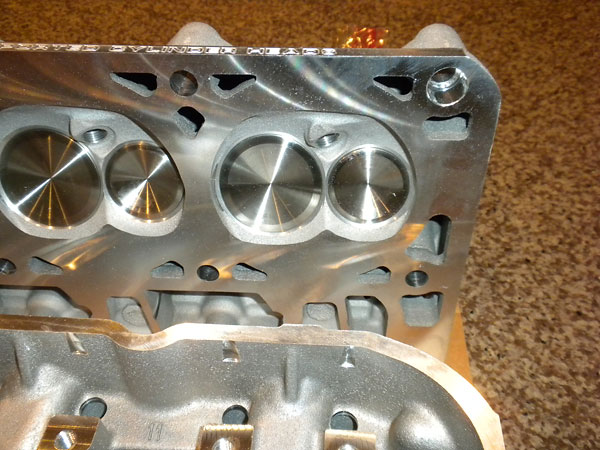
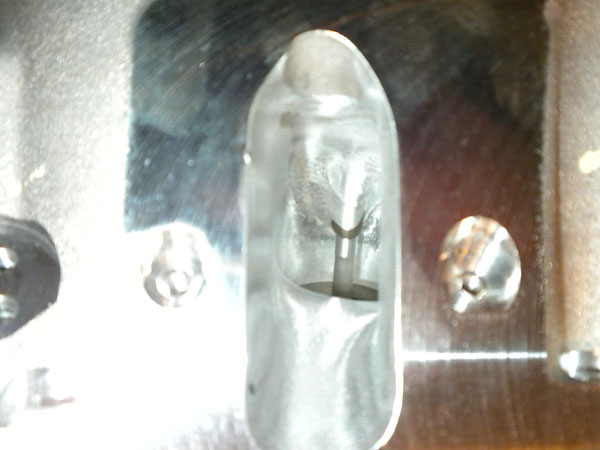
The cylinder head porting was done automatically with a CNC milling machine.
�
They call this shape "cathedral ported".
�
�
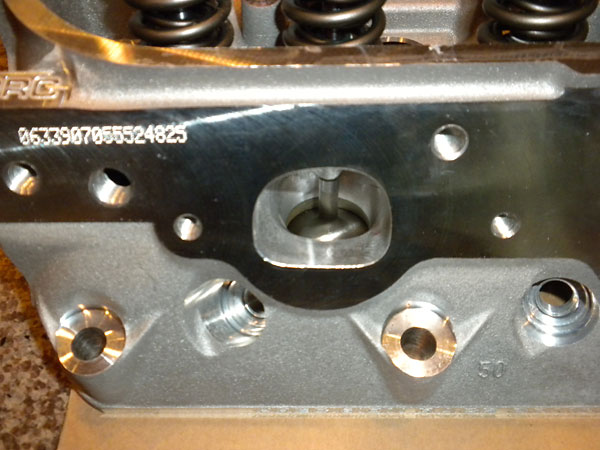
Some LS heads have round exhaust ports. The versions with D-shaped exhaust ports flow better.
�
�
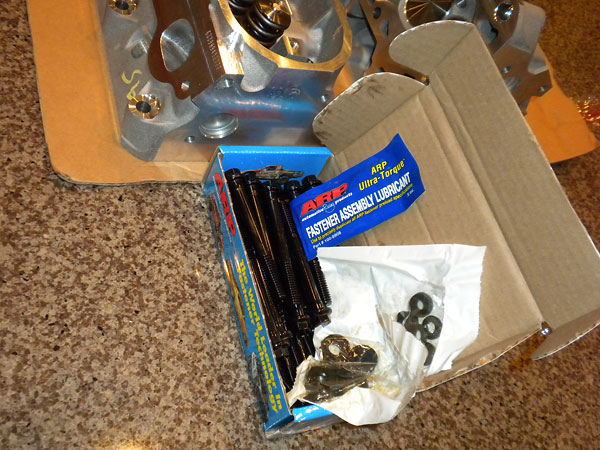
ARP cylinder head bolts. (These are re-usable whereas the OEM bolts were for one-time-use.)
�
�
Rockers (top of photo, ready to be installed) mount on individual rocker stands (middle of photo).
�
�
Timing cover and crankshaft pulley installed.
�
�
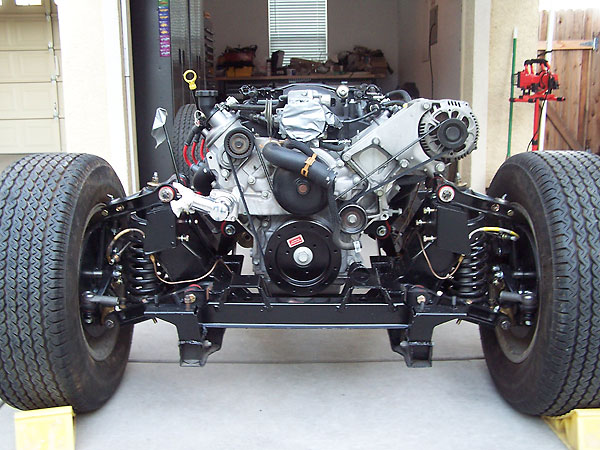
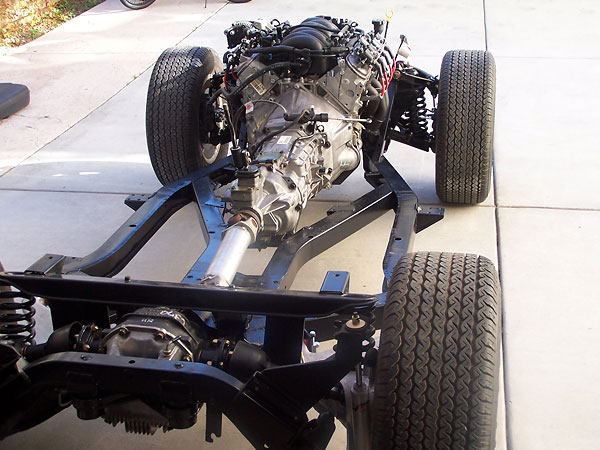
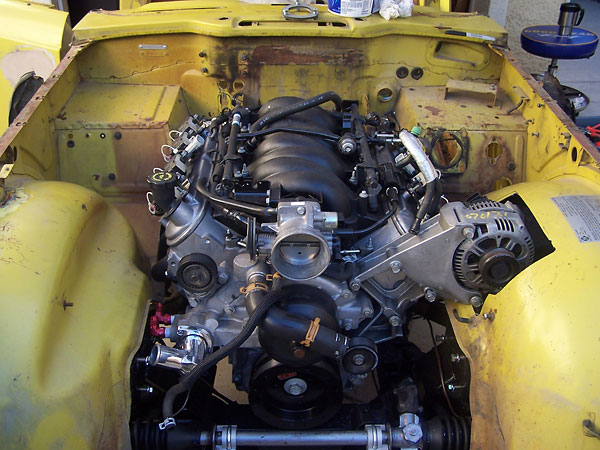
This is just one of many trial installations of the LS1 engine into Calvin's TR6 chassis.
�
�
Driver side exhaust header installation. (No problem here.)
�
�
Passenger side header installation. (A little too tight for comfort. Changes shown below.)
�
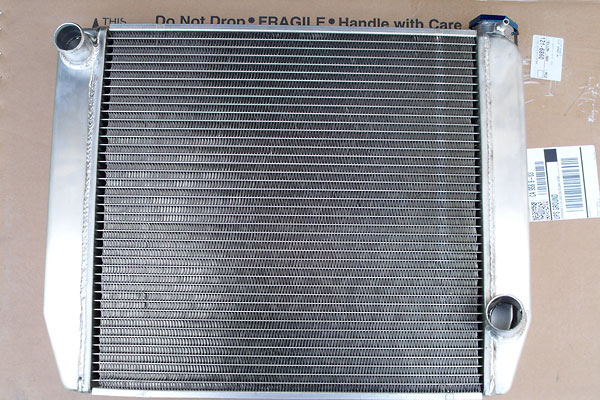
Cooling System
��
�
Griffin aluminum crossflow radiator (24" x 19" x 3") with 2-row (1.25" tube) core.
�
�
Sixteen inch 2250cfm electric fan with matching shroud.
�
�
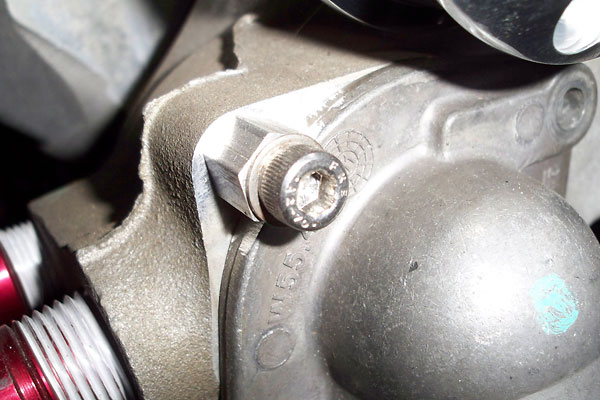
Stock thermostat housing rotated counter-clockwise ninety degrees to point downward.
�
The standard coolant thermostat for LS-series engines opens at 195°F.
�
�
1/4" NPT threaded aluminum bung installed on the radiator to vent out trapped air.
�
�
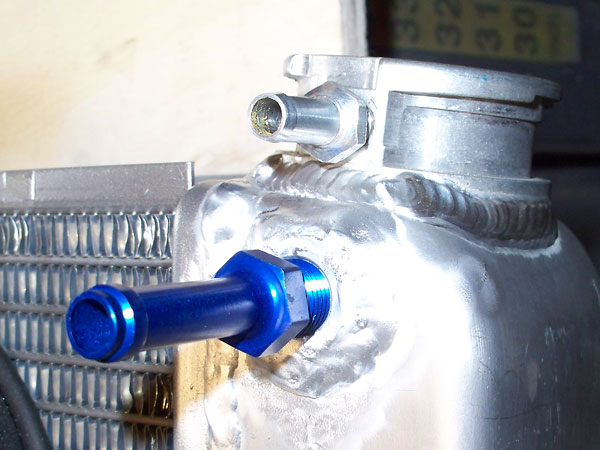
On an LS1, the radiator's steam vent can be plumbed to the warmer system on the throttle body. (Plumbing
�
to a header tank would be another good option.) Also shown: the hose barb at the pressure relief cap.
�
�
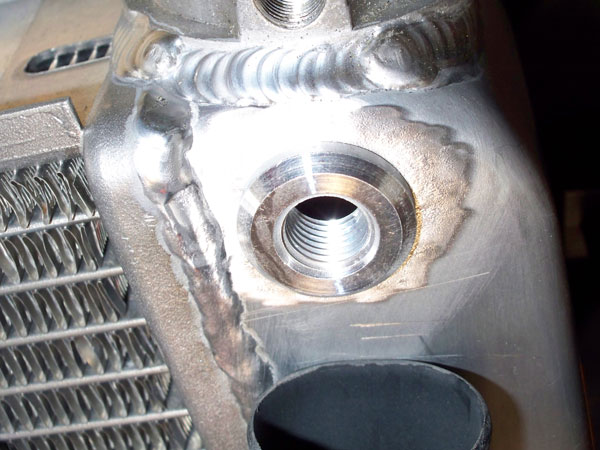
Replaced lower radiator port.
�

�
Radiator mounting bracket.
�
�
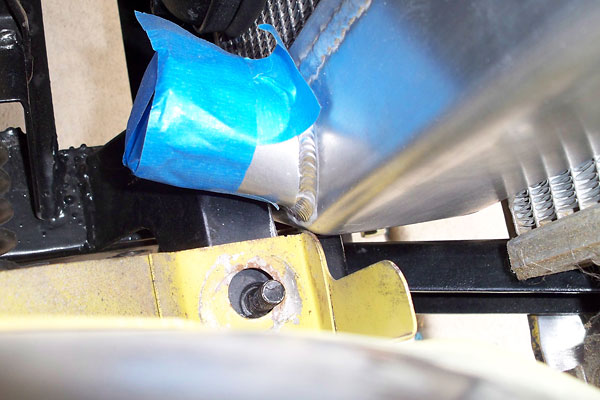
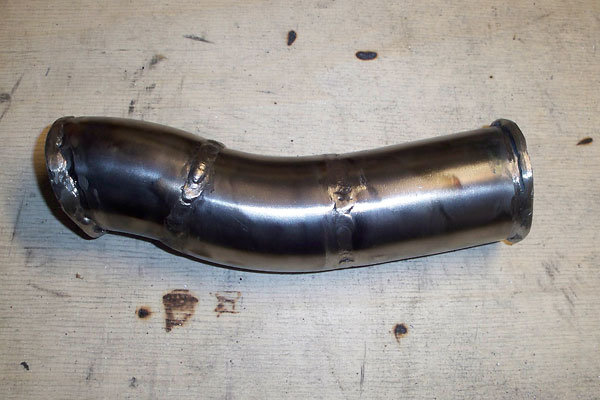
Custom stainless steel tube for the lower coolant line.
�
�
Lower coolant plumbing will go here.
�
Exhaust System
��
�
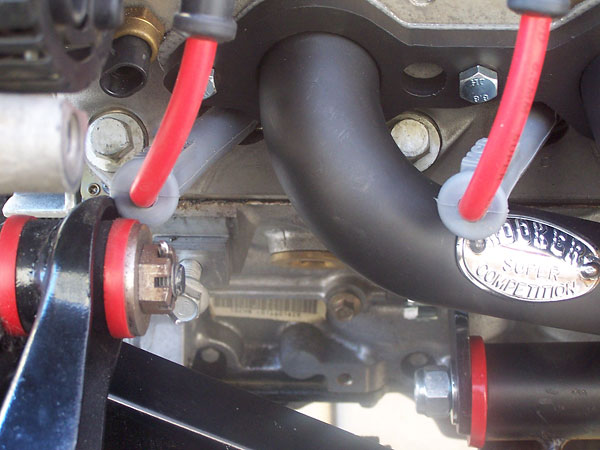
Hooker Super Competition four-into-one exhaust headers.
�
�
The driver-side exhaust header fit pretty well right out of the box.
�
�
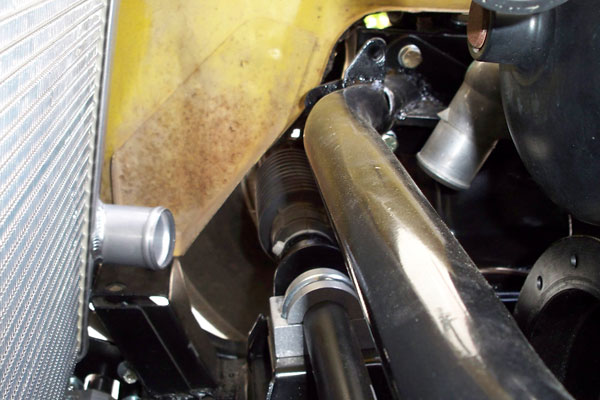
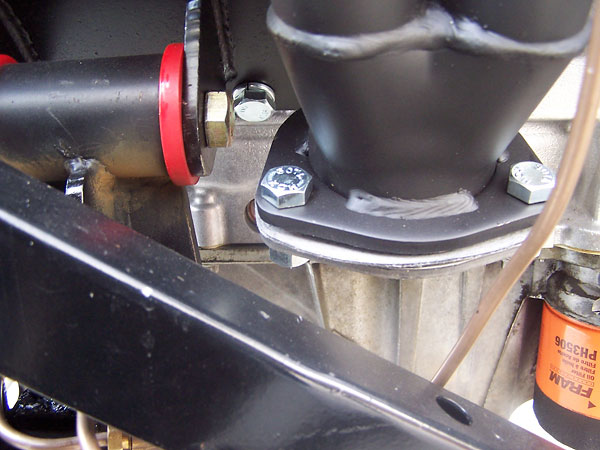
On the passenger-side, the exhaust header was nearly touching the motor mount and also
�
uncomfortably close to the starter motor, so Calvin decided to extend the header's
�
lower flange downward by about two inches. At left: oxygen sensor.
�
�
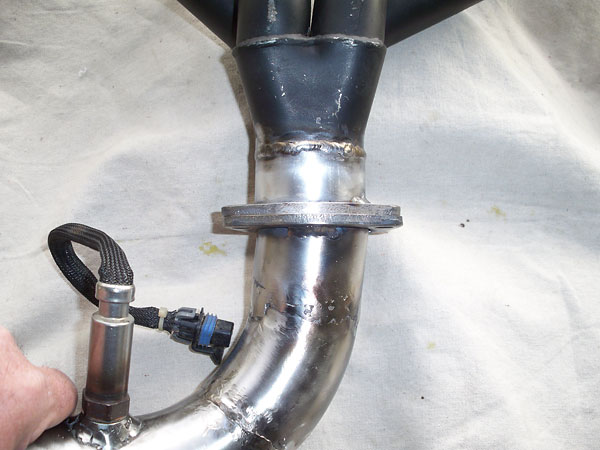
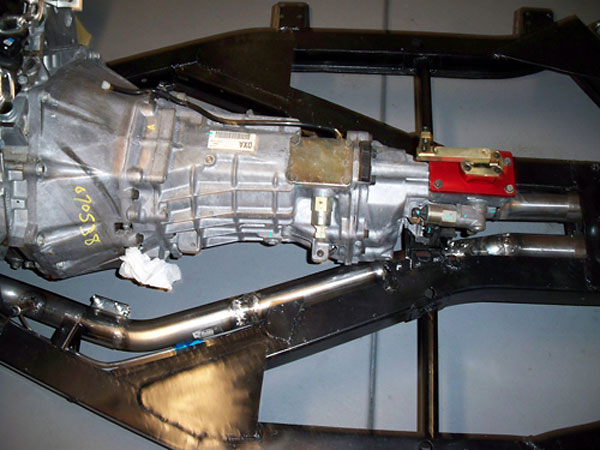
Routing exhaust below the frame would seriously compromise ground clearance, so Calvin was
�
compelled to engineer a through-the-frame system. For convenient service, from here back
�
just six stainless steel band clamps hold the exhaust system together
�
�
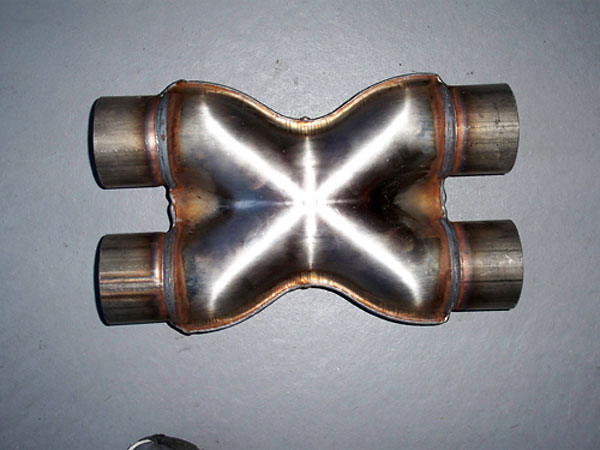
Magnaflow X-pipe.
�
�
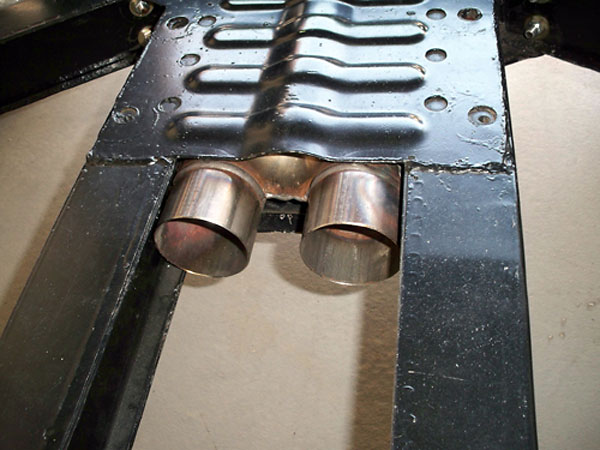
The X-pipe is tucked into the narrow "t-shirt" section of the Triumph TR6 frame. This is
�
as physically close as Calvin could get the X-pipe to the headers.
�
�
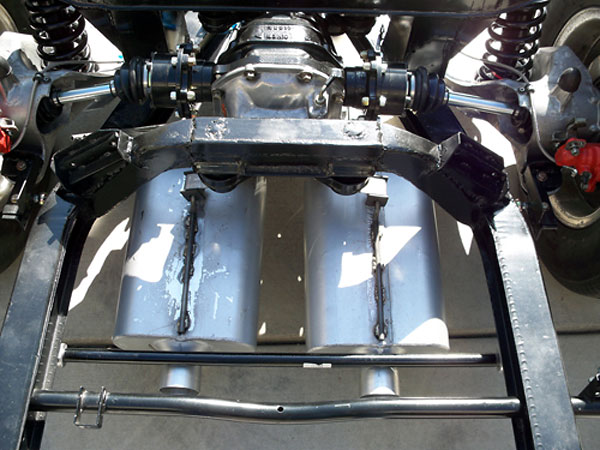
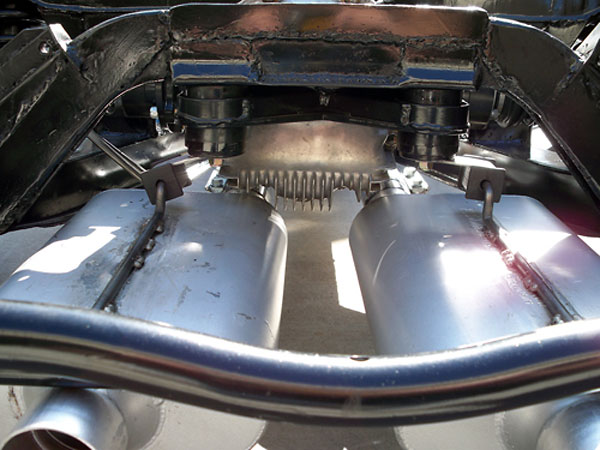
The mufflers shown on this page are FlowMaster 40s, but Calvin took those off pretty soon after
�
the car was roadworthy because they were too loud. He replaced the FlowMasters with Borla Pro XS
�
stainless steel mufflers (mounted similarly.) The Borla mufflers are slightly longer and heavier.
�
�
Mounted on rubber hangers, the mufflers don't transfer vibration directly into the body.
�
Transmission, Clutch, Shifter, Etc.
� �
�
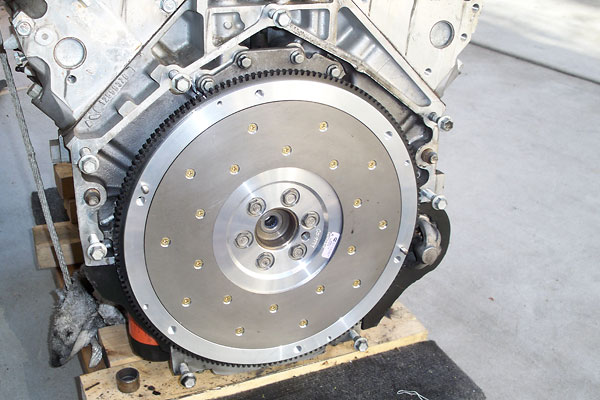
Fidanza 12.5 pound aluminum flywheel with changable clutch surface.
�
�
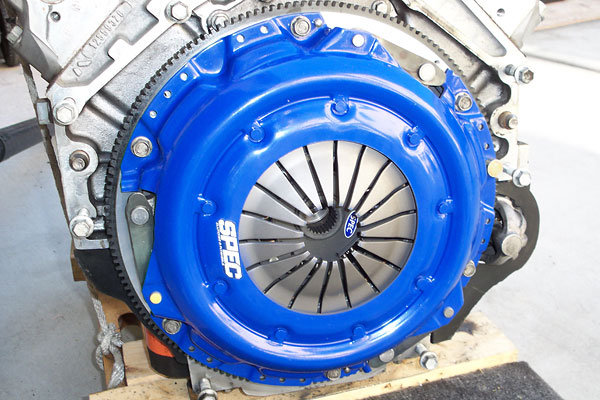
SPEC Stage 2+ pressure plate.
�
�
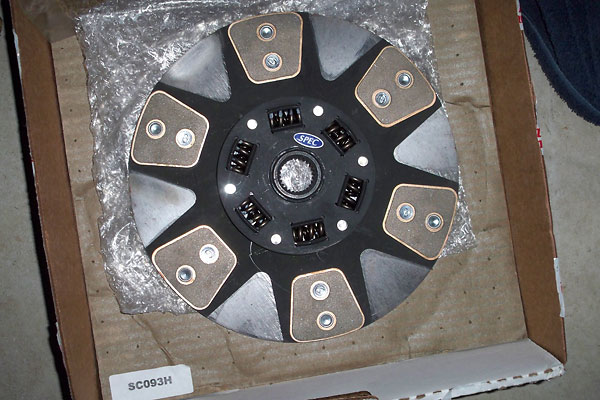
SPEC clutch disc. This clutch/pressure plate combination should be good for ~625 foot pounds of torque.
�
�
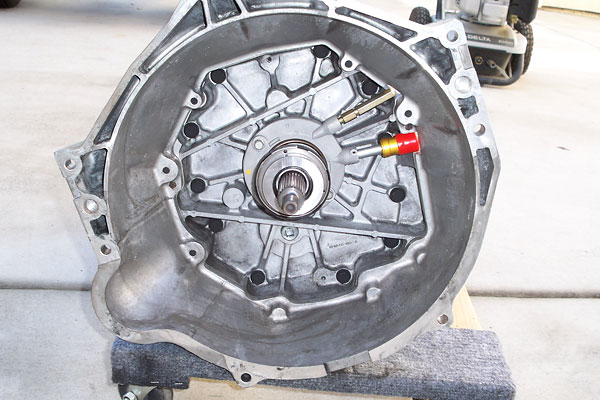
LS1/T56 bellhousing, including annular clutch slave cylinder.
�
(Also known as a "hydraulic throw-out bearing".)
�
�
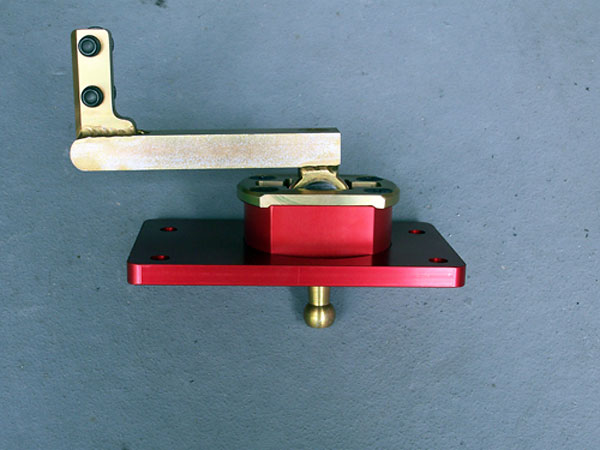
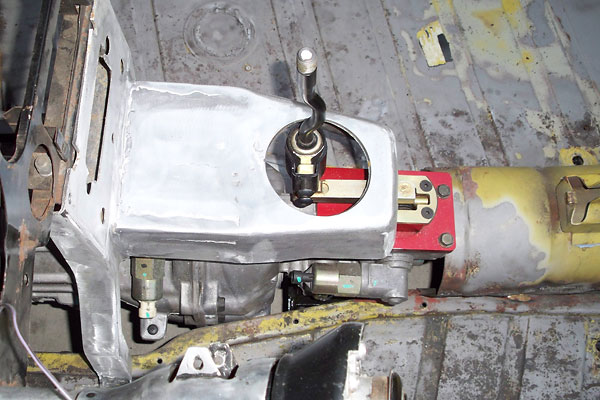
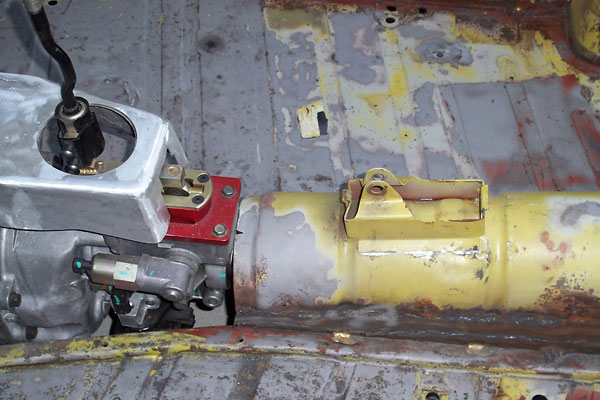
Street & Performance Inc. gear shifter.
�
(That company markets this shifter as a "shifter handle relocator.)
�
�
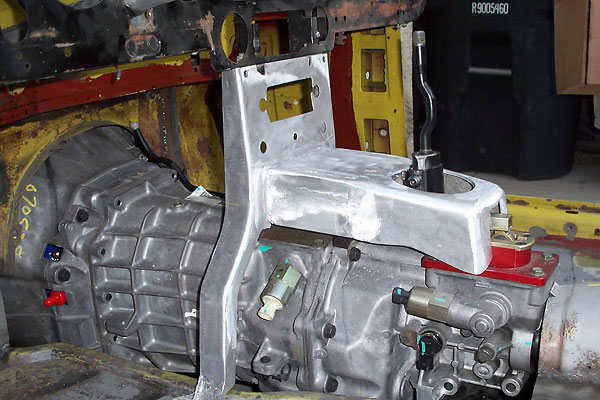
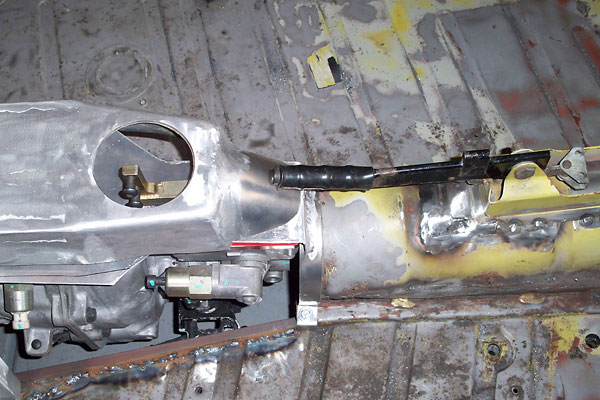
Original Triumph TR6 dash support, stripped down to bare aluminum and then cut
�
and extended 4.5" rearward. The special gear shifter extends forward to meet it.
�
�
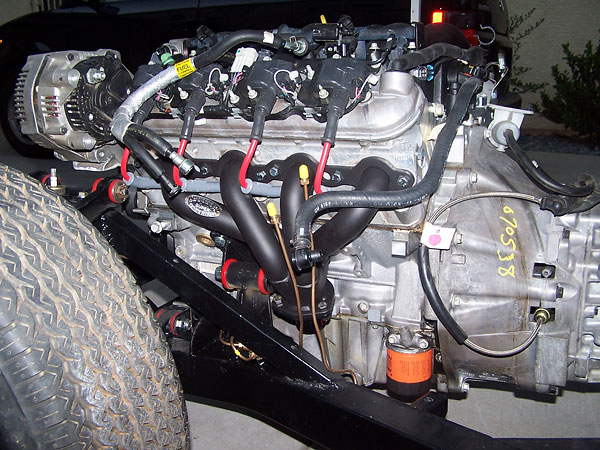
Tremec T56 6-speed with normal GM F-body gearing. Not lightweight and not compact...
�
but it has its virtues, including two overdrive gears. (Great for fuel economy!)
�
�
The original driveshaft tunnel has been cut out and reinstalled about two inches higher.
�
�
The parking brake lever had to be shifter rearward (3.5").
�
�
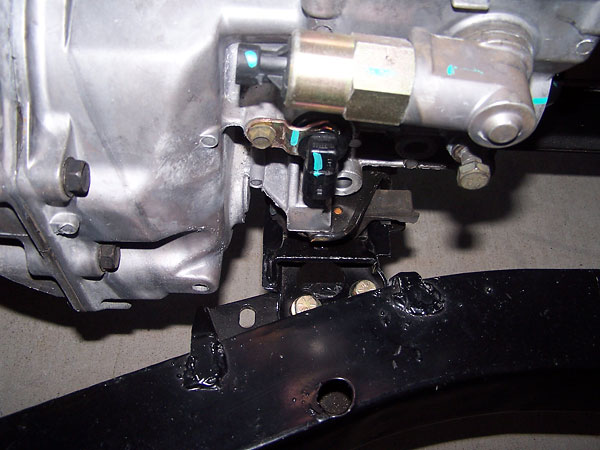
The T56's bulky reverse gear lockout solenoid. Near the end of the build, after the car
�
had been test driven multiple times, Calvin decided this solenoid stuck out too far.
�
He removed it and substituted a cap with a heavy spring and plunger. Reverse can be
�
engaged while moving forward, but it will take a little muscle.
�
�
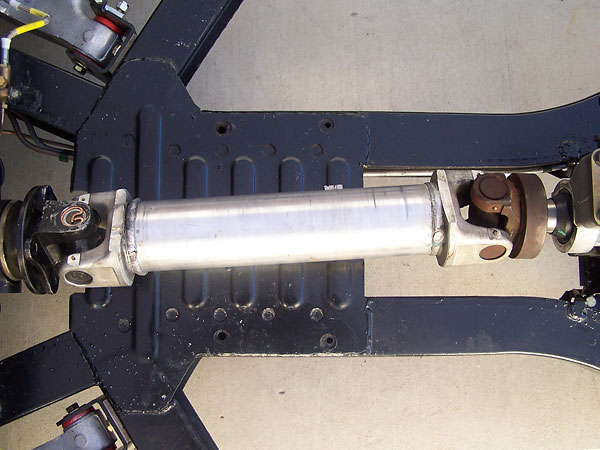
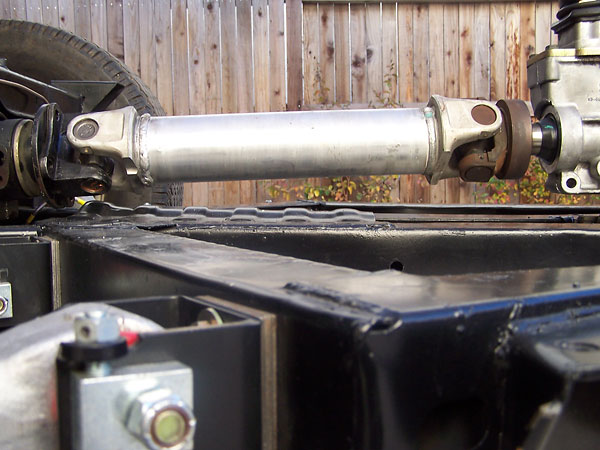
Chevy Camaro 3" aluminum prop shaft, shortened to 25".
�
�
Nissan Infiniti Q45 U-joint at the differential. Camaro-spec U-joint at the transmission.
�
Fuel System
��
�
Racers Choice 19 gallon aluminum fuel tank (12" x 12" x 30"). Calvin cut open one side of
�
the tank, inserted baffles, TIG welded them into place, and welded the exterior back up.
�
�
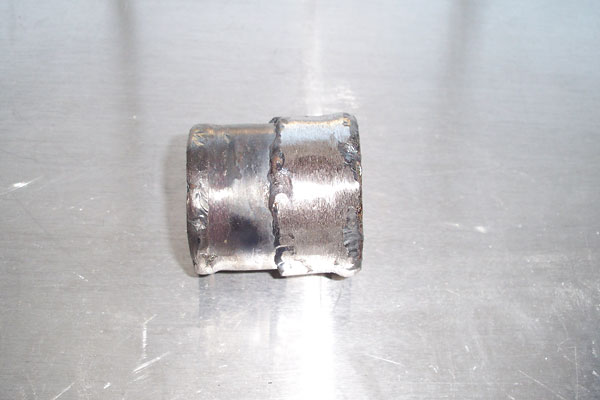
A stock Triumph TR6 fuel filler connects to a 2" inside diameter hose.
�
The filler neck on the fuel cell accepts a 1.75" ID hose.
�
�
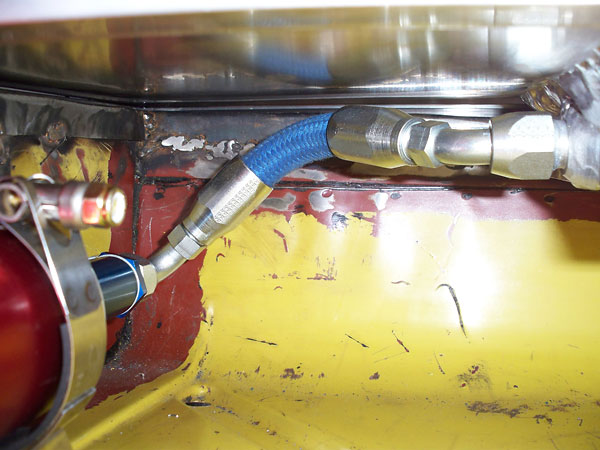
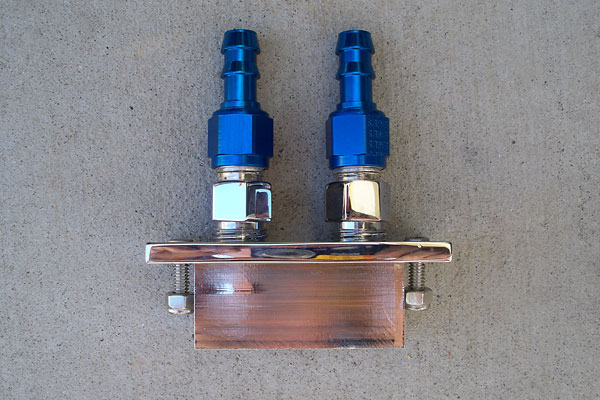
Calvin fabricated this coupler to mate the two fuel hose elbows together.
�
�
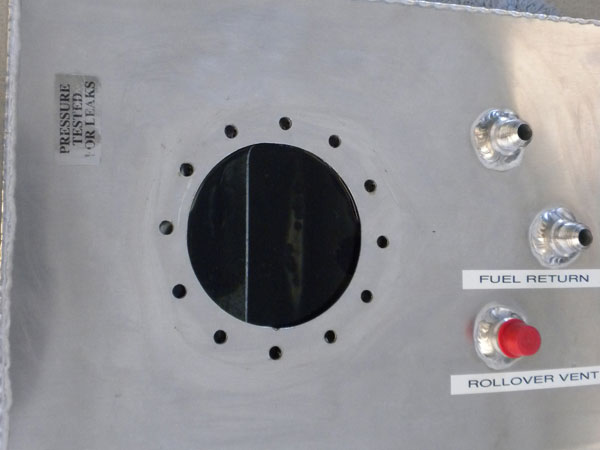
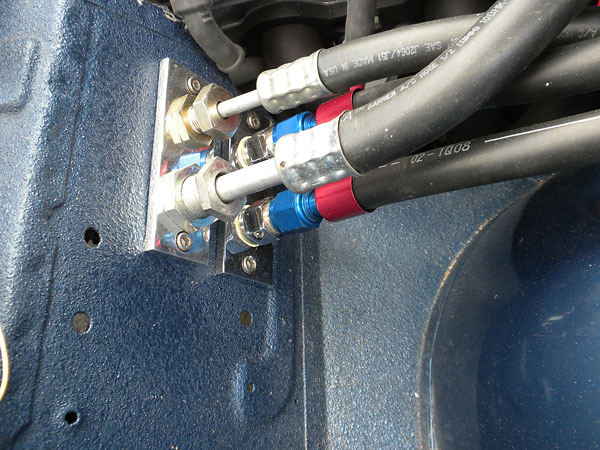
Foreground: the hose for the rollover vent, connected with a "dash eight" (half inch)
�
AN fitting. The fuel cell came with similarly large fittings for its other two ports.
�
Calvin used dash eight to dash six converter couplings into 3/8" braided hoses.
�
�
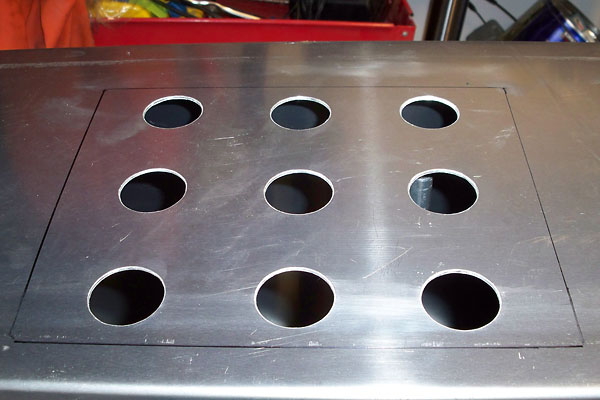
Calvin's original plan was to use racecar-style fuel cell foam to prevent sloshing of fuel within his
�
tank. That foam breaks down and has to be replaced every few years, so instead he decided to
�
add a simple sump to the bottom of his tank and draw fuel from there. 9 holes, 1.125" diameter.
�
(In the righthand center hole, you can see the original but now-obsolete fuel pickup tube.)
�
�
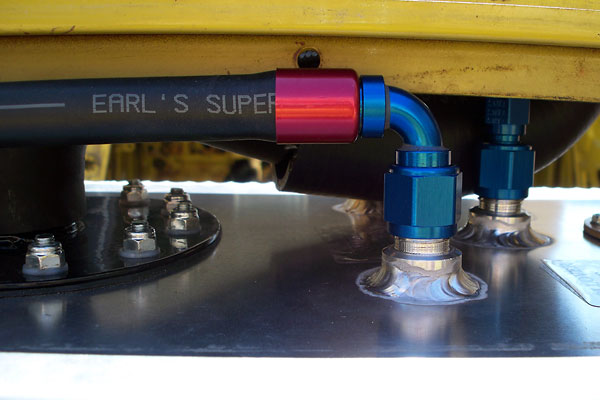
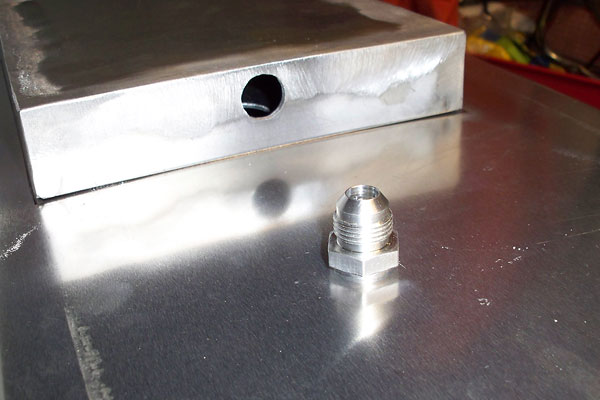
The sump measures 8" by 10" by 2" deep. At right: 8AN aluminum bung.
�
�
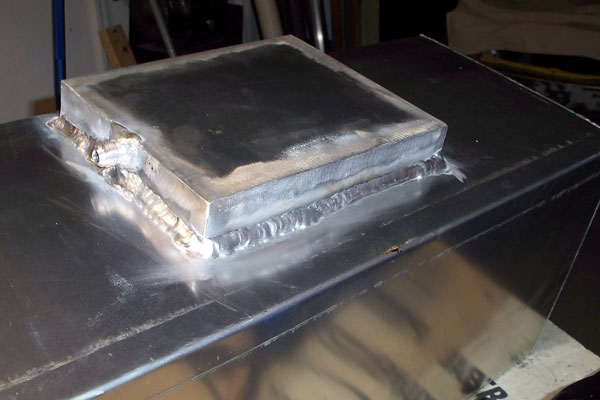
With the sump TIG welded into place, the bung points to the driver's side.
�
�
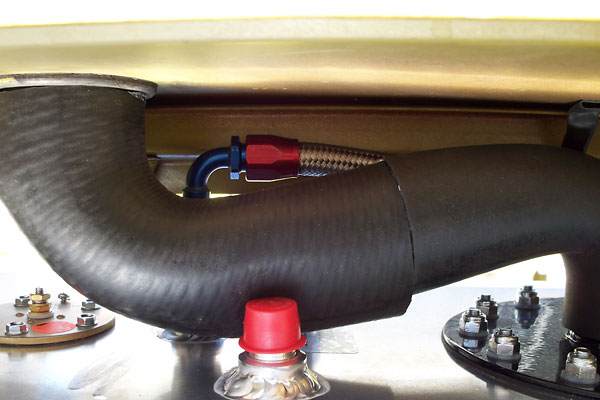
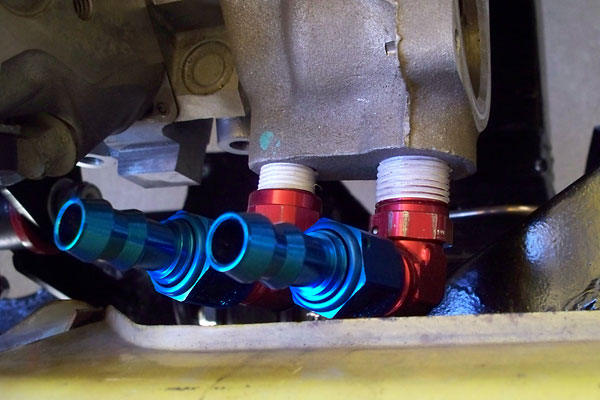
Aircraft style connection of the Aeromotive high pressure fuel pump to the fuel tank. From
�
the pump, gas goes directly into a filter assembly with a built-in pressure regulator.
�
A portion of the fuel continues to the engine. Excess is routed back to the tank.
�
�
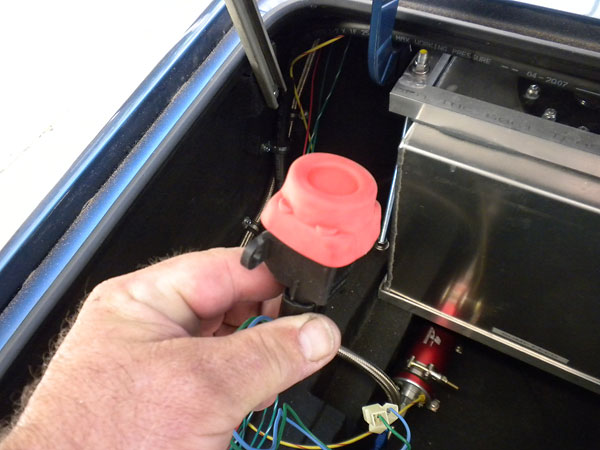
In the event of an accident, this inertia switch would shut-off the high volume fuel pump.
�
Front Suspension and Brakes
��
�
This is basically a "before photo." Many alterations to the TR6 frame will be shown below.
�

�
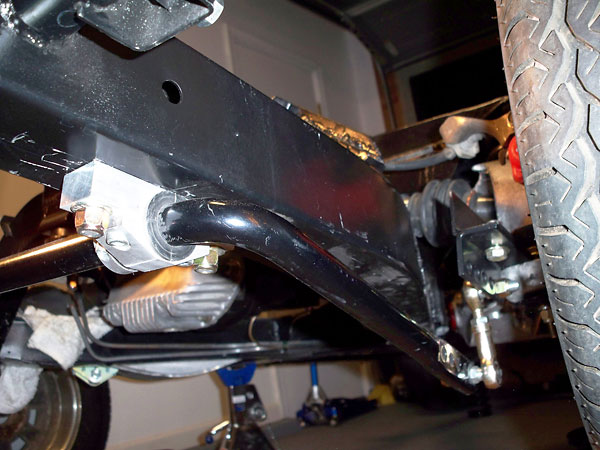
Original Triumph TR6 front anti-sway bars are mounted quite low, and vulnerable to contact with curbs.
�
Calvin followed Ken Hiebert's lead and re-mounted this Good Parts anti-sway bar higher, on the top surface
�
of the car's skid plate. This is, however, an early photo of that. He subsequently shifted the skid plate and
�
anti-sway bar forward about 1.25". Doing so improved the anti-sway bar link geometry and also provided
�
more clearance for radiator installation. (He lowered the radiator slightly for filler cap to hood clearance.)
�
�
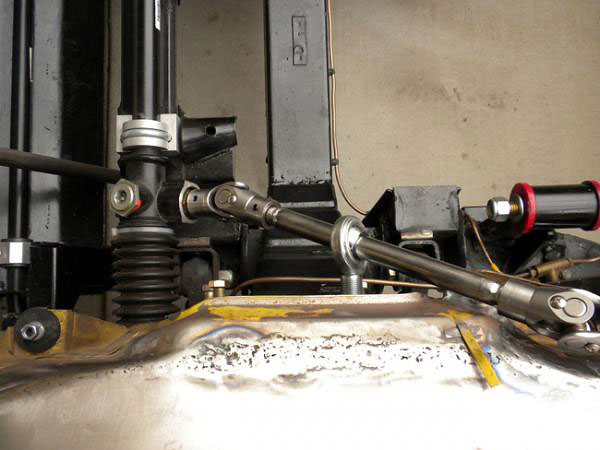
Quick ratio steering rack: 2.5 turns lock-to-lock versus 3.5 turns as standard.
�
�
Calvin initially set-up the front suspension with KYB shock absorbers, but he has recently
�
replaced them with adjustable Spax shock absorbers. He has them set pretty stiff too.
�
�
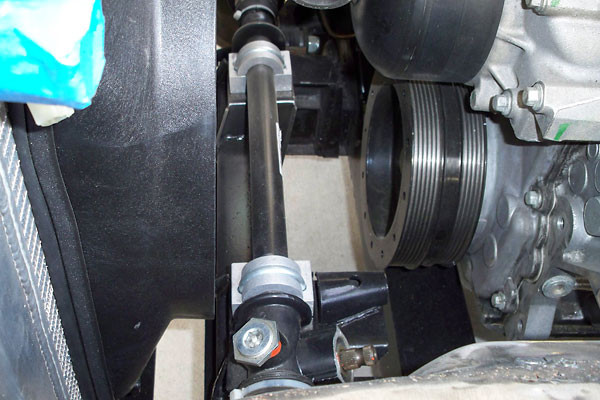
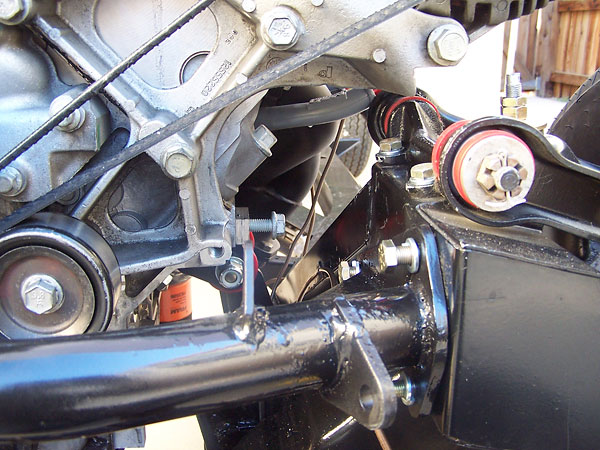
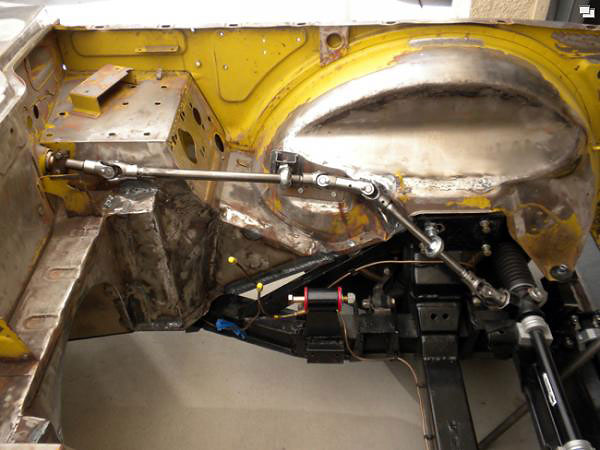
To route the steering around the engine, Calvin used Woodward Power Steering Products components.
�
He special ordered u-joints to mate to stock Triumph TR6 parts (0.563" by 36 splines at both the
�
rack and pinion and the steering column.) The opposite ends of those u-joints and the components
�
in the middle are all 0.750" by 20 splines.
�
�
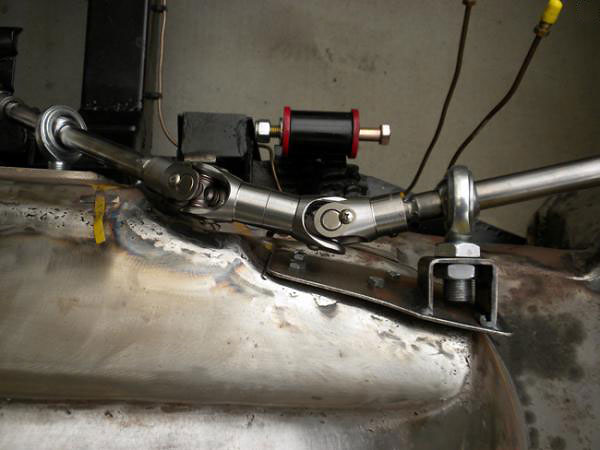
There are two tubular intermediate shafts, both constructed of 0.75" OD by 0.490" ID material.
�
Woodward sells splined tips that get welded into these. To install them, Calvin drilled out the
�
tubes to 0.514" (1.25" deep) on all 4 ends. The OD of the splined tips were 0.512". Plug them
�
in and they're self aligning; fire up the TIG welder and make the assembly permanent.
�
�
There are two Heim joint supports: one on the inner fender and one on the suspension tower box.
�
�
Bolt-in crossmember, added to reinforce the motor mounts.
�
�
Stock TR6 rotors, cross-drilled and slotted. Braided stainless steel brake lines.
�
�
1985 Toyota 4x4 brake calipers. Incidentally, the original Triumph dust shields were
�
still installed here, although trimmed slightly to suit the larger calipers. Since these
�
photos were taken, Calvin has upgraded to Wilwood 4-pot calipers and 12.19" rotors.
�
�
Enjoying this article? Our magazine is funded through the generous support of readers like you!
�
To contribute to our operating budget, please click here and follow the instructions.
�
(Suggested contribution is twenty bucks per year. Feel free to give more!)�
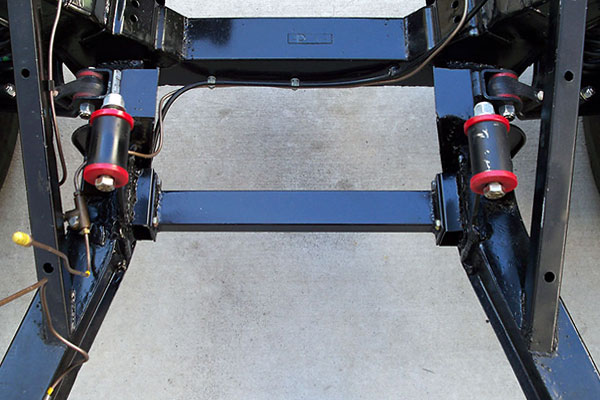
Rear Suspension and Brakes, Etc.
��
�
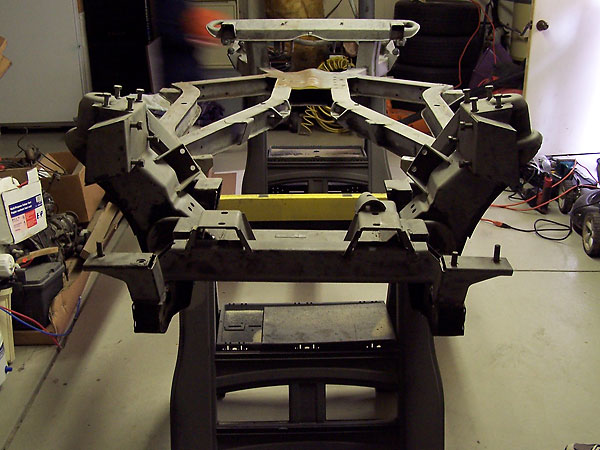
Another before photo: this one shows rear frame design details better.
�
�
The original Triumph TR6 rear axle ratio was 3.69:1.
�
�
Nissan R200 rear end out of a Nissan / Infiniti Q45. The 3.54:1 ratio R200 rear ends came
�
with six bolt housings, whereas other versions came with five-bolt housings. Richard Good
�
offers mounting brackets for putting either version in a Triumph.
�
�
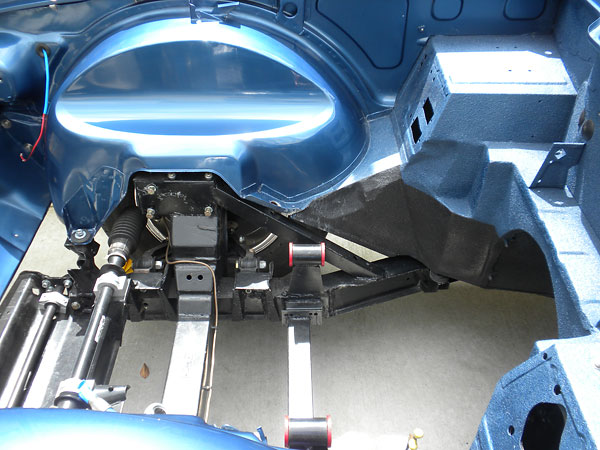
At the right you can see bracing for the transmission mounts, fabricated from thick
�
wall round tubing (1.5" OD by 0.25" wall), and 3" square mounting plates.
�
�
This photo shows reinforcing plates added to the top surface of the frame (only).
�
They're attached with plug welds plus welds around the perimeter.
�

�
Good Parts adjustable trailing arm attachment brackets and Nylatron bushings.
�

�
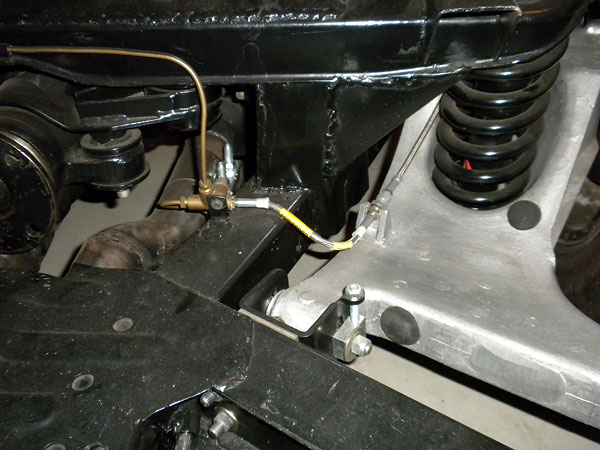
Steel tubes were welded into the frame for routing fuel and brake lines.
�
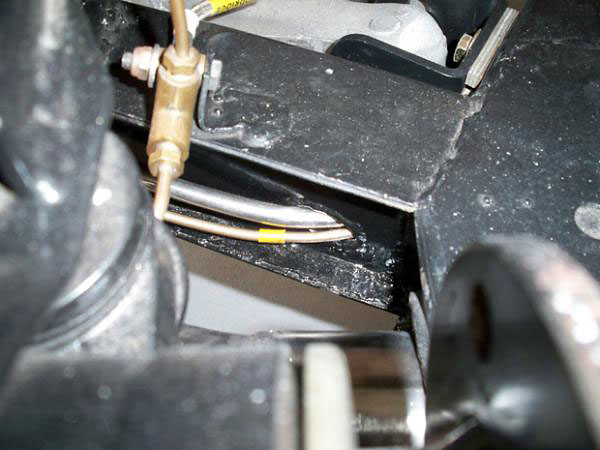
�
The fuel and brake lines were strategically routed to avoid exhaust heat.
�

�
This adapter bracket for mounting an R200 rear end is from Richard Good / Good Parts.
�
�
Many reinforcement plates and braces were welded to the TR6 chassis.
�
�
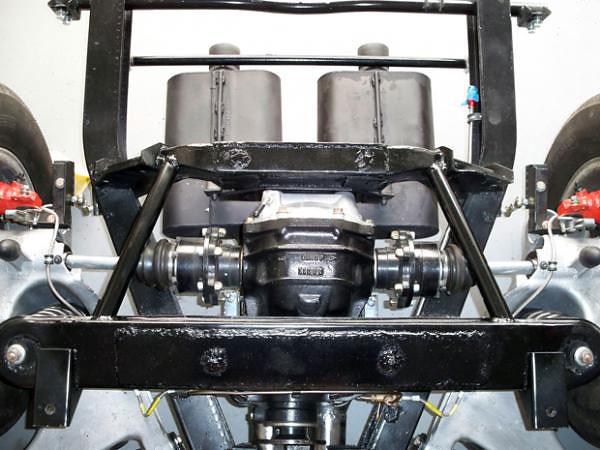
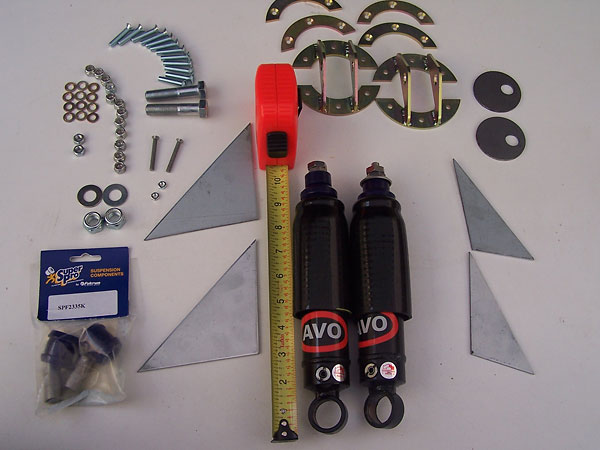
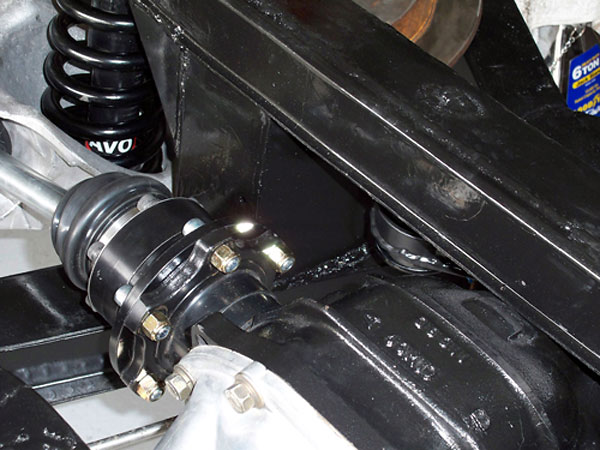
Roadster Factory (Revington TR) coilover conversion kit, featuring AVO shock absorbers.
�
�
These are single-adjustable shock absorbers, although the adjuster screws are hidden.
�
Calvin drilled access holes, so he can adjust them from outside with an Allen wrench.
�
�
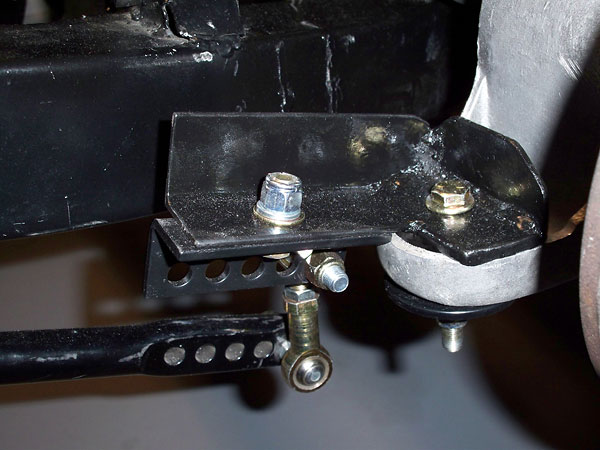
Good Parts rear anti-sway bar. Calvin relocated the sway bar rearward because
�
Richard Good's original design conflicted with Calvin's coilover conversion kit.
�
�
The rear sway bar has five selectable stiffness settings.
�
�
Calvin's experience is that front differential mounts are one of the weaker links of
�
the Triumph TR6 chassis, so he put particular care into reinforcing them.
�

�
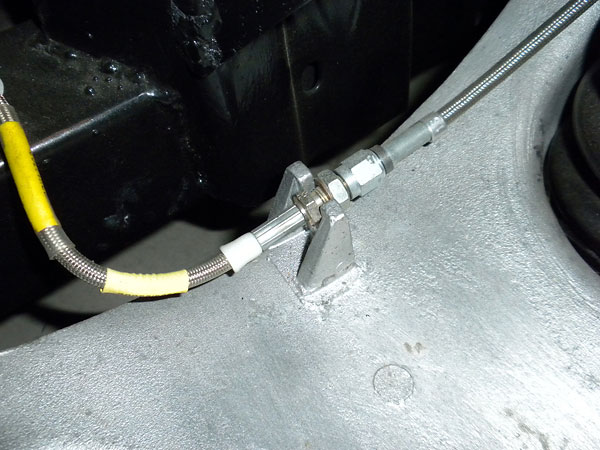
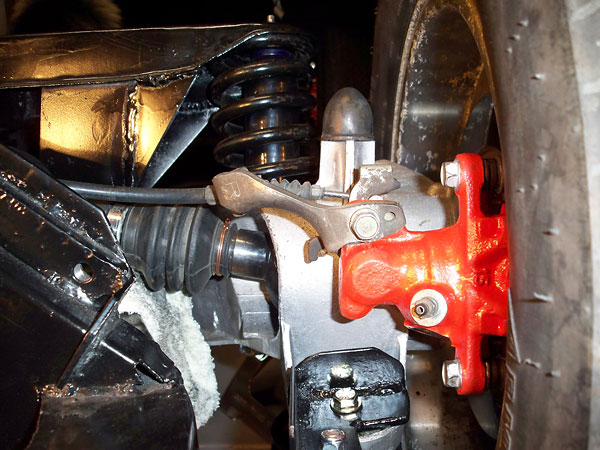
This photo is a nice overview of the rear suspension, but it also shows the 3/8" stainless
�
steel fuel line during installeation. (AN fittings thoughout. No hoses or barbed fittings.)
�
�
Triangular reinforcements have been welded-in both front-and-rear
�
on both righthand and lefthand shock absorber towers.
�
�
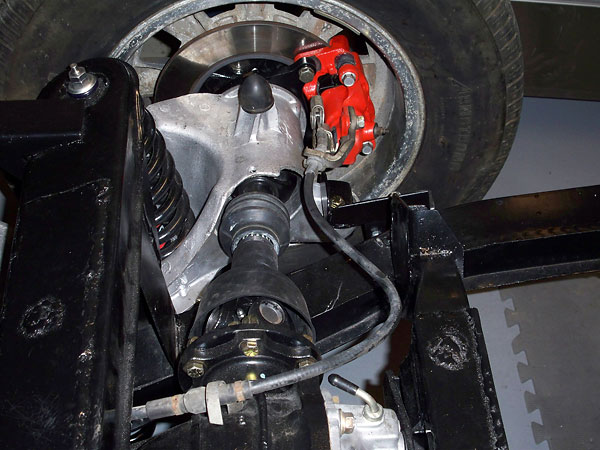
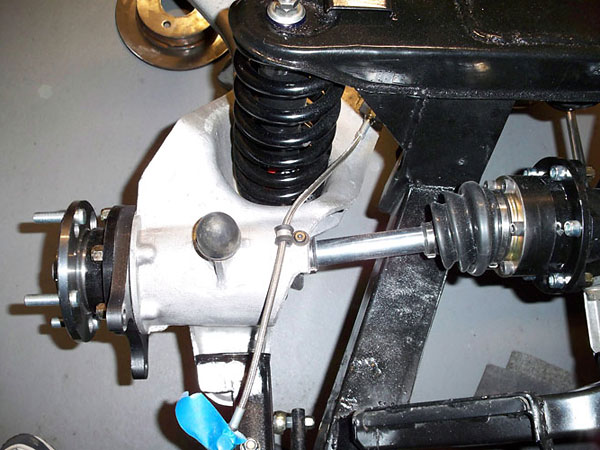
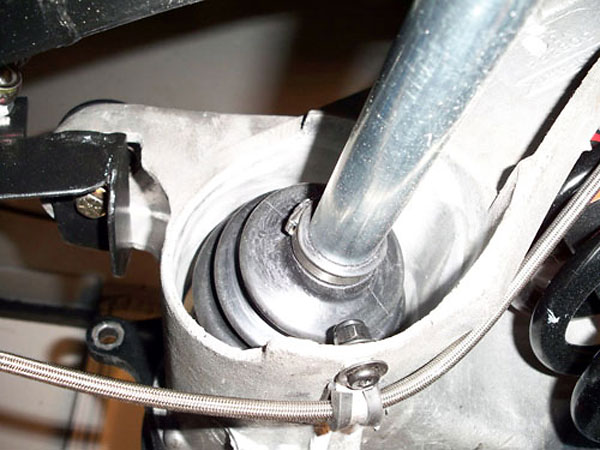
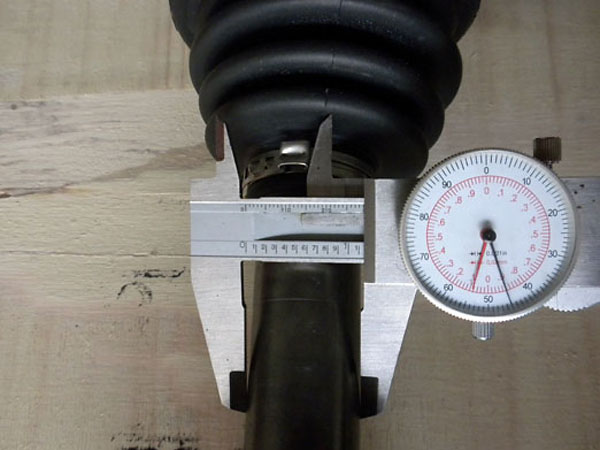
Close tolerance (~0.100") of CV joint boot to housing.
�
�
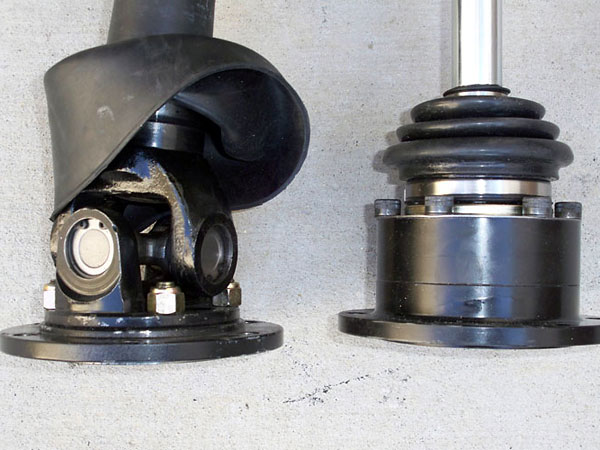
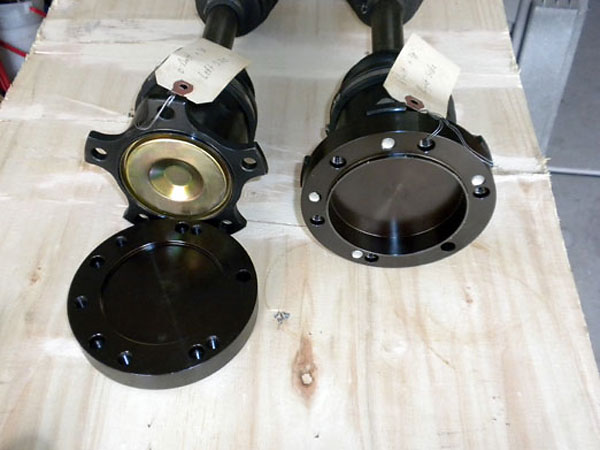
At left: an original Triumph TR6 universal joint halfshaft.
�
At right: one of Richard Good's first generation constant velocity joint halfshafts.
�
�
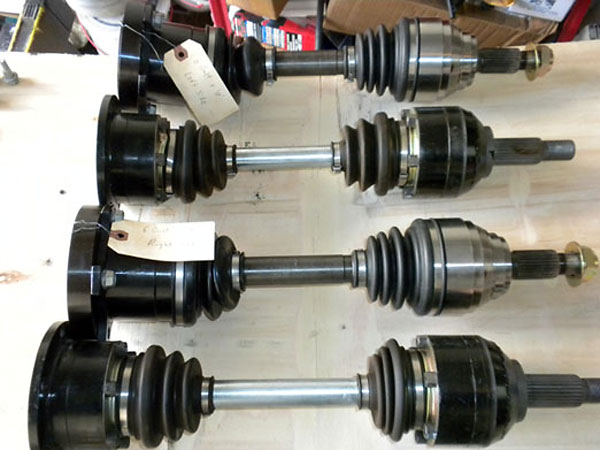
It only took a couple test drives to destroy one of the first CV-jointed halfshafts Calvin tried. "What!
�
They weren't designed to deliver 400+ horsepower?" Calvin called Richard Good and told him what
�
happened. Good Parts immediately sent new and improved axles at no charge. The first generation
�
version had used floating CV joints both inboard and outboard, whereas the second generation
�
design featured a floating-inboard / stationary-outboard combination.
�
�
In this view, the second generation axles are marked with tags; the old ones aren't.
�
�
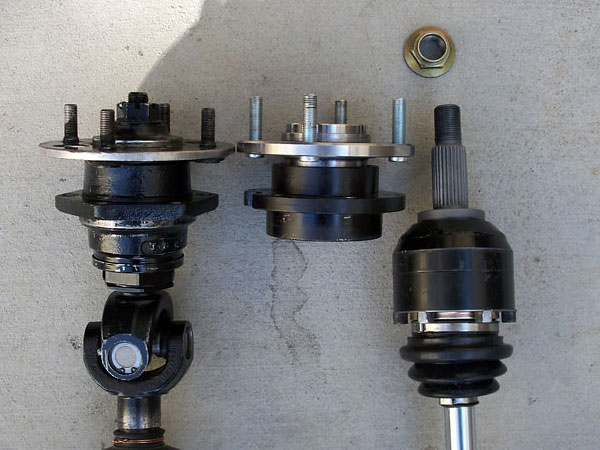
The diameter of the second generation axle shafts is 1.145", and that's about 0.20" larger
�
than the first generation shafts. The weight difference comes to about 2.6 pounds per side.
�
�
These CV joints have 5-bolt flanges, so Calvin needed to use adapters to mate to his 6-bolt
�
Nissan rear end. End result: nine bolts per axle and shorter axle shafts. Since Calvin is
�
using disc brakes instead of drums, the mounting difference figured into length
�
calculations too. (Shafts need to be about 3/8" longer per for disc brakes.)
�
�
Calvin initially set the car up with 450#/inch rear springs (shown here), but he has recently
�
updated the rear suspension with 600#/inch springs supplied by Richard Good at Good Parts.
�
The stiffer springs have cured the car's tendency to squat deeply on acceleration.
�
�
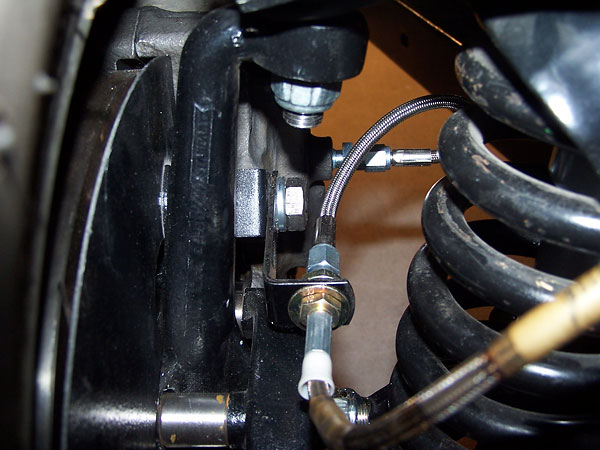
Stainless steel braid covered brake lines.
�
�
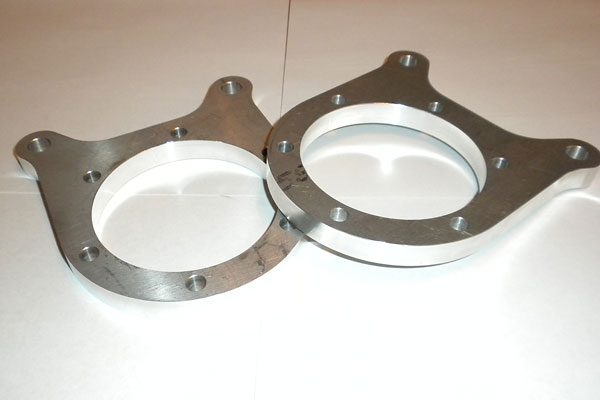
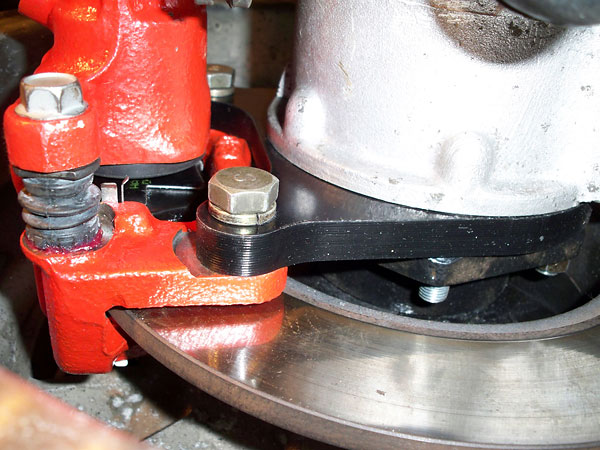
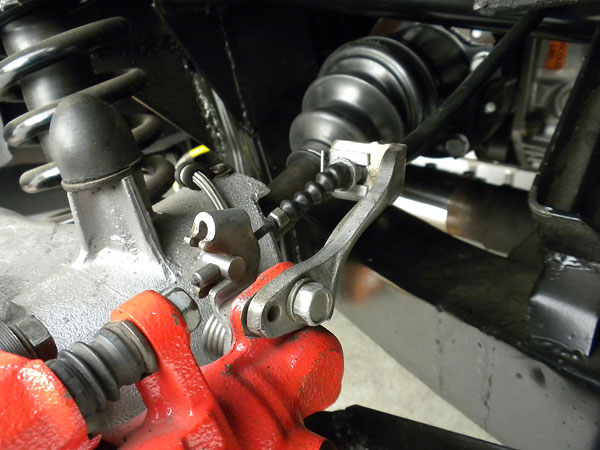
Don Watson supplied brake caliper mounting brackets.
�
�
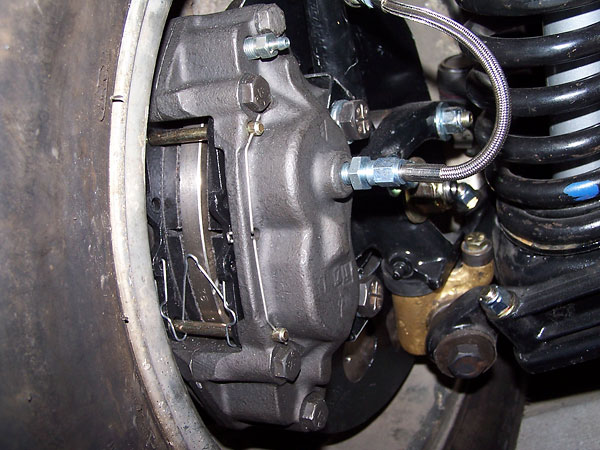
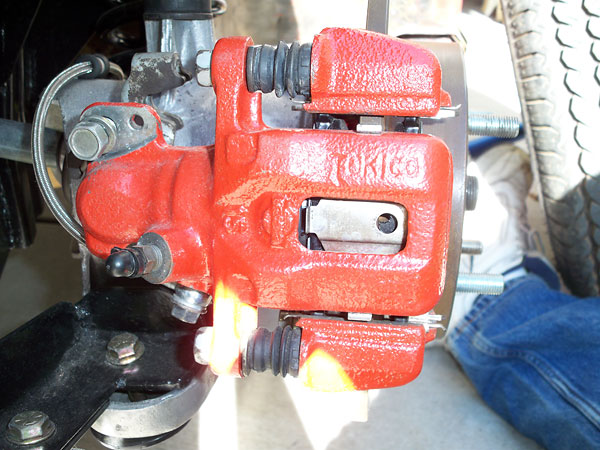
1987 Nissan Maxima brake calipers used in combination with 1992 Nissan 240SX rotors.
�
�
There are two styles of brake caliper for a 1987 Maxima. The change occured in March of
�
that year, and the earlier design has fewer internal parts. This difference should only
�
matter if you decide to rebuild a set of these calipers yourself.
�
�
The Nissan 240SX brake rotors require a very minimal modification: the inner hole
�
that goes over the hub will need to be machined out ~0.068". Pretty much anyone
�
with a metal lathe should be able to to make this change in short order.
�
�
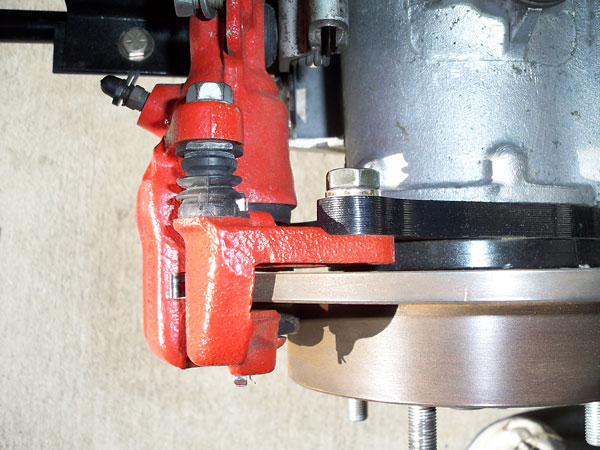
The bleeder screw on the caliper isn't ideally positioned. To bleed the brakes fully,
�
remove the calipers and temporarily position them so that the bleeder is pointed
�
upward. Put a spacer between the pads that's about the same thickness as a rotor.
�
�
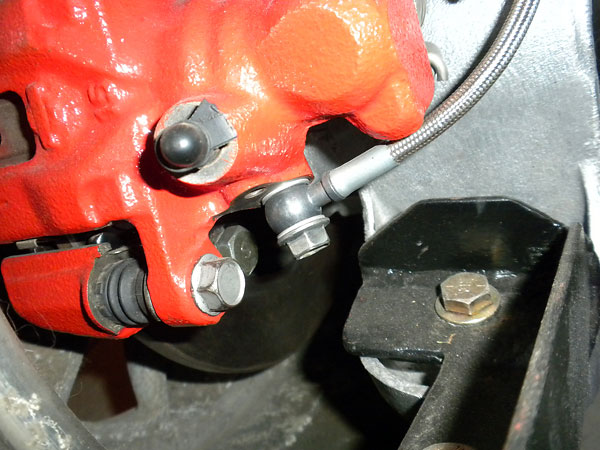
When first installed, the emergency brake cable brackets on the Maxima calipers were
�
pointed upward. Calvin found that the cable brackets on old 240SX calipers will
�
install on the Maxima calipers and solve this problem. Now, the emergency brake
�
cables point toward the differential.
�
�
Want to know more? How To Upgrade your Triumph TR6 with Rear Disc Brakes
�
Interior Trim
��

�
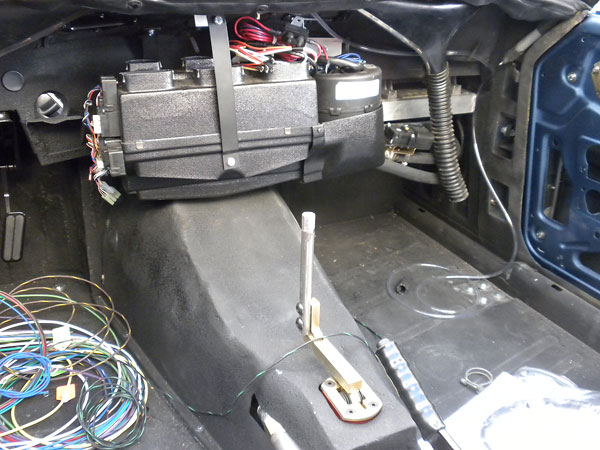
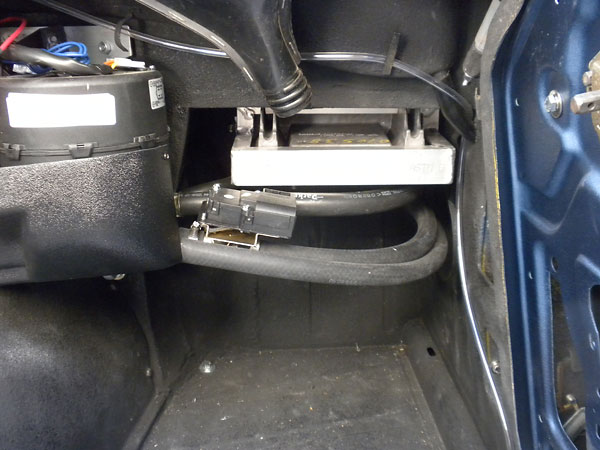
Vintage Air Mini II heater and AC evaporator unit, mounted in place. Notice that,
�
its position will require relocation of the radio downward. The new electric HVAC
�
control panel will be mounted into the original heater control area.
�
�
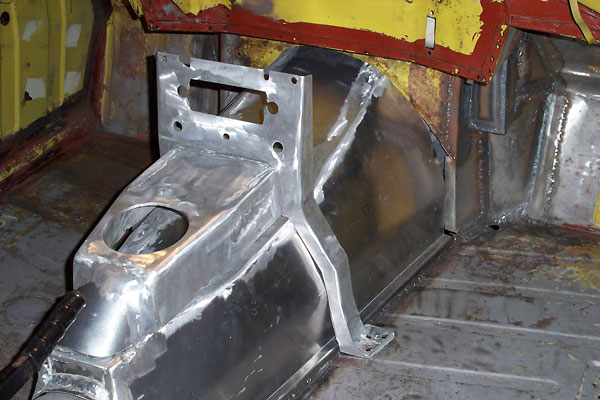
Specially fabricated aluminum transmission cover.
�
�
Engine computer.
�
�
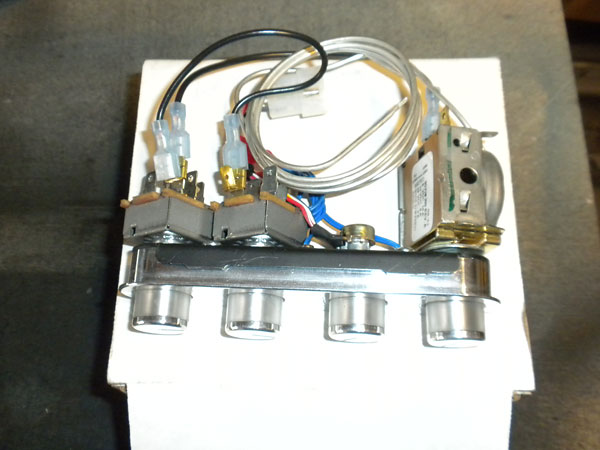
Vintage Air Mini air/heat/defrost control panel.
�
�
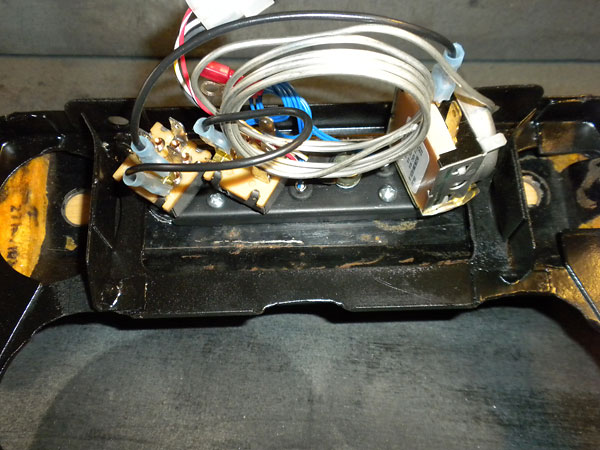
HVAC controls, viewed from the rear.
�
�
Heater hose connections on the water pump.
�
�
Heater hose bulkhead pass-through.
�
�
Air conditioning line and heater hose pass-throughs, installed.
�

�
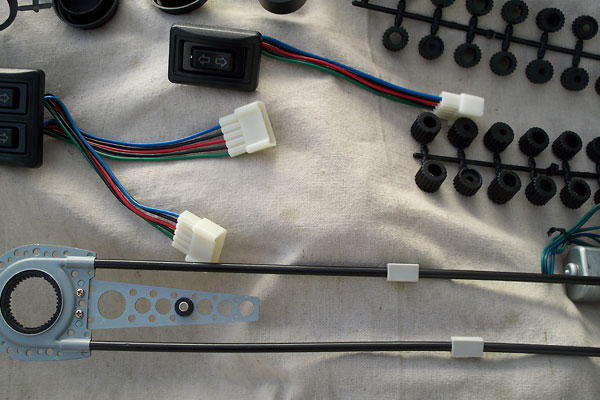
SPAL Deluxe power window kit - electric motor.
�
�
SPAL Deluxe power window kit - cable drive system.
�
�
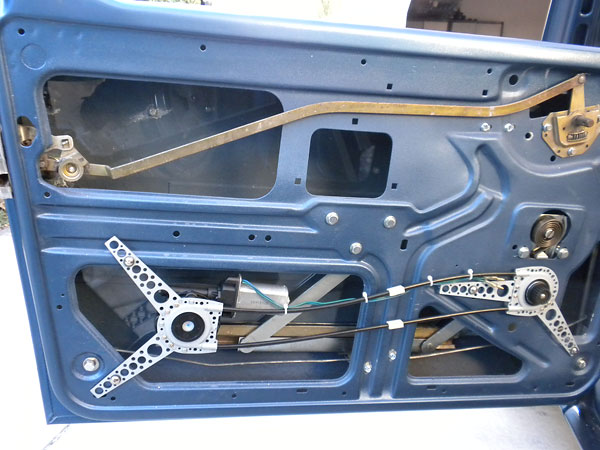
Mounting the SPAL power window kit in a Triumph TR6 door.
�
�
Power window switches mounted in the driver side door card.
�
�
Custom fabricated aluminum Triumph TR6 transmission cover and center console.
�
�
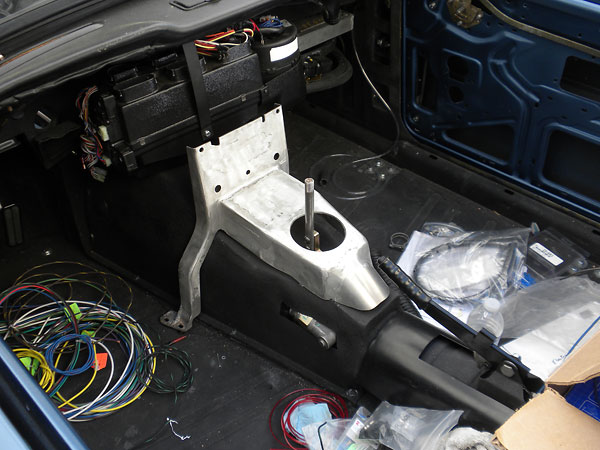
Installing the HVAC system and behind-the-dashboard wiring.
�
�
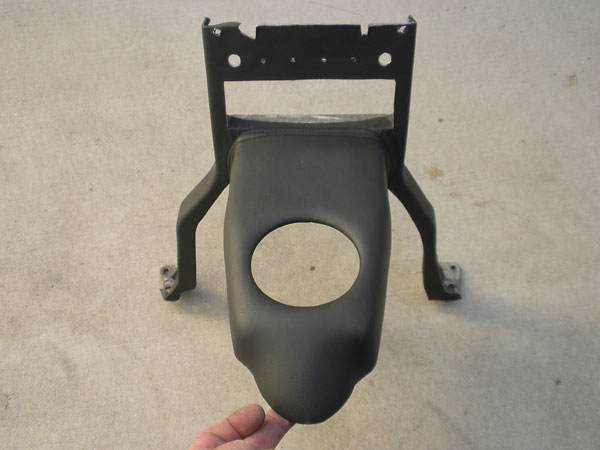
Upholstery wrapped center console.
�
�
Switches on the side surface of the center console are for electric seat heaters.
�
�
Cable routing.
�

�
Thin aluminum firewall between fuel tank and passenger compartment.
�

�
Rear speaker installation in the aluminum firewall.
�
�
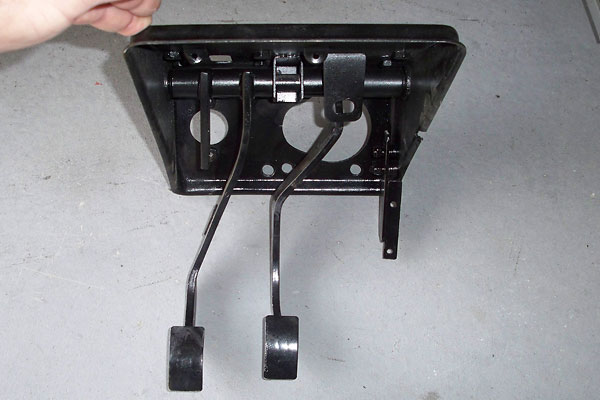
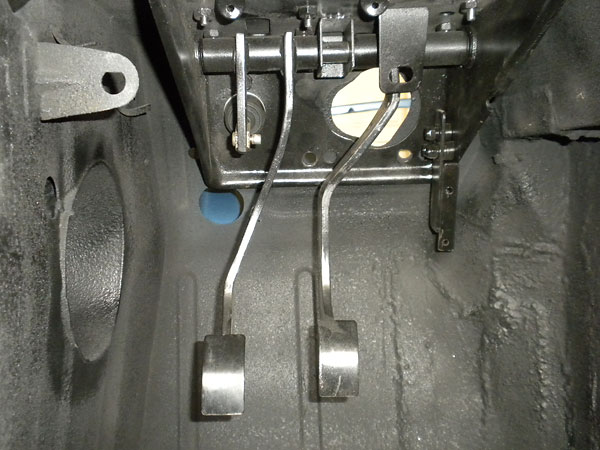
Modified Triumph TR6 pedal assembly with brake master cylinder shifted outboard 3/4" to make room
�
to package the steering shaft between the power brake booster and the LS1's driver-side valve cover.
�
�
Brake and clutch pedals have been shifted just a little bit to the left.
�
�
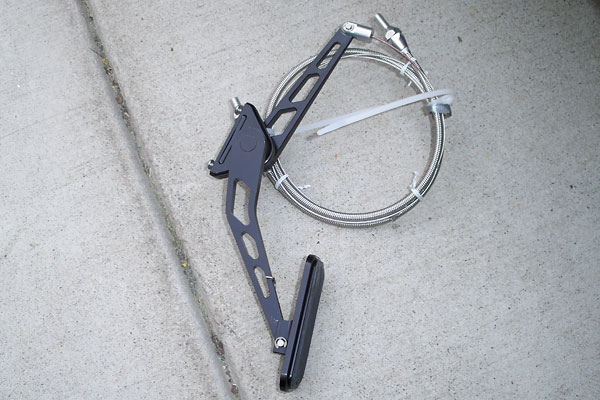
New cable-operated throttle pedal assembly.
�
�
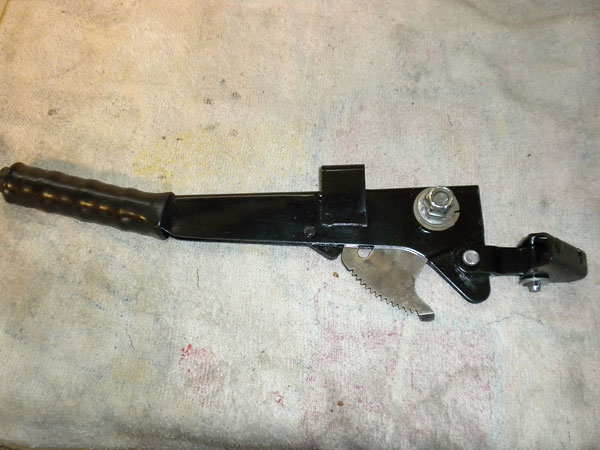
Restored parking brake lever. (A heat gun was used to remove and replace the grip.)
�
�
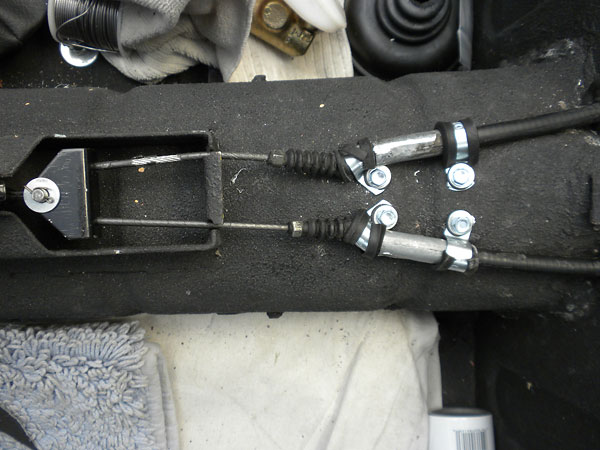
Nissan 240SX parking brake cables, connected to the Triumph TR6 lever and bracketry.
�
Interior
��
�
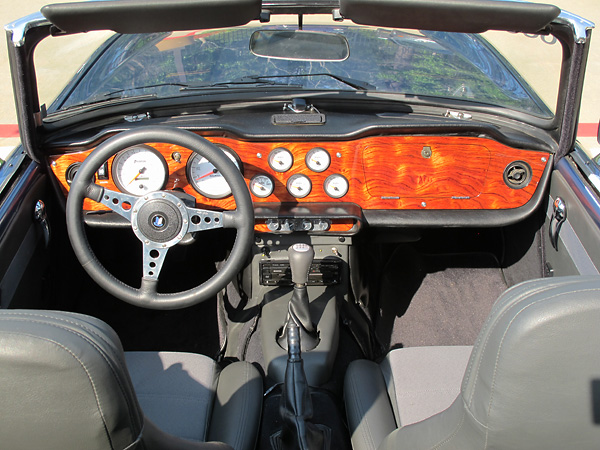
Custom dashboard made from Kewazinga African rosewood by Randy Keller of Prestige Autowood.
�
�
Leather wrapped Moto-Lita steering wheel.
�
�
AutoMeter Phantom II digital gauges (set of 7).
�
�
Early Mazda Miata seats with upgraded speakers in headrests and
�
with both upper and lower cushion electric seat heaters.
�
�
Custom upholstered door panels.
�
�
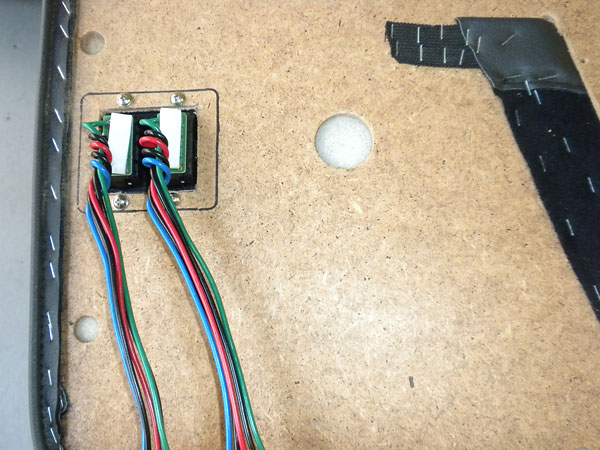
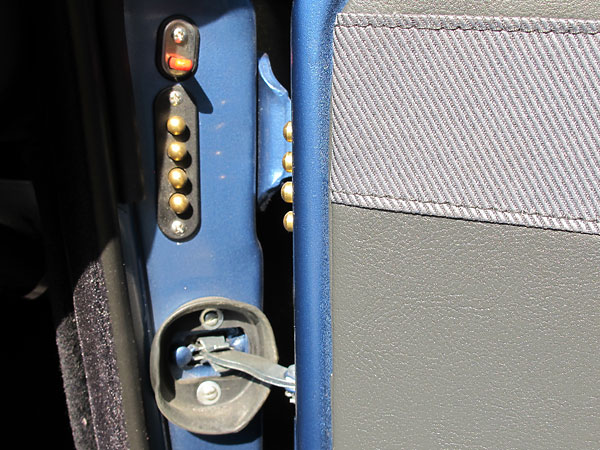
Four-pin electrical contact strips at the door jams for electric window circuits.
�
�
Enjoying this article? Our magazine is funded through the generous support of readers like you!
�
To contribute to our operating budget, please click here and follow the instructions.
�
(Suggested contribution is twenty bucks per year. Feel free to give more!)�
Bodywork and Paint
��

�
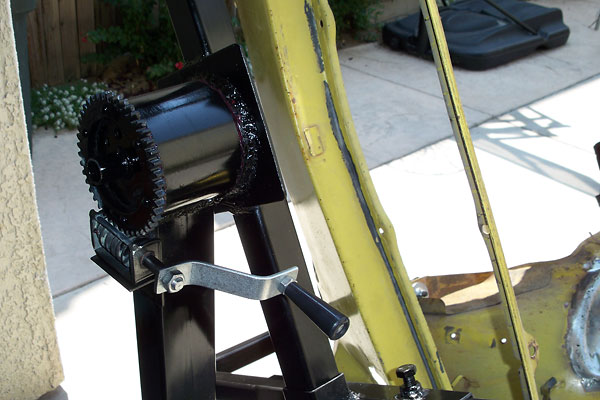
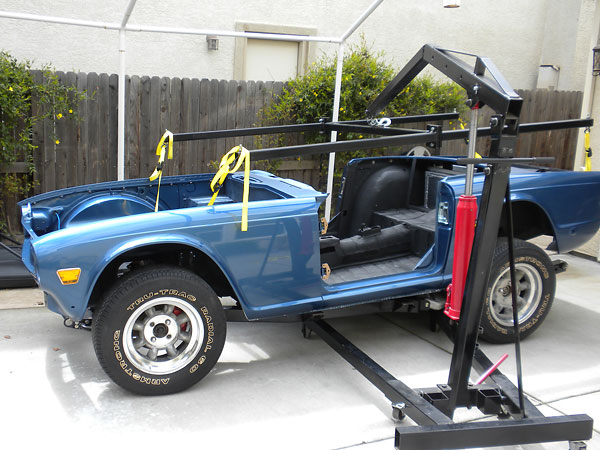
Modified hydraulic engine hoist and adapter frame for lifting/lowering the car's body.
�
�
A couple Sawzall cuts are sometimes needed rather early on in a project.
�
�
Having pieces in place can make it easier to come up with elegant bodywork solutions.
�
�
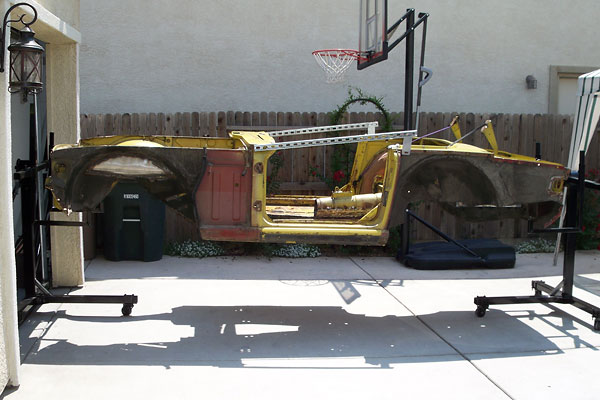
Calvin's home-made rotisserie.
�
�
(Instructions for building a similar rotisserie can be found by clicking here.)
�
�
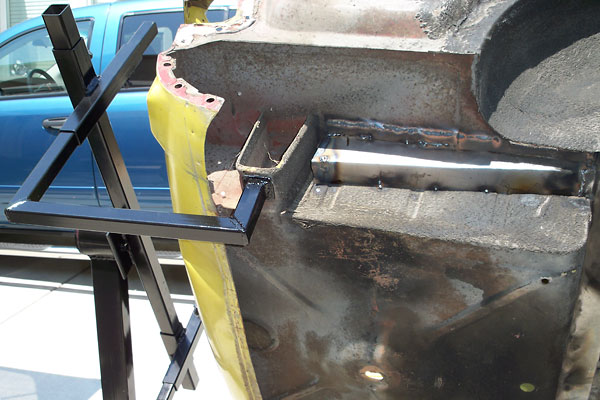
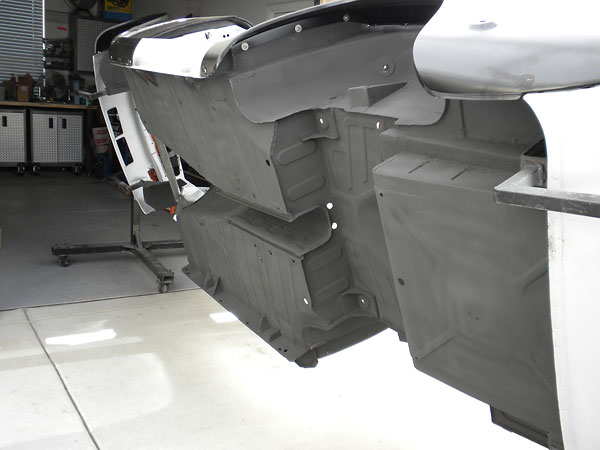
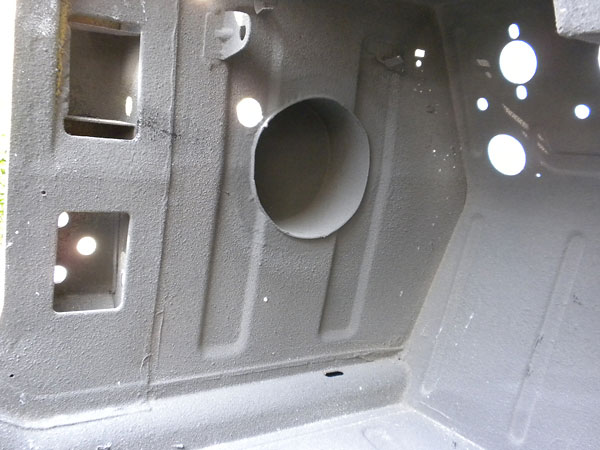
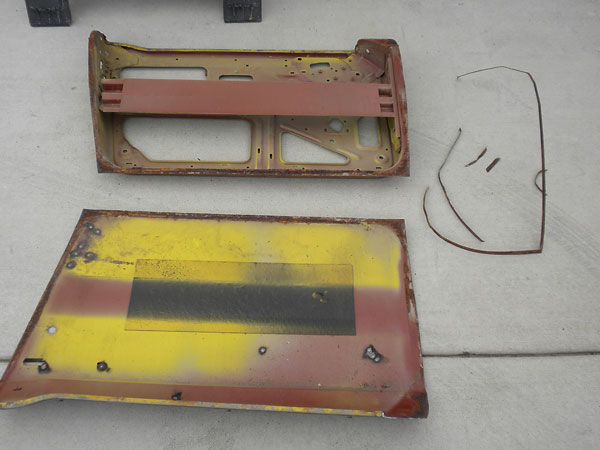
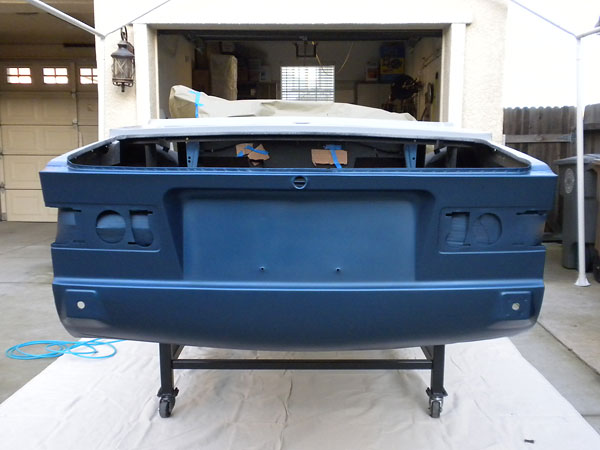
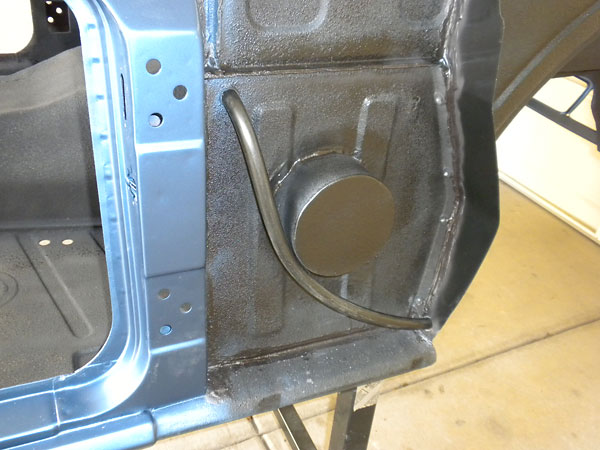
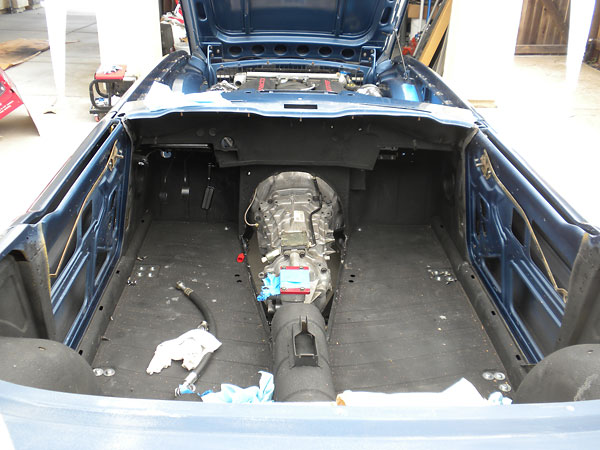
This view shows from the outside how Calvin modified his trunk floor so a
�
generously sized fuel tank can be slid into and out of position inside.
�
�
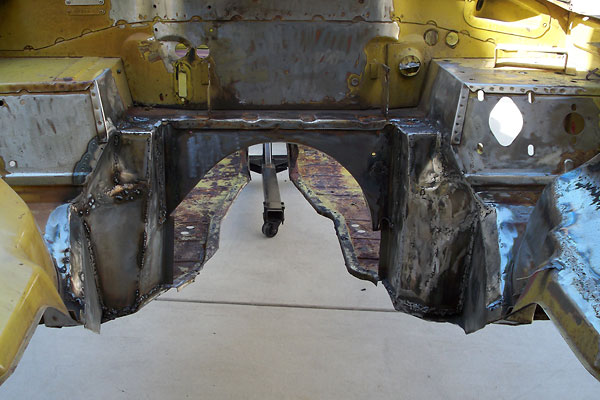
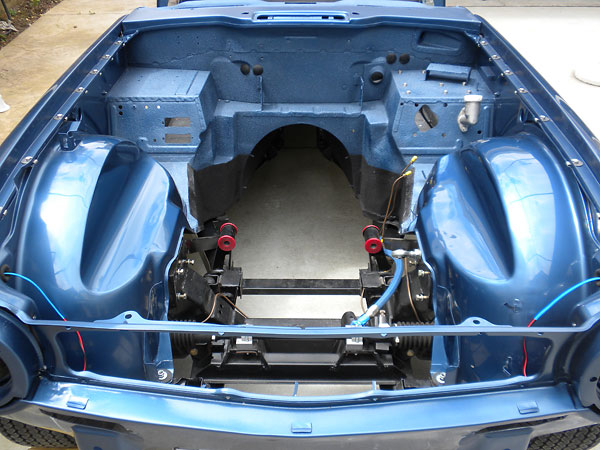
The firewall section that sits closest to the transmission bellhousing has been cut out
�
and shifter rearward far enough that the engine and transmission can be installed as a
�
bolted together unit. The original battery location is therefore no longer viable.
�
�
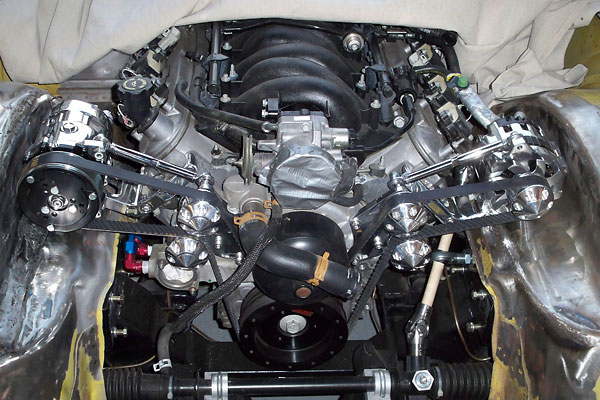
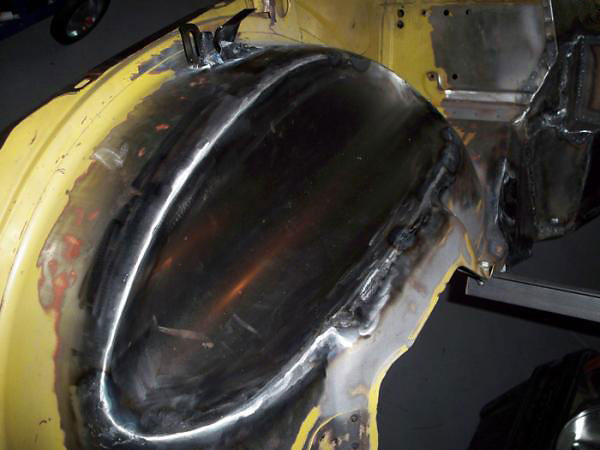
This photo shows a trial installation of the then-new Front Runner serpentine-belt accessory
�
drive system. There wasn't as much clearance on the air conditionion compressor side as
�
anticipated, so Calvin ended up cutting out that bodywork and re-doing it. (See next photo.)
�
�
Here's Calvin's second and much improved passenger-side inner fender modification. Halfway
�
through this project, Calvin bought a Miller Diversion 165 TIG welder. He found it easy to
�
use and that it dramatically improved his welding results. Less warpage. Less clean-up.
�
�
Lizard Skin spray-on sound control and ceramic insulation were applied to both interior and
�
exterior surfaces of just about every little part of the body except for the shiniest ones.
�
The company that markets Lizard Skin (Mascoat) claims it can reduce sound transfer by
�
twelve decibels or more and also engine and solar heat transfer by 30°F or more.
�
�
The Lizard Skin sound control product must be applied first, before their ceramic heat control
�
coating. Calvin strongly recommends buying Lizard Skin's own special sprayer kit for the job.
�

�
Footbox area speaker enclosure, viewed from outside.
�
�
Footbox area speaker enclosure, viewed from inside.
�
�
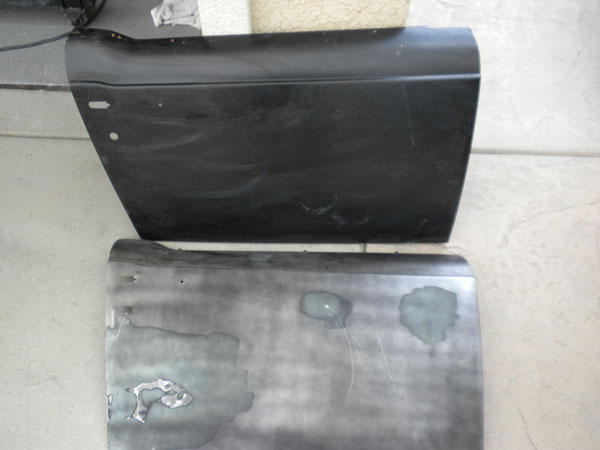
Removing an old, damaged door skin: the very edge is carefully ground away with a
�
side grinder and then the folded-over lip comes free and can be set aside.
�
�
A replacement door skin, pre-primed black, is shown here ready to install.
�
�
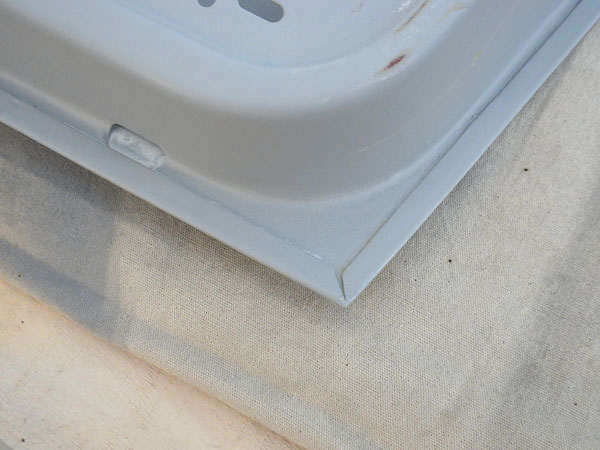
The new door skin is folded over and crimped tight down to the inner door assembly.
�
�
This is hammer and dolly work. The curved sections take a bit of finesse.
�
�
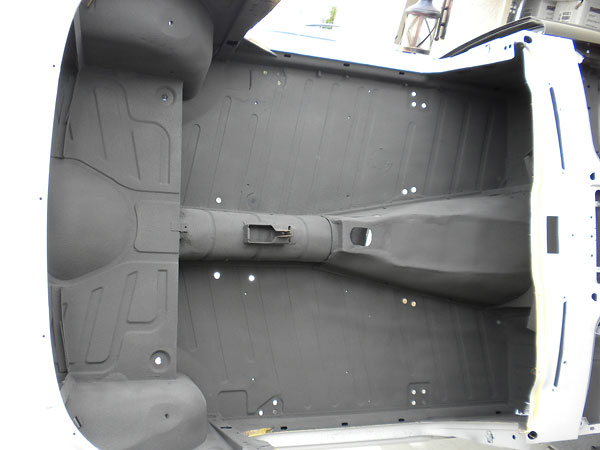
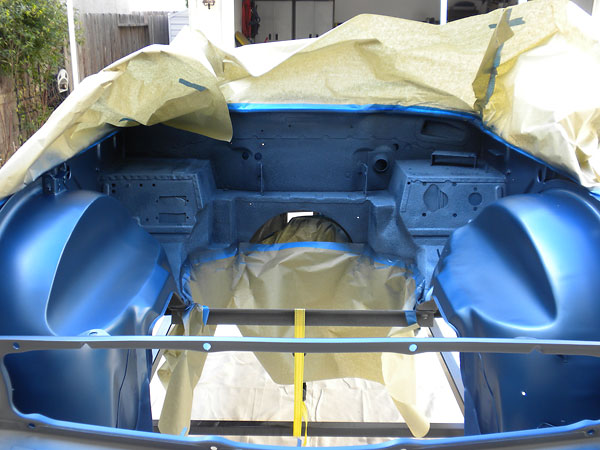
Finally, base coat paint has been applied to the engine compartment. Toward the rear,
�
you can see the textured surface where Lizard Skin was applied before the color coat.
�
�
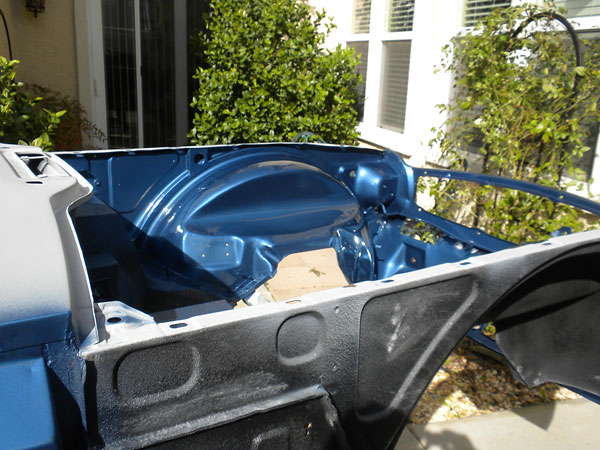
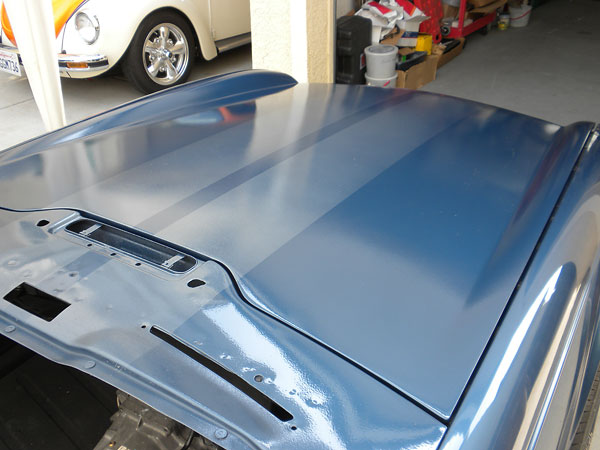
There's just a little bit of pearl mixed into this paint, but
�
the light is right in this view to bring out the effect.
�
�
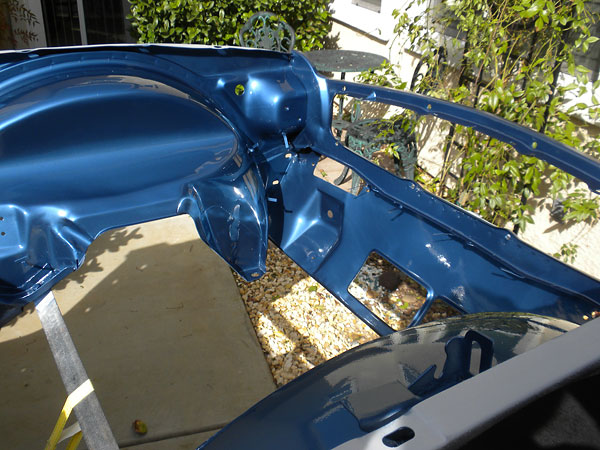
A detail spray gun and great care are required to do a nice job like this.
�
�
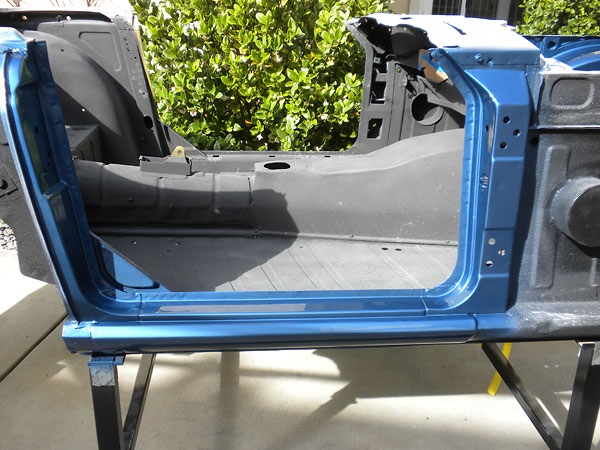
Don't take shortcuts when painting door jams. Quality really shows here.
�
�
Should the rear of a Triumph TR6 be painted body color?
�
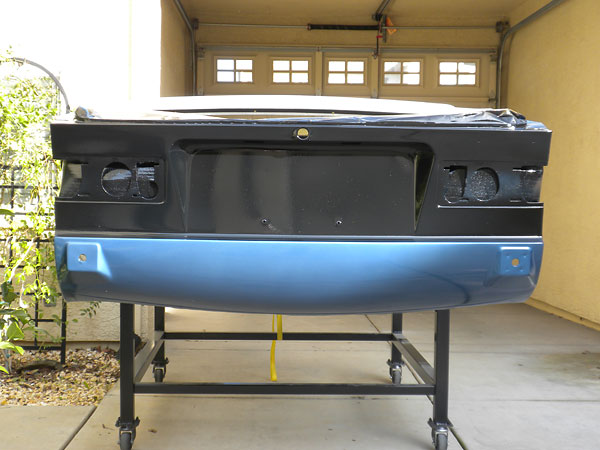
�
Calvin and Brenda looked at a lot of TR6s and decided they prefer gloss black.
�
�
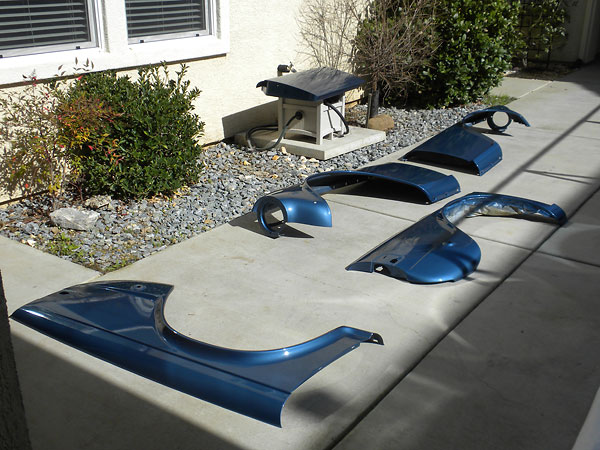
Painting individual panels off-the-car isn't so hard. Getting them all installed
�
and properly aligned will be another story.
�

�
Boot lid.
�
�
Curious about what Lizard Skin weighs? The sound control product weighs 26.6 lbs per two gallon
�
pale, and covers ~100 square feet. The insulation product weighs 11.8 lbs per two gallon pale
�
and covers 40 to 70 square feet. It could easily add thirty to forty pounds to your car.
�
�
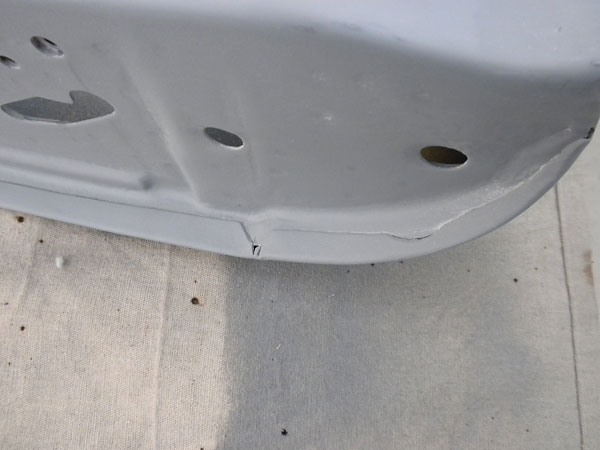
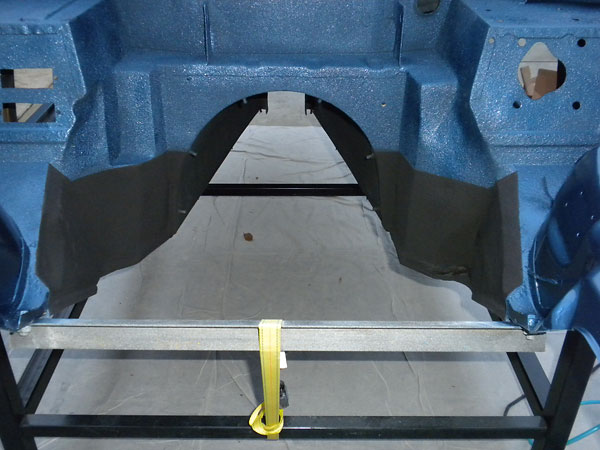
Calvin added a rubber drain tube on both sides. On a stock TR6, water
�
simply drips through a vent from the cowl area down onto the inner sill.
�
�
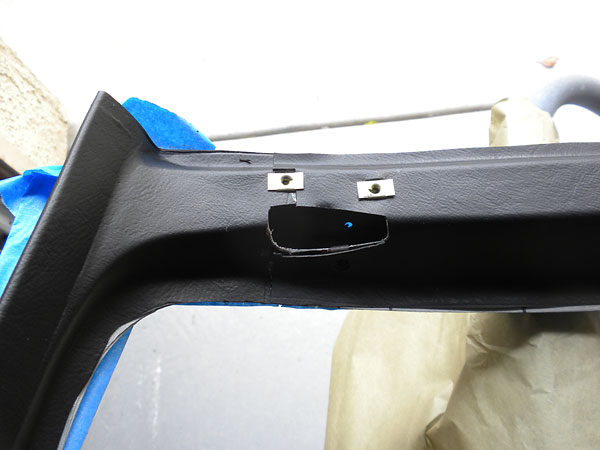
The inboard surfaces of the TR6 windshield surround are covered with
�
pre-formed vinyl that's held on with strong 3M spray adhesive.
�
�
Careful, now!
�
�
Comparing the two modified inner fenders, the drivers side was done with a MIG welder
�
whereas the passenger side was done with a TIG welder. The TIG welder transfers less
�
heat out into the sheetmetal and therefore causes less warpage.
�
�
The black paint at right is high-temperature rated. (It will be closer to the exhaust.)
�
�
With the newly painted body bolted down, final assembly will move along quickly.
�
�
PPG Atlantic Pearl Blue two stage paint with white pearl ghost stripes. The ghost stripes are base
�
paint but with no (blue) tint; white pearl was mixed-in instead. They're painted overtop two coats
�
of the regular (blue) base coat, and then two coats of clear coat were applied over everything.
�
Exterior
��
�
Calvin's exceptional Triumph TR6 V8 project was journaled in this message board thread.
�
�
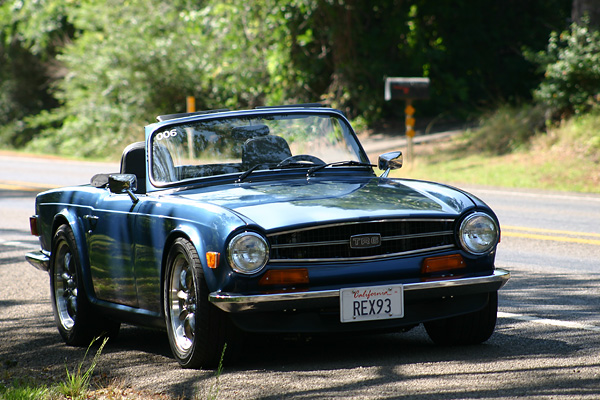
The British call this a "Q car". Nothing on the outside hints at what's hidden inside.
�
Who would guess that this Triumph TR6 puts over 400 horsepower to the ground?
�
�
Okay, maybe dual Monza 2.5"-to-4" glass-pack tailpipe tips are a subtle clue.
�
�
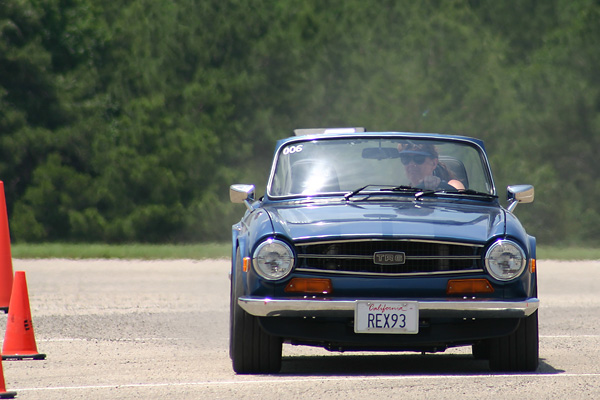
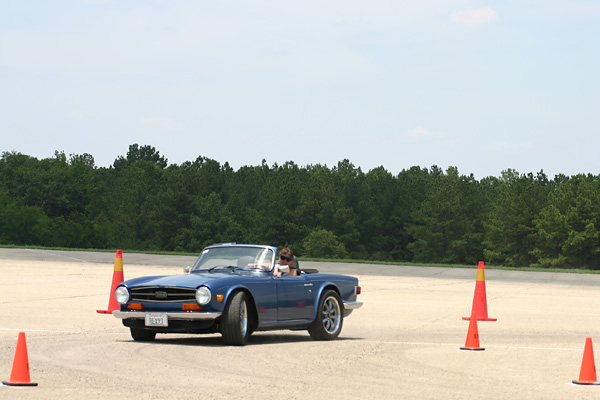
Brenda showed tremendous natural talent during the BritishV8 2012 autocross.
�
�
Smooth and fast at the same time.
�
�
Rota RB Hyper Black aluminum wheels (17x7.5, 4-100mm lug spacing, +45mm offset).
�
�
Yokohama S-drive w-rated 245/45R17 tires (~10" wide).
�
� Generally, photos showing the course of this project are by Calvin Grannis.� Photos by Calvin have three-letter codes in their file names.� Photos showing the completed project are by Curtis Jacobson.� Photos by Curtis have two-digit codes in their names.� The two action photos (above) were taken during the BritishV8 2012 autocross by Jim Watson.� All the photos are copyright protected. Please contact BritishV8 to arrange permission before reproduction.�
�