
�
�
How To: Upgrade your Triumph TR6 with Rear Disc Brakes
� as published in BritishV8 Magazine, Volume XVII Issue 1, July 2009�� by: Don Watson, with Calvin Grannis�
�
�
Is the search for rear disc brakes the Holy Grail of Triumph TR6 modifications? �
It may not be a discovery that Indiana Jones would be willing to die for, but �
it's definitely a challenging quest. This article is about my personal quest, �
and especially about my solution to the vexing challenge. But before we leave �
the subject of dying, please note that this is not a conversion to do on the �
cheap or to take lightly. Read and heed the strongly worded disclaimer at the �
end of all BritishV8 brake modification articles. �
�
My quest for the TR6 Holy Grail started with the simple event of doing a rear �
brake job. You know: simply pull the drum, clean the dust out, replace the shoes, �
turn the drum, check and if necessary rebuild/replace the wheel cylinders, then �
reassemble. Well, I don't know about you, but after 30 years of playing with �
cars I have a lot of scars on my hands. Sometimes I think that most of these �
have been from brake jobs. Drum brakes tend to be a maintenance pain in both �
a figurative and literal sense. A routine brake job on my 1974 TR6 initiated �
my world wide quest for a rear disc brake conversion. �
�
�
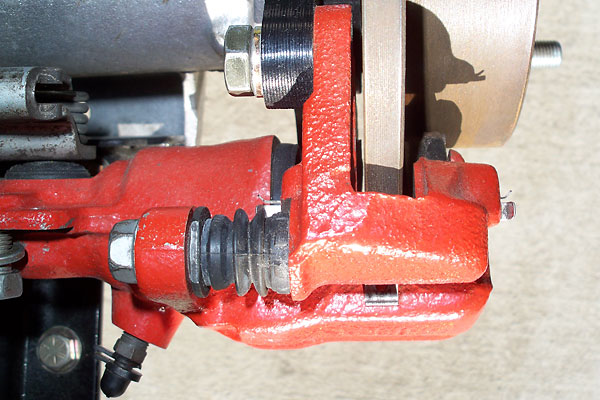
Datsun 240z rear disc brake conversion kit, as purchased from Modern Motorsports.
�
�
The Datsun Z family of cars did have a similar style system, but like Indy's �
hat, it will not fit me or my purpose. Looking at web pictures, reading forums, �
finally got the best of me. I prefer to learn by doing. I need to experience �
with hands on, so I purchased a 240Z rear brake conversion kit from Modern �
Motorsports, with the hope of making some modifications to their brackets. �
From this, I hoped to develop my own version of rear disc brakes for the TR6. �
�
Like the sting of Indy's whip, I learned that the Z's used a different hub �
mounting and hub diameter. The brackets were of a 3 bolt semi-arch design to �
fit on the outside of the Z hub housing. This will not work on the TR6 unless �
you are going to design a very large offset to the bracket, which would weaken �
the bracket. Still, the calipers would work and the hands on experience got me �
motivated.�
�
 �
�
�
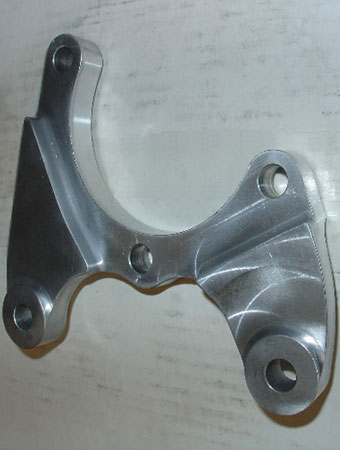
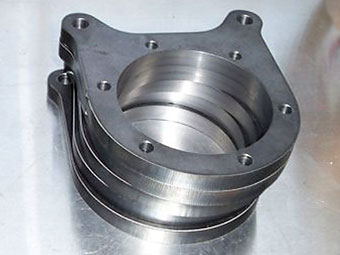
� So here is what I did. My first move was to locate and purchased a used TR4A � or TR6 swing arm so that I could mock up the disc brake system without taking � my baby off the road for an extended amount of time. I found them dirt cheap � on eBay as no one in my local club had a spare one. Keep in mind that this is � just for mock up so the condition does not need to be great. Only the hub face � and housing need to be good. This allowed me to mock up everything, measure � and have prototype brackets made from CAD files by The Columbus Machine Works, Inc. � in Columbus, Ohio.�
��
�
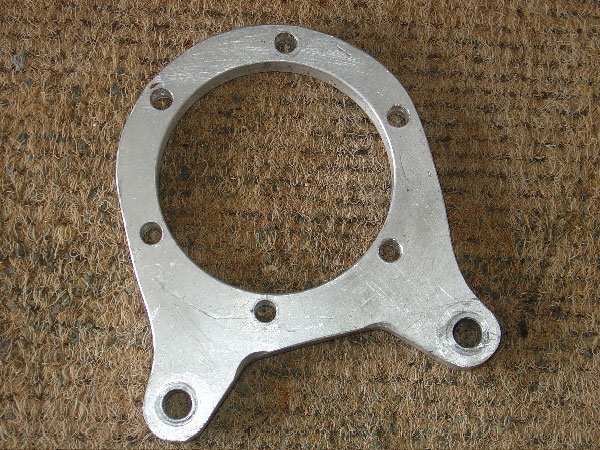
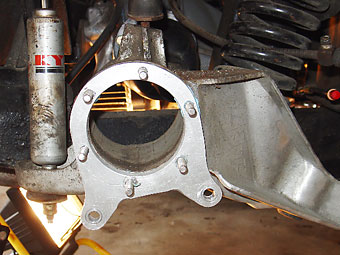
Prototype TR6 rear brake caliper brackets were made for me by The Columbus Machine Works, Inc.
�
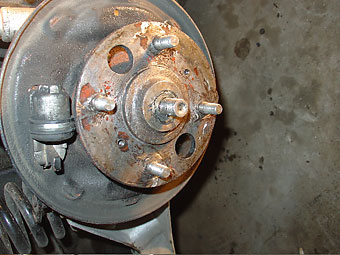
� I removed the rear wheel, drum and disconnected the emergency brake cable � followed by removing the brake shoe springs, clips, and rotating the wheel � facing to get access to the hub nuts. �
��
�
� Once the brake shoes, springs, clips, etc., are removed the hub, the half � shaft pull right out. Pay close attention to any play or slop in the hub � then replace or rebuild if necessary, A note of caution on this as it should � be done by a qualified shop with the proper tools. I replaced the u-joint � now, while you have real easy access.�
��
 �
�
�
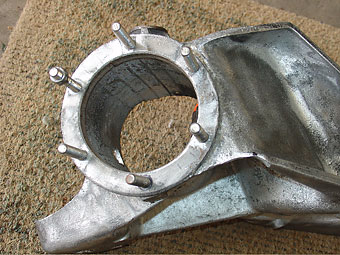
� Next the dust plate can be removed as well as the stock studs. You will notice � that the stock TR6 studs are two different threads, fine and coarse, and about � 1.5" in length. The brackets are a half inch thick, so new 2" studs are needed. � The swing arms are aluminum, so to prevent galvanic corrosion I used three-eighths � inch stainless steel studs. Some conversions suggest heli-coils for strength. � Make sure that when you install the studs that they are perfectly square and centered.�
��
 �
�
�
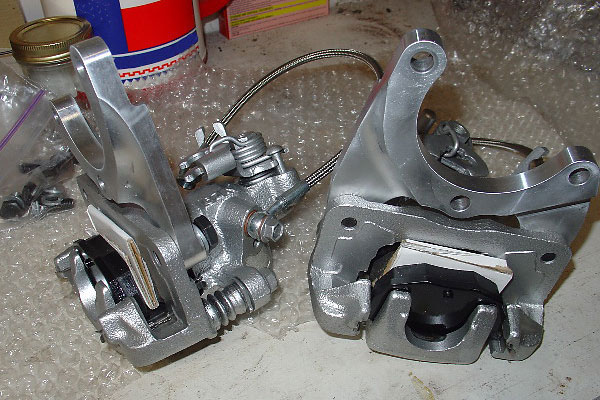
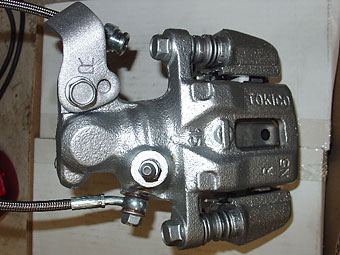
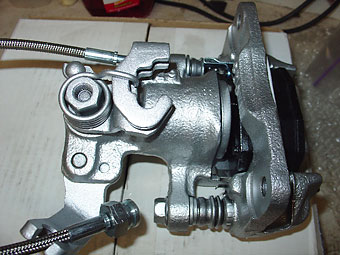
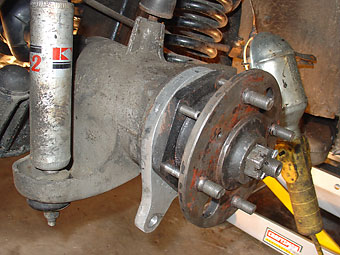
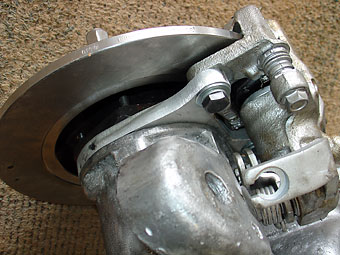
� The brackets were made to fit 1981-84 Nissan Maxima calipers with hardware. � If you buy similar calipers, make sure to note whether mounting hardware � is included. Apparently some sources include them and some don't. In the � righthand picture below, you can see the additional plate that the calipers � float on. �
��
 �
�
�
�
These calipers have an integral, cable operated emergency brake, and specicifically �
it's a "short pull" brake. Other models have an "extended pull" e-brake. Also note �
that Nissan apparently used several different makes and models of calipers. I �
understand that some 1981-1983 200sx/240sx calipers may suit our use. �
�
Brakes are a system, so I don't recommend mixing new and old components. I replaced �
all the brake lines, T-fittings, etc., and I used new braided stainless steel hoses �
to the calipers. �
�
 �
�
�
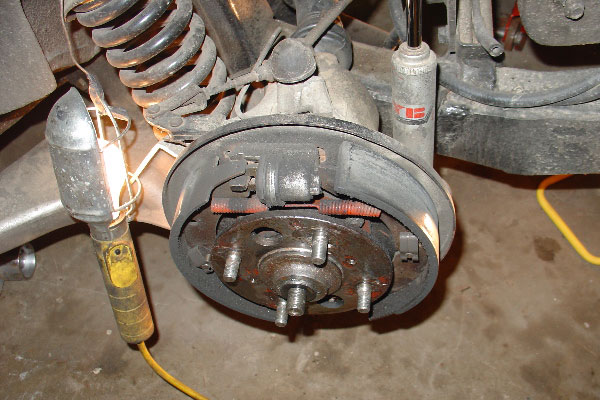
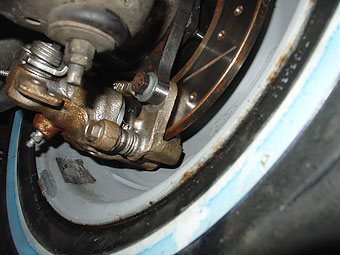
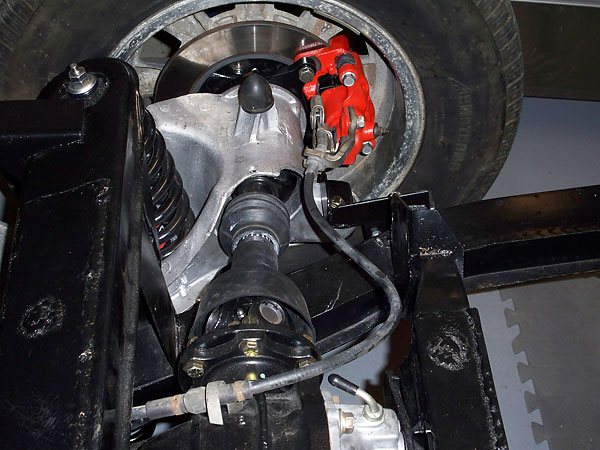
� I chose not to modify or fabricate for coil-over shock absorbers, and instead � kept my front positioned springs with converted gas shocks mounted on the rear � of the swing arm. There are some really nice works out there by others as � referenced before. But I have a two car garage, limited shop tools, limited � work space, and limited funds. To avoid conflicts with the shock, spring, and � bump stops on the swing arm, I chose to mount the calipers under the swing arm � (i.e. at "six o'clock"). If you mount yours similarly, keep in mind that you'll � need to bleed the caliper in an upright position because air bubbles don't like � to flow downhill. �
��
Enjoying this article? Our magazine is funded through the generous support of readers like you!
�
To contribute to our operating budget, please click here and follow the instructions.
�
(Suggested contribution is twenty bucks per year. Feel free to give more!)�
�
 �
�
�
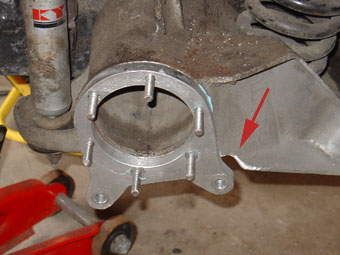
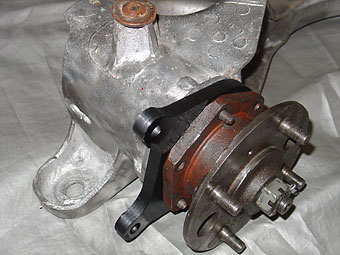
� Now, with studs in place, the nest step is to install the brake brackets onto � the swing arms. Please note that a little modification may be needed to improve � serviceability. See the bracket's front mounting ear and the swing arm position � is very close and will prevent access to the mounting bolt head with a socket. � I used a grinder to remove just enough material from the swing arm to allow � access with a socket. Don't cut into the hub housing! Next, I installed the hub, � new u-joint, and half shaft. I tightened the stud nuts to Triumph torque specifications. �
��
 �
�
�
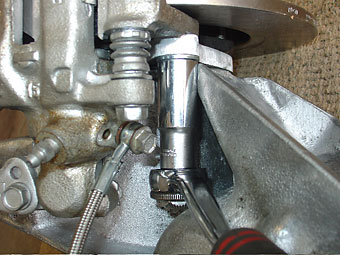 �
�
�
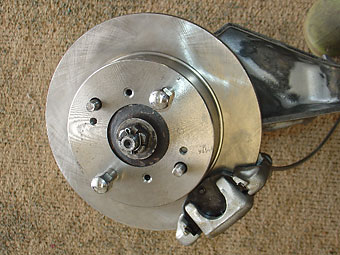
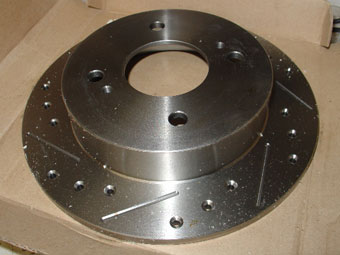
� I next sourced a set of 1992 Nissan 240sx rotors (4x100mm lug pattern). Their � outside diameter is 258mm, and their hat height is 47mm. I had to have the � central hole enlarged 0.40" to fit the TR6 hub. I also had to re-drill and � recess the rotor retaining holes for the 2 screws that keep the rotor attached � when removing lug nuts and wheel for servicing. (Ultimately, after going through � the whole process with regular rotors, I decided to upgrade to drilled and � slotted rotors for looks. Now I have to buy something else: new drilled and � slotted rotors for the front!)�
��
 �
�
�
�
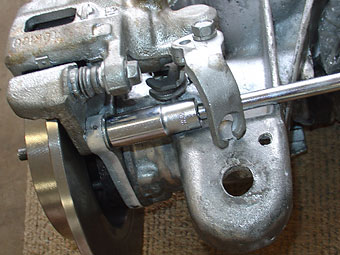
I installed the calipers, remembering to first bleed the system with the calipers �
upright. (This can alternatively be done by either rotating the caliper around to �
the top of the rotor or by temporarily putting a half inch thick metal spacer �
between the brake pads. Without some sort of spacer, the pistons would hyperextend �
from their cylinders.) �
�
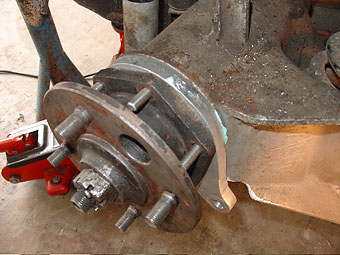
The next step was to connect the emergency brakes. I used a Lokar emergency brake �
cable assembly. They're made to be cut to length, and they come with simple instructions. �
�
 �
�
�
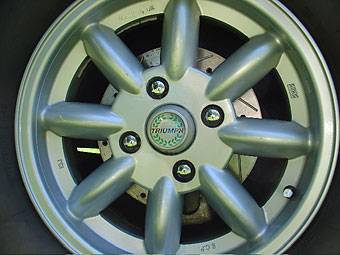
� I run 15"x7" Panasport wheels, with 3.9" backspacing (i.e. zero offset, nominally. Stock � TR6 steel wheels are 3.5" backspace / +12mm offset.) Since I don't have a fifth Panasport � wheel, I use a steel wheel for my spare tire, so I made sure to check for clearance with � both wheels.�
��
 �
�
�
�
I've received several e-mails about using this type of bracket on the top side of �
the swing arm. If you don't want the emergency brake function, you might be able �
to rotate and flip the bracket to face the rear of the swing arm, and then use a �
caliper that doesn't have the bulky emergency brake mechanism. However, you might �
still run into conflicts with the rear shock absorber mounting, if you run gas �
shocks. You might also run into conflicts with a rear sway bar system.�
�
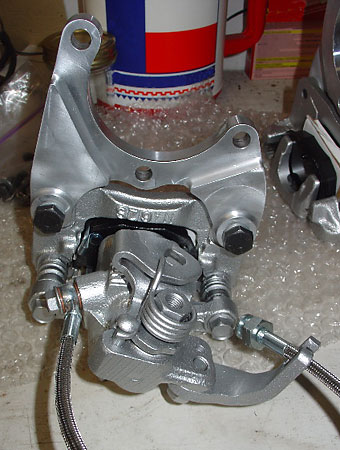
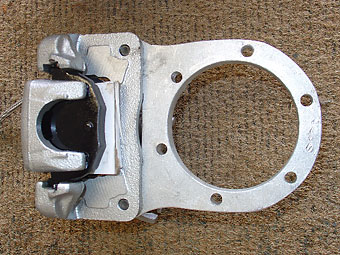
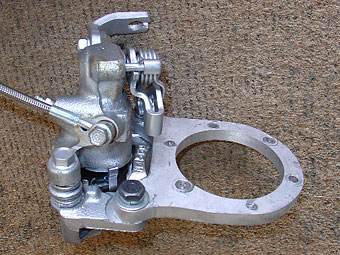
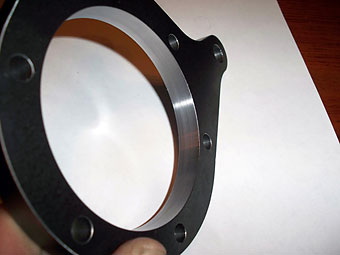
Note: when I mocked up the brackets, the first CNC pass was with aluminum. The black �
bracket, shown at left below, is the final version in half inch steel for additional �
strength.�
�
 �
�
�
� The motivation for this article is for us, collectively, to give something back to � the BritishV8 and Triumph community that has given so much to us. Through How-to's, � "been there done that" emails, technical forums, and lessons learned, we have all � benefited from the collective knowledge of our fellow enthusiasts.�
��
�
�
Calvin Grannis Continues the Story...
��
I purchased a set of caliper mounting brackets from Don, and needed to source �
brake calipers locally. As he explained above, Don had bought an aftermarket kit�
from Modern Motorsports that's marketed for converting an old Datsun 240Z to disc �
brakes. Don assumed that the calipers included in the kit were from a Nissan 240SX, �
so I went to a local recycling yard and picked up a set of 240SX calipers and brackets, �
complete with the emergency brake cable. When I got home it didn't look right to me �
and the calipers wouldn't bolt-up to the brake brackets. I went back the recycling �
yard to hunt for the right brake calipers and brackets.�
�
I found a 1987 Nissan Maxima had calipers which would work for me, and with a little �
additional research I can add an additional caveat: apparently there is an "earlier" �
and a "later" style of caliper for a 1987 Maxima! The change occured in March of that �
year. I don't know the full extent of the change, but the earlier design has fewer �
internal parts. �
�

�
�
I used 1992 Nissan 240sx rotors. On the inner hole that goes over the hub, I had �
to take off about 68 thousandths of an inch. I just took the old Triumph�
drums and the new Nissan rotors to someone with a lathe, and had them match the�
rotor diameter to the drum diameter.�
�
Another small difficulty had to be overcome. The emergency cable brackets on the �
Nissan Maxima calipers was pointing upward towards the body. I found that the cable �
brackets on the old 240SX calipers would install on the Maxima calipers and this�
fixed the problem in short order. The 240SX brackets redirected the emergency brake �
cables so that they pointed toward the differential. �
�
I ended up using the used Nissan 240SX emergency brake cable. �
�
Since they were used and of unknown history, I rebuilt both Maxima calipers. Upon �
close inspection, I noted at this time that the Maxima calipers have a bigger piston �
than the 240SX calipers. �
�
 �
�
�
�
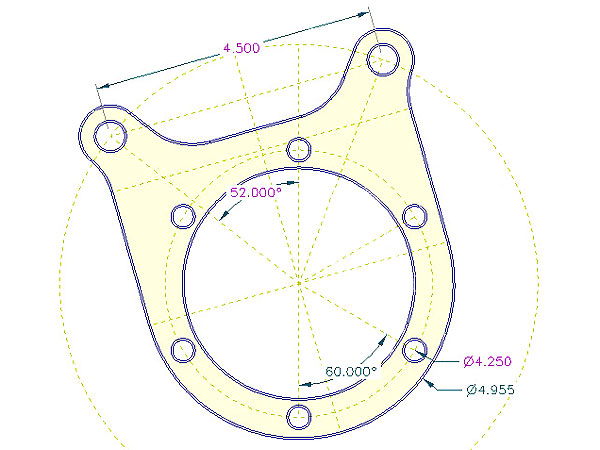
CAD files for making your own brackets are available free for the asking! Just use the BritishV8 message
�
board's private message system to contact Don Watson �
("dwtr6v8") or Calvin Grannis �
("74ls1tr6").�
� Disclaimer: This page was researched and written by Don Watson and Calvin Grannis. � Views expressed are those of the authors, and are provided without warrantee or � guarantee. Apply at your own risk. Neither the author nor BritishV8 make any � warrantees or representations regarding the use of the materials in this website � in terms of their correctness, accuracy, adequacy, usefulness, timeliness, reliability � or otherwise. BritishV8 shall not be liable for any special or consequential damages � that result from use or inability to use, the materials on this website or the performance � of the products. Brakes are critically important safety equipment. If you're � uncomfortable working on brake components, take the work to a qualified professional.�
� Photos by Don Watson and Calvin Grannis for BritishV8 Magazine. All rights reserved. �
