�
 �
�
�
�
�
�
�
�
�
�
 �
�
�
�
 �
�
� by: Larry Shimp�
� The suspension comes in several forms with several options. Simplest is the front, � where the only option is polyurethane or MGB V8 rubber bushings (or no bushings at � all, owner supplied). I choose to have the MGB V8 rubber bushings factory installed. � The rear suspension comes almost anyway you want. It can be a complete, assembled � unit, or just the just the fabricated components. In England and Europe the ready � availability of Ford Scorpio/Sierra parts makes the incomplete form a viable option. � Here, parts are so hard to find, I went with the full assembly. If you do buy just � the kit, at least get the optional shortened and rebuilt half-shafts, and the � custom hubs and brake rotors, then everything else is stock Scorpio stuff. I choose � the 3.38 ratio Scorpio V6 limited slip differential. Other differentials and ratios � are available, but be wary of the 4 cylinder differentials because they are too weak � for a V8. The strongest differential is the Cosworth unit, but its ratio is too low � (about 4:1). However, the V6 differentials are strong enough for most applications. � They are used successfully in Scorpio/Sierra, Ford and Rover V8 conversions in � Britain and Australia, and these cars are significantly heavier than MGB's. Hoyle � sells used, rebuilt differentials. They come painted in a silver aluminum color and � not the natural factory finish. If you care, I suppose the paint can be removed and � the underlying metal cleaned up.�
�
�
�
�
�
�
Hoyle Suspension Upgrades for the MGB
� as published in British V8 Newsletter, Volume XIII Issue 1, January 2005�� by: Larry Shimp�
� The suspension comes in several forms with several options. Simplest is the front, � where the only option is polyurethane or MGB V8 rubber bushings (or no bushings at � all, owner supplied). I choose to have the MGB V8 rubber bushings factory installed. � The rear suspension comes almost anyway you want. It can be a complete, assembled � unit, or just the just the fabricated components. In England and Europe the ready � availability of Ford Scorpio/Sierra parts makes the incomplete form a viable option. � Here, parts are so hard to find, I went with the full assembly. If you do buy just � the kit, at least get the optional shortened and rebuilt half-shafts, and the � custom hubs and brake rotors, then everything else is stock Scorpio stuff. I choose � the 3.38 ratio Scorpio V6 limited slip differential. Other differentials and ratios � are available, but be wary of the 4 cylinder differentials because they are too weak � for a V8. The strongest differential is the Cosworth unit, but its ratio is too low � (about 4:1). However, the V6 differentials are strong enough for most applications. � They are used successfully in Scorpio/Sierra, Ford and Rover V8 conversions in � Britain and Australia, and these cars are significantly heavier than MGB's. Hoyle � sells used, rebuilt differentials. They come painted in a silver aluminum color and � not the natural factory finish. If you care, I suppose the paint can be removed and � the underlying metal cleaned up.�
�
�
I bought the Hoyle suspension, both front and rear, before there were any US distributors �
(and the dollar-pound exchange rate was lower). I understand that the front suspension, �
but not the rear, is now available in the US. When I ordered the suspension I had three �
delivery options: by sea delivered to my house; by air delivered to my house, and by air, �
where I arrange customs clearing myself. The latter was the least expensive option and �
the one I chose. After the shipment arrived at Kennedy airport (outside of New York) I �
spent a day dealing with the customs bureaucracy. The suspenseful part was awaiting the �
decision on the import duty: if the inspector believed the parts were for my own use, �
the fee was a nominal $20, if he believed the parts were for resale, then the duty was �
a substantial percentage of the purchase price. Luckily I only had to pay the nominal �
fee. To get the parts home (nicely packed in two crates) I had to borrow a friend's �
pick-up truck. Unloading at home required an engine hoist.�
� �
�
�
�
�
�
�
� Be sure that the curved plates are set far enough back to clear the springs on full � compression. As the springs are compressed, they move inward. Without driving the car, � it is impossible to compress the springs fully to check this, so if in doubt, be � generous with the clearance.�
��
�
� Assembly of the suspension is quite similar to the stock MGB suspension, but even easier � because the springs are already attached to the shocks and no spring compression steps � are needed.�
� There are adjustments for camber (easily adjusted by turning a bolt), toe in, sway bar � side to side preload, and, as with the rear, the spring height and shock damping are � adjustable.�
� Ride height: I have a chrome bumper car but I made the usual conversion to a rubber � bumper front cross member. With all the springs set at the lowest level, the car sits � at a heightabout at the stock chrome bumper ride height. Lowering the car further would � require changing the springs. The springs used are standard 2 1/4 inch diameter racing � springs. According to John Hoyle, all the springs have a rate of 300 pounds/inch, but � the front ones are 9 inches long, while the rear are 10 inches long. What would be � required is to put 8 inch long 300 pound springs on the front and put the front springs � on the rear. However, this really does not seem necessary, and will probably cause � exhaust clearance problems. Aside from changing springs, the spring height can be � adjusted using a standard spring seat spanner wrench. �
� Both springs and adjusting tools are available from, for example, Pegasus Racing � (www.pegasusautoracing.com).�
� Performance: Although I've had the suspension for over 4 years, I have only used it � this year, and with more experience and experimentation, I will be able to improve � the settings. (I have been trying for 5 years to get the car painted and have now given � up. I just assembled the car and drive it, even though it looks like hell. The turning � point was when the last body shop smashed up the front while trying to move the car � into the paint booth). At this point I have about 5500 hundred miles on the suspension � and I am very pleased with it.�
� I noticed that the front of the car was very civilized, but the rear seemed very � harsh. In ordering the kit I specified MGB V8 bushings in the front, but only � polyurethane bushings were available for the rear. Thinking that the urethane � bushings were the cause of the harshness, I replaced the rear urethane bushings with � V8 rubber bushings. These fit perfectly except that the retaining bolts are smaller � in diameter than the holes in the bushings. Therefore I had to make sleeves to go over � the bolts. The change to rubber bushings was well worth it and gave a dramatic � reduction in both road noise and ride harshness. I can now see rough spots in the � pavement, but not feel them. In addition, steering responsiveness seems unchanged.�
� The disadvantage of the rubber bushings is that they will eventually wear out, while � the urethane bushings should last forever. While I am very happy with the rubber � bushings, that may be because my car is a GT, and in a roadster, the difference � between urethane and rubber bushings may not be as noticeable. �
� �
�
� The unit installs easily. To get working room it is necessary to remove the fuel tank. � Also, be sure that the upper rear mounting tab on the differential is cut off. It is � not used, and if left in place it will hit the trunk floor. Begin installation by first � attaching the main assembly using the existing shock mount holes in the frame. Shims are � supplied to compensate for production variations in the frame rail spacing. The next step � is to loosely attach the arms that extend from the front spring mounts to the suspension � frame. I found that the arms were a long way from reaching my suspension frame so I had � to buy longer bolts and use a generous amount of washers. When changing hardware be aware � that all of the threaded fasteners on the suspension assembly itself are metric. Once � these steps are completed, drill holes through the limit strap brackets on the frame into � and through the tabs on the suspension assembly. Then install the bolts, being sure to � use the aluminum spacers between the bracket ears.�
� It helps to "preload" the suspension bolts to prevent slight movements that make a � creaking noise every time the car begins to move. To do this, first remove the bolts � from the spring mount arms to the suspension frame, but do not loosen any of the bolts � holding the suspension frame to the shock mount holes or to the rebound strap hole. � Then jack up the car by the rear of the suspension frame. Even with the tight bolts � this will cause the front of the frame to move slightly away from the spring mount � arms as the frame settles. Gather enough washers to take up all of the space between � the arms and frame, then insert and tighten the arm to frame bolts.�
� �
�
� With the basic assembly in place, the drive shaft measurements can be made. Be sure � to leave about 1/2 to 3/4 of an inch clearance between the transmission drive yoke � and the rear of the transmission housing. Finding a rear yoke to mate to the pinion � flange is very difficult. The Ford cars used factory balanced drive shafts that were � not rebuildable. Even now, replacements are only available as complete assemblies. I � found that Cannon Drive Shafts (10921 Chandler Boulevard, North Hollywood, California � USA 91601. Phone: (818) 508-0123. E-mail: 1.drive@cannonengineering.com) had access to � the proper yoke and could make up a shaft to my specifications. This they did in a few � days at a very reasonable price. Be sure to specify a shaft diameter no larger than � 1 3/4 inch, otherwise the shaft will not clear the parking brake mechanism. If you want � a local shop to build your drive shaft, be sure to order a rear flange from John Hoyle � along with the suspension kit.�
� Important! Earlier I put a rubber bumper shaft tunnel plate at the rear of my � driveshaft tunnel. This turned out to be fortunate because if you leave the smaller chrome � bumper plate on your early car, it appears it would be necessary to remove either the rear � suspension assembly, or the engine and transmission, to install or remove the driveshaft � from the tunnel.�
� Parking Brake: The suspension kit includes cables and fittings to connect up the parking � brake to the existing MGB lever. My kit had no instructions, but the construction was � obvious. A clamp is installed at the rear of the tunnel to hold the outer cable sheaths, � and then an equalizing plate installs on the existing MGB brake lever rod and holds the � inner cable ends. Adjustment is the same as with the stock system. However, the brake only � works on the disk pads, not a separate internal drum as most cars now have, and so the � brake holding action is feeble. Be sure to run the brake cables where they will not � get damaged and fasten them as needed with tie wraps.�
� �
�
� Road Brakes: Very long stainless brake hoses are supplied. These can be connected to the � MGB brake pipe T, but the T must be relocated to a point near the front top of the � suspension frame. I used flare-to-AN adapters to fit the hoses to the T. Be very careful � to run the brake hoses where they will cause no damage. I tied them down where it seemed � necessary using tie wraps over small pieces of rubber hose placed on the brake hoses � as cushions.�
� Tightening suspension fasteners: A general rule is that nothing on the assembled suspension � is fully tightened. Check all nuts and bolts, including the large nuts holding the hubs in � place. As with any suspension, do not tighten the actual joint bolts until the suspension is � compressed to its normal ride height. However, with the standard urethane bushings in all of � the A-arm pivot points, this becomes less important.�
�
�
�
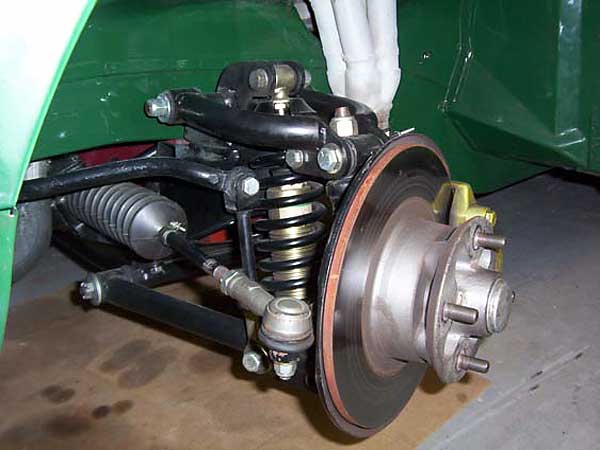
Front Suspension
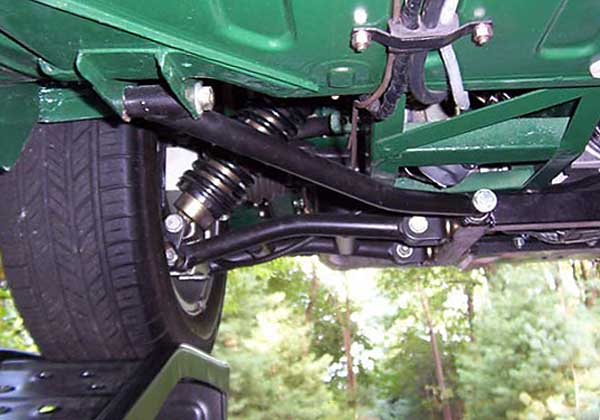
� The kit uses the stock cross member (with modifications), the spindle assemblies and the � lower A-arm pivots. All the rest of the parts are custom, and like the rear, are mainly � powder coated steel tubing.� Unlike the rear suspension, some fabrication is required to assemble the front suspension. � To clear the shock/spring assemblies, the ends of MGB cross member must be cut off and � the supplied curved plates welded in. This is very easy because the metal is so thick. � Just turn the welder current up� and have at it. There is no chance of burning holes as with body sheet metal.�� Be sure that the curved plates are set far enough back to clear the springs on full � compression. As the springs are compressed, they move inward. Without driving the car, � it is impossible to compress the springs fully to check this, so if in doubt, be � generous with the clearance.�
�
| �
Enjoying this article? Our magazine is funded through the generous support of readers like you! � To contribute to our operating budget, please click here and follow the instructions. � (Suggested contribution is twenty bucks per year. Feel free to give more!)� |
� Assembly of the suspension is quite similar to the stock MGB suspension, but even easier � because the springs are already attached to the shocks and no spring compression steps � are needed.�
� There are adjustments for camber (easily adjusted by turning a bolt), toe in, sway bar � side to side preload, and, as with the rear, the spring height and shock damping are � adjustable.�
� Ride height: I have a chrome bumper car but I made the usual conversion to a rubber � bumper front cross member. With all the springs set at the lowest level, the car sits � at a heightabout at the stock chrome bumper ride height. Lowering the car further would � require changing the springs. The springs used are standard 2 1/4 inch diameter racing � springs. According to John Hoyle, all the springs have a rate of 300 pounds/inch, but � the front ones are 9 inches long, while the rear are 10 inches long. What would be � required is to put 8 inch long 300 pound springs on the front and put the front springs � on the rear. However, this really does not seem necessary, and will probably cause � exhaust clearance problems. Aside from changing springs, the spring height can be � adjusted using a standard spring seat spanner wrench. �
� Both springs and adjusting tools are available from, for example, Pegasus Racing � (www.pegasusautoracing.com).�
� Performance: Although I've had the suspension for over 4 years, I have only used it � this year, and with more experience and experimentation, I will be able to improve � the settings. (I have been trying for 5 years to get the car painted and have now given � up. I just assembled the car and drive it, even though it looks like hell. The turning � point was when the last body shop smashed up the front while trying to move the car � into the paint booth). At this point I have about 5500 hundred miles on the suspension � and I am very pleased with it.�
� I noticed that the front of the car was very civilized, but the rear seemed very � harsh. In ordering the kit I specified MGB V8 bushings in the front, but only � polyurethane bushings were available for the rear. Thinking that the urethane � bushings were the cause of the harshness, I replaced the rear urethane bushings with � V8 rubber bushings. These fit perfectly except that the retaining bolts are smaller � in diameter than the holes in the bushings. Therefore I had to make sleeves to go over � the bolts. The change to rubber bushings was well worth it and gave a dramatic � reduction in both road noise and ride harshness. I can now see rough spots in the � pavement, but not feel them. In addition, steering responsiveness seems unchanged.�
� The disadvantage of the rubber bushings is that they will eventually wear out, while � the urethane bushings should last forever. While I am very happy with the rubber � bushings, that may be because my car is a GT, and in a roadster, the difference � between urethane and rubber bushings may not be as noticeable. �
�
�
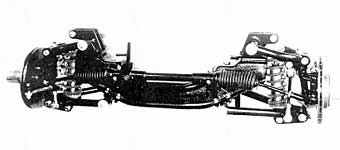
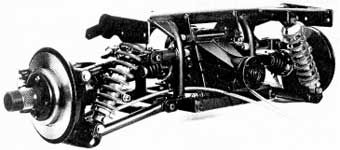
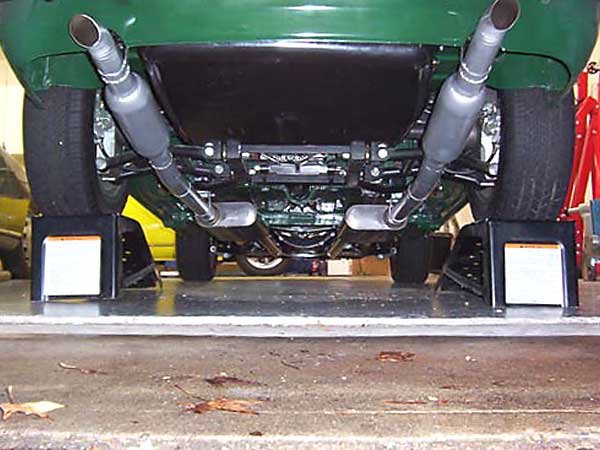
Rear Suspension
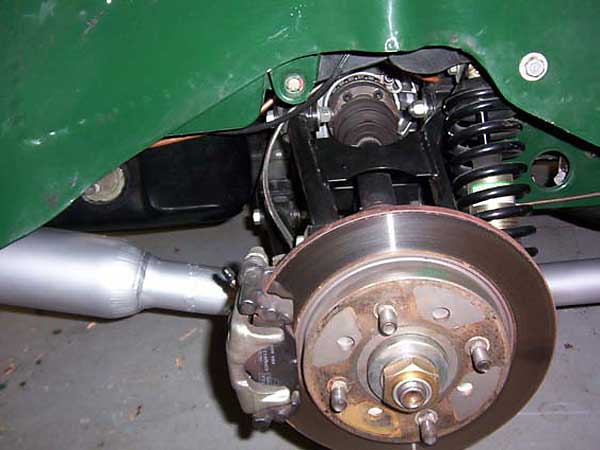
� All of the suspension components are nicely made, mostly of powder coated tubular steel. � The exception is the hub carriers which seem to be CNC machined out of billet aluminum � which is then clear anodized. I took an approximate weight of the assembly, complete � with brakes, and found that it was very close to the weight of the stock MGB axle and � metal leaf springs. With fiberglass leaf springs, there could be less weight at the � rear of the car, depending on what axle was chosen. Of course, most of the Hoyle weight � is unsprung so that is an advantage.�� The unit installs easily. To get working room it is necessary to remove the fuel tank. � Also, be sure that the upper rear mounting tab on the differential is cut off. It is � not used, and if left in place it will hit the trunk floor. Begin installation by first � attaching the main assembly using the existing shock mount holes in the frame. Shims are � supplied to compensate for production variations in the frame rail spacing. The next step � is to loosely attach the arms that extend from the front spring mounts to the suspension � frame. I found that the arms were a long way from reaching my suspension frame so I had � to buy longer bolts and use a generous amount of washers. When changing hardware be aware � that all of the threaded fasteners on the suspension assembly itself are metric. Once � these steps are completed, drill holes through the limit strap brackets on the frame into � and through the tabs on the suspension assembly. Then install the bolts, being sure to � use the aluminum spacers between the bracket ears.�
� It helps to "preload" the suspension bolts to prevent slight movements that make a � creaking noise every time the car begins to move. To do this, first remove the bolts � from the spring mount arms to the suspension frame, but do not loosen any of the bolts � holding the suspension frame to the shock mount holes or to the rebound strap hole. � Then jack up the car by the rear of the suspension frame. Even with the tight bolts � this will cause the front of the frame to move slightly away from the spring mount � arms as the frame settles. Gather enough washers to take up all of the space between � the arms and frame, then insert and tighten the arm to frame bolts.�
�
�
� With the basic assembly in place, the drive shaft measurements can be made. Be sure � to leave about 1/2 to 3/4 of an inch clearance between the transmission drive yoke � and the rear of the transmission housing. Finding a rear yoke to mate to the pinion � flange is very difficult. The Ford cars used factory balanced drive shafts that were � not rebuildable. Even now, replacements are only available as complete assemblies. I � found that Cannon Drive Shafts (10921 Chandler Boulevard, North Hollywood, California � USA 91601. Phone: (818) 508-0123. E-mail: 1.drive@cannonengineering.com) had access to � the proper yoke and could make up a shaft to my specifications. This they did in a few � days at a very reasonable price. Be sure to specify a shaft diameter no larger than � 1 3/4 inch, otherwise the shaft will not clear the parking brake mechanism. If you want � a local shop to build your drive shaft, be sure to order a rear flange from John Hoyle � along with the suspension kit.�
� Important! Earlier I put a rubber bumper shaft tunnel plate at the rear of my � driveshaft tunnel. This turned out to be fortunate because if you leave the smaller chrome � bumper plate on your early car, it appears it would be necessary to remove either the rear � suspension assembly, or the engine and transmission, to install or remove the driveshaft � from the tunnel.�
� Parking Brake: The suspension kit includes cables and fittings to connect up the parking � brake to the existing MGB lever. My kit had no instructions, but the construction was � obvious. A clamp is installed at the rear of the tunnel to hold the outer cable sheaths, � and then an equalizing plate installs on the existing MGB brake lever rod and holds the � inner cable ends. Adjustment is the same as with the stock system. However, the brake only � works on the disk pads, not a separate internal drum as most cars now have, and so the � brake holding action is feeble. Be sure to run the brake cables where they will not � get damaged and fasten them as needed with tie wraps.�
�
�
� Road Brakes: Very long stainless brake hoses are supplied. These can be connected to the � MGB brake pipe T, but the T must be relocated to a point near the front top of the � suspension frame. I used flare-to-AN adapters to fit the hoses to the T. Be very careful � to run the brake hoses where they will cause no damage. I tied them down where it seemed � necessary using tie wraps over small pieces of rubber hose placed on the brake hoses � as cushions.�
� Tightening suspension fasteners: A general rule is that nothing on the assembled suspension � is fully tightened. Check all nuts and bolts, including the large nuts holding the hubs in � place. As with any suspension, do not tighten the actual joint bolts until the suspension is � compressed to its normal ride height. However, with the standard urethane bushings in all of � the A-arm pivot points, this becomes less important.�
�
�
Differential notes: The fill plug cannot be reached with the fuel tank in place. Keep this �
in mind. The differential has a small vent hose rubber extension. I replaced it with a �
longer hose that I ran through an existing hole into the trunk. �
� Fuel tank: The fuel tank cannot be installed with the suspension in place because its � flange does not clear the suspension frame. What has to be done is to support the chassis � of the car, remove the support arms from the suspension frame to the front spring mounts, � and then the suspension frame bump strap bolts and rear (former lever arm) shock mount bolts. � The suspension unit, which is then hanging on one bolt on each side, can be tilted forward � far enough to get the tank in place. One installed, the tank body easily clears the � suspension components.�
� Adjustments: The camber and toe in are adjustable by means of shim washers inserted between � the A-arm pivot mounts and the suspension frame. Even the rear track is slightly adjustable � by means of the shims. In addition, the spring height and shock damping are adjustable.�
� Spare wheel clearance: I am using 15 inch Panasport road wheels and these cleared all the � suspension components with no problem. However, I am using an original Rostyle wheel as a � spare, and this would not fit on the rear. What was needed was to grind down the lower shock � mounts to clear. I called John Hoyle and he said that that would not cause any problems so � I did it.�
� Aside from ride quality, the real question is, does this suspension system offer any � performance advantage over an upgraded and well sorted out, modified MGB suspension � with say, tube shocks, Panhard rod, radius rods and fiberglass springs? To be honest, � in its present state of tune my suspension is probably no better. But it has much � more potential due to its fundamentally better predictability (especially in the rear) � and lower rear unsprung weight, as well as its huge adjustability. �
� Most of the adjustability advantages are at the rear due to replacing a simple axle � with a double A-arm independent set up. For the first time rear camber and toe in � are adjustable, as well as shock damping and ride height. In addition more subtle � adjustments are possible. Especially interesting effects can come from mixing � urethane and rubber bushings. For example, by only replacing the rear urethane � A-arm pivot bushings with softer MGB V8 front bushings, oversteer can be decreased. � On hard cornering, the greater load deflection of the softer bushings will cause � the outer rear wheel to turn slightly out which will decrease oversteer. Putting � the soft bushings at the front pivots will, of course, increase oversteer. The � point is, with all of the adjustments possible, this suspension system is bound � to produce better results than a more traditional system.�
� What don't I like about the Hoyle suspension? The choice of pads for the rear brakes � is very limited. MinTex pads put out a huge amount of dust, and EBC Green Stuff pads, � although they are supposed to be almost dust free, were even worse. John Hoyle is aware � of the dust problem and says that the Green Stuff pads should cure it. Maybe I should � try again. Another problem is that the A-arms require the exhaust pipe(s) to be even � lower than a live axle set up (there is no way the pipes can be run over top of the � suspension). A final drawback of the design is more difficult maintenance of the � differential. The fuel tank must be removed to change the differential oil, and � removing the tank requires nearly removing the suspension frame.�
� What do I like about the Hoyle suspension? Everything else! I also like the fact that � John Hoyle is extremely helpful and supportive.�
� �
�
� (Notice: comments about non-suspension aspects of Larry's MGB which appeared at the � end of THIS article in the print-edition of the newsletter have now been REMOVED to the � appropriate page of the "MG Photo Gallery": � www.britishv8.org/MG/LarryShimp.htm.)�
� Editor's note: follow-up information including Larry's upgrades to the Hoyle IRS can be � found in "Hoyle IRS � Suspension Mods: New Anti-Sway Bar and Stronger Axles" which appears in British V8 � Newsletter, Volume 14 Issue 3, December 2006.�
� Disclaimer: This page was researched and written by Larry Shimp. Views expressed are � those of the author, and are provided without warrantee or guarantee. Apply at your own risk.�
� Photos by Curtis Jacobson. All rights reserved. �
�
�
� Fuel tank: The fuel tank cannot be installed with the suspension in place because its � flange does not clear the suspension frame. What has to be done is to support the chassis � of the car, remove the support arms from the suspension frame to the front spring mounts, � and then the suspension frame bump strap bolts and rear (former lever arm) shock mount bolts. � The suspension unit, which is then hanging on one bolt on each side, can be tilted forward � far enough to get the tank in place. One installed, the tank body easily clears the � suspension components.�
� Adjustments: The camber and toe in are adjustable by means of shim washers inserted between � the A-arm pivot mounts and the suspension frame. Even the rear track is slightly adjustable � by means of the shims. In addition, the spring height and shock damping are adjustable.�
� Spare wheel clearance: I am using 15 inch Panasport road wheels and these cleared all the � suspension components with no problem. However, I am using an original Rostyle wheel as a � spare, and this would not fit on the rear. What was needed was to grind down the lower shock � mounts to clear. I called John Hoyle and he said that that would not cause any problems so � I did it.�
� Aside from ride quality, the real question is, does this suspension system offer any � performance advantage over an upgraded and well sorted out, modified MGB suspension � with say, tube shocks, Panhard rod, radius rods and fiberglass springs? To be honest, � in its present state of tune my suspension is probably no better. But it has much � more potential due to its fundamentally better predictability (especially in the rear) � and lower rear unsprung weight, as well as its huge adjustability. �
� Most of the adjustability advantages are at the rear due to replacing a simple axle � with a double A-arm independent set up. For the first time rear camber and toe in � are adjustable, as well as shock damping and ride height. In addition more subtle � adjustments are possible. Especially interesting effects can come from mixing � urethane and rubber bushings. For example, by only replacing the rear urethane � A-arm pivot bushings with softer MGB V8 front bushings, oversteer can be decreased. � On hard cornering, the greater load deflection of the softer bushings will cause � the outer rear wheel to turn slightly out which will decrease oversteer. Putting � the soft bushings at the front pivots will, of course, increase oversteer. The � point is, with all of the adjustments possible, this suspension system is bound � to produce better results than a more traditional system.�
� What don't I like about the Hoyle suspension? The choice of pads for the rear brakes � is very limited. MinTex pads put out a huge amount of dust, and EBC Green Stuff pads, � although they are supposed to be almost dust free, were even worse. John Hoyle is aware � of the dust problem and says that the Green Stuff pads should cure it. Maybe I should � try again. Another problem is that the A-arms require the exhaust pipe(s) to be even � lower than a live axle set up (there is no way the pipes can be run over top of the � suspension). A final drawback of the design is more difficult maintenance of the � differential. The fuel tank must be removed to change the differential oil, and � removing the tank requires nearly removing the suspension frame.�
� What do I like about the Hoyle suspension? Everything else! I also like the fact that � John Hoyle is extremely helpful and supportive.�
�
�
� (Notice: comments about non-suspension aspects of Larry's MGB which appeared at the � end of THIS article in the print-edition of the newsletter have now been REMOVED to the � appropriate page of the "MG Photo Gallery": � www.britishv8.org/MG/LarryShimp.htm.)�
� Editor's note: follow-up information including Larry's upgrades to the Hoyle IRS can be � found in "Hoyle IRS � Suspension Mods: New Anti-Sway Bar and Stronger Axles" which appears in British V8 � Newsletter, Volume 14 Issue 3, December 2006.�
� Disclaimer: This page was researched and written by Larry Shimp. Views expressed are � those of the author, and are provided without warrantee or guarantee. Apply at your own risk.�
� Photos by Curtis Jacobson. All rights reserved. �
