
�
�
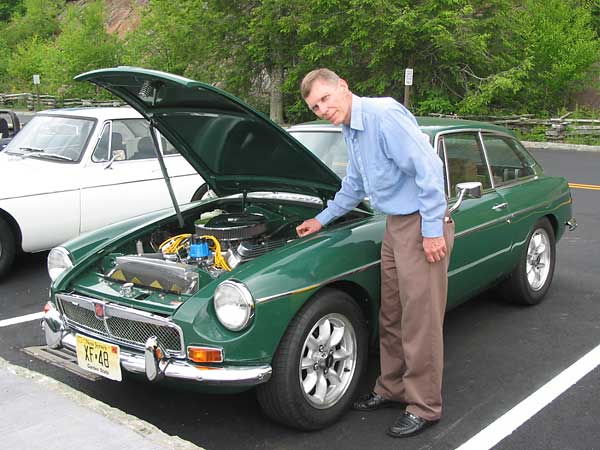
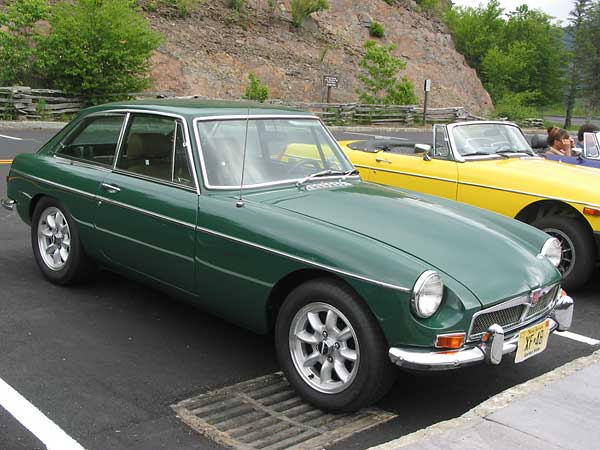
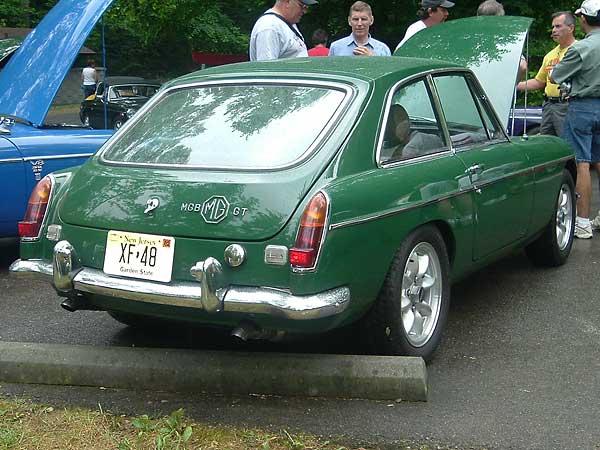
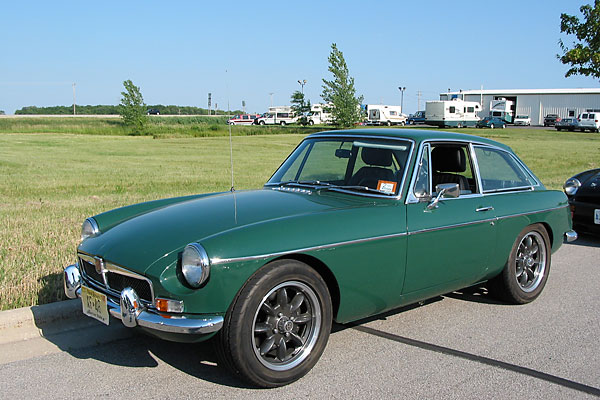
Larry Shimp's 1968 MGB-GT with Ford 302 V8
� � Owner: Larry Shimp� City: Morganville, NJ
� Model: 1968 MGB-GT
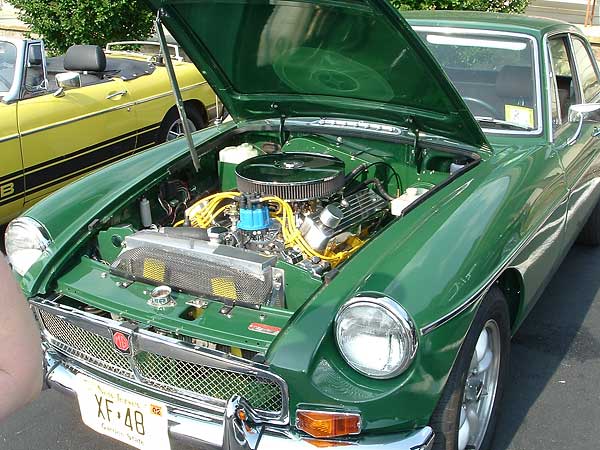
� Engine: Ford 302 V8 (crate motor)
� Conversion performed by: Owner
�
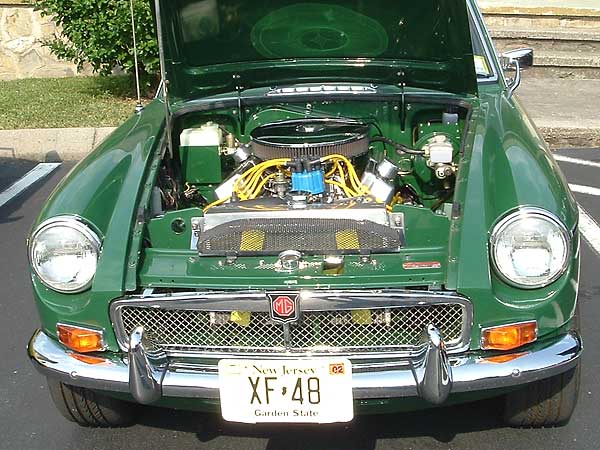
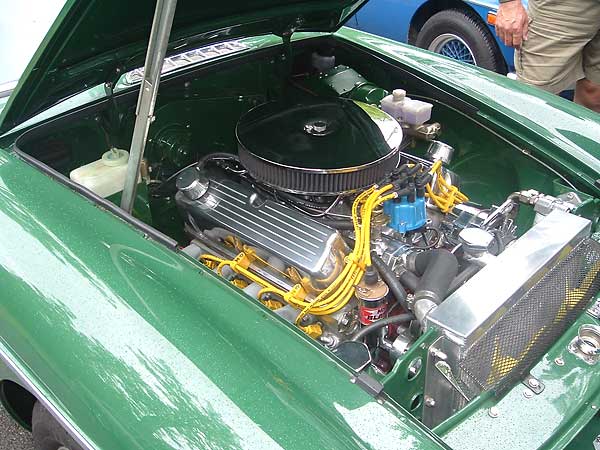
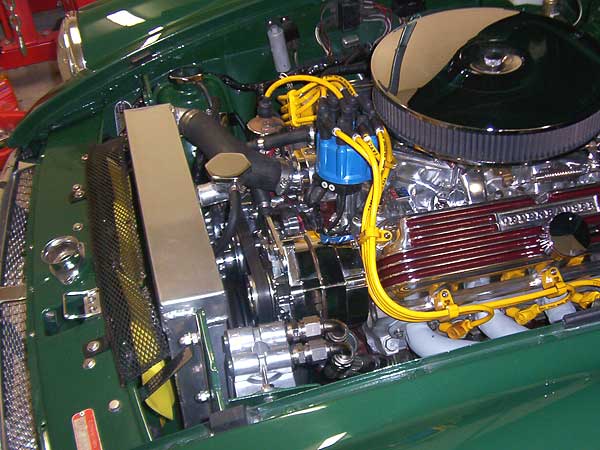
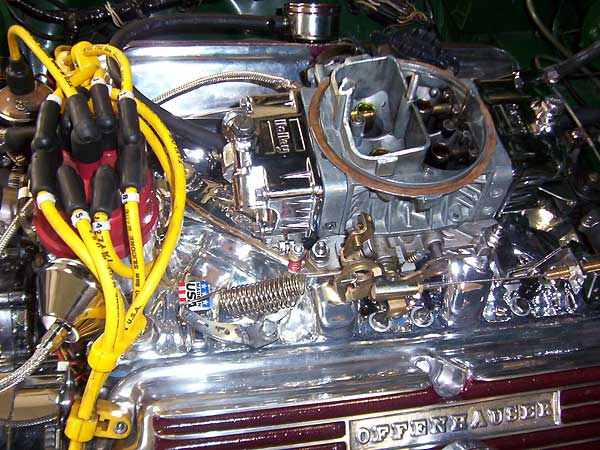
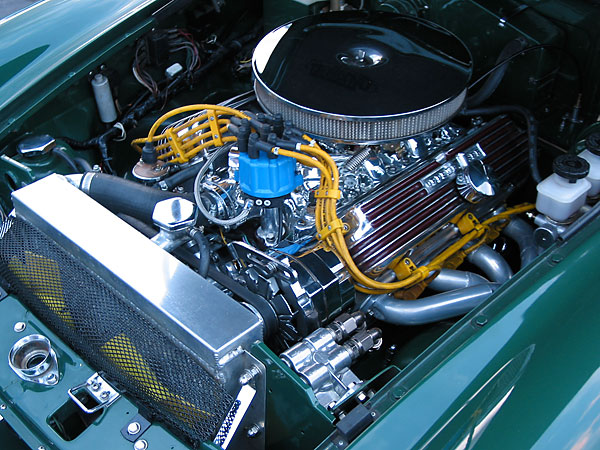
| Intake: | �Edelbrock Performer / Holley 650. | �
| Cam: | �XE268HR. | �
| Engine Electrical: | �Crane distributor, MSD ignition. | �
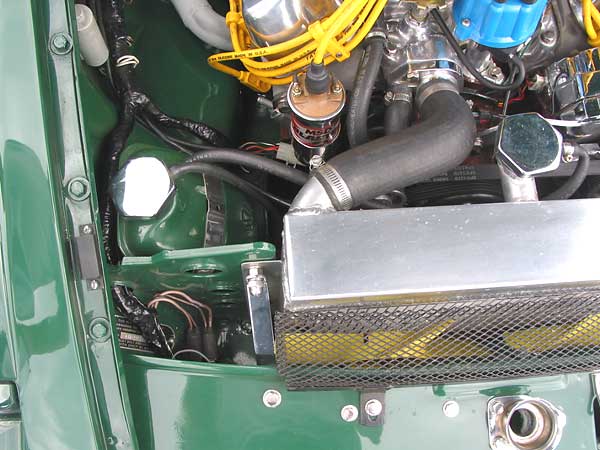
| Cooling: | �D&D aluminum radiator. | �
| Exhaust: | �stainless, 2.25" pipes, Edelbrock mufflers. | �
| Transmission: | �Borg Warner T5 5-speed (2.95:1 first gear / 0.63:1 fifth gear), Centerforce clutch. | �
| Rear Axle: | �Ford Scorpio axle (3.43:1 / LSD). | �
| Suspension: | �Hoyle Engineering front and rear suspension. | �
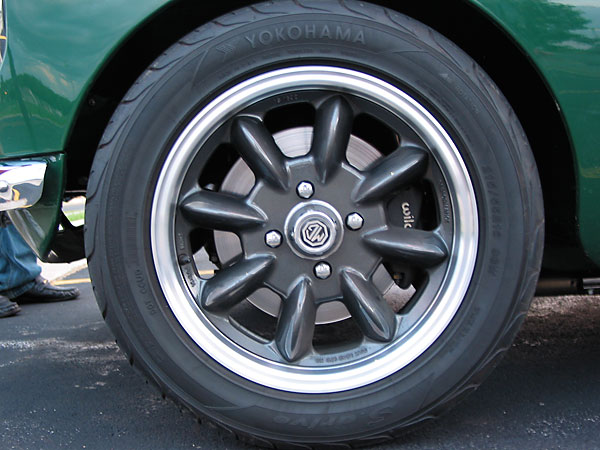
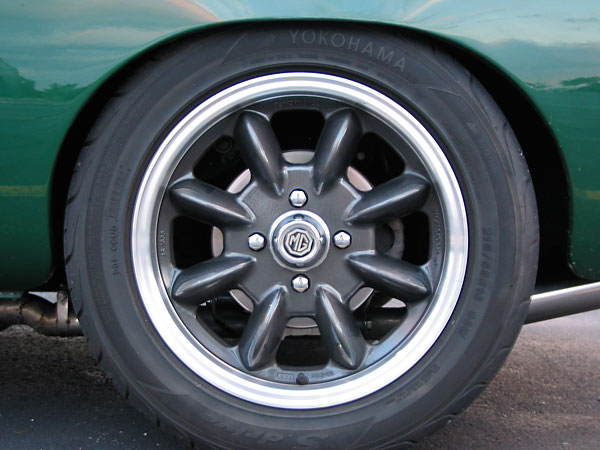
| Wheels/Tires: | �Panasport 15 x 6, 205/60/R15 Michelin tires. | �
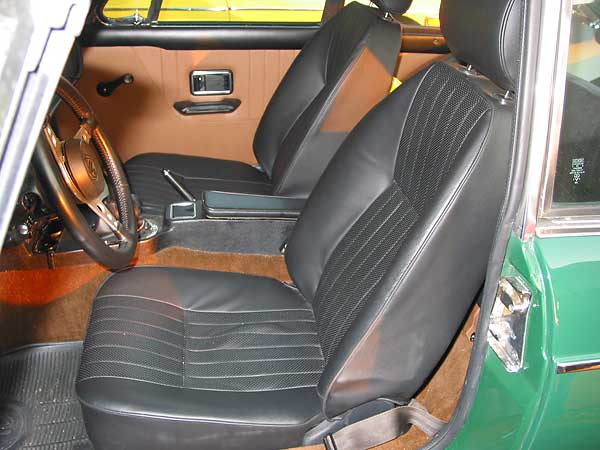
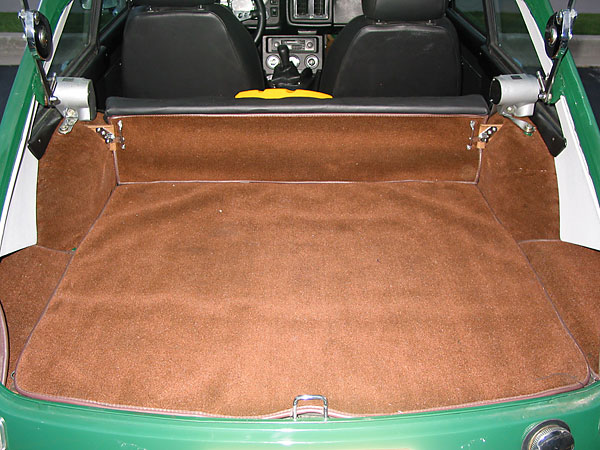
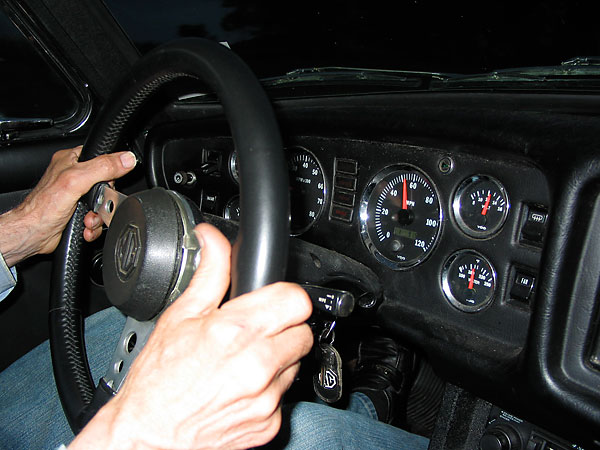
| Interior: | �1977 dashboard with VDO gauges. MGOC leather seats (which provide superior �
support, compared to the reupholstered original seats that Larry had previously.) | �
| Performance data: | �26mpg highway. (Editor's note: Is that a tongue-in-cheek answer or what!) | �
| Completed: | �2005. | �
| Miles Driven: | �15,000 (as of the British V8 2006 meet). | �
�
�
�
�
�
�
�
How It Was Done
�(originally published in British V8 Newsletter, Volume 12 Issue 3)
�| Engine: | �Ford 302 (New crate engine), w/ GT40 heads and B303 camshaft. | �
| Induction: | �Edelbrock 2121 manifold, Carter 9504 carburetor. | �
| Exhaust: | �home-made headers w/1.5" primary and 2.25" secondaries into a single �
Edelbrock muffler. (Editor's note: from the photos, it looks like he's �
already upgraded to a dual exhaust system.) | �
| Ignition: | �Mallory distributor and a MSD AL6 ignition controller. | �
| Miscellaneous: | �Explorer front timing cover and water pump. Serpentine-belt drive �
also powers a GM alternator and uses a Corvette tensioner. Brackets �
are home-made. | �
| Transmission: | �Borg-Warner "World Class" T-5, Ford-style (2.95/1.94/1.34/1/00/0.63) �
bought off eBay. Ford clutch (M7560-A301), bell-housing and flywheel. �
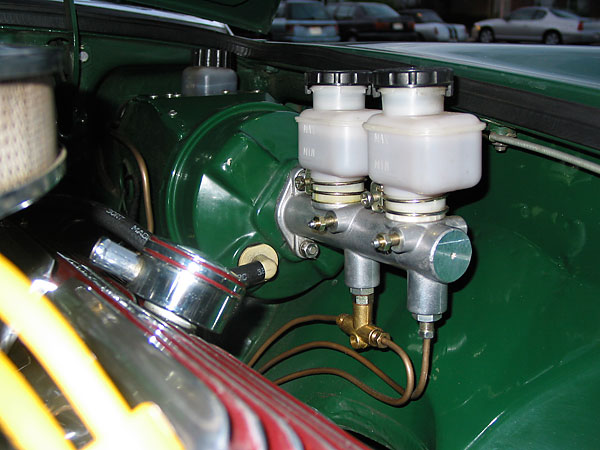
Tilton 7/8 Master Cylinder and CNC 5/8 Slave Cylinder. | �
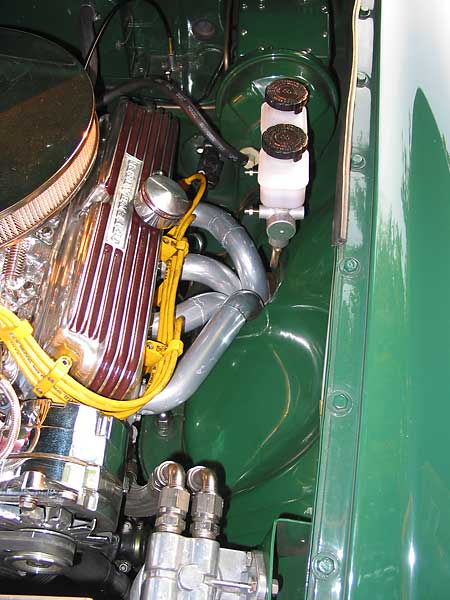
| Cooling: | �D&D aluminum cross-flow radiator and stock MGB dual electric fans. �
TR-6 heater valve with MGB control head. | �
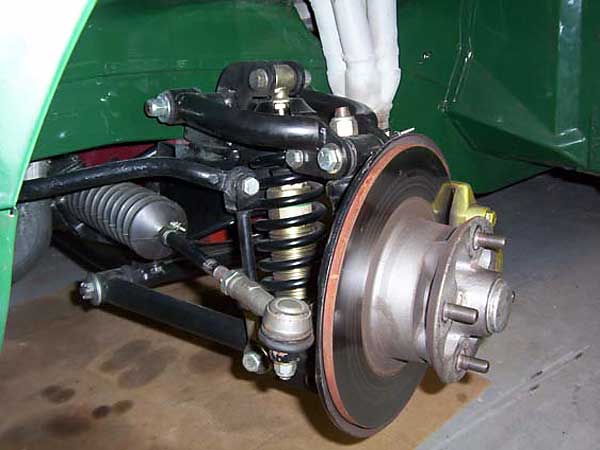
| Front suspension: | �John Hoyle IFS kit�
with coil-over adjustable shocks and tubular A-arms mounted on a �
modified rubber-bumper front cross-member. | �
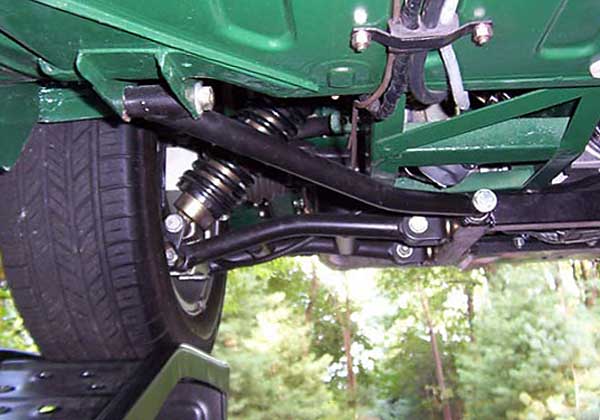
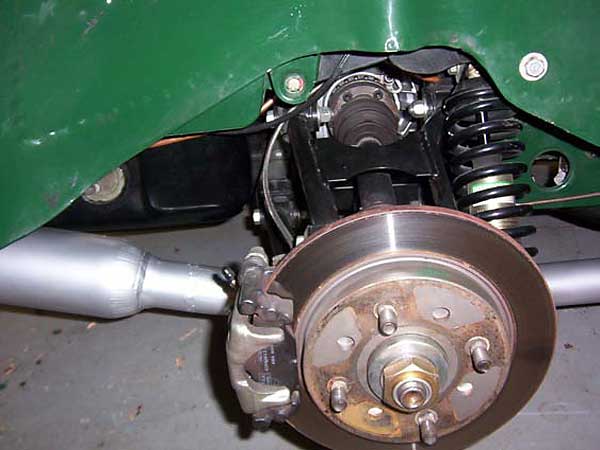
| Rear suspension: | �John Hoyle IRS kit�
with a 3.38 Limited Slip Sierra/Scorpio differential. Shortened Sierra half-shafts, Sierra �
brakes and custom hubs. Adjustable coil-over tube shocks. | �
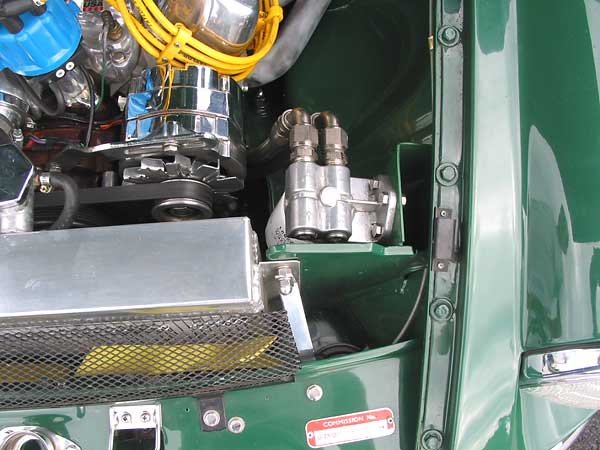
| Brakes: | �Stock in the front w/Sierra in the back. 1977 MGB power-assist �
system added. | �
| Wheels: | �Panasport 15x6 with Michelin Pilot 15x195/60. | �
| Exterior: | �Not painted yet. Engine compartment bulkheads from a 1974.5 donor car. �
Radiator supports and front suspension cross-member from a 1977 donor car. | �
| Interior: | �Seats from a 1974.5 B covered w/Moss Motors leather upholstery. �
VDO gauges in a 1977 dash. | �
| Overview: | �Original V8 conversion in June 2004 used Olds 215. Driven 2000 miles. �
Ford 302 installed in July 2004 and subsequently driven 1000 miles. �
Owner performed all work, and cost estimate runs in the $10K range. | �
| Recommendations: | �Consider using a Ford engine. I had both an Olds 215 and a Ford in �
this car. There was no difference in handling, steering or front-end �
height between the two, but the Ford engine was more fun! With proper �
carburetor and exhaust it will be even better. The only additional �
work required to install the Ford over the Olds was the need to make �
my own headers for the Ford. � Never get a car painted in NJ - it took 4 years and 5 shops to get a � stripped body-shell interior painted. I've been waiting one year to � get the exterior painted. The last shop I took it to started the car � in gear and smashed it into the paint booth, crushing the front end and � the left fender! The exterior is still not painted, and there are no � good prospects in sight. When I lived in Colorado, I restored 2 cars, � and both body-shells were painted in 6-8 weeks. � I'll install a dual exhaust, as the single-exhaust is too restrictive � for the Ford engine. I'll also try a different cam with a lower, broader � power range. I may upgrade the front brakes as well as the carburetor, � but I haven't decided on what model carburetor to install. � I found it very difficult to get through NJ state inspection. Ultimately, � I found an inspection shop that knew that the law allows engine conversions. | �
�
�
�
�
�
�
�
�
�
�
�
�

�
Update on The Conversion (1)
��
(originally published in British V8 Newsletter, Volume 13 Issue 1)�
�
In the last issue I reported on the conversion of my MGB from an Oldsmobile 215 V8 �
to a Ford 5.0 V8. Since then I have made several improvements which are of interest �
because they reflect my experience with the car, and corrections of these minor �
issues greatly contribute to driving enjoyment. Any major conversion involves �
essentially re-engineering the car so it is unlikely that an amateur conversion �
will be optimal the first time around. Even a total restoration of a car back to �
original specifications usually requires some sorting out before the end result�
meets expectations.�
�
My first upgrade was to replace the Carter 500 cfm carburetor with a Road Demon �
625. All Road Demons have electric chokes and vacuum secondaries as well as 4 �
corner idle adjustments, accelerator pumps for the secondaries, adjustable �
secondary idle throttle stops, and most importantly, center hung floats. A real �
annoying problem with the Carter was that it cut out on hard cornering making it �
impossible to enjoy the full potential of the suspension capabilities. The Demon �
is unaffected by corners, and is also much better matched to the engine. I have �
not had the car dyno tuned, but I did find that a change to #73 main jets from the �
standard #70 jets was beneficial. Otherwise the carburetor is as it came out of �
the box. �
�
A Holley carburetor could also be used as well as the Demon, but I do not think �
that a Carter/Edelbrock would ever work as well. In spite of the better carburetion, �
there was still a fuel problem. I noticed that accelerating fast in one gear went �
well, but performance was bad when shifting to the next gear and continuing to �
accelerate. For example, accelerating fast just in second went well, but accelerating �
fast in second after accelerating fast in first generated a huge flat spot. I �
suspected that the fuel pump could not keep up, and the fuel level in the carburetor �
was dropping. Therefore, I replaced the Carter electric pump (72 gph at 4-6 psi) �
with a Holley "red" pump (97 gph at 7 psi) and this solved the problem. �
�
I replaced the Mallory distributor with a Crane small cap electronic distributor. �
The Crane distributor has 3 vacuum advance curves and 9 mechanical advance curves �
selectable by two micro rotary switches. The Mallory worked fine, but changing the �
advance curves is not nearly as easy as on the Crane. Because I plan on getting �
the engine dyno tuned some time I figured the easy adjustability of the Crane would �
save a considerable amount of expensive dyno time and therefore pay for itself. �
In any case, by trying most of the advance programs I feel I learned a lot about �
the timing needs of the engine.�
�
Another benefit of the Crane distributor is that it is shorter than the Mallory �
distributor. The hood cross brace passes directly over the distributor and I had �
to move the cross brace forward to clear the Mallory distributor. With the Crane �
in place, I tried an unmodified hood and this did fit over the Crane distributor �
(with maybe 1/16 inch clearance over the coil wire terminal).�
�
I replaced the B303 cam that came in the engine with a CompCams XE264HR grind. �
The new cam has a lower duration and a much wider lobe center separation than �
the B303. Being so much milder than the B303 the XE264HR cam would be expected �
to make less power. However, the XE cam has a higher lift and, because the �
aluminum heads can make full use of the lift, power is the same as or greater �
than with the B303 cam (according to published dyno reports). The big advantages �
are much more low-end power with the XE cam and far less exhaust emissions at �
idle. Emissions are important because I want to drive my car and so did not get �
antique registration for it. This means the car must pass emissions inspection �
and it would certainly have failed with the B303 cam.�
�
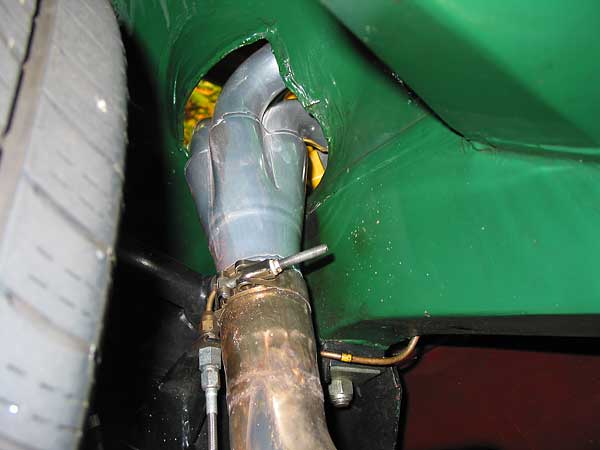
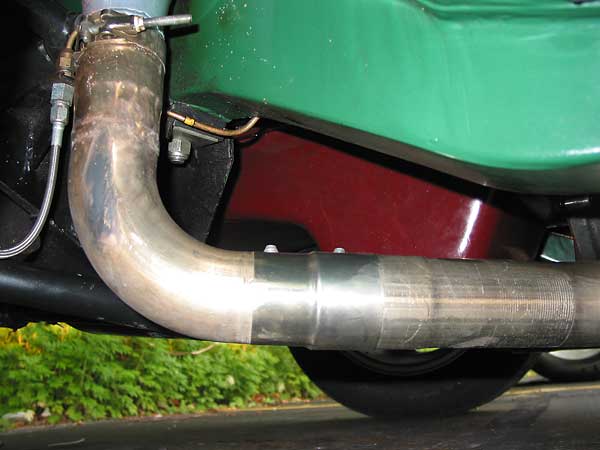
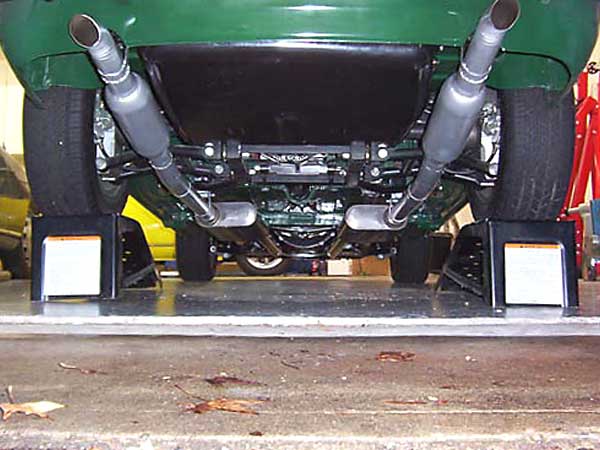
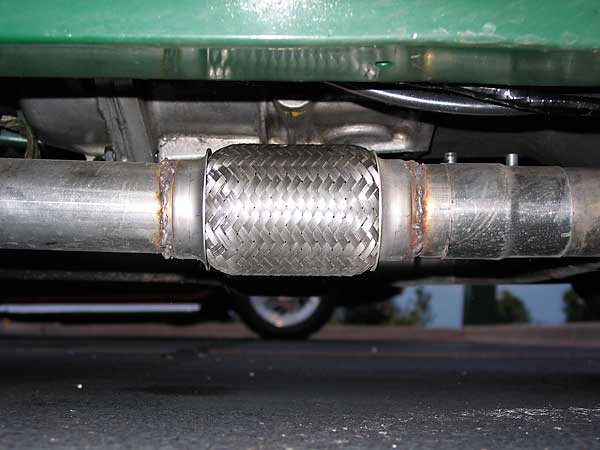
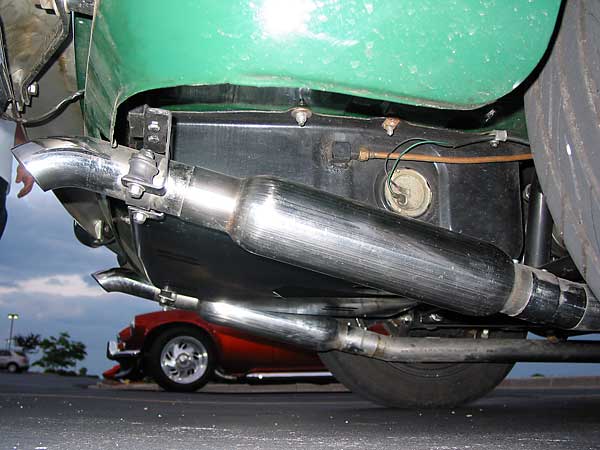
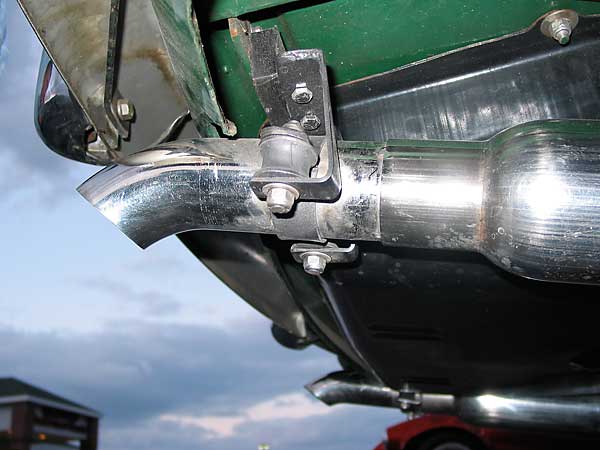
Another major change I made was to the exhaust. As first installed it was a �
single pipe, 2 1/4 inch system. To replace it, I centered the gas tank and put �
in dual 2 1/4 inch pipes with an equalizer just behind the bell housing. �
Silencing is taken care of by a pair of Edelbrock mufflers backed up by�
Summit short bullet style glass packs. I highly recommend a dual, equalized system �
to anyone using an engine much beyond a mild 215 V8.�
�
In a failed experiment I tried blocking off the intake manifold exhaust heat �
passages. The theory is that a cooler intake charge increases power because it �
of its higher density and less potential for detonation. This seemed ok as long �
as the weather was warm, but as soon as the temperatures dropped into the 40s it �
was a disaster. I opened up the passages and everything has been fine since.�
�
The last change I made was to replace the polyurethane bushings in the rear �
suspension (it is a Hoyle independent system) with MGB V8 rubber bushings. �
To do so I had to fabricate sleeves for the bolts to compensate for the small �
bolt diameter relative to the bushing ID. The end result is a decrease in both �
road noise and harshness over small bumps. I really like the results, but they �
may be more significant for me because I have a GT. In a roadster, the �
improvement may not be as noticeable. One upgrade left is to do something about �
the front brakes. They are original MGB and are not up to the performance �
level of the rest of the car. I am still looking into the best solution for this.�
�
All of these refinements have made the car very easy to live with on a daily �
basis. I can just drive it and not be annoyed by quirks in the throttle �
response, excessive vibration at idle and other minor things that conspire �
to make the car tedious over the long haul. I have not done any formal �
performance testing but the car seems to be effortlessly fast. I typically �
take freeway entrance ramps in 4th gear in what seems a relaxed pace only �
to find that I have to brake at the end to match the 70 mph traffic flow. �
Updates To The Conversion (2)
��
(information added 12/15/2006 and 4/15/2007...)�
�
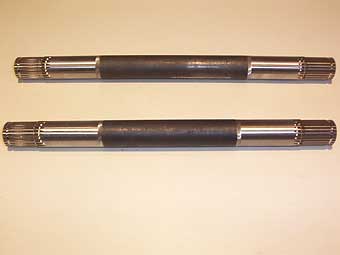
Since June, I've replaced the axle shafts with stronger, custom made items. This was �
required because I broke one of the original shafts and twisted the other... �
I also found a way to install an MG Midget rear sway bar to the Hoyle suspension.�
(See photos below.) I've discovered I can fit 16 x 7 wheels with 215 width tires, �
with no fender flares. This is one advantage of setting 2 degrees of negative rear �
camber! However, the wheels and tires will have to wait until later. �
�
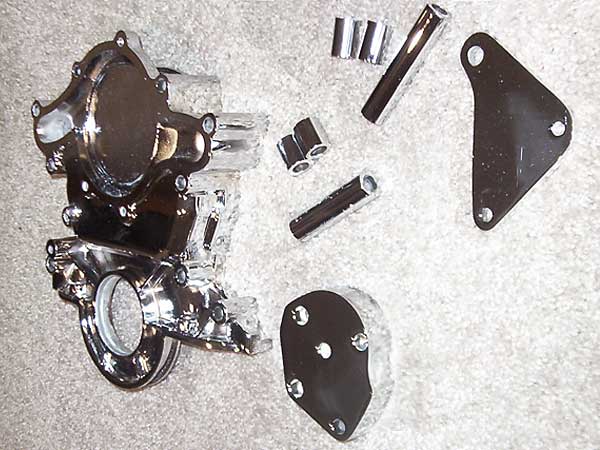
Other changes include polishing the timing cover and having it chromed. Also, I've �
found that a high-performance Rattler damper can be adapted to replace the Ford �
Explorer damper that normally has to be used with the short timing cover and water �
pump, and I got my headers silver ceramic coated while the car was out of service �
waiting for the new axles.
�
Editor's note: detailed coverage of Larry's upgrades to the Hoyle IRS can be found in �
"Hoyle IRS �
Suspension Mods: New Anti-Sway Bar and Stronger Axles" which appears in British V8 �
Newsletter, Volume 14 Issue 3, December 2006. Larry also contributed �
�
"MGB Power Brake Upgrade: Fitting a Wilwood Master Cylinder" to that issue, �
and "Performance �
Carburetor Selection and Set Up" to Volume 15 Issue 1, April 2007.�
 | �
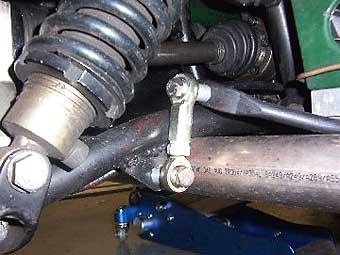 | �
| � New, stronger axle shafts. | �� Sway bar connection to lower control arm (shown at full droop). � 1" aluminum pillow blocks are mounted under the battery boxes.� New axle shaft is also visible. | �
�
�
�
�
Updates To The Conversion (3)
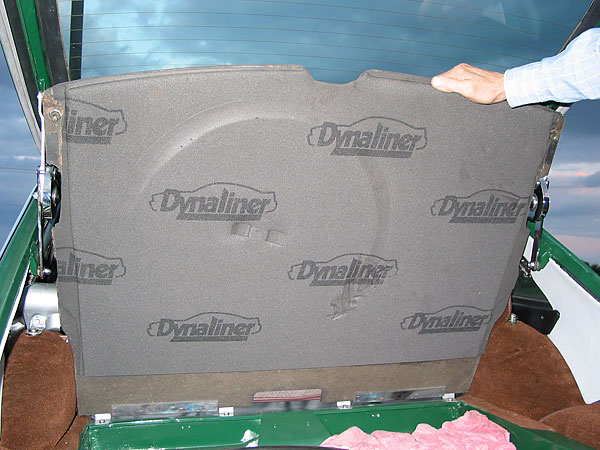
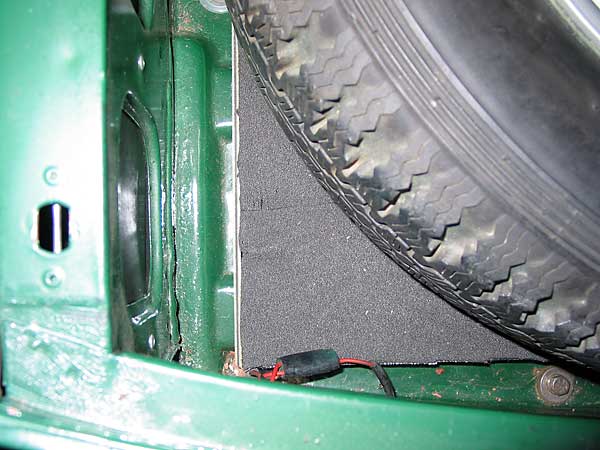
�� (British V8 2008 photos, featuring: new wheels/tires, exhaust system improvements, new sound insulation, etc.)�
��
�
�
�
�
�
�
�
�
�
�
�
�
 �
�
