
�
�
�
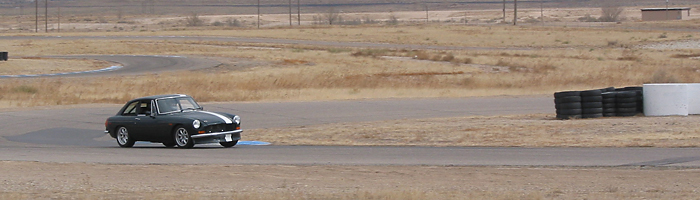
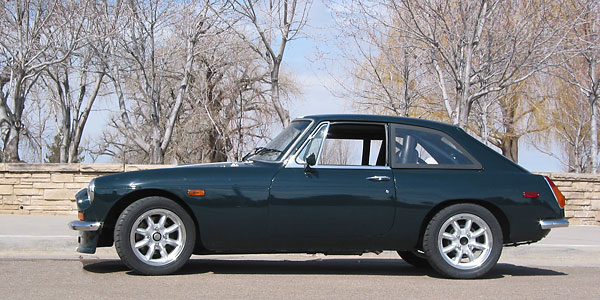
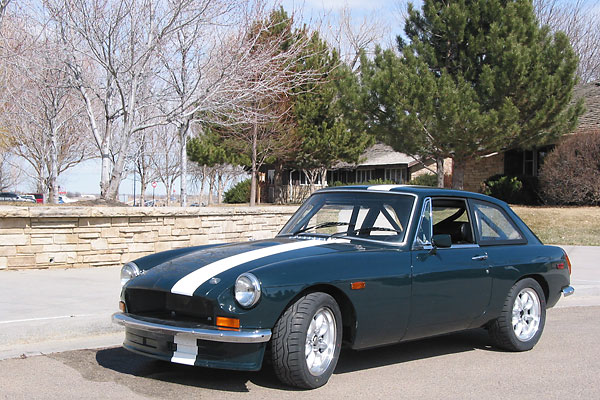
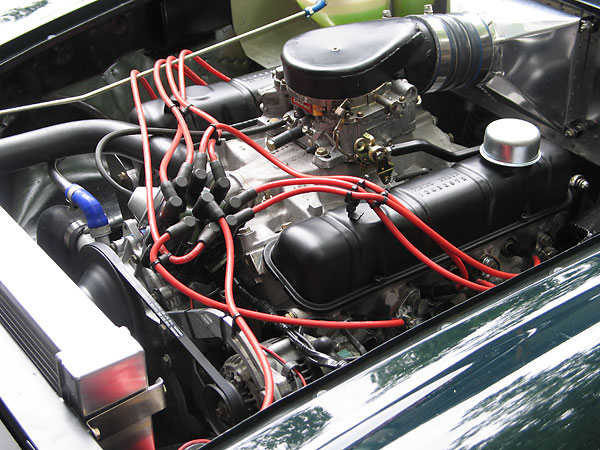
Curtis Jacobson's 1971 MGB GT with Buick 215 V8
��
Owner: Curtis Jacobson
�
BritishV8 UserID: Moderator
�
City: Portland, Oregon
�
Model: 1971 MGB GT
�
Conversion by: owner
�
Bonnie's Story
� �
This 1971 MGB GT was worn out, wrecked, and left derelict by the mid 1980s. My buddy Donnie Moyer�
discovered it on an old farm, tucked behind Dulles airport in Northern Virginia. Donnie and I had�
been talking about building a racecar. We were college freshmen: clueless and poor. But this�
little MGB GT could be had for one dollar if we could convince its owner that we'd give it a good�
home. (We also had to fix his wife's Oldsmobile; that only took a moment.) He had turned down�
offers from people who wanted his MG for parts. We promised we'd put it back on the road,�
and that's what he wanted to hear.�
�
We went to work with baling wire and duct tape, second hand tires, discarded road signs, alligator�
clips and chewing gum. We managed to get the original MGB engine to run; we even put one or two�
thousand miles on the old girl. She burned a whole lot of oil! At about that time, we christened our�
cute little MGB GT "Bonnie". Why that name? Suffice it to say that she's always had a distinctive�
"bonnet" - that's British for "hood" - and incidentally she's now wearing her fourth one. Anyhow,�
just when we thought we had her carburetors sorted out, Bonnie threw a connecting rod. We had�
to park her while we finished college, but we continued to think she might make a good racecar�
someday. Largely ignorant of SCCA class restrictions, our daydreams included American V8 engines. �
�
We soon learned that Buick's "215" aluminum V8 is the most important production engine in the history�
of motorsport. It's the only American V8 to ever win a proper Grand Prix. One of these little aluminum�
V8s powered Jack Brabham to victory in the 1966 Formula One World Championship. Buick's 215 is also�
the production engine that ended Offy's monopoly at the Indy 500. In 1962 Dan Gurney used a Buick 215�
in his "Rookie of the Year" appearance, paving the brickyard for followers like Jim Clark with a�
Lotus-Ford. More relevantly: a stock Buick 215 delivers twice the power and torque of an MGB 4-banger,�
yet weighs fully forty pounds less. And it's a V8. And I found a running 1963 Buick Special for $150.�
�
After college, I settled in North Carolina and Bonnie moved into the parking lot of my apartment�
building. I built up the Buick engine in my living room. With help from two of my Volvo Truck�
colleagues, Ashley Dudding and Rob Henson, I installed the engine in 1990. In 1991, Bonnie was�
complete enough to pass the state's safety inspection. She was still pretty rough looking,�
but she was drivable. Since then, my plan has always been to drive her in warm months and improve�
her in cold months. She's been extensively modified and upgraded over subsequent decades, but�
always on a shoestring budget. Over all that time, Bonnie has never gone more than a few months�
without being driven. She has completed many long cross-country road trips. She is occasionally�
used for track days and for autocrosses too. Perhaps one day she'll evolve into the fierce little�
racecar she's always wanted to be. �
�
�
�
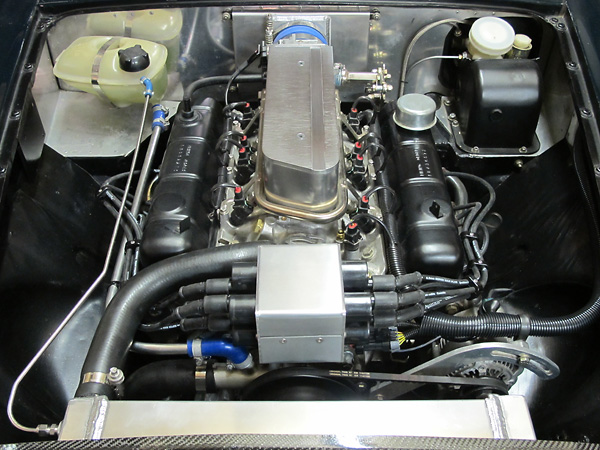
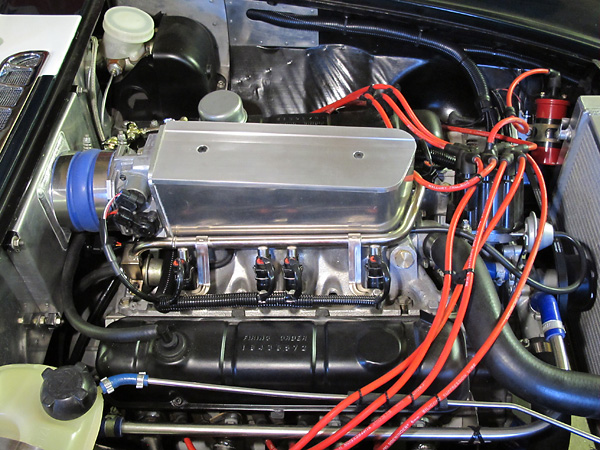
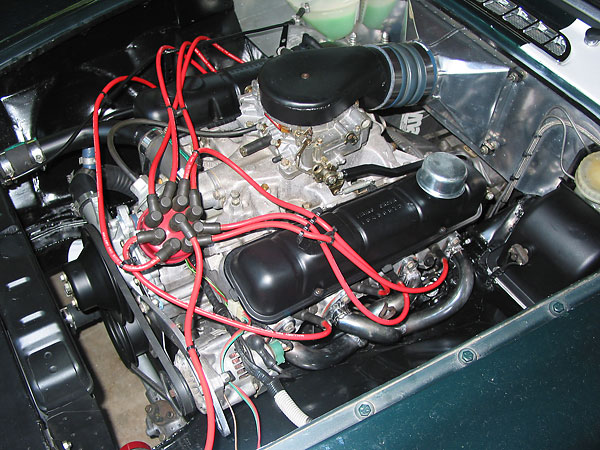
This 1963 Buick 215 aluminum V8 has been updated with custom sequential electronic
�
fuel injection and a custom crank-fired eight-coil ignition system.
�
How It Was Done
�| Engine: | ��
stock Buick 215 engine block, crankshaft, connecting rods, valve gear, valve covers, oil pan,�
timing gears, etc.�
Silvolite 8.8:1, 0.030" oversize pistons.�
Kenne-Bell camshaft (model 1XA, 0.462" lift, 260 degree duration, 110 degree lobe center).�
�
Buick V6 timing cover.�
Buick V6 "metric" oil pump.�
AC Delco PF47 oil filter.�
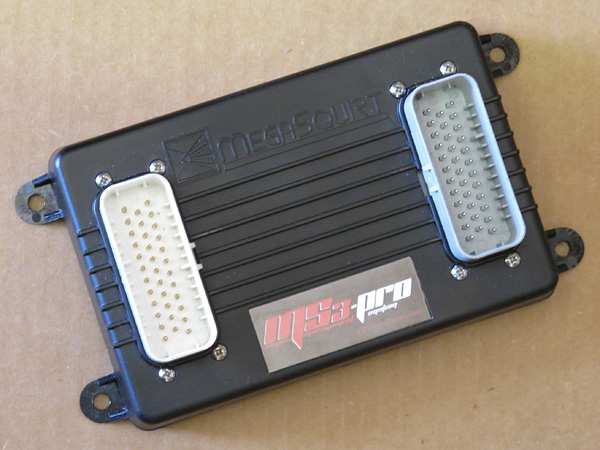
MegaSquirt MS3-Pro engine control module.�
Rover 14CUX intake manifold and fuel rail.�
Lucas fuel injectors and fuel pressure regulator.�
Chevrolet throttle body and MAP sensor.�
Chevrolet "LS2-truck" ignition coils.�
Champion "Truck" spark plugs (part# 4404).�
Custom motor mounts, utilizing Barry Controls 22000 series isolators.�
Custom cowl induction intake with Ford Probe oiled gauze panel air filter.�
� Original Buick cylinder heads were replaced in May 2009 with Rover 4.0L heads (circa 1996-2003).� These late model heads have smaller combustion chambers (~28cc vs. ~37cc). Shaved 0.010" and� with composite head gaskets, they raised the engine's static compression ratio to ~10.1:1.� The Rover 4.0L heads also have larger valves (1.570" inlet vs. 1.5", 1.350" exhaust� vs. 1.312") and significantly larger ports. For compatibility with the relatively high-lift� camshaft, it was necessary to reduce the height of the valve guides. Stock valvesprings were� checked for coil bind, and found to be okay. All head work was performed by Abacus Racing. � At installation, lifter preload was set to 0.040" by making and installing custom pedestal shims. � � | �
�
 � The engine was rebuilt and installed in 1991. Engine block and internal components have � remained unchanged since then, while nearly everything else in this photo has been upgraded. � | �
|
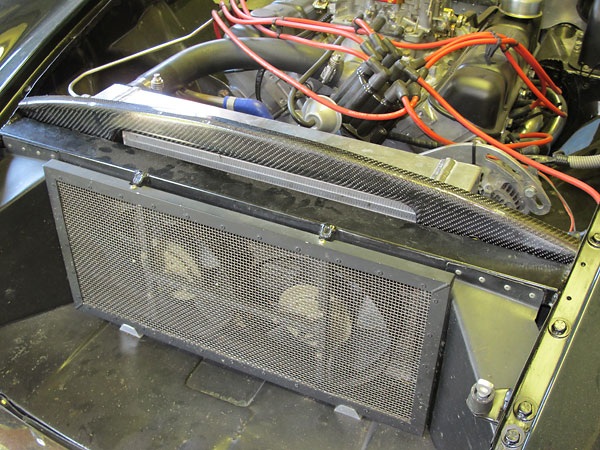
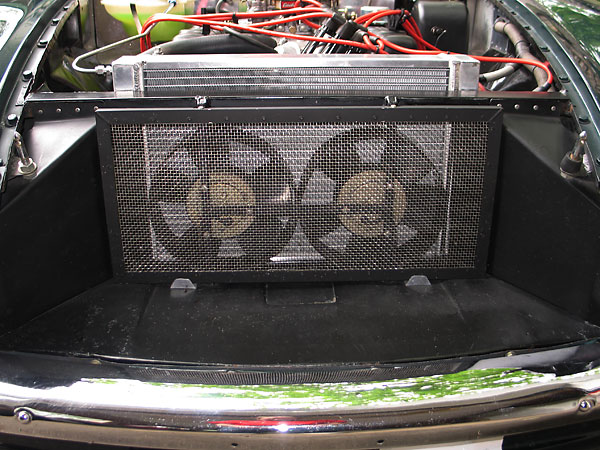
| Cooling: | �� AFCO dual-pass aluminum radiator, part number "80107N", reworked� with 1.5" ports and a bung for a vent line. Core size = 12" by 17.75".� � Dayco hoses (top: #70635, 1970-1979 Camaro and Monte Carlo. bottom: #71013, 1969-2006 Ford Mustang.) � Transparent remote header tank (1990s VW Jetta, part# 171121407E) installed on firewall.� Twin 8.5" Honda Civic electric A/C condensor fans, pushing.� Low-clearance fan rings.� Custom carbon fiber recirculation shield.� Stainless steel mesh bug screen.� | �
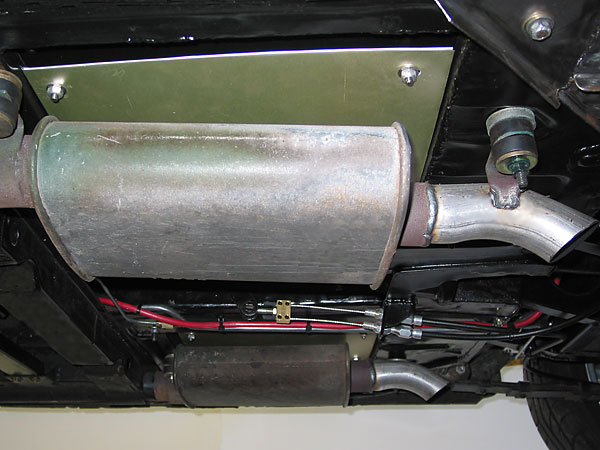
| Exhaust: | �� custom sand bent Tri-Y headers.� Dual Thrush Turbo mufflers.� | �
| Transmission: | �� 1992-model Borg Warner T5 "World Class" 5-speed manual.� Gear ratios: 1st=2.95, 2nd=1.94, 3rd=1.34, 4th=1.00, and 5th=0.73.� Custom transmission mount, utilizing Barry Controls 22000 series isolators.� Buick 215 bellhousing. D&D Fabrications steel flywheel.� 10.4" Camaro clutch and diaphragm pressure plate.� Externally mounted Girling slave cylinder.� | �
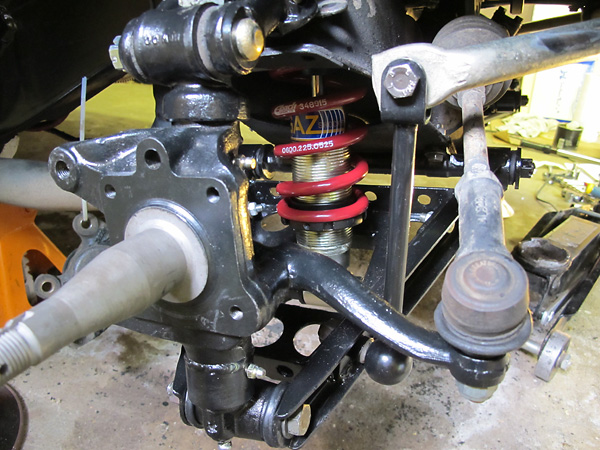
| Front Suspension: | �� See below for details.� Dropped spindles.� Eibach 525# springs.� Gutted Armstrong lever-type shock absorbers serve as upper control arms� and upper mounts for GAZ adjustable coilover shock absorbers.� Spring pans from a Moss coilover front suspension kit, lightened.� ADDCO front anti-sway bar on polyurethane mounts.� | �
| Rear Suspension: | �� Stock leaf springs, although they've sagged badly.� Custom extended shackles to raise the rear ride height back up.� Telescoping shocks ('84-'88 Dodge Colt, Monroe 5877ST). � Custom fabricated Panhard rod.� | �
| Rear End: | �� 1992 Ford Mustang 5.0 8.8" axle.� 3.27:1 gears.� Traction-Lok limited-slip differential.� � Moser Engineering axle shafts � | �
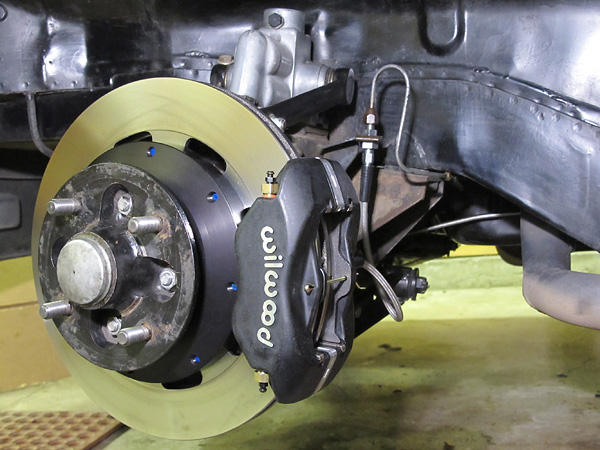
| Brakes: | ��
new MGB master cylinder. � front - Classic Conversions (Wilwood) big brake kit. Wilwood 2psi residual pressure valve. � rear - Ford 9" diameter drums, 13/16" wheel cylinders, Wilwood 10psi residual pressure valve. � Lokar parking brake cable set connected to (3/4") extended MGB lever.� | �
| Wheels/Tires: | ��
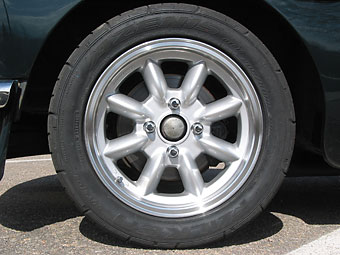
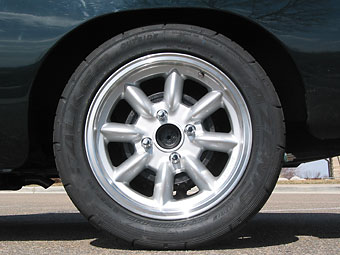
Panasport 8-spoke wheels (15"x6", -22mm offset, 15.0# each, polished rim).�
Dunlop Direzza DII tires, size 205/50R15.�
McGard 64000 lug nuts (1/2"x20 by 1.5", cone seat). � | �
�
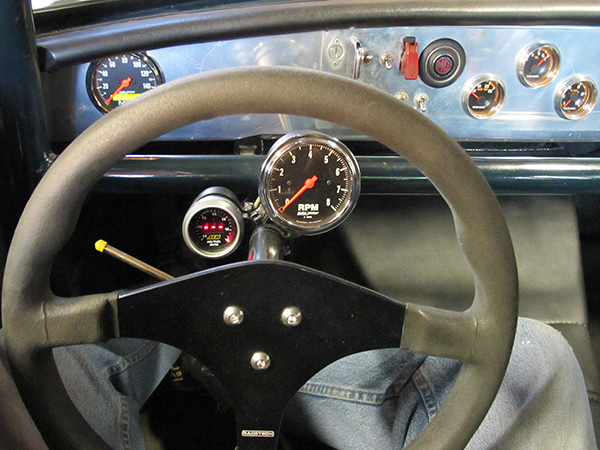 � Spring 2016: Autometer Speedometer model 2489 and Tachometer model 2499. � � | �
|
| Instruments: | ��
Speedometer - Autometer "Traditional Chrome" model 2489 (0-160mph).�
� Air/fuel ratio - AEM, electronic. Used with a Bosch UEGO wideband oxygen sensor. � Tachometer - Autometer "Traditional Chrome" model 2499 (0-8000rpm).� � Fuel level - Stewart Warner "Track Force", electrical. � Oil pressure - Stewart Warner "Track Force", mechanical. � Water temp - Stewart Warner "Track Force", electrical. � | �
| Electrical: | �� Nippondenso 55A internal regulator alternator from a Chevy Swift.� (Suzuki part# 31400-86210, Nippondenso part# 100211-4150.) � Single 12-Volt battery in passenger-side location.� FIA-approved battery disconnect switch with removeable key.� (Separate contacts disconnect the alternator before the battery.)� All new home-made wiring featuring crosslink insulation (instead of PVC) and Metri-Pac connectors.� Where possible, wiring has been moved inside the cabin (instead of running under the floorboards, etc.)� Ten fuses and four relays are mounted under the dashboard where it's cleaner, drier, and cooler.� | �
| Lighting: | �� Wipac "Quadoptic" (Made in England) H4 halogen headlamps.� � VW Jetta front turn signals (part# 165953155), � Hyundai Excel side markers.� LED taillamps (see below).� Toyota Corolla license plate lamps.� Chevy S10 rearview mirror with integral map lights.� | �
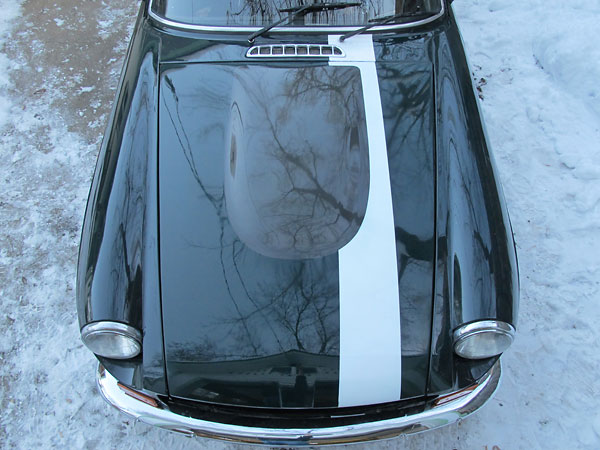
| Body: | �� custom carbon fiber bonnet from Preform Resources.� Ureflex air dam.� PPG Deltron basecoat/clearcoat in Jaguar "Brooklands Green" (see below), with a white Sebring stripe. � | �
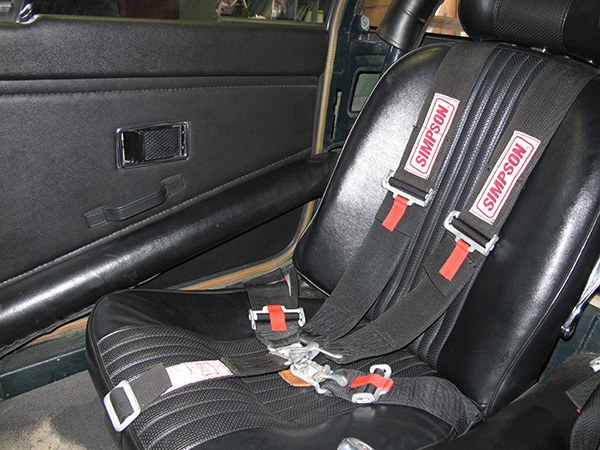
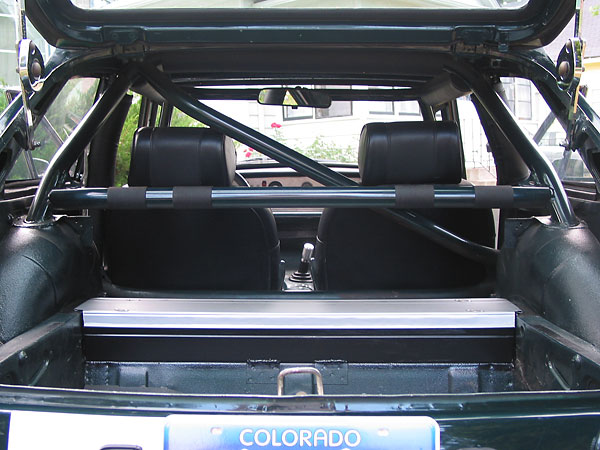
| Interior: | �� six point roll cage. (Stitched/seam-welded body seams in the engine compartment too.)� Simpson 5-point latch-and-link safety harnesses.� Home-made aluminum dashboard (with early-model MGB padded eyebrow).� Aluminum door trim.� Custom quickly-removable polycarbonate rear quarter windows on lightweight steel � box-tube frames held in by three quarter-turn (Dzus) fasteners per window.� Built-in toolbox in cargo area.� | �
| Owner's Comments: | ��
This little car still makes me smile every single time I drive it.�
I've had her over twenty-five years and I'm comfortable with her.�
She is by nature and intent a continuing project.�
Since sorting out the conversion, she's proven very reliable.�
Frankly, I've driven much more powerful and refined MGB V8 conversions, but "Bonnie" �
still feels, sounds and looks more like a racecar than any other MGB I've driven.�
Being a GT, plus having a cage, my car is really noticeably more rigid than others.�
In my opinion that's a great thing. My main plan for the future is just to drive more!�
� | �
 �
�
�
�
�
�
As measured at British V8 2013, this car weighed 2150 pounds "wet" (i.e. full tank of fuel).
�
That's about 160 pounds lighter than original, and 277 pounds less than a "factory" MGB GT V8.
�
Corner weights: 521 (LF), 546 (RF), 542 (LR), 541 (RR). Distribution: 49.63% front to 50.37% rear.
�
�
�
The term "British Racing Green" has always been ambiguous. This particular MGB has been painted
�
a popular Jaguar color. From 1991 through 1998, Jaguar called this shade "Brooklands Green"
�
(Jaguar code# 753/HFB. PPG code# 46968). In 1999, Jaguar began calling this same color
�
British Racing Green. The white stripe is Ford's "Performance White".
�

�
This paint job has never been "rubbed out" and in twenty years it has also never been waxed.
�
Water still beads-up on it! Good automotive clearcoat is amazingly durable, so I recommend
�
simply leaving it alone. Car waxes aren't durable, and applying them causes swirl marks.
�
�
More recent photos of Bonnie may be found here:�
Moss Motors' 2014 Motoring Challenge!�
�
 �
�
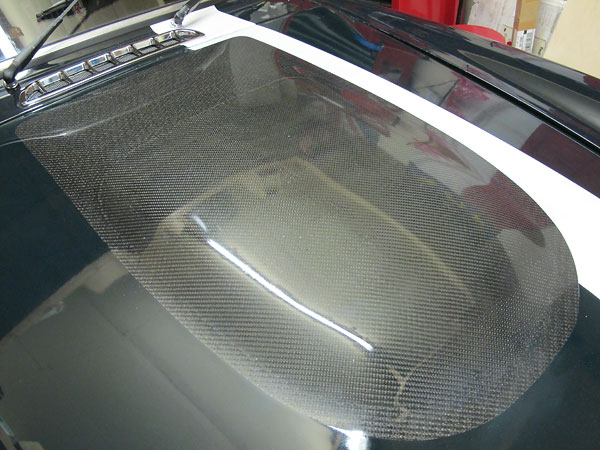
Winter 2011: Custom Carbon Fiber Bonnet
� �
�
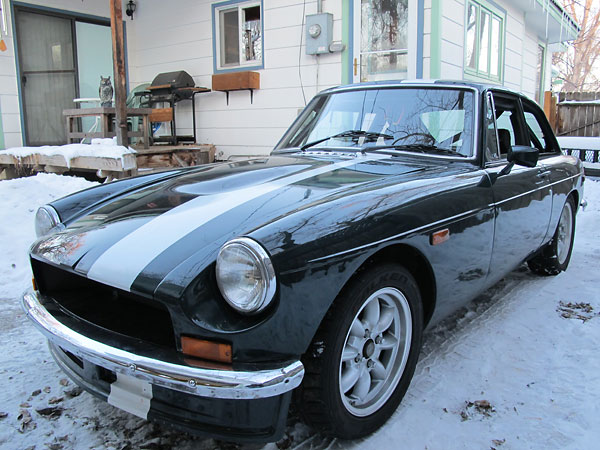
In 2011, my good friend Dave Craddock of Preform Resources built this custom carbon fiber bonnet.
�
The new bonnet weighs less than five pounds! That's over twenty pounds less than a steel one.
�
I reckon Bonnie probably has the lightest weight bonnet of any MGB in the entire world.
�
�
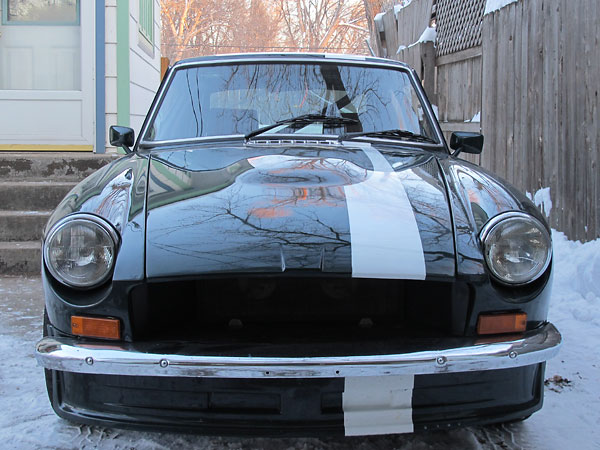
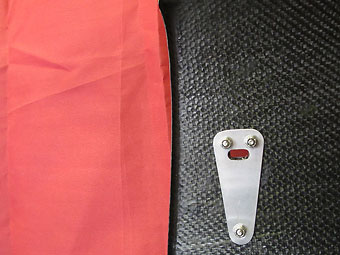
These photos were snapped just hours after I received it. Hood pins have subsequently been installed
�
to hold down the front. Hidden aluminum tabs hold down the back; they slide into slots cut into the
�
MG's steel bodyshell above the original hinge positions.
�
�
The large "RV8 style" bulge in the bonnet provides room for a new induction system (see below).
�
�
"When you got it, flaunt it!" - It would be a pity not to show off a little of the carbon fabric.
�
 �
�
 �
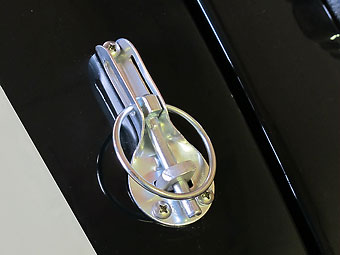
Instead of regular glued-on reinforcements with provisions for hinges and latches, this hood
�
Instead of regular glued-on reinforcements with provisions for hinges and latches, this hood
�
"skin" has only a honeycomb core to provide its stiffness. To avoid crushing the core when
�
installing OMP aluminum hood pins (part# EB/492/A), I crafted aluminum reinforcements.
�
April 2012: My First Home-Made Carbon Fiber Part
� �
�
This custom carbon fiber and epoxy recirc shield touches the bottom of the bonnet all
�
the way across, preventing any airflow from bypassing the radiator. This part only
�
weighes about five ounces! It'd be even lighter if I had tools for vacuum bagging.
�
�
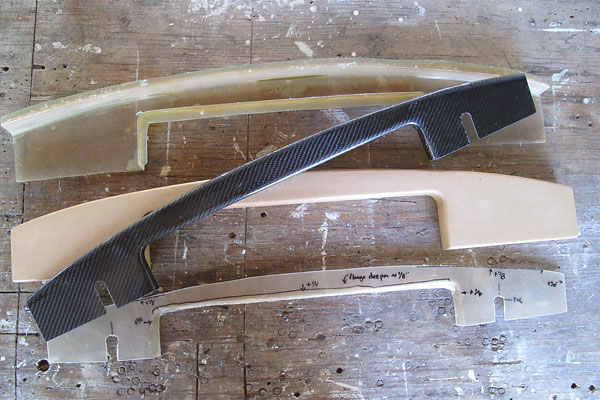
Foreground: the new carbon part, freshly removed from the mold (and trimmed on a bandsaw.)
�
Background, bottom to top: a quick-and-dirty fiberglass/polyester prototype, an MDF "plug",
�
and the fiberglass mold made by draping over the plug. Obviously I could have made the
�
recirc shield out of aluminum or whatever, but learning new fabrication techniques is fun.
�
May 2012: Coilover Front Suspension with Dropped Spindles
� �
�
Gutted and milled out Armstrong lever shock absorbers have been combined with GAZ single
�
adjustable coilover shock absorbers from Moss Europe and Eibach 525 pound/inch springs.
�
Lower spring pans from Moss Motors have been drilled out to reduce their weight. Dropped
�
spindles sourced from Targett Motorsports lower the car one inch, and do so without
�
shifting the suspension's roll center lower. Most importantly of all, the steering arms
�
have been modified to minimize bump steer associated with the lowered ride height.
�

April 2013: Wilwood Dynalite Brake Calipers and 11.75" Vented Rotors
� �
�
Wilwood Dynalite four-pot forged aluminum brake calipers and 11.75" vented rotors,
�
sourced from Bill Guzman at Classic Conversions Engineering.�
�

Winter 2012/2013: Electronic Fuel Injection
� �
�
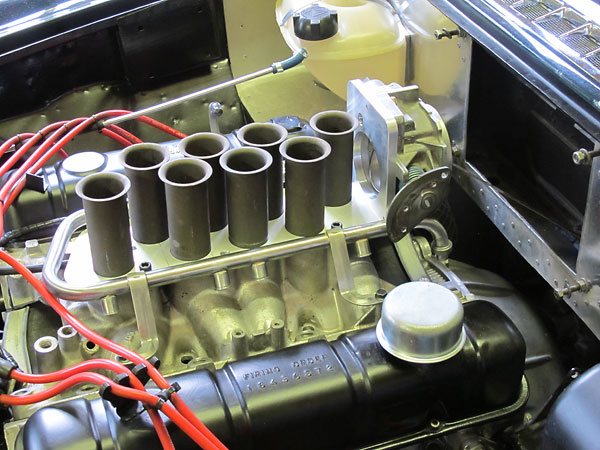
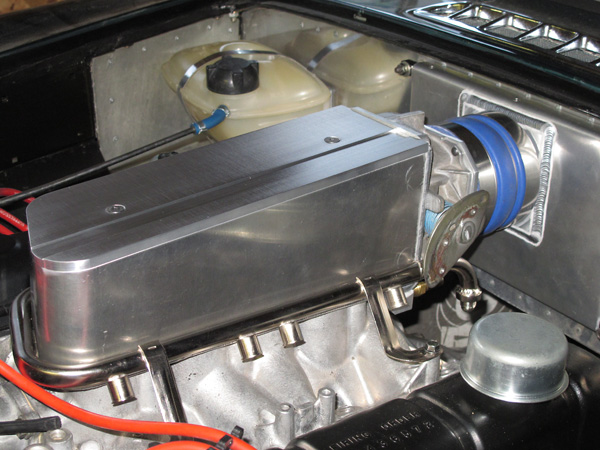
Here, a bespoke fuel injection system coming together! The basic plan was to combine a
�
Rover manifold and injectors, a custom cowl-induction plenum, a GM throttle body, and a
�
custom built/programmed MegaSquirt (speed-density) control system.
�
�
6061-T6 aluminum (16-gage) has the right properties for a wraparound plenum wall. However,
�
to form it with modest force you must first anneal the bend region. Draw a line on the surface
�
with a Sharpie, and then use a propane torch to heat the surface until the line disappears.
�
(I had to repeat the annealing process several times as I worked my way around each bend.)
�
�
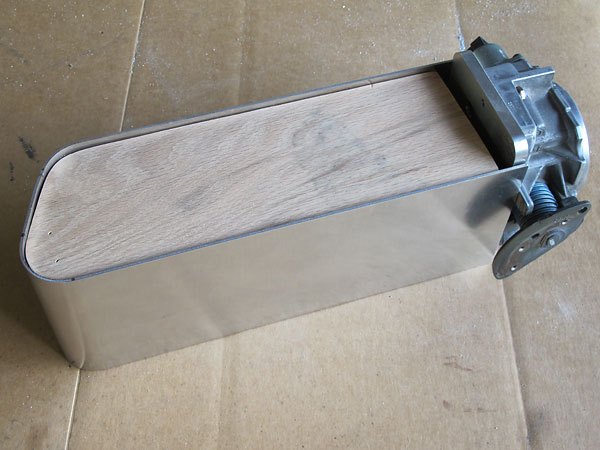
December 2012: a Rover fuel rail has been extensively modified, then electroless nickel plated.
�
The plenum wall has been welded up. I also fabricated a new air cleaner housing.
�
�
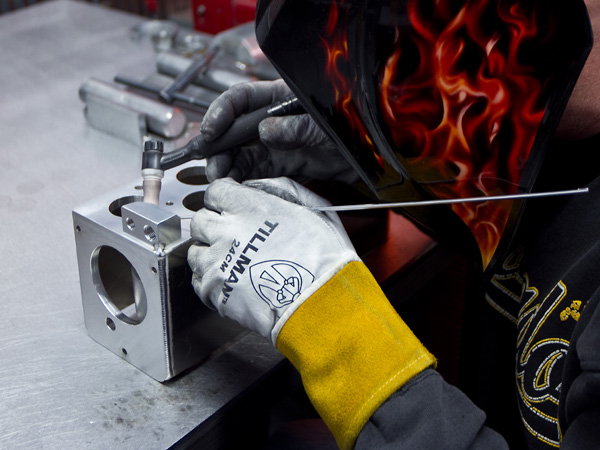
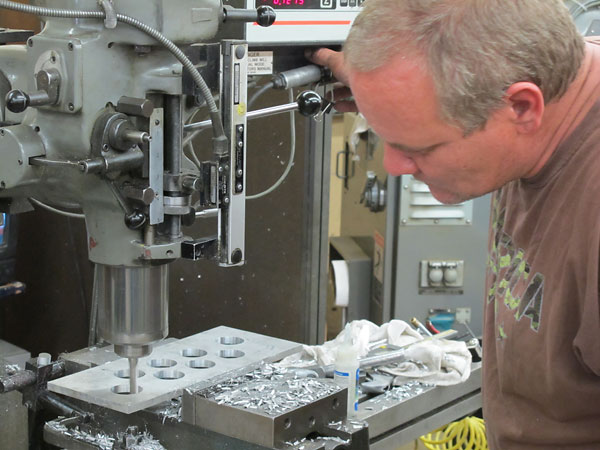
This photo shows attachment of a PCV and MAP sensor port block to the bottom of my plenum.
�
The guys at Peterson Fluid Systems in Denver certainly do beautiful TIG welding, don't they?
�
They're fun people to work with too. (Photo by Mike Morten for BritishV8.)
�
�
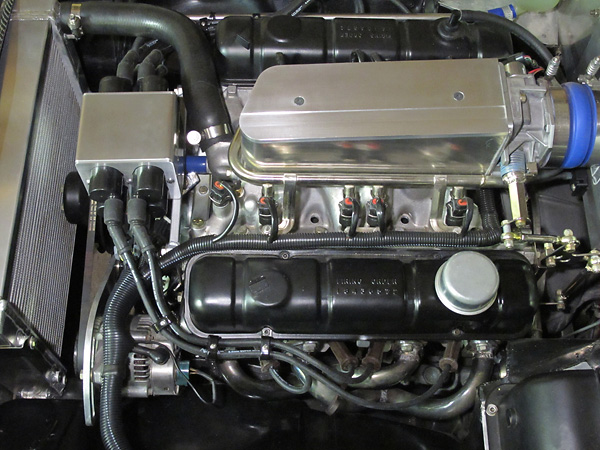
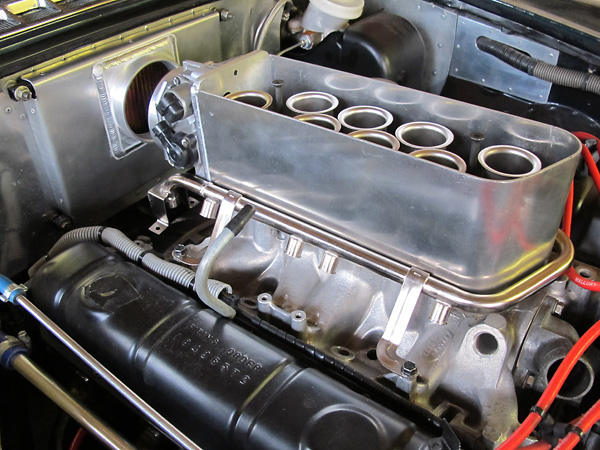
Top: Rover intake manifold thermostat bypass has been relocated to suit Buick style timing cover.
�
�
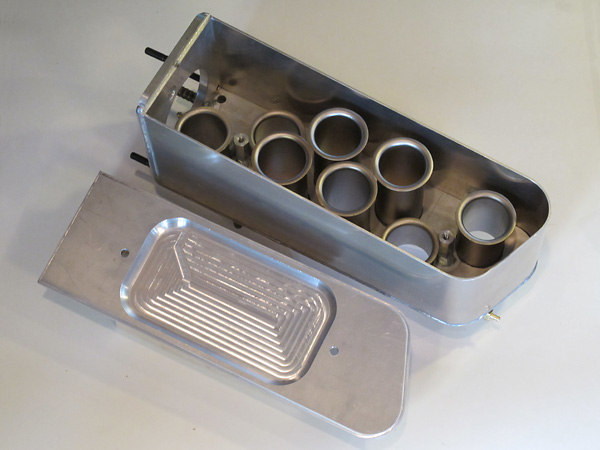
The volume of each intake tract, measured from valve seat to trumpet top, has been
�
carefully cc'd and equalized. Note that the trumpets for cylinders #1 and #7 were
�
shortened significantly compared to the trumpets for cylinders #2 and #8.
�
�
Plenum wall trimmed down (at an angle) and capped with a lid.
�
Note racing stripe offset to one side, to echo my car's paint scheme.
�
�
My very good friend Scott McRoberts has been incredibly helpful with this project.
�
I heartily recommend his family business: McRoberts Machine of Longmont Colorado.
�
�
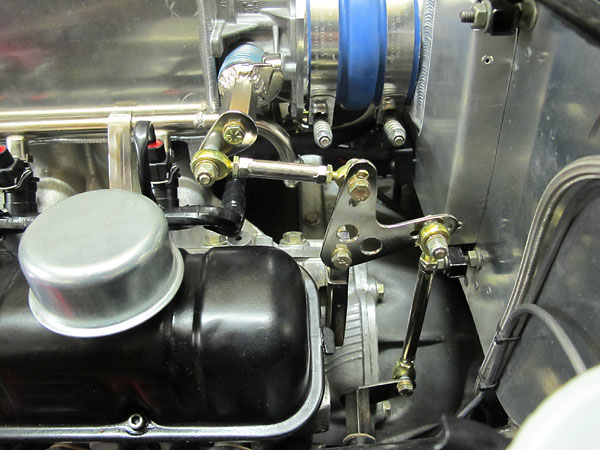
The throttle linkage is rather elaborate, but it seems to work well.
�
I sent it and some other parts out to be electroless nickel plated.
�
�
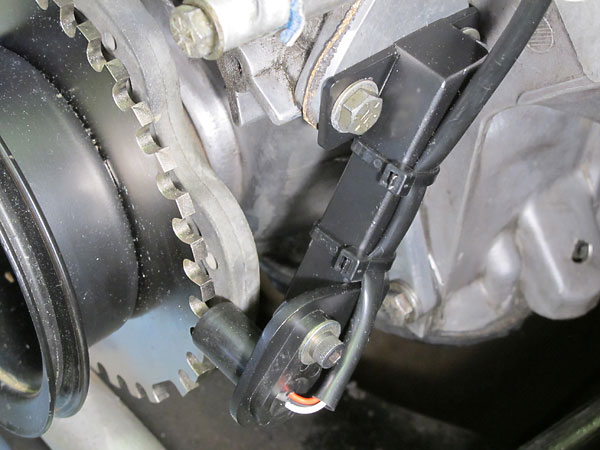
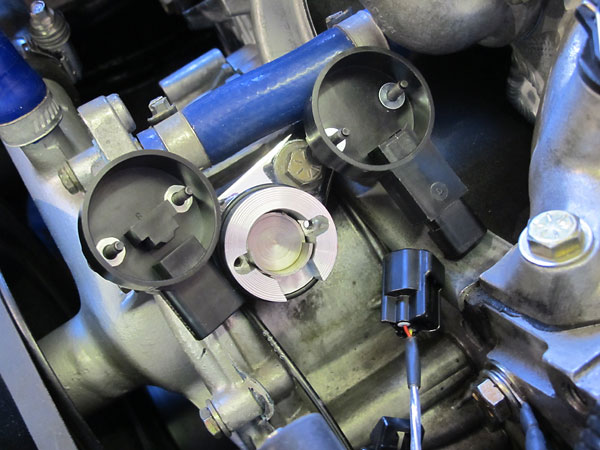
I'd planned to use a Hyundai crank sensor because they're widely available and have a nice
�
form factor. After mounting the Hyundai sensor on my engine, I thought to verify its signal
�
output. Instead of producing a 0 to 5 volt waveform, the output toggled between 5 and 8 volts.
�
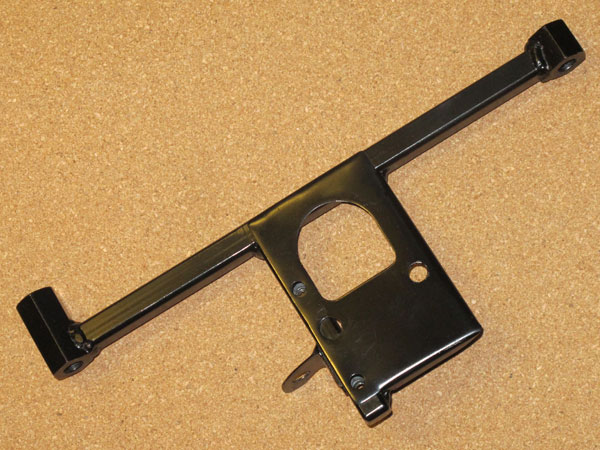
So... this is a second generation Hall effect sensor on a second generation bracket.
�
�
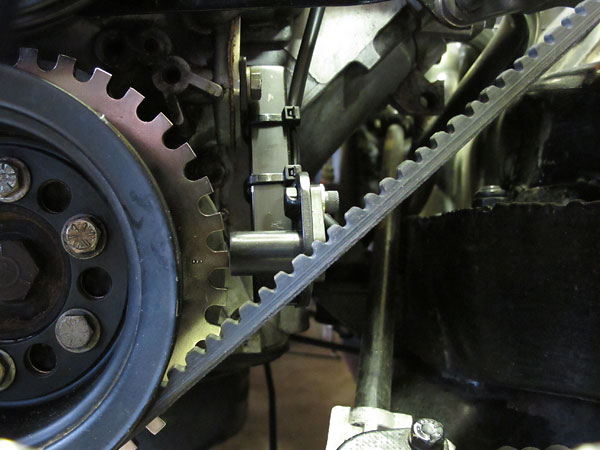
This is a "36-1" trigger wheel: it has 36 teeth positions on ten degree centers and one
�
missing tooth to provide a reference for indexing. I mounted the trigger wheel between
�
balancer and crank pulley on the six existing bolts. (Buick's six-hole pattern is unusual.
�
Most of the pre-drilled aftermarket trigger wheels are set up for four or eight bolts.)
�
�
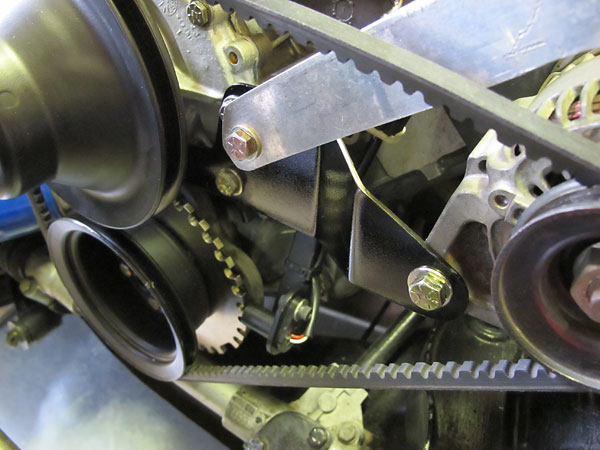
The trigger wheel shifted my crank pulley out of alignment, so I made a spacer for the
�
water pump pulley and a new outboard bracket (and spacer) for the alternator.
�
�
Here's a snapshot of the MS3-Pro engine computer. Initially, I only used it to control
�
electronic fuel injection. It's much more powerful than that! MS3-Pro computors will
�
support electronic ignition and they're handy for all sorts of data logging too.
�
�
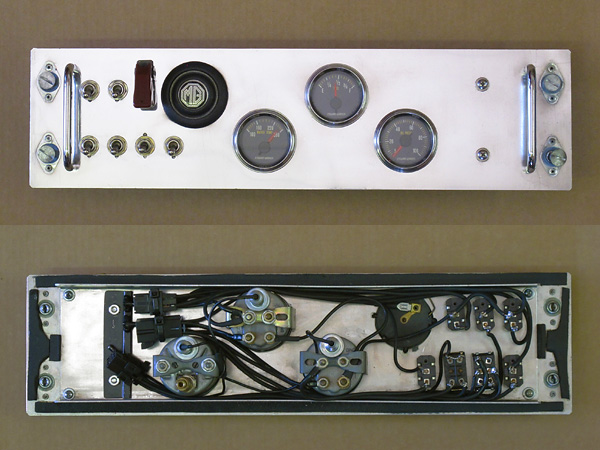
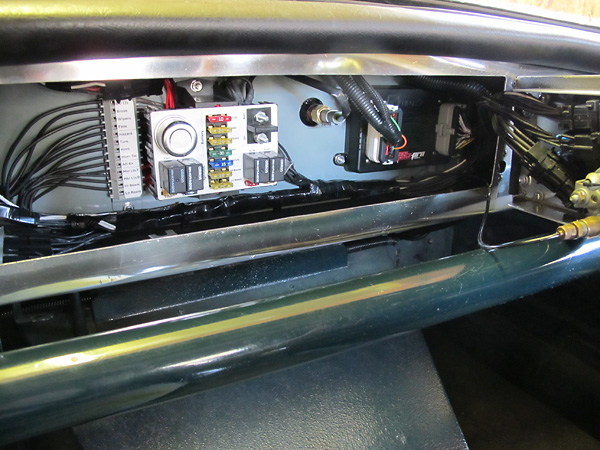
Although designed to be easily removable for service or upgrades, this instrument panel
�
served without modification from 1991 until 2013. Originally, a fuse panel was mounted
�
on the back side of the panel. As part of the EFI installation, I decided to add several
�
relays and make the long-overdue upgrade from glass fuses to blade fuses.
�
�
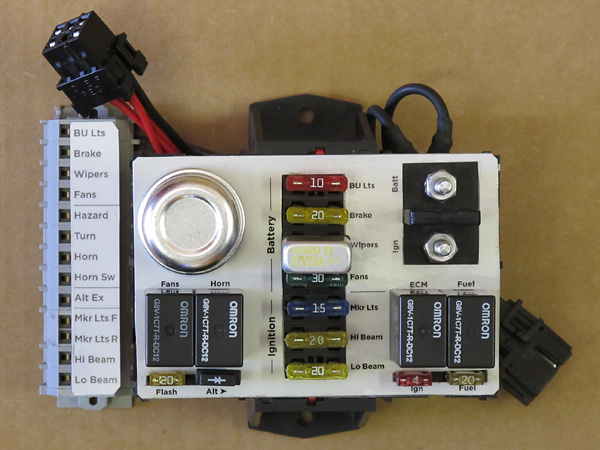
This new fuse and relay center will be mounted on the firewall next to the MS3-Pro ECM.
�
Incidentally, the two relays and two fuses at right are highly recommended features of
�
the MegaSquirt installation. Fuel pumps and injectors produce a lot of "noise" which
�
could potentially compromise the ability of the control module to "hear" various sensors.
�
�
Part of this fuseblock was assembled by American Autowire (and marketed as a "Comp-9" kit).
�
I bought it at auction because I recognized they'd used DillBlox modular components. Thus,
�
it was easy for me to add a two-#10-power-stud block and also a two-relay-two-fuse block.
�
I also re-wired one of the previously existing relays to control my radiator cooling fans.
�
�
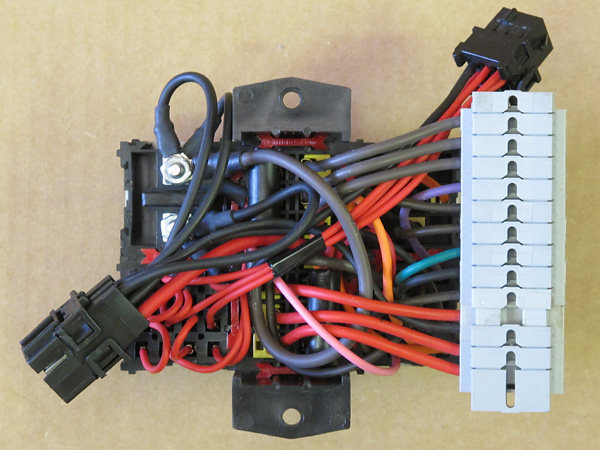
An intake air temperature (IAT) sensor is installed between the new fuse/relay center
�
and the MS3-Pro controller. Cables to the switch/gauge panel will pull out about eight
�
inches further. It attaches with three Metri-Pack connectors. The oil pressure gauge
�
is mechanical, and in this view you can see the hose that connects to it.
�
�
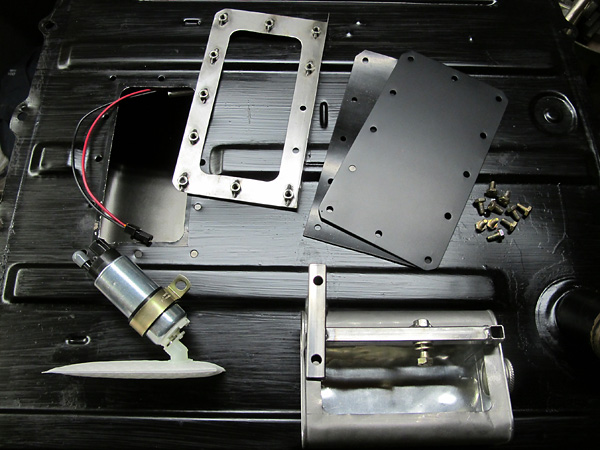
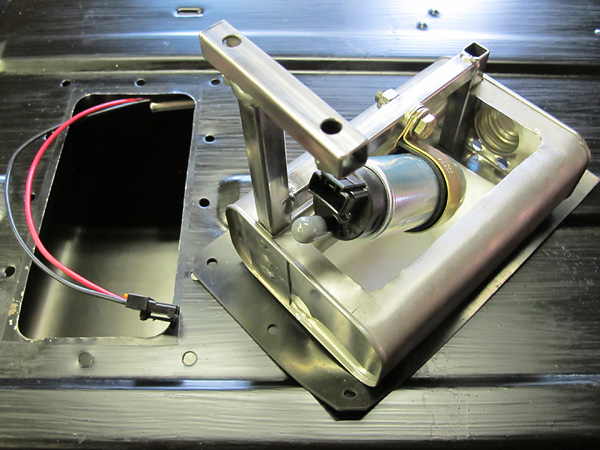
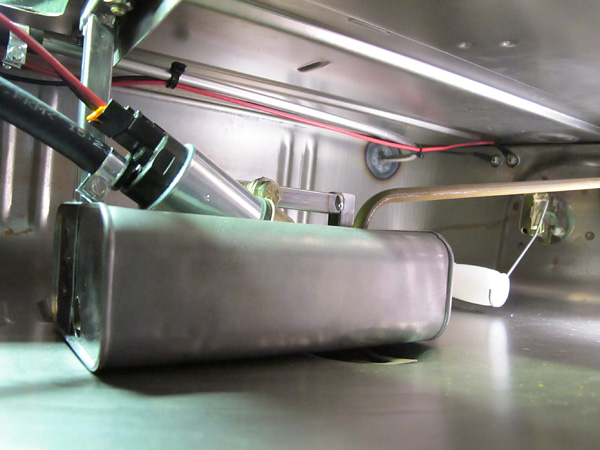
In-tank fuel pumps offer major advantages: fuel cools them and also muffles their noise.
�
However, a stock MGB fuel tank measures just six and half inches tall. I decided to
�
mount a Walbro GSS250 (190 liter per hour) fuel pump at a 45 degree angle.
�
A Honda Civic (1992-on) prefilter facilitated the installation.
�
�
Fuel sloshing within the tank could easily cause the filter to come loose from the fuel pump,
�
so some sort of baffle is highly desirable. I fabricated a "false sump" type baffle from
�
materials in my recycling bin: an old solvent can and scraps of half inch box tubing.
�
�
A new fuel outlet was fabricated from an AN-6 male weld-in fitting and a scrap of 5/16" stainless
�
steel tubing. Electrical passthrough connections were created by stacking PTFE washers of two
�
different outside diameters. The MGB's original fuel pickup remains in place, but will now
�
be used as a return line directly to the false sump.
�
�
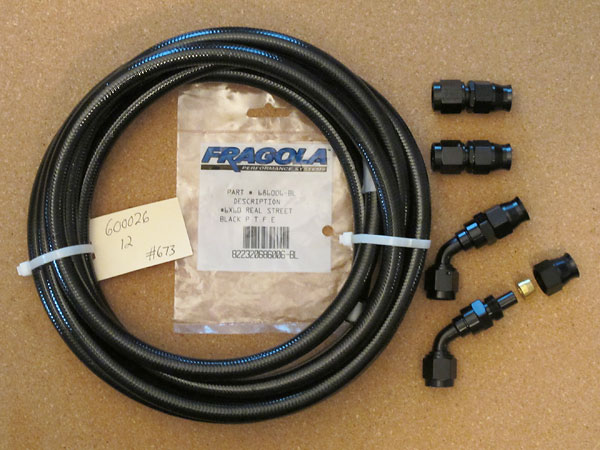
The higher pressure fuel supply line is PTFE (Teflon) lined with stainless steel braid
�
and a black outer sheathing so it's easy to keep clean plus less destructive to chassis
�
paint along its routing. Fragola straight AN-6 fittings are used at the fuel filter.
�
Fragola sixty-degree swivel fittings are used at the fuel rail and fuel tank.
�
�
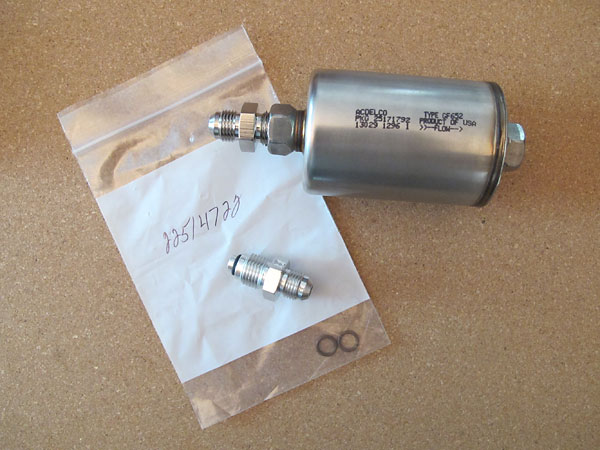
Install it and forget it: an AC Delco steel fuel filter will provide years of
�
trouble free service. AN-6 adapter fittings mate it to the new fuel lines.
�
�
Fuel injector and sensor wiring is clipped to a formed and nickel plated steel rod
�
assembly, and then covered in nylon convoluted tubing of various sizes.
�

�
Throttle position sensor (TPS) and Idle Air Control (IAC) stepper motor valve
�
connections on the side of the throttle body assembly.
�
Winter 2013/2014: Electronic Ignition
��
�
By this point the EFI system was running very well in batch-fire mode and I'd put a couple thousand
�
miles on it, but there was more to do. Addition of a cam position sensor would facilitate upgrading
�
to sequential injection and implementing electronic ignition. (Cam position sensors have a simple
�
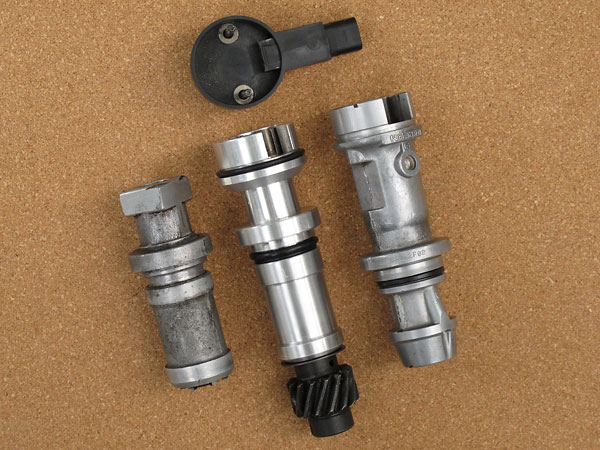
job to do: differentiate exhaust strokes from compression strokes.) This photo shows an early 2000s
�
Ford Taurus/Windstar V6 cam position sensor (top and right) that I purchased and took apart. At left
�
is a section of old Buick 350 distributor. I copied its dimensions and used its drive gear for the
�
new custom part in the center. My good friend Scott McRoberts did the machine work.
�
�
The Ford shaft was cut in diameter and length. We milled flats onto its end to drive a Buick oil
�
pump. Note how it has a "half moon wheel" at the top instead of one with one or more narrow
�
teeth. The sensor at right came with it; it's a VR (variable reluctance) 2-wire sensor. I prefer
�
to instead use the Hall effect 3-wire sensor at left. This particular Airtex Wells sensor (part#
�
5S1283) is an improved version of a Hall effect sensor Ford used in the 1990s. It features an
�
over-molded magnet instead of one that can shake loose. The functional advantage of a Hall
�
effect sensor in combination with a half moon wheel is quicker starts. MS3-Pro can "poll" cam
�
position when the crank sensor detects a missing tooth and immediately sync ignition timing.
�
�
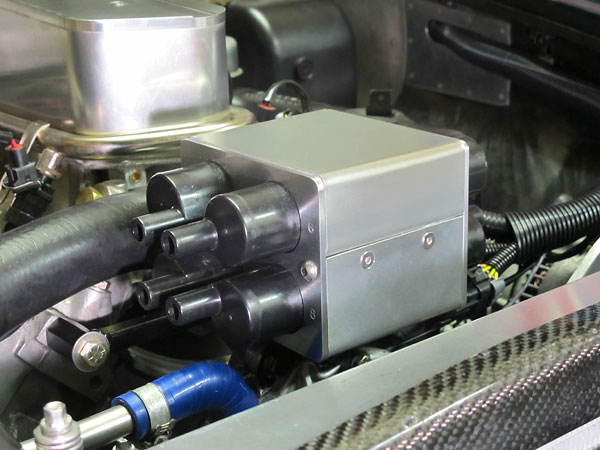
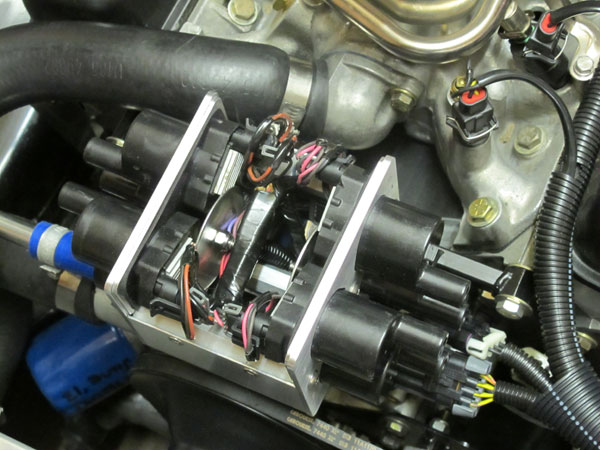
Here's the mount I invented to hold eight Chevy LS2 Truck ignition coils.
�
�
These coils are bad boys - possibly the most powerful coils ever installed by a major OEM.
�
�
A neoprene gasket provides a modest measure of vibration isolation.
�
�
This bracket spans between the cylinder heads and a boss on the timing cover.
�
(The coil pack connects to it three places too.)
�
�
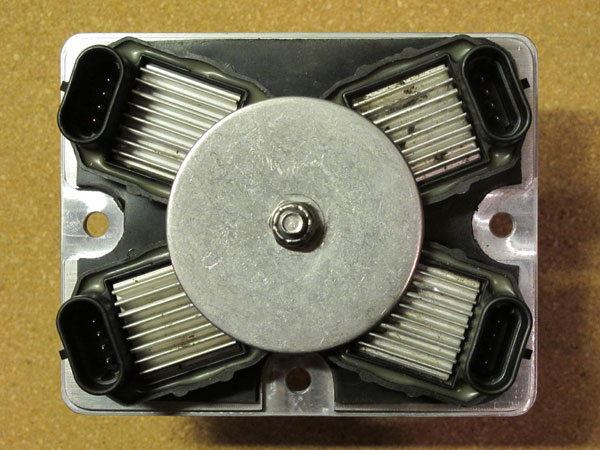
I reworked a pair of Chevrolet coil harnesses into one new harness. Now all eight
�
trigger leads come through one eight-way Metri-Pack connector, and a second three
�
way connector provides power and ground connections. (One ground is connected to
�
the engine. A second ground lead connects to the MegaSquirt MS3-Pro computer.)
�
�
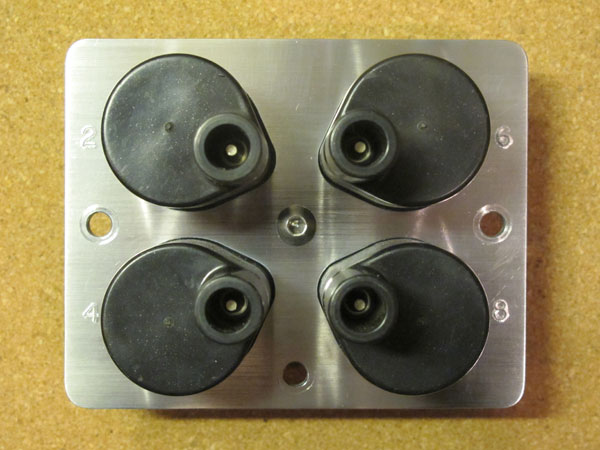
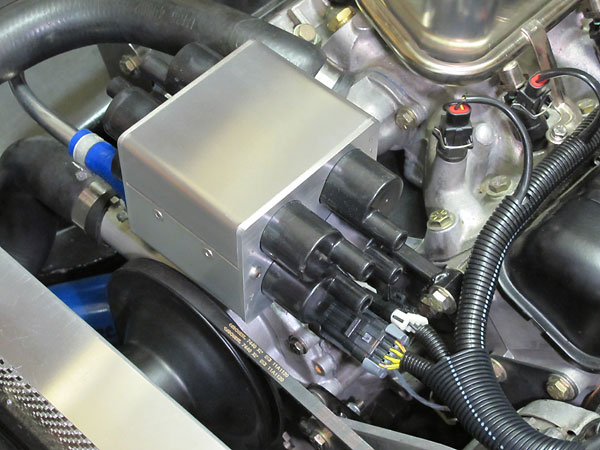
The top cover snaps back on neatly and tightly.
�
�
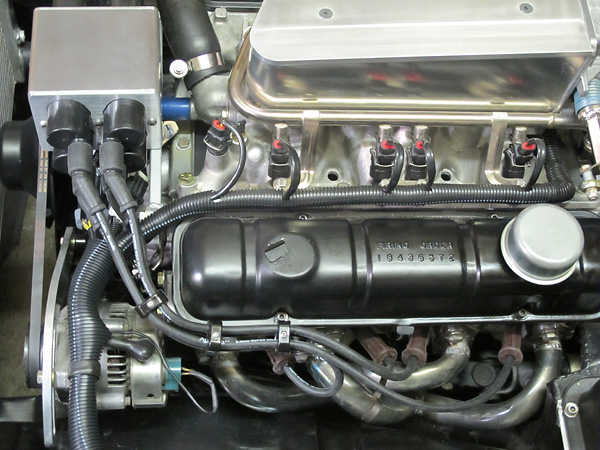
Aurora custom spark plug wires and Made-4-You Products "Smoothie Stac-Pak" separators.
�
�
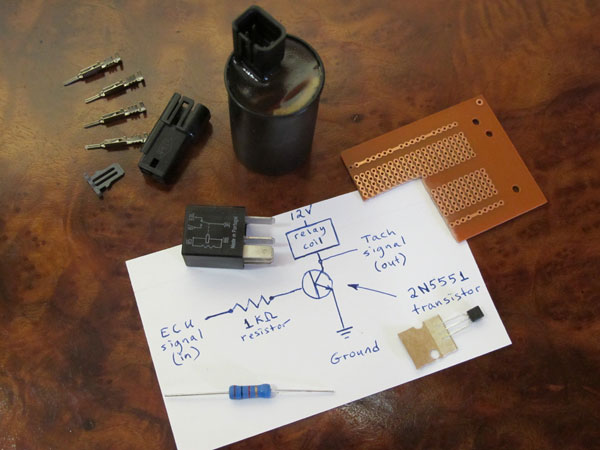
MS3-Pro will reportedly drive any modern tachometer. My tach wasn't modern, so I pieced
�
together an adapter from a gutted relay, a transistor, and a resistor. This photo shows
�
the finished part potted inside a 35mm film canister and some spare components. (The
�
adapter worked fine, but I upgraded to a new tach in 2016, making this redundant.)
�
April 2014: Upholstered Transmission Tunnel
��
�
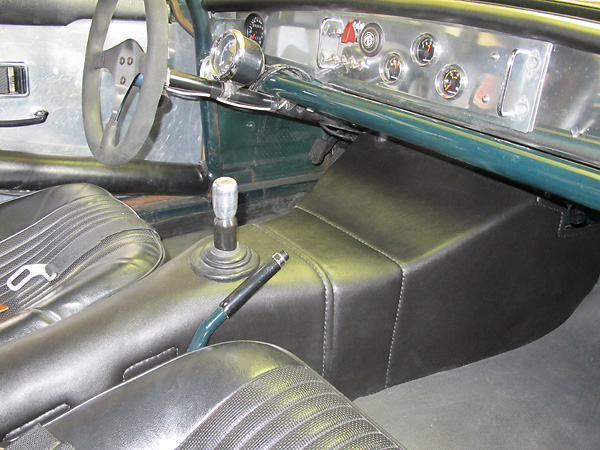
From shifter hole to firewall, the steel transmission tunnel was fabricated back in 1990. Since then,
�
the tunnel has only ever been covered with paint. I've had a lot of time to think about covering it.
�
I knew I didn't want a console or carpet! Design criteria included: total weight under two pounds,
�
easy to keep clean, and removable without tools or fasteners. This resulting two-piece transmission
�
tunnel cover features hand-stitched Morbern "Allsport" 4-way stretch vinyl installed over 1/8" thick
�
landau pad atop a very lightweight molded fiberglass structure.
�
�
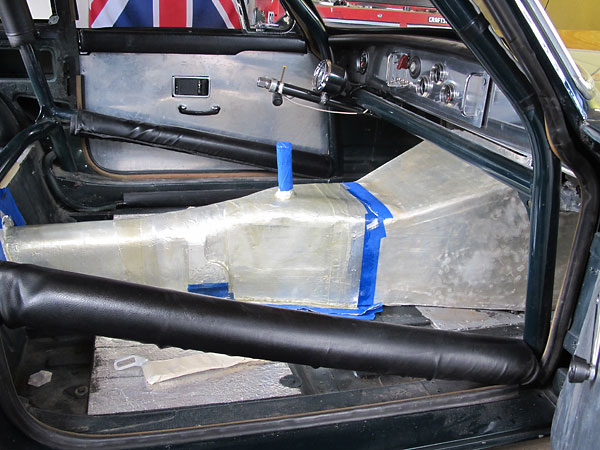
In this photo, the rearward fiberglass part is newly made. The forward part had been made the day
�
before. Both were constructed of two layers of glass fabric and regular polyester resin. First, I
�
taped 1/16" craft foam to the steel tunnel to even out its irregular shape. I covered the foam with
�
aluminum foil faced duct tape, and then applied mold release to the tape. (Quick. Easy. Cheap.)
�

�
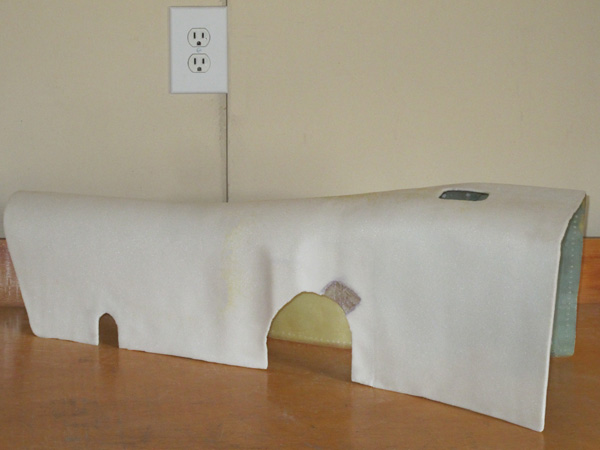
I applied a very modest amount of Evercoat "Lite Weight" body filler to the fiberglass to fill in
�
some of the hollows. Then I layed-out and drilled a pattern of over 1000 5/32" diameter stitch holes
�
on 5/16" spacing. After that, I used Weldwood HHR (high heat rated) contact cement to secure
�
sandable/sculpable, 1/8" thick, closed-cell cross-linked polyolefin landau pad over the fiberglass.
�
�
Contact cement holds the vinyl tightly in place, but a whole lot of strategically placed stitches are
�
there to make sure. The thread is waxed nylon from Tandy Leather, and the stitch technique is a two
�
needle "saddle stitch". In other words, both needles passed through every hole, one from the back
�
and the other from the front. Stitching goes all the way around all edges and also through the middle
�
of all concave areas. The two upholstered covers fit nice and tight with no fasteners, except ones
�
that secure a thin stainless steel protective shield next to the throttle pedal.
�
May 2014: Easy LED Taillamps
��
�
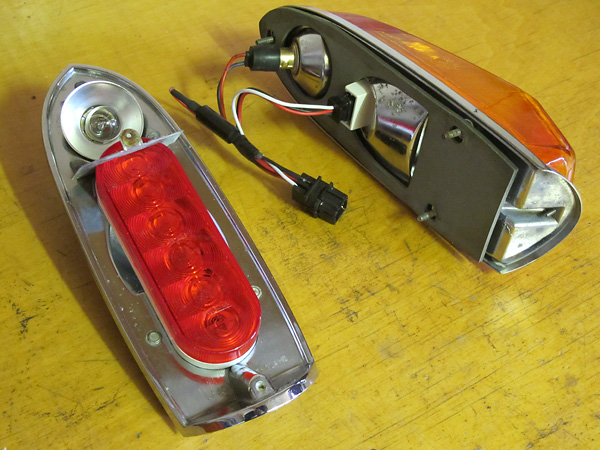
It's 2014, and almost every tractor trailer produced uses light emitting diodes for rearward lighting.
�
Mass production has advanced the state-of-the-art and brought costs down. So, I decided to install
�
some off-the-shelf, sealed, stop/turn/taillamp assemblies inside my MGB's old Lucas housings. I wired
�
them to illuminate in all three modes. MGB's original incandescent brake and tail lamp feature remains.
�
Bottom line: much more effective and also more reliable lighting. Total cost: less than $30.
�
�
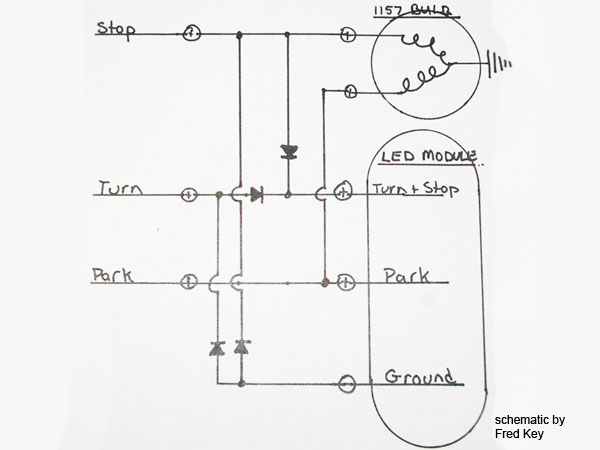
A diode is simply a checkvalve for electric current. This schematic shows how to use four diodes
�
to isolate the various lamp functions. One diode keeps the incandescent brake lamp from blinking
�
with the LED turn signals. Another diode keeps front and rear lamps from affecting each other.
�
My friend Fred Key suggested adding two more diodes to keep the rear turn signals blinking even
�
when the brake lights are applied. No relays are required, and I use an ordinary flasher module.
�
June 2014: Upholstered Door Panels
��

�
When I installed the roll cage, I got the front hoop too close to the passenger-side window crank.
�
Moving the cage wasn't practical, so I decided to clock the window winder bracket rearward.
�

�
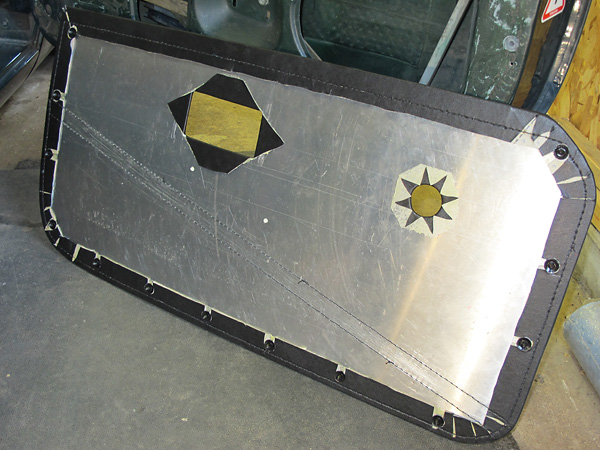
With the window crank in a non-standard location, a standard MGB door card won't fit anymore.
�
No worries! I preferred to make my own upholstered door cards and caps anyhow. I molded the
�
door caps out of fiberglass. I made them taller than stock to be more comfortable as armrests.
�
Of course they're lighter weight than stock too. I made door cards out of flat aluminum panels.
�
�
Two-needle hand stitching through pre-drilled holes. Like the transmission tunnel cover (above),
�
door panels and caps were covered with landau pad and then premium automotive grade vinyl.
�
�
Stitching across the door panels was aligned to match rollcage tubes.
�
Stock 1972-only MGB door pulls were substituted for the earlier style.
�
October 2014: Refined Engine Tune
� �
�
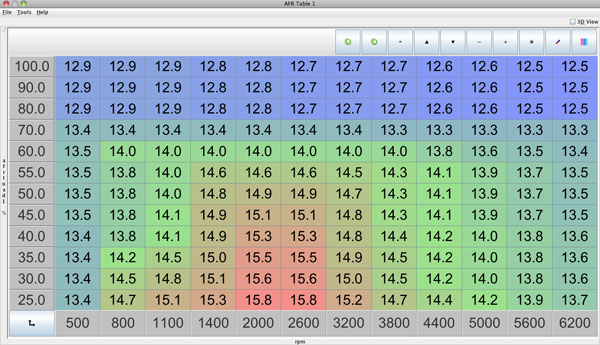
This is an "AFR Table" for my Buick/Rover V8 engine. Obviously the x-axis is engine speed.
�
The table's y-axis is "Fuel Load %", which is derived from the MAP sensor's measurements.
�
The table's cells (i.e. the z-axis) show the target air/fuel ratios I had as of 2014. (Note: as
�
of 2016, my tune has been updated to "stoich" (14.7:1) at idle speeds and it's also leaner
�
in the cruise region. Result: a smoother/slower idle and better fuel economy.)
�
�
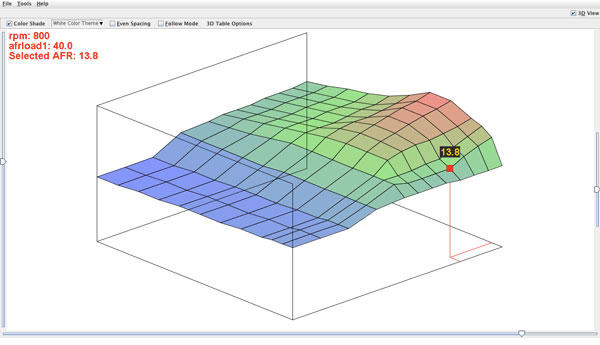
This is the exact same AFR Table, except converted into a "topographic map" view.
�
�
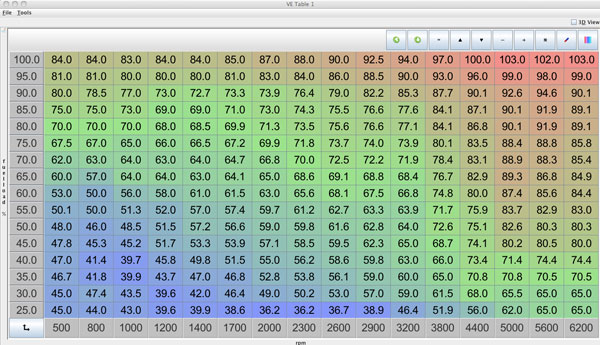
This is a Volumetric Efficiency table, tuned for the characteristics of my engine
�
including for example its fuel injection system, camshaft grind, cylinder heads, etc.
�
The VE table is really critical for engine operation because its z-axis is the main
�
determinant for how long fuel injectors are pulsed for each combustion event.
�

�
If you're familiar with mechanical and vacuum advance mechanisms on distributors,
�
you'll have no trouble comprehending this table: x equals engine speed, y equals
�
manifold vacuum, and the z axis shows ignition advance (in degrees before TDC).
�
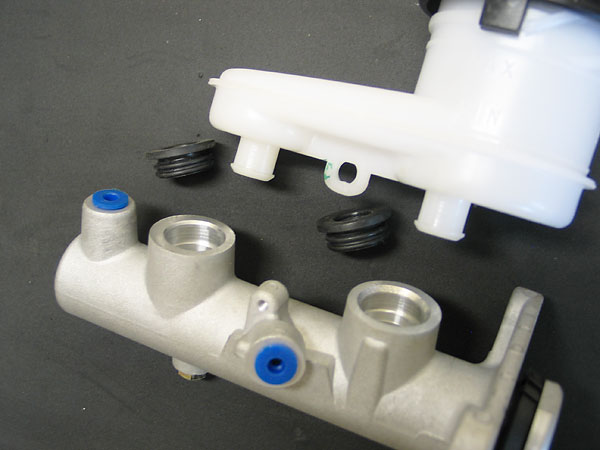
November 2014: Customized Big-Bore Brake Master Cylinder
� �
�
Now that the driving season is winding down, I'm preparing to install a newly customized big-bore
�
brake master cylinder and some related upgrades. Stay tuned. I'll post pictures and notes here.
�
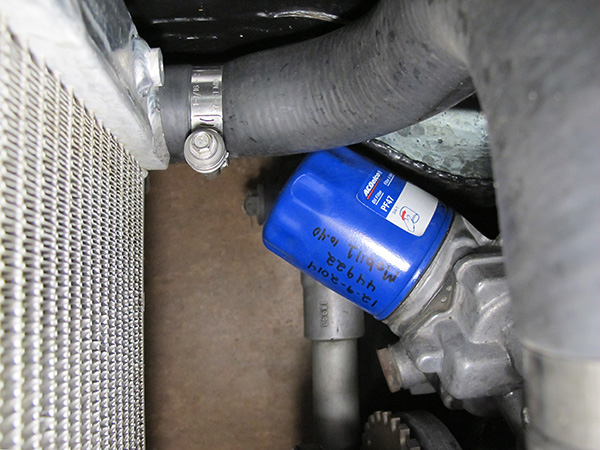
Somebody Asked For Close-up Photos of my Oil Filter Installation
� �
�
A Buick V6 "metric" oil pump facilitated doing away with the previous remote oil filter.
�
�
I formed a shallow recess with a few blows of a ballpeen hammer.
�
AC Delco PF47 (and similar) oil filters fit nicely.
�
�
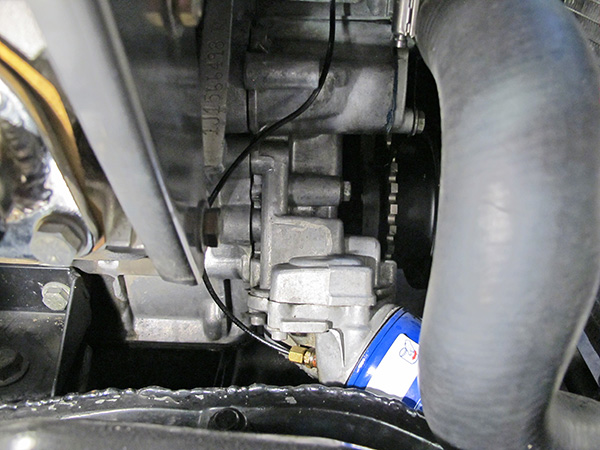
Vinyl hose and compression fitting for the oil pressure gauge.
�
�
�
Click Here to see Photos from Bonnie's 2014 North American Tour!�
�
� �
Original How-It-Was-Done Text
��
(exactly as published in MG V-8 Newsletter, Volume 5 Issue 1, February 1997.)
�
By: Curtis Jacobson
�
City: Greensboro NC
�
Model: MGB/GT (purchased for $1.00 in 1987)
�
Year: 1971
�
Color: British Racing Green with white Sebring stripe
�
| Engine: | �� 1963 Buick Special 215. (Complete running car purchased for $150!) Bored 0.030" oversize, � Kenne-Bell cam, Edelbrock carburetor, Mallory Unilite distributor, oil pump kit (longer� gears), remote oil filter (home-made adapter).� | �
| Transmission: | �� 1992-model Borg Warner T5 5-speed manual. Transmission was purchased new (Rockland Standard� Gear, $995). Transmission is the Camaro style with GM mounting configuration and 1-1/8"� 26-spline input, friction-lined rings (instead of brass synchros) and integral shifter linkage.� | �
| Bellhousing: | �� 1963? Buick, purchased loose with T10 transmission. � | �
| Clutch Slave Cylinder: | �� Girling 0.87" bore. Cylinder mounting bracket and link with spherical rod end were� specially fabricated.� | �
| Clutch: | �� 1992 Mercedes 190SL. Purchased new, no modifications required. Outside plate diameter� is less than 9-1/2" so you can use it with the stock Buick pressure plate and with� unmodified Borg Warner T5 trans.� | �
| Flywheel: | �� Stock 1963 Buick. � | �
| Exhaust: | �� Home-made sand bent Tri-Y's. (These are really pretty!) Dual side exhaust with mufflers� pocketed up under seats. � | �
| Brakes: | ��
Cross drilled front rotors. Ford 9" drums brakes, redrilled for MGB lug pattern.�
Currently making plans for dual master cylinders and rear disc brakes. Rear disc�
brakes will be tricky due to limited clearance between springs and parking brake�
mechanism, otherwise aftermarket Mustang parts will bolt on.�
� | �
| Wheels/Tires: | �� Goodyear Eagle GTII tires (P195/60 R14) on 8-spoke Minilite copies (14"x5.5", 13.6# ea)� | �
| Suspension: | �� Moss coil-over front suspension kit (highly recommended). Moss telescoping rear shocks� (required substantial rework). (So did mine! - Ed.) Kingpins, steering, leafs springs,� etc. renewed.� | �
| Cooling System: | �� MGB radiator re-ported but not inverted. Filler neck removed. Plastic remote surge/fill� tank fitted on firewall with a direct line to the water pump to prevent cavitation. New� structure and ductwork around radiator fabricated for improved rigidity and airflow.� (I didn't cut into the box section structure ahead of the radiator.) Twin 8-1/4" fans� (from Honda Civic A/C system) ahead of the radiator. Low clearance fan rings fitted to� increase efficiency.� | �
| Rear End: | �� 1992 Ford Mustang 5.0 8.8" Traction-Lok limited-slip differential with 3.27:1 � gearing. Purchased at salvage yard for $500, and subsquently narrowed. (See REAR ENDS� article in this issue for additional information.)� | �
| Instruments: | ��
Fuel level -Smith's (incredibly inaccurate), � Oil pressure - Stewart Warner (mechanical) � Water temp - Stewart Warner (electric) � Speedometer - VDO (electronic/programmable) � Tachometer - Sun.� | �
| Other Modifications: | ��
Nippondenso integral regulator alternator on fabricated mounting (very light.) � 6-point roll cage (aids handling due to vastly improved rigidity.) � Cowl induction/panel air filter. � Home made steering column, aluminum dashboard, and interior trim panels. � Modern wiring harness featuring sealed Metri-Pack connectors.� | �
| General Recommendations: | ��
Chrome bumper MG's handle and look better than rubber bumper MG's because they sit lower�
and because they sit at the ride height the designer intended. The lower height substantially�
reduces space available for fitting a V8, especially without modifying the front crossmember�
or steering shaft, but the conversion is especially rewarding at the end. An important�
advantage of starting with an older car is that it's easier to keep them legally on the road�
in states that require you to keep the stock level of emission control. (In my state, with�
a post-1975 MGB you'd have to fit catalytic converters to pass annual inspection. Check with�
your state.) � Buick parts cost much less than Rover parts and are much easier to find locally. � In my opinion, the ONLY reason British cars don't have as good a reputation for reliability� as some other imports is the quality of Lucas electrical parts. If someone is willing to� accept the challenge of installing a V8 in an MG, they shouldn't be intimidated by rewiring� the car with better quality wire, components, and technique. Switches and light fixtures� are also very easy to upgrade. Why wait until they leave you stranded? For example, Volkswagen� Jetta front turn signals fit a chrome bumper MGB with only a little modification. Many� Japanese cars from the 1980s were fitted with side marker and license plate lamps than can� easily be installed on an MGB. They look less clunky than the original, and they work really� well. You can streamline appearance, save an amazing amount of money, stop opening up light� fixtures to clean corroded contacts, and you'll be safer because of vastly superior modern� optics.� | �
�
�
�
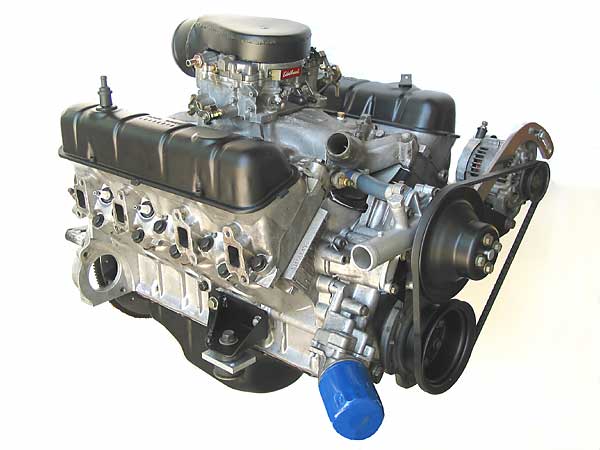
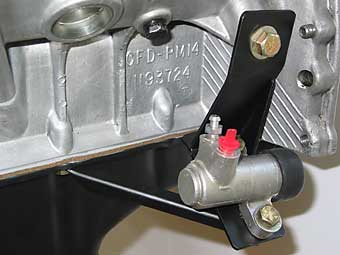
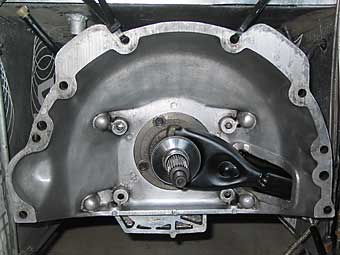
One of the custom motor mounts. Buick V6 "metric" oil pump, which angles the filter forward.
�
Note: Pete at Mantell Motorsport blasted & powder-coated all the black parts shown here.
�

�
A compact Nippondenso alternator and an external clutch slave cylinder, both on custom brackets.
�
�
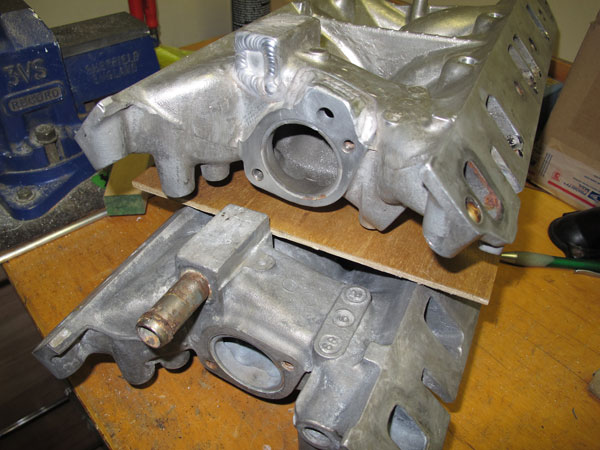
The seven accessory mounting bosses on Rover 4.0L heads are placed differently than the two bosses
�
on original Buick 215 heads. Upgrading heads necessitated significant alternator bracket modifications.
�
Also, two bosses had to be cut off to clear the driver side bulkhead. A more surprising difference:
�
exhaust port spacing is slightly different between Buick and Rover heads. Just different enough
�
that I had to enlarge the mounting holes in my precision-crafted headers!
�
�
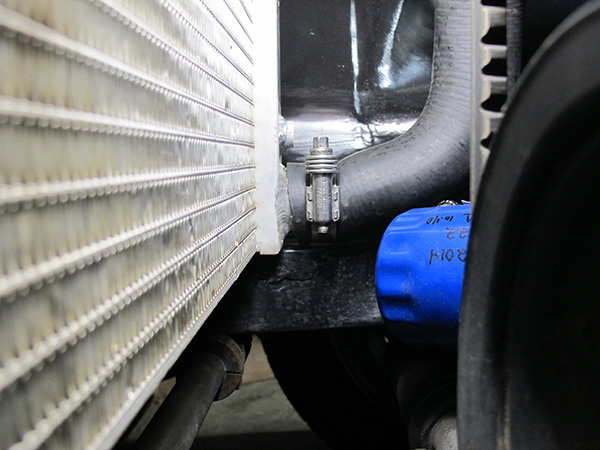
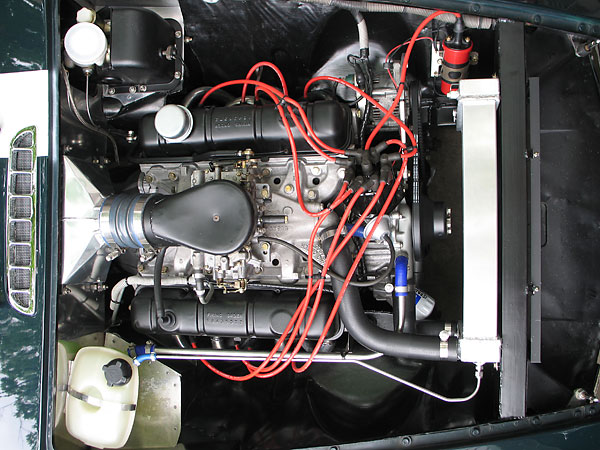
The radiator is directly above the anti-sway bar, not out in front.
�
The Buick V8 engine is mounted further rearward than usual too.
�

�
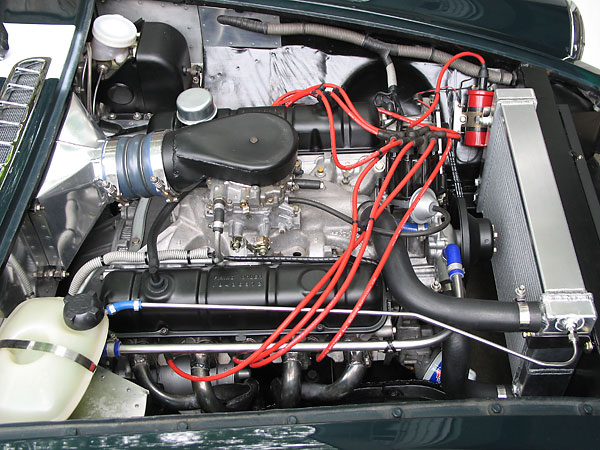
Cold air induction is one unusual feature of this Buick "215" engine installation.
�
A throttle linkage is employed, in lieu of a cable.
�
�
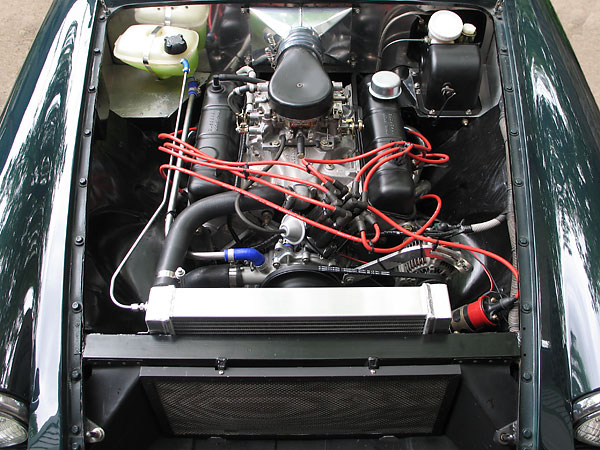
Stainless steel vent lines ensure self-purging of air from the cooling system.
�
�
AFCO "Scirocco" dual-pass aluminum racing radiator (part number 80107N).
�
�
Twin Honda Civic electric cooling fans.
�
�
Homemade sand-bent Tri-Y headers with slip joints at the collectors for easy installation. The
�
theory of this design is that proper pairing can improve exhaust scavenging. For the Buick's
�
firing sequence, cylinders are paired as follows: 1 & 5, 3 & 7, 2 & 4, and 6 & 8.
�
(Note the modified MGB radiator, which was used for about seventeen years.)
�
�
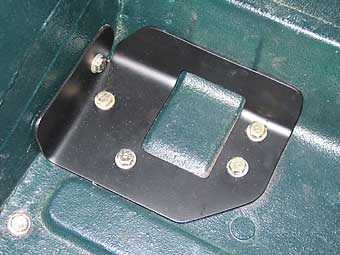
This photo shows muffler placement, muffler heat shields, and Lokar parking brake cables.
�
 �
�
�
Custom mount for a Girling slave cylinder, and shortened throw-out fork.
�
 �
�
�
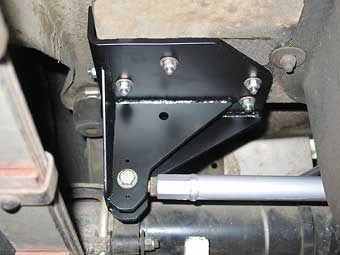
Homemade Panhard rod attached to a Ford 8.8 axle. A doubling plate sandwiches and reinforces the trunk floor.
�
 �
�
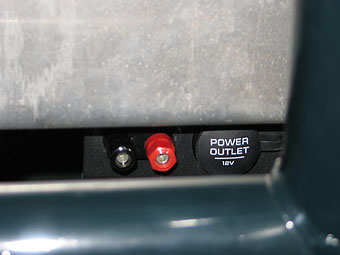 �
Left: Chevy S10 rear view mirror with integral map lights. Right: 12V power socket & binder posts.
�
Left: Chevy S10 rear view mirror with integral map lights. Right: 12V power socket & binder posts.
�
�
Six-point roll cage made from 1.75" seamless (DOM) mild steel tubing, w/ 0.090" wall thickness.
�
Note horizontal tubes under the dashboard, at shoulder-strap height, and low, behind the seats.
�
This photo also shows the built-in tool chest, with lid held down by Dzus quarter-turn fasteners.
�
 �
�
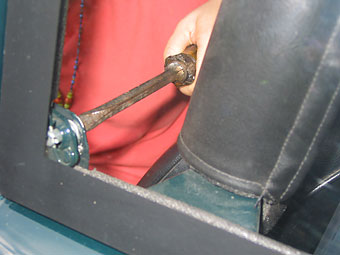 �
Lightweight polycarbonate quarter windows are secured in place with Dzus quarter-turn
�
Lightweight polycarbonate quarter windows are secured in place with Dzus quarter-turn
�
fasteners (three per window), and they're easily removable for ventilation.
�
Righthand photo also shows one of many supplemental cage-to-body brackets.
�
 �
�
�
Panasport 15x6 -22mm wheels weigh 15.0# each. 205/50-R15 tires.�
� Use by written permission from "britishv8.org" only. �
