
�
� presented by: Bill Guzman of Classic Conversions Engineering
� coverage by: Curtis Jacobson�
� The theme of Bill Guzman's tech session at British V8 2006 was: "Keep it simple!" All too � many people who start engine conversion projects never complete them. If one allows their � project to grow complex, it will also grow in time and monetary investment required. � I think he really struck a chord by essentially stating that none of us likes to see an � abandoned project car or a hack-job. If there's one piece of advice we should share with � newbies it's "Keep it simple." Bill's company, Classic Conversions Engineering, provides � kit parts that simplify performance modification of MGB sports cars. Bill's products � span the functional areas of the car: engine conversions, brakes, traction/suspension, � even aerodynamics. So despite its title, Bill's tech session covered a lot of ground and � offered new wisdom even to though of us who've completed and are driving project cars. �
�
�
�
�
�
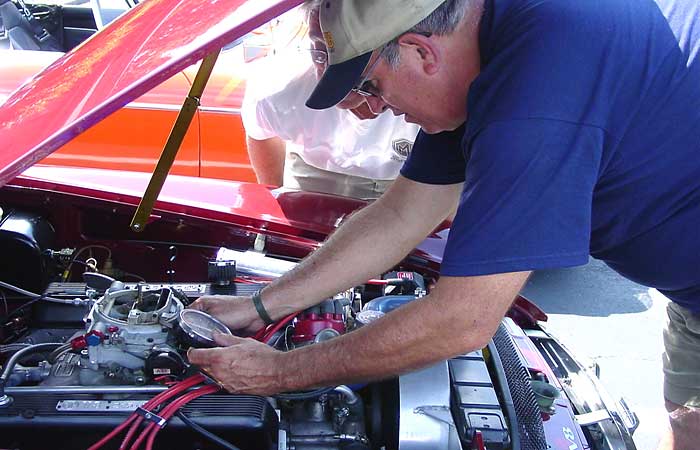
Bill Guzman demonstrates his vacuum-gauge engine-tuning techniques to Paul Schils �
British V8 2006 Tech Session: MGB V6 Engine Conversions
� as published in British V8 Newsletter, Volume XIV Issue 2, August 2006�� presented by: Bill Guzman of Classic Conversions Engineering
� coverage by: Curtis Jacobson�
� The theme of Bill Guzman's tech session at British V8 2006 was: "Keep it simple!" All too � many people who start engine conversion projects never complete them. If one allows their � project to grow complex, it will also grow in time and monetary investment required. � I think he really struck a chord by essentially stating that none of us likes to see an � abandoned project car or a hack-job. If there's one piece of advice we should share with � newbies it's "Keep it simple." Bill's company, Classic Conversions Engineering, provides � kit parts that simplify performance modification of MGB sports cars. Bill's products � span the functional areas of the car: engine conversions, brakes, traction/suspension, � even aerodynamics. So despite its title, Bill's tech session covered a lot of ground and � offered new wisdom even to though of us who've completed and are driving project cars. �
�
�
Although it took awhile for Bill to get to the core subject, I'm going to start there. �
� Bill strongly recommends the GM sixty-degree V6 engines for MGB sports cars. This family � of engines, he explained, has appeared in many different cars including both front wheel � and rear wheel drive models. They were used in 1985 to 1995 Camaros and Firebirds, the � Chevy Celebrity and Citation (including the X11 variant that produced 155hp), and some � S10 pickup trucks (although 90 degree V6s were also used in that model.) The sixty-degree � V6 is available in different displacements and states of tune. (The '93 to '95 Camaro � had the L32 3.4L with sequential port fuel injection and distributorless ignition in a RWD � configuration, but) Bill's all-round favorite is the crate-motor 3.4L V6 which can be � purchased new with a factory warranty starting at about $1800. �
��
�
� Classic Conversions offers various engine installation kits. The most basic contain motor � and tranny mounts, plus headers. They also offer different pulley systems, intake manifolds, � etc. Bill likes carburetors, but can also help his customers set up fuel injection systems.�
� Speaking of carburetors, Bill branched off to talk about engine tuning. When people have � problems cooling their newly engine-converted MGB's, the first thing they should check is � the engine tuning. From Bill's experience, it's most likely that the engine in question is � running lean. "Nothing cools like fuel." Rough or large scale adjustment is done by changing � jets... and the classic tried-and-true approach is to shut down the engine fast, pull a plug, � and check the color of combustion deposits. This will at least get you within a jet size � or two, after which performance testing will get you narrowed down to the correct jet. � Once the jets are right, the next step is to adjust the idle air mixture. �
� Bill then reviewed the classical technique for dialing in ignition advance and idle air � mixture, as follows: Connect a vacuum gauge to the "direct vacuum" port on your intake manifold, � disconnect your vacuum advance and plug the carburetor's vacuum-advance orifice, start the � engine, let it get to running temperature, loosen the distributor clamp, rotate the distributor � to advance the ignition timing until you get the highest vacuum reading you can at IDLE, � then retard the timing until it reads 1" (of mercury, which is the normal unit of measurement � shown on the face of an automotive vacuum gauge) less vacuum to avoid pre-ignition (aka � "pinging"), then tighten the distributor clamp and re-connect the vacuum advance. Proceed to � adjusting the carburetor.�
�
�
�
� Bill strongly recommends the GM sixty-degree V6 engines for MGB sports cars. This family � of engines, he explained, has appeared in many different cars including both front wheel � and rear wheel drive models. They were used in 1985 to 1995 Camaros and Firebirds, the � Chevy Celebrity and Citation (including the X11 variant that produced 155hp), and some � S10 pickup trucks (although 90 degree V6s were also used in that model.) The sixty-degree � V6 is available in different displacements and states of tune. (The '93 to '95 Camaro � had the L32 3.4L with sequential port fuel injection and distributorless ignition in a RWD � configuration, but) Bill's all-round favorite is the crate-motor 3.4L V6 which can be � purchased new with a factory warranty starting at about $1800. �
�
| �
Enjoying this article? Our magazine is funded through the generous support of readers like you! � To contribute to our operating budget, please click here and follow the instructions. � (Suggested contribution is twenty bucks per year. Feel free to give more!)� |
� Classic Conversions offers various engine installation kits. The most basic contain motor � and tranny mounts, plus headers. They also offer different pulley systems, intake manifolds, � etc. Bill likes carburetors, but can also help his customers set up fuel injection systems.�
� Speaking of carburetors, Bill branched off to talk about engine tuning. When people have � problems cooling their newly engine-converted MGB's, the first thing they should check is � the engine tuning. From Bill's experience, it's most likely that the engine in question is � running lean. "Nothing cools like fuel." Rough or large scale adjustment is done by changing � jets... and the classic tried-and-true approach is to shut down the engine fast, pull a plug, � and check the color of combustion deposits. This will at least get you within a jet size � or two, after which performance testing will get you narrowed down to the correct jet. � Once the jets are right, the next step is to adjust the idle air mixture. �
� Bill then reviewed the classical technique for dialing in ignition advance and idle air � mixture, as follows: Connect a vacuum gauge to the "direct vacuum" port on your intake manifold, � disconnect your vacuum advance and plug the carburetor's vacuum-advance orifice, start the � engine, let it get to running temperature, loosen the distributor clamp, rotate the distributor � to advance the ignition timing until you get the highest vacuum reading you can at IDLE, � then retard the timing until it reads 1" (of mercury, which is the normal unit of measurement � shown on the face of an automotive vacuum gauge) less vacuum to avoid pre-ignition (aka � "pinging"), then tighten the distributor clamp and re-connect the vacuum advance. Proceed to � adjusting the carburetor.�
�
�
Use the same vacuum gauge to adjust the carb, simply turning the idle air mixture screws until �
you get the highest vacuum reading you can. Drive the car. After a few miles, recheck as �
follows: bring the engine up to 2000 rpm and while at this rpm (with vacuum advance connected), �
loosen the distributor and rotate to advance the ignition timing a little bit further until �
you get the highest vacuum and the engine revs itself up a couple hundred RPM. (Maybe it will �
settle in the original speed, or maybe you will pick up a couple of hundred RPM...) �
� Another topic Bill discussed was dyno testing. Bill gave us a word of caution: it's hard to � compare dyno results that come from two different dyno operators. Dyno operators like to have � happy customers, so they very often allow test parameters to be a little "optimistic". Bill � has particularly noted that where and how the operator places their temperature sensor on the � top of the intake manifold can skew results. Some dyno operators will fudge numbers by entering � the wrong bore and/or stroke parameters into the computer program that generates the results � report. Seemingly small changes in these areas can significantly change calculated performance � curves. �
�
�
�
� Another topic Bill discussed was dyno testing. Bill gave us a word of caution: it's hard to � compare dyno results that come from two different dyno operators. Dyno operators like to have � happy customers, so they very often allow test parameters to be a little "optimistic". Bill � has particularly noted that where and how the operator places their temperature sensor on the � top of the intake manifold can skew results. Some dyno operators will fudge numbers by entering � the wrong bore and/or stroke parameters into the computer program that generates the results � report. Seemingly small changes in these areas can significantly change calculated performance � curves. �
�
�
On the topic of getting power to the pavement, Bill provided a hand-out for a great afternoon �
project: making simple traction bars from old, discarded leaf springs. Bill's concern is that �
solid traction bars that are used to control leaf spring wind-up (and thereby reduce tramp) �
produce unintended and undesirable consequences on street driven cars, including especially roll �
oversteer. Bill's testing reveals that solid traction bars aren't always as helpful on the �
dragstrip as people assume either. Bill feels that spring energy can actually help launch a �
car from the line, and that solid traction bars weaken the launch on cars with less than, say, �
400lbs of torque. �
� Click here for Bill's "Easy Traction" instructions. �
� Disclaimer: This page was researched and written by Curtis Jacobson. Views expressed � are those of the author, and are provided without warrantee or guarantee. Apply at your � own risk.�
� Photos by Curtis Jacobson. All rights reserved. �
�
�
� Click here for Bill's "Easy Traction" instructions. �
� Disclaimer: This page was researched and written by Curtis Jacobson. Views expressed � are those of the author, and are provided without warrantee or guarantee. Apply at your � own risk.�
� Photos by Curtis Jacobson. All rights reserved. �
