�
 �
�
�
�
�
�
�
�
�
�
� by: Jim Blackwood, Blackwood Labs LLC�
� My car was ordinary enough in the beginning. It was a standard North American � spec red MGB convertible, but by the time it reached me the car had already � differentiated itself. It had acquired a racing history. �
�
�
�
�
�
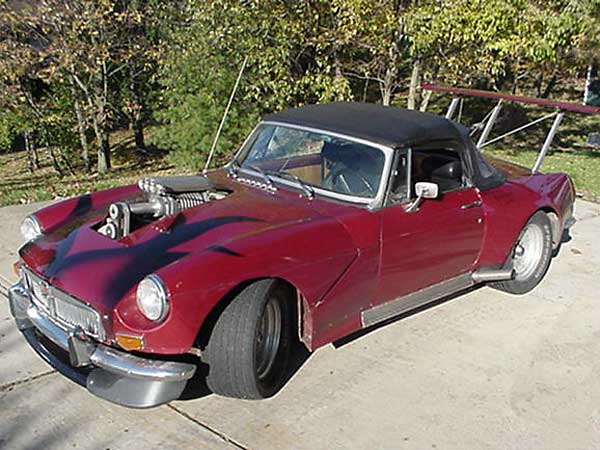
Jim Blackwood's 1971 MGB V8 Roadster
� The British V8 Newsletter, Volume XV Issue 1�� by: Jim Blackwood, Blackwood Labs LLC�
The Four-Cylinder Days
� I began this write-up using the British V8 submission sheet but considering the � unique character of the vehicle and the path it has traveled I felt a bit of � literary license was warranted. �� My car was ordinary enough in the beginning. It was a standard North American � spec red MGB convertible, but by the time it reached me the car had already � differentiated itself. It had acquired a racing history. �
�
�
The racing was not at all what you would expect from an MG, as it had run on �
the dirt tracks of southern West Virginia. I don't know with what success, but �
the remarkable thing was that it hadn't been beat up as you might expect though �
it had been repainted about a year before I bought it due to minor dings and �
deterioration of the original paint. The carpet was gone, the seats were worn �
and the car had about 50,000 miles on it. We pulled the engine, installed new �
bearing shells, and serviced the clutch. Overall it was sound. �
� After paying the princely sum of $1100 for it, I swapped in the lowered � suspension of its twin (which was ultimately to be a parts car) including � a GT sway-bar, Delrin(tm) bushings and competition shock valves. I was ready � to head off to Los Angeles, stopping for a couple months in Florida and � reinstalling lever arm shocks in the rear along with oversized U-bolts on � the axle. (Ride quality improved noticeably.) With a short stop in Louisiana � to replace a bad U-joint and a brief visit in Texas to see my young son and � ex-wife, I was soon on the west coast. �
� In LA I de-arched the rear springs and added a leaf, bringing the car down � level and stiffening it, and then using a pair of shortened front wire wheel � hubs, cut off the flange and welded on a new one drilled for a 4-1/2" 5 lug � pattern. To these I mounted Mach-I Mustang ventilated rotors, 14 x 8" Cragar � SS wheels and 265/50-14 BFG radial TA's and mounted the Mustang calipers � using a bracket I welded up and machined out of steel plate. �
� To get the back to match, I used a pair of wheel adapters, figuring I would � either change the axle out later or make up new rear hubs. (Note: a couple � of years later I made and fitted a new set of axle flanges similar in � construction to the front hubs. The gears finally started making noise after � driving The Tail of the Dragon during the 2003 British V8 meet so I swapped � those axle shafts into the replacement axle. I had been planning on a Currie � 8" Ford axle with limited slip differential and disc brakes, but they didn't � have a suitable brake package (I wanted discs with an integral parking brake) � and besides, I didn't have the money. �
� In order to fit the rear tires, the fenders needed to be modified and as the � only appropriate tool I had to work with was a cutting torch that's what I used, � which left a rough edge and turned the paint yellow where the flame hit. In � this condition, I next headed east up into Utah, visiting friends for a few � weeks through Christmas and then headed over Vail Pass on the leading edge of � a huge winter storm. �
� Knowing the storm was coming, I stopped at Checker Auto in Provo and bought � the biggest set of tire chains they had, and then shortened them to fit the � rear tires. About a quarter way up the mountain range the wisdom of this � foresight was proven. With several inches of snow accumulated, I pulled over � and put the chains on. On up the mountain we went. Eventually I hit interstate � and as we neared the summit I was keeping up a steady pace driving along two � ruts in the snow in the slow lane, the snow dragging on the bottom of the car � constantly and passing lumps in the fast lane which I figured to be cars that � stalled, though you really couldn't tell. �
� At one point there was a hitchhiker out in the middle of nowhere and I stopped � and gave her a ride, but when we got to Vail conditions were so bad that I � stopped in the traffic lane rather than risk not being able to get started � again. Luckily that didn't get me stuck and I was soon headed down the mountain � into Colorado, once again back to the front of the storm with the snow turning � to rain and then finally stopping altogether. I was the last car down the � mountain that night before they closed down the highway! �
� I had the entire highway all to myself coming down the mountain into Denver. � As you might imagine for a guy who dearly loved drifting the turns, I was � having quite a time. (The chains were back in the trunk of course.) Developing � a miss, I drove into Denver looking for a set of points for the Mallory � dual-point distributor I had installed a month or two earlier but it being � very early in the morning no parts places were open. So pulling back on the � interstate I hoped to drive awhile and then get parts. �
� Mistake! The engine quit and I had to stop. It was cold, and I mean really � cold. It was clear to me that the only reasonable chance I had at survival � was to fix the distributor and I wasn't going to get any extra chances at � it before my fingers got too numb to use. So using every means at my disposal � to conserve warmth, I climbed out and quickly removed both the distributor � and the external ballast resistor I had installed with it and got back in � the car. Inspecting the distributor and finding one set of points burned � beyond use, I removed the bad set and adjusted the other and turned my � attention to the ballast resistor which had tested "open". �
� Using a small screwdriver, I broke out the ceramic and unwound the ni-chrome � wire. Finding it burned out in three places, I twisted the ends back together, � wrapped the length of it around the housing and looped the ends under the � lug screws and was ready to reinstall. Luckily the MGB distributor only � goes in one way so once I had it back in and hooked up with the cap back � on I was real glad to be back in the car, even though my hands were shaking � so bad from the cold it was hard to turn the key. �
� The engine fired right up and I was able to head on back to West Virginia � without further incident, having spent just about a year making the loop. �
�
� To form the rear fender flares, I spliced a 3" strip of sheet metal into � the inner fender by splitting it at the seam. Then bent a length of half inch � conduit around a 55 gallon oil drum to get the curve I wanted for the opening. � Next I shaped sheet metal to match that to the outer fender. Once it was all � welded and brazed together I bumped the inner and outer fender out as one to � give more tire clearance and a more aesthetically pleasing curve. (Shortly � thereafter, a friend who was a body man informed me that brass continues to � outgas for about a year, so I quit using brazing rod and gave it plenty of � time to cure before final paint.) �
�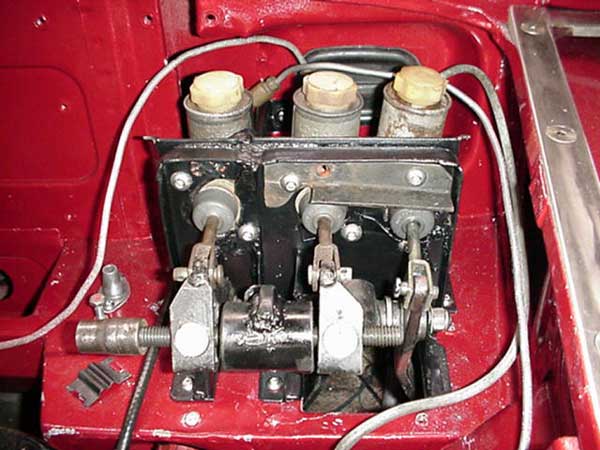
� I worked up the brake pedal assembly mostly from parts lying around, � reshaping and using arms from an extra pedal assembly and a few other � parts. A half inch hardened jackscrew provided the adjustment shaft � along with a spherical bearing for the pivot and some custom made swivels. � The pedal box was widened to accommodate three single piston cylinders. � To allow adjustment while driving, a flex shaft was run through the � firewall and dashboard where a large custom made walnut knob was placed � and a rubber shifter boot sealed the cable connection to the cover. �
�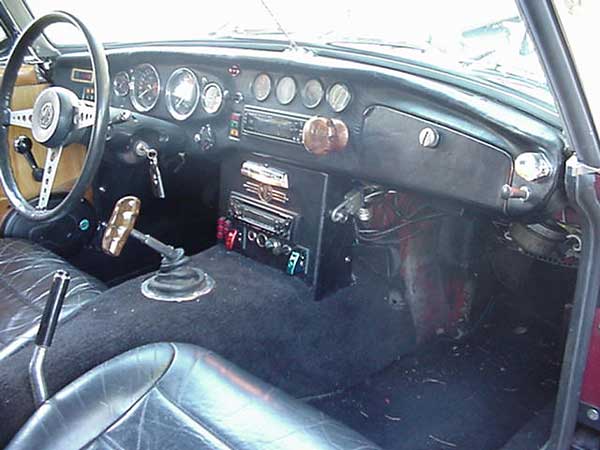
� The dash pillow had developed a crack, so I removed it, stripped � off the vinyl and the pad and made a few changes there before � re-covering it all in black leather. Early gages were substituted � and the square hole welded up. Provision was made to mount a 7-band � graphic equalizer, and 5 round gage holes were added, one of which � was used for the brake adjuster knob. Further to the right, an early � glove box opening was grafted-in as well as a map light and switch. � Part of the original pad was retained as a brow, and the center console � below the dash was reworked as well. I found a molded-plastic glove � box liner out of a compact GM that fit the opening nicely. �
��
�
� I had long admired the easy accessibility of the Spitfire and GT6 and � felt this was possible with the MGB, but it wasn't until after a mishap � left me with a damaged fender that I felt there was no loss in trying my � hand at making one. (Had I known the cost of MGB fenders I might have � thought better of it!) �
�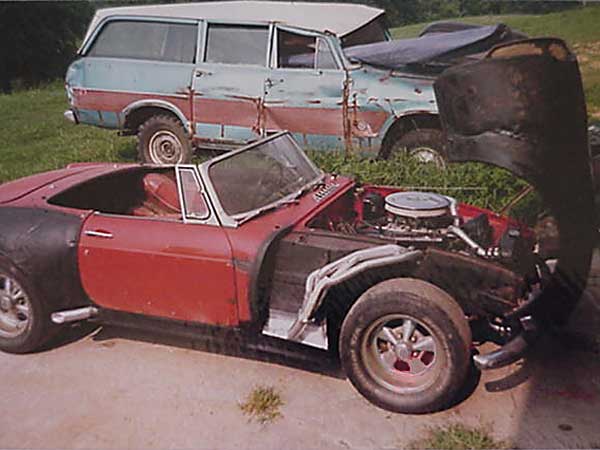
� I set to with hammer and dolly and when I was done I had what was then � a very "unique" design. Unbolting the fenders and cutting them at the � rear hood line, I welded the fenders to the hood, did a bit of reinforcing, � cut out the headlight buckets, flattened the bulge and spread the sheet � metal out to cover the tires. When finished, it had a continuous line � that followed the curve of the hood out to the edge. Again conduit � provided the lip. A set of quad rectangular headlights were procured � and mounted, two in the fenders and two in the grille space. �
�
� I built a pair of simple hinges and spliced together a pair of old bumpers. � A center section for the front spoiler was built which served double duty � as a radiator guard. Two cut-down MGB hood latches were positioned at the � rear, and were operated by the standard hood release cable. No bumper � over-riders were fitted at that time (due to the tilt geometry). A � stock hood prop kept it off the ground when open. This design is shown in � the included photos and though very rough, I was happy with it for a time � due to its unique character. �
�
�
�
� After paying the princely sum of $1100 for it, I swapped in the lowered � suspension of its twin (which was ultimately to be a parts car) including � a GT sway-bar, Delrin(tm) bushings and competition shock valves. I was ready � to head off to Los Angeles, stopping for a couple months in Florida and � reinstalling lever arm shocks in the rear along with oversized U-bolts on � the axle. (Ride quality improved noticeably.) With a short stop in Louisiana � to replace a bad U-joint and a brief visit in Texas to see my young son and � ex-wife, I was soon on the west coast. �
� In LA I de-arched the rear springs and added a leaf, bringing the car down � level and stiffening it, and then using a pair of shortened front wire wheel � hubs, cut off the flange and welded on a new one drilled for a 4-1/2" 5 lug � pattern. To these I mounted Mach-I Mustang ventilated rotors, 14 x 8" Cragar � SS wheels and 265/50-14 BFG radial TA's and mounted the Mustang calipers � using a bracket I welded up and machined out of steel plate. �
� To get the back to match, I used a pair of wheel adapters, figuring I would � either change the axle out later or make up new rear hubs. (Note: a couple � of years later I made and fitted a new set of axle flanges similar in � construction to the front hubs. The gears finally started making noise after � driving The Tail of the Dragon during the 2003 British V8 meet so I swapped � those axle shafts into the replacement axle. I had been planning on a Currie � 8" Ford axle with limited slip differential and disc brakes, but they didn't � have a suitable brake package (I wanted discs with an integral parking brake) � and besides, I didn't have the money. �
� In order to fit the rear tires, the fenders needed to be modified and as the � only appropriate tool I had to work with was a cutting torch that's what I used, � which left a rough edge and turned the paint yellow where the flame hit. In � this condition, I next headed east up into Utah, visiting friends for a few � weeks through Christmas and then headed over Vail Pass on the leading edge of � a huge winter storm. �
� Knowing the storm was coming, I stopped at Checker Auto in Provo and bought � the biggest set of tire chains they had, and then shortened them to fit the � rear tires. About a quarter way up the mountain range the wisdom of this � foresight was proven. With several inches of snow accumulated, I pulled over � and put the chains on. On up the mountain we went. Eventually I hit interstate � and as we neared the summit I was keeping up a steady pace driving along two � ruts in the snow in the slow lane, the snow dragging on the bottom of the car � constantly and passing lumps in the fast lane which I figured to be cars that � stalled, though you really couldn't tell. �
� At one point there was a hitchhiker out in the middle of nowhere and I stopped � and gave her a ride, but when we got to Vail conditions were so bad that I � stopped in the traffic lane rather than risk not being able to get started � again. Luckily that didn't get me stuck and I was soon headed down the mountain � into Colorado, once again back to the front of the storm with the snow turning � to rain and then finally stopping altogether. I was the last car down the � mountain that night before they closed down the highway! �
� I had the entire highway all to myself coming down the mountain into Denver. � As you might imagine for a guy who dearly loved drifting the turns, I was � having quite a time. (The chains were back in the trunk of course.) Developing � a miss, I drove into Denver looking for a set of points for the Mallory � dual-point distributor I had installed a month or two earlier but it being � very early in the morning no parts places were open. So pulling back on the � interstate I hoped to drive awhile and then get parts. �
� Mistake! The engine quit and I had to stop. It was cold, and I mean really � cold. It was clear to me that the only reasonable chance I had at survival � was to fix the distributor and I wasn't going to get any extra chances at � it before my fingers got too numb to use. So using every means at my disposal � to conserve warmth, I climbed out and quickly removed both the distributor � and the external ballast resistor I had installed with it and got back in � the car. Inspecting the distributor and finding one set of points burned � beyond use, I removed the bad set and adjusted the other and turned my � attention to the ballast resistor which had tested "open". �
� Using a small screwdriver, I broke out the ceramic and unwound the ni-chrome � wire. Finding it burned out in three places, I twisted the ends back together, � wrapped the length of it around the housing and looped the ends under the � lug screws and was ready to reinstall. Luckily the MGB distributor only � goes in one way so once I had it back in and hooked up with the cap back � on I was real glad to be back in the car, even though my hands were shaking � so bad from the cold it was hard to turn the key. �
� The engine fired right up and I was able to head on back to West Virginia � without further incident, having spent just about a year making the loop. �
�
More Modifications
� Once back home I began making some further changes: finishing the rear � wheel-wells, building the adjustable brake bias assembly, and reworking � the dashboard, then moving on to building the first forward tilt hood � assembly and finally doing the V8 swap. �� To form the rear fender flares, I spliced a 3" strip of sheet metal into � the inner fender by splitting it at the seam. Then bent a length of half inch � conduit around a 55 gallon oil drum to get the curve I wanted for the opening. � Next I shaped sheet metal to match that to the outer fender. Once it was all � welded and brazed together I bumped the inner and outer fender out as one to � give more tire clearance and a more aesthetically pleasing curve. (Shortly � thereafter, a friend who was a body man informed me that brass continues to � outgas for about a year, so I quit using brazing rod and gave it plenty of � time to cure before final paint.) �
�
� I worked up the brake pedal assembly mostly from parts lying around, � reshaping and using arms from an extra pedal assembly and a few other � parts. A half inch hardened jackscrew provided the adjustment shaft � along with a spherical bearing for the pivot and some custom made swivels. � The pedal box was widened to accommodate three single piston cylinders. � To allow adjustment while driving, a flex shaft was run through the � firewall and dashboard where a large custom made walnut knob was placed � and a rubber shifter boot sealed the cable connection to the cover. �
�
� The dash pillow had developed a crack, so I removed it, stripped � off the vinyl and the pad and made a few changes there before � re-covering it all in black leather. Early gages were substituted � and the square hole welded up. Provision was made to mount a 7-band � graphic equalizer, and 5 round gage holes were added, one of which � was used for the brake adjuster knob. Further to the right, an early � glove box opening was grafted-in as well as a map light and switch. � Part of the original pad was retained as a brow, and the center console � below the dash was reworked as well. I found a molded-plastic glove � box liner out of a compact GM that fit the opening nicely. �
�
| �
Enjoying this article? Our magazine is funded through the generous support of readers like you! � To contribute to our operating budget, please click here and follow the instructions. � (Suggested contribution is twenty bucks per year. Feel free to give more!)� |
� I had long admired the easy accessibility of the Spitfire and GT6 and � felt this was possible with the MGB, but it wasn't until after a mishap � left me with a damaged fender that I felt there was no loss in trying my � hand at making one. (Had I known the cost of MGB fenders I might have � thought better of it!) �
�
� I set to with hammer and dolly and when I was done I had what was then � a very "unique" design. Unbolting the fenders and cutting them at the � rear hood line, I welded the fenders to the hood, did a bit of reinforcing, � cut out the headlight buckets, flattened the bulge and spread the sheet � metal out to cover the tires. When finished, it had a continuous line � that followed the curve of the hood out to the edge. Again conduit � provided the lip. A set of quad rectangular headlights were procured � and mounted, two in the fenders and two in the grille space. �
�
� I built a pair of simple hinges and spliced together a pair of old bumpers. � A center section for the front spoiler was built which served double duty � as a radiator guard. Two cut-down MGB hood latches were positioned at the � rear, and were operated by the standard hood release cable. No bumper � over-riders were fitted at that time (due to the tilt geometry). A � stock hood prop kept it off the ground when open. This design is shown in � the included photos and though very rough, I was happy with it for a time � due to its unique character. �
�
�
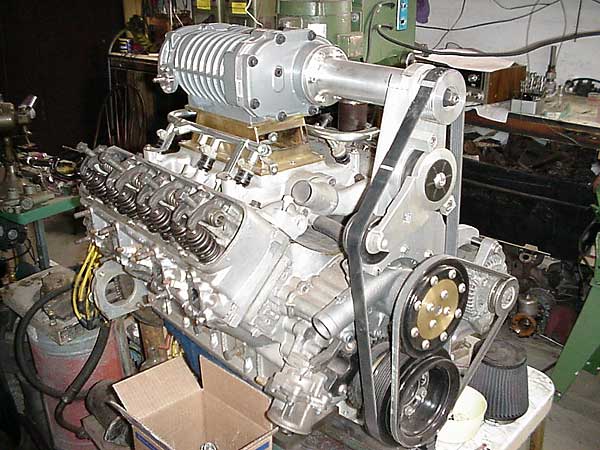
� Once broken down and at the machine shop two things became apparent. � There was a crack in the water jacket, and this wasn't the best engine � choice. So back I went and between me and a buddy we ended up hauling 4 � or 5 engines down off that hill. I began test fitting. I found that if a � small diameter oil filter was used, it could be positioned to fit between � the steering rack and sway-bar. This determined the engine position, giving � just barely enough room between the steering shaft and rear header bolt, � just enough starter clearance, and no need to cut the firewall. The one � thing in the way was the slam panel, but since the latches would be in � the rear that wasn't much of a concern, and I simply cut it out. Using � stock Buick engine mounts, I fabricated bosses onto the cross-member � for them to bolt into. These were made up of a couple different sizes of � black pipe and some gussets, test fit a few times, tacked in place and � welded up. �
� Being the mid 80's, the transmission I selected was a Warner T-50 5 speed. � With just a little bending the shifter came up through the hole in the stock � MG shifter plate. So far this had all been done very cheaply, but the big � expense was the engine. I used a Buick 215 4bbl. which had about 20,000 � miles on it. I tore it down, cleaned it up and put it back together with � new rings, bearings, etc. along with a 600 Holley mounted on a modified � stock intake and the hottest cam I could find. �
�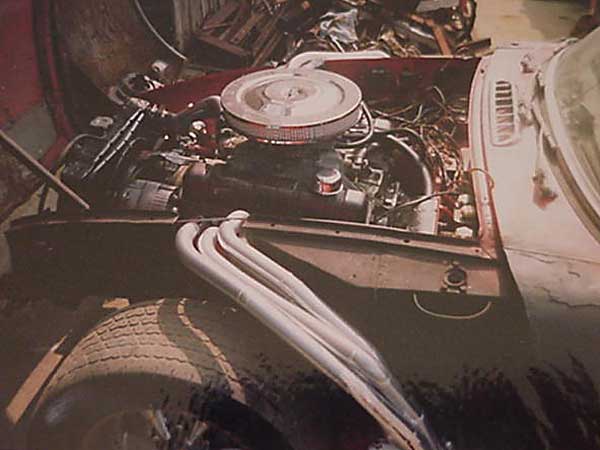
� The next job was to build that wild set of headers you can see in the photo. � I used parts from "Headers by Ed", and completed the job in 80 hours. � The finished headers have 34" x 1-3/8" primaries all of which were within � 1/8" in length; swirl scavenged into 2-3/8" collectors. This was followed � by glass packs housed within flared rockers (to simulate "ground effects" � and blend nicely with the front and rear bodywork). The exhaust dumped in � front of the rear tires. The exhaust was sent out for coating, which was � still a very new process at that time, and the total cash outlay was around � $750 for the exhaust and $1400 for the engine. There were other conversion � costs, of course, but nothing on that order of magnitude. �
� I originally used an external slave cylinder for the clutch. I shortened the � clutch fork as much as I could get by with, made a box in the floor � under the gas pedal, and shortened the pedal. For the driveshaft, I found � a junkyard GM shaft and had a local shop splice the two together. (I later � replaced it with a small diameter heavy-wall driveshaft.) �
� The radiator had been re-cored with a 4" longer core a few years earlier so � some modification of the necks was all that needed. Exhaust tubing was � welded up into coolant lines. A stock aluminum-nose 215 starter was found � and the nose modified to reposition the solenoid by welding on new ears � and cutting down the snout on a belt sander. (I still use the same starter � today, though it has been rebuilt!) �
� That was really about it except for cutting a big hole in the hood for the � air filter. I found a JC Whitney scoop to cover the hole and painted the whole � car flat black and it looked like something out of a Mad Max film, but it ran � like a scalded dog. I first got it running with the V8 in '88 and estimated � about a 240hp output. Finally I had the power to go with the handling, and � the mountain roads of West Virginia once more found me power sliding around � the turns the way I had been doing with my 1970 Olds Cutlass back in the � early 70's, but going a good bit faster. �
� In fact, the MGB had at this point gotten so fast that, as I often told � people, "If it's a blind turn and the tires are squealing, there'd better � not be anything in the road because I'm going to hit it." It had become � faster than my reaction time which was really quite good, and I found myself � no longer at the point of tire adhesion in those blind turns purely for � reasons of self preservation. �
� Have you ever crossed the New River Gorge Bridge on Rt. 19 in Fayetteville, � West Virginia? (Editor's note: a "must see", it's famous for bungee jumping!) � From a dead stop at one end, I once hit 130mph about 2/3 of the way across. � I had to back off the throttle due to the front end getting light. It was � after this run that I added the front spoiler. It wouldn't do to float over � the guard-rail 900 ft up!�
�
� A buddy sold me a close ratio T-50, and it proved a much better choice � than the (ex-V6) wide-ratio box I was using. Years later I sold the � original T-50 on eBay. It was bought by (fellow MGB V8'er) Jake Voelckers � out in Utah. Regrettably, I'd damaged the transmission before removing it � and forgotten about it, so I had a mess on my hands. I refunded Jake's � money and let him keep the remains in exchange for his shipping costs. � He found this acceptable as he was able to use some of the parts in his � first transmission for his V8 swap, but it would have been better for us both � if I'd checked out the tranny before listing it! That's hindsight, so an � apology is the best I can do. �
� Next up was a better radiator. Having moved to Cincinnati to attend UC � law school, I found a local shop that would build me a custom brass � radiator along with fitting a crank-driven fan and I soon thought I had � the answer to my intermittent overheating problems. That helped, but was � not the complete answer and I continued to fight this bugaboo for a long � time. I tried several different electric fan setups, two different crank � fans, a correctly engineered fan shroud, re-coring the custom radiator � with the most efficient core possible, adding a surge tank and overflow � tank, re-plumbing to automatically remove all air from the system, and � finally learning to tune the engine for temperature control, but I'm � getting ahead of myself. �
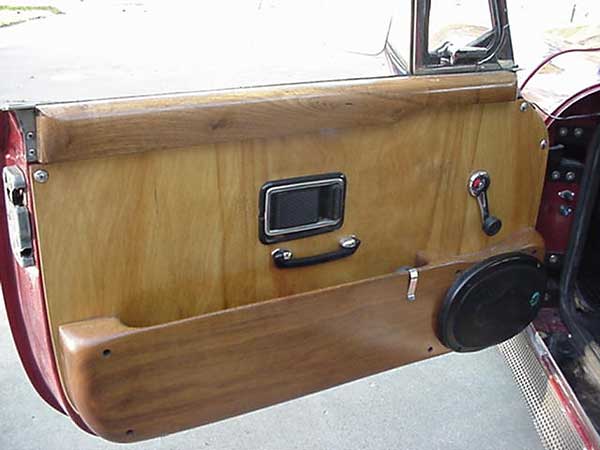
� During this period I made new wooden interior trim which really improved � the inside appearance and comfort. To match the brake balance knob, I carved � a black walnut "T" grip for the shifter and shaped new cap rails for the � doors. I bought some thin Birch plywood and cut new door and trim panels. � I carved thick walnut planks into door-pocket/speaker-mounts. This was a � pretty big project, done with a Forstner bit, a Skilsaw, a large hole-saw, � and small belt sander. The end result has allowed me to ditch the foot-well � pocket. I finished the doors out with chrome window cranks. �
�
� After stripping and polishing the rear cockpit surround, modifying the top � frame for speedy removal by utilizing the tonneau brace sockets and � reconditioning a Parish Plastics hard top for winter use, I was satisfied � for the time being.�
�
�
�
My First V8 Conversion!
� Some time later I'd expended all of my engine spares and with the last � remaining engine giving up the ghost, I was determined to proceed � on my V8 transplant, even though I had only heard rumors that it had � been done before at the factory. I had learned of a disused junkyard � where 215's might be found, and arriving tool bag in hand climbed � the hill, fought through the multi-floral roses, and discovered several � cars with the desired engine. Picking a 2 barrel F-85 automatic as � the easiest one from which to remove the engine, I spent an hour or � two unbolting it, then climbed into the engine compartment and physically � wrestled the engine out and onto the ground. I then rolled it onto the � hood of the car, looped a couple of fan belts together and attached � them to the hood and dragged the works back down the hill like a sled, � a distance of probably a couple hundred yards through brush and ruts � so deep it was impossible to get a vehicle up there. �� Once broken down and at the machine shop two things became apparent. � There was a crack in the water jacket, and this wasn't the best engine � choice. So back I went and between me and a buddy we ended up hauling 4 � or 5 engines down off that hill. I began test fitting. I found that if a � small diameter oil filter was used, it could be positioned to fit between � the steering rack and sway-bar. This determined the engine position, giving � just barely enough room between the steering shaft and rear header bolt, � just enough starter clearance, and no need to cut the firewall. The one � thing in the way was the slam panel, but since the latches would be in � the rear that wasn't much of a concern, and I simply cut it out. Using � stock Buick engine mounts, I fabricated bosses onto the cross-member � for them to bolt into. These were made up of a couple different sizes of � black pipe and some gussets, test fit a few times, tacked in place and � welded up. �
� Being the mid 80's, the transmission I selected was a Warner T-50 5 speed. � With just a little bending the shifter came up through the hole in the stock � MG shifter plate. So far this had all been done very cheaply, but the big � expense was the engine. I used a Buick 215 4bbl. which had about 20,000 � miles on it. I tore it down, cleaned it up and put it back together with � new rings, bearings, etc. along with a 600 Holley mounted on a modified � stock intake and the hottest cam I could find. �
�
� The next job was to build that wild set of headers you can see in the photo. � I used parts from "Headers by Ed", and completed the job in 80 hours. � The finished headers have 34" x 1-3/8" primaries all of which were within � 1/8" in length; swirl scavenged into 2-3/8" collectors. This was followed � by glass packs housed within flared rockers (to simulate "ground effects" � and blend nicely with the front and rear bodywork). The exhaust dumped in � front of the rear tires. The exhaust was sent out for coating, which was � still a very new process at that time, and the total cash outlay was around � $750 for the exhaust and $1400 for the engine. There were other conversion � costs, of course, but nothing on that order of magnitude. �
� I originally used an external slave cylinder for the clutch. I shortened the � clutch fork as much as I could get by with, made a box in the floor � under the gas pedal, and shortened the pedal. For the driveshaft, I found � a junkyard GM shaft and had a local shop splice the two together. (I later � replaced it with a small diameter heavy-wall driveshaft.) �
� The radiator had been re-cored with a 4" longer core a few years earlier so � some modification of the necks was all that needed. Exhaust tubing was � welded up into coolant lines. A stock aluminum-nose 215 starter was found � and the nose modified to reposition the solenoid by welding on new ears � and cutting down the snout on a belt sander. (I still use the same starter � today, though it has been rebuilt!) �
� That was really about it except for cutting a big hole in the hood for the � air filter. I found a JC Whitney scoop to cover the hole and painted the whole � car flat black and it looked like something out of a Mad Max film, but it ran � like a scalded dog. I first got it running with the V8 in '88 and estimated � about a 240hp output. Finally I had the power to go with the handling, and � the mountain roads of West Virginia once more found me power sliding around � the turns the way I had been doing with my 1970 Olds Cutlass back in the � early 70's, but going a good bit faster. �
� In fact, the MGB had at this point gotten so fast that, as I often told � people, "If it's a blind turn and the tires are squealing, there'd better � not be anything in the road because I'm going to hit it." It had become � faster than my reaction time which was really quite good, and I found myself � no longer at the point of tire adhesion in those blind turns purely for � reasons of self preservation. �
� Have you ever crossed the New River Gorge Bridge on Rt. 19 in Fayetteville, � West Virginia? (Editor's note: a "must see", it's famous for bungee jumping!) � From a dead stop at one end, I once hit 130mph about 2/3 of the way across. � I had to back off the throttle due to the front end getting light. It was � after this run that I added the front spoiler. It wouldn't do to float over � the guard-rail 900 ft up!�
�
Upgrades and Interior
� I drove the car like this for a few years, trading the Cragar wheels for � polished Centerlines as soon as the old BF Goodrich's needed replaced, � which didn't take long, and thus began a long period of incremental upgrades. �� A buddy sold me a close ratio T-50, and it proved a much better choice � than the (ex-V6) wide-ratio box I was using. Years later I sold the � original T-50 on eBay. It was bought by (fellow MGB V8'er) Jake Voelckers � out in Utah. Regrettably, I'd damaged the transmission before removing it � and forgotten about it, so I had a mess on my hands. I refunded Jake's � money and let him keep the remains in exchange for his shipping costs. � He found this acceptable as he was able to use some of the parts in his � first transmission for his V8 swap, but it would have been better for us both � if I'd checked out the tranny before listing it! That's hindsight, so an � apology is the best I can do. �
� Next up was a better radiator. Having moved to Cincinnati to attend UC � law school, I found a local shop that would build me a custom brass � radiator along with fitting a crank-driven fan and I soon thought I had � the answer to my intermittent overheating problems. That helped, but was � not the complete answer and I continued to fight this bugaboo for a long � time. I tried several different electric fan setups, two different crank � fans, a correctly engineered fan shroud, re-coring the custom radiator � with the most efficient core possible, adding a surge tank and overflow � tank, re-plumbing to automatically remove all air from the system, and � finally learning to tune the engine for temperature control, but I'm � getting ahead of myself. �
� During this period I made new wooden interior trim which really improved � the inside appearance and comfort. To match the brake balance knob, I carved � a black walnut "T" grip for the shifter and shaped new cap rails for the � doors. I bought some thin Birch plywood and cut new door and trim panels. � I carved thick walnut planks into door-pocket/speaker-mounts. This was a � pretty big project, done with a Forstner bit, a Skilsaw, a large hole-saw, � and small belt sander. The end result has allowed me to ditch the foot-well � pocket. I finished the doors out with chrome window cranks. �
�
� After stripping and polishing the rear cockpit surround, modifying the top � frame for speedy removal by utilizing the tonneau brace sockets and � reconditioning a Parish Plastics hard top for winter use, I was satisfied � for the time being.�
�
�
� When my old friend Harry Johnston moved to Virginia he sold me the Olds � 215 that we'd built in his basement. (The same engine I'd sledded down the � hill a couple years before.) Harry had impulsively bought a set of low � compression Buick pistons and there was no way I could talk him out of using � them in the engine. With the 2 bbl Olds heads, the resulting compression ratio � was probably around 6.5:1. Although this was exceptionally low, the motor � still ran and made better power than you might expect. It was still a very � significant improvement over the 4 cylinder engine. I knew this because I'd � swapped it into the MG temporarily while I did a cam change on the Buick � engine a year or two earlier. �
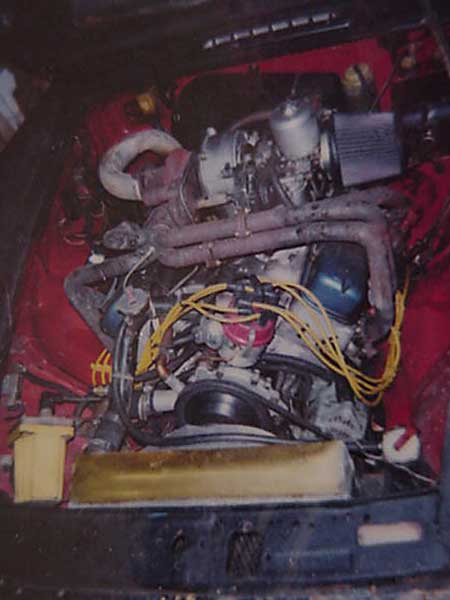
� In the meantime I'd been scouting for an Olds Jetfire turbo and found not � just the turbo unit, but also the engine, mounted in, you guessed it, an � MGB. The car was toast. The previous owner had hacked up the sills and � tranny tunnel extensively, but I bought the works for a thousand bucks and � began adapting the turbo to the ultra low compression Olds engine. �
�
� Why not the fresh Jetfire? I was saving it for later after all the bugs � were worked out. I set to work making up a set of turbo headers, some � adapters, linkages and such, and making it all work in the MG. Once it � was back together, I began tuning the 2" SU carb I had feeding the turbo. � I lathe turned new needles and drilled out the main jet but midrange tuning was � tricky. In order to get it right, I enlisted the aid of a fellow whitewater � guide and motorcyclist who I've been close with ever since the early 80's � named: "Cosmic" John Janzen. I knew I could count on him to be comfortable � in the wind! I had John stand up, lean over the windshield, and with a � screwdriver adjust the main jet of the SU while we drove up and down Clifton � Hill in Cincinnati. (Unlike the 1-3/8" SU of the MGB, this 2" version had � a rocker linkage on the jet with a top adjustment.) �
� John still ribs me about that ride (exaggerating the speed and such) but � we got the adjustment right after a few tries and with the turbo putting � out 7 lbs of boost the engine ran nearly as well as the Buick until it � started gasping for air around 5 grand. Fuel mileage was poor, but response � was pretty good if you could overlook the turbo lag. It wasn't a lot of � lag, but it was near impossible to time it accurately and it put me sideways � so often that I had two freeway collisions because of it in a period of � just a few years. I began to look for another option.�
�
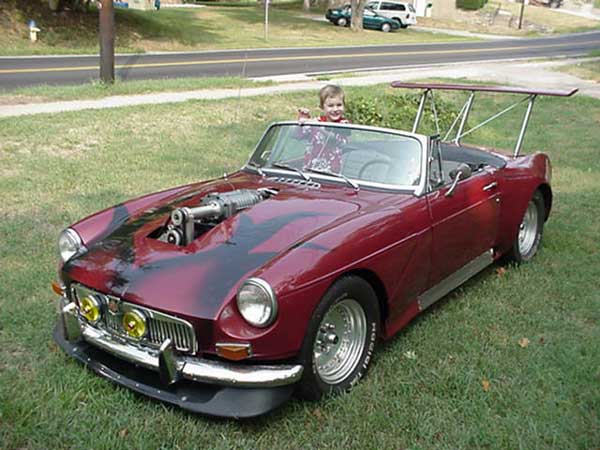
� Along about the same time as the turbo swap, I grew weary of being asked � by looky-loos if the car was a Porsche. The front end was never going to � be right anyway and besides, I had recently seen another car in the area � that looked suspiciously similar. Commonly nick-named the "Clown Shoe". � That was just too much for me! I decided my car needed to look more like � an MG. �
� I thought up a brilliant scheme to make a new front end out of fiberglass. � I envisioned it as being basically similar but having a raised snout with � an MG grille that was tall and narrow, like a cross between a TD and an MGB. � I began building this apparition and actually drove the car with it in � place for a number of weeks before deciding that my free-form fiberglass � skills were not up to the task. The fiberglass hood followed my first � homemade hood into the dumpster in favor of more traditional sheet-metal. �
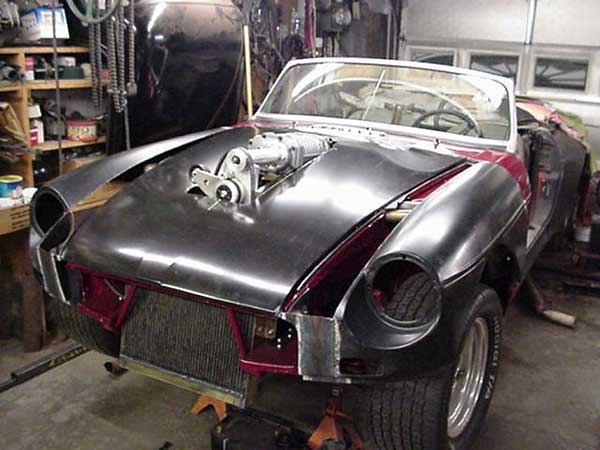
� I had a set of fenders and hood from the Jetfire car, so I mounted them and � cut a line from the cowl to the inside of the headlight bucket. Then I � spread the fender 3" to the outside at the front edge, and spliced in some � steel to close the gap. The resulting design looked more "MG", so I was � very satisfied with it. I drove with this prototype until the turbo shaft � bearing began to wear. At that point I was fortunate enough to be in a � position to buy new sheet metal as well as a new Eaton M-90 blower form � Magnuson Enterprises in California. M-90's had not yet appeared on � production cars, and I actually had to call and twist their arms to have � the boys ship me one, but at last the final plan was set into motion. �
� The car was torn down to the basic shell and prepped for paint. At the same � time, I finished up some details. The rockers were trimmed for new perforated � stainless grilles that would allow some of exhaust heat to escape. I decided � not to remove the box section under the gas pedal at that time as the � hydraulic throw-out bearing would be new and was as yet untested. Along � with the new sheet metal and the blower equipped engine it would be getting � an experimental heat-pipe based intercooler, distributor-less ignition, and � sequential fuel injection, plus the wing from the Cutlass would at last be � mounted. Other changes were in the works as well, meaning that this time � the car would be down a couple of years. �
� I made a point to do some work on it every day, even if it was a tiny step. � In this way, the project kept moving forward. I highly recommend this approach � to anyone doing a conversion. It keeps the project foremost in your mind, � gives you a constant feeling of accomplishment, and prevents the car from � languishing in the corner. Tasks that seem insurmountable become much easier � when you tackle one part at a time. �
� Clearly you have to sort out some of the largest issues before you start � though. What kind of blower, what kind of intercooler, how to make sure � there was space for both, and things like that. If you're a CAD wizard so � much the better, but I am not. What I'm saying is that you don't necessarily � have to know where every bolt will go before you begin. "Anything worth doing � is worth doing twice!" Keep that in mind as you work on your conversion and � you will find the entire experience much less frustrating. You will be less � tempted to walk away from it.�
�
�
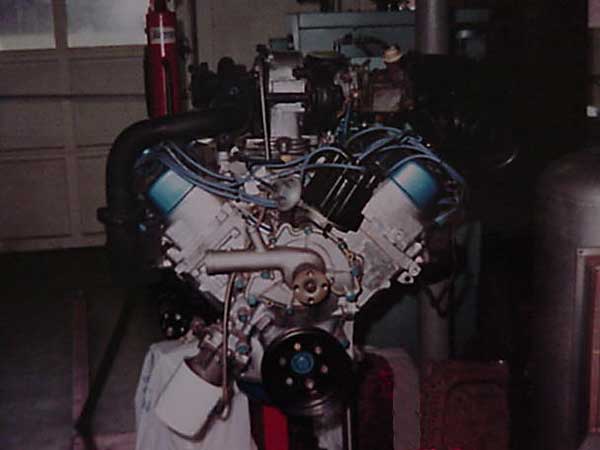
� Skipping the intimate details of how the ports were machined or the rivet � nuts installed, in more general terms I next proceeded to mount the blower � to the Jetfire engine by modifying the old Offenhauser dual port intake. I � chose this one because of the large plenum space, which after all internal � dividers were removed gave me room for the intercooler. �
�
� Originally a Ford EEC-IV SEFI/EDIS system was used for injection and ignition � by cannibalizing a Crown Vic. The Delco distributor was cut down and used � only as an oil pump drive and cam sensor, thereby leaving room for the � blower drive. 5/8" aluminum plate was used to make the front drive support, � which also serving as the tensioner and alternator mount. (It supported the � front of the intercooler as well.) �
�
�
�
�
The Turbo
� Then the engine blew up. This was entirely foreseeable as I had been winding � it to 7 grand frequently and it still had the original cast pistons. Still, � losing power, overheating, blowing out smoke and rapidly slowing to a stop � was not what I wanted that particular afternoon. I got a buddy to tow it � back to my place and I had an alternate plan already in the works. �� When my old friend Harry Johnston moved to Virginia he sold me the Olds � 215 that we'd built in his basement. (The same engine I'd sledded down the � hill a couple years before.) Harry had impulsively bought a set of low � compression Buick pistons and there was no way I could talk him out of using � them in the engine. With the 2 bbl Olds heads, the resulting compression ratio � was probably around 6.5:1. Although this was exceptionally low, the motor � still ran and made better power than you might expect. It was still a very � significant improvement over the 4 cylinder engine. I knew this because I'd � swapped it into the MG temporarily while I did a cam change on the Buick � engine a year or two earlier. �
� In the meantime I'd been scouting for an Olds Jetfire turbo and found not � just the turbo unit, but also the engine, mounted in, you guessed it, an � MGB. The car was toast. The previous owner had hacked up the sills and � tranny tunnel extensively, but I bought the works for a thousand bucks and � began adapting the turbo to the ultra low compression Olds engine. �
�
� Why not the fresh Jetfire? I was saving it for later after all the bugs � were worked out. I set to work making up a set of turbo headers, some � adapters, linkages and such, and making it all work in the MG. Once it � was back together, I began tuning the 2" SU carb I had feeding the turbo. � I lathe turned new needles and drilled out the main jet but midrange tuning was � tricky. In order to get it right, I enlisted the aid of a fellow whitewater � guide and motorcyclist who I've been close with ever since the early 80's � named: "Cosmic" John Janzen. I knew I could count on him to be comfortable � in the wind! I had John stand up, lean over the windshield, and with a � screwdriver adjust the main jet of the SU while we drove up and down Clifton � Hill in Cincinnati. (Unlike the 1-3/8" SU of the MGB, this 2" version had � a rocker linkage on the jet with a top adjustment.) �
� John still ribs me about that ride (exaggerating the speed and such) but � we got the adjustment right after a few tries and with the turbo putting � out 7 lbs of boost the engine ran nearly as well as the Buick until it � started gasping for air around 5 grand. Fuel mileage was poor, but response � was pretty good if you could overlook the turbo lag. It wasn't a lot of � lag, but it was near impossible to time it accurately and it put me sideways � so often that I had two freeway collisions because of it in a period of � just a few years. I began to look for another option.�
�
� Along about the same time as the turbo swap, I grew weary of being asked � by looky-loos if the car was a Porsche. The front end was never going to � be right anyway and besides, I had recently seen another car in the area � that looked suspiciously similar. Commonly nick-named the "Clown Shoe". � That was just too much for me! I decided my car needed to look more like � an MG. �
� I thought up a brilliant scheme to make a new front end out of fiberglass. � I envisioned it as being basically similar but having a raised snout with � an MG grille that was tall and narrow, like a cross between a TD and an MGB. � I began building this apparition and actually drove the car with it in � place for a number of weeks before deciding that my free-form fiberglass � skills were not up to the task. The fiberglass hood followed my first � homemade hood into the dumpster in favor of more traditional sheet-metal. �
� I had a set of fenders and hood from the Jetfire car, so I mounted them and � cut a line from the cowl to the inside of the headlight bucket. Then I � spread the fender 3" to the outside at the front edge, and spliced in some � steel to close the gap. The resulting design looked more "MG", so I was � very satisfied with it. I drove with this prototype until the turbo shaft � bearing began to wear. At that point I was fortunate enough to be in a � position to buy new sheet metal as well as a new Eaton M-90 blower form � Magnuson Enterprises in California. M-90's had not yet appeared on � production cars, and I actually had to call and twist their arms to have � the boys ship me one, but at last the final plan was set into motion. �
� The car was torn down to the basic shell and prepped for paint. At the same � time, I finished up some details. The rockers were trimmed for new perforated � stainless grilles that would allow some of exhaust heat to escape. I decided � not to remove the box section under the gas pedal at that time as the � hydraulic throw-out bearing would be new and was as yet untested. Along � with the new sheet metal and the blower equipped engine it would be getting � an experimental heat-pipe based intercooler, distributor-less ignition, and � sequential fuel injection, plus the wing from the Cutlass would at last be � mounted. Other changes were in the works as well, meaning that this time � the car would be down a couple of years. �
� I made a point to do some work on it every day, even if it was a tiny step. � In this way, the project kept moving forward. I highly recommend this approach � to anyone doing a conversion. It keeps the project foremost in your mind, � gives you a constant feeling of accomplishment, and prevents the car from � languishing in the corner. Tasks that seem insurmountable become much easier � when you tackle one part at a time. �
� Clearly you have to sort out some of the largest issues before you start � though. What kind of blower, what kind of intercooler, how to make sure � there was space for both, and things like that. If you're a CAD wizard so � much the better, but I am not. What I'm saying is that you don't necessarily � have to know where every bolt will go before you begin. "Anything worth doing � is worth doing twice!" Keep that in mind as you work on your conversion and � you will find the entire experience much less frustrating. You will be less � tempted to walk away from it.�
�
�
Turbos are great but a Blower is Better
� It was along in here somewhere that I met Kurt Schley and attended the � Indianapolis V8 meet. With the car down for redesign, I felt a little out � of place, as many new participants do. I felt as if there had to be some � doubt as to whether I really even had an MGB, much less a fire breathing � monster like the one I eventually showed up with. So be sure to show extra � consideration to the new guys.�� Skipping the intimate details of how the ports were machined or the rivet � nuts installed, in more general terms I next proceeded to mount the blower � to the Jetfire engine by modifying the old Offenhauser dual port intake. I � chose this one because of the large plenum space, which after all internal � dividers were removed gave me room for the intercooler. �
�
� Originally a Ford EEC-IV SEFI/EDIS system was used for injection and ignition � by cannibalizing a Crown Vic. The Delco distributor was cut down and used � only as an oil pump drive and cam sensor, thereby leaving room for the � blower drive. 5/8" aluminum plate was used to make the front drive support, � which also serving as the tensioner and alternator mount. (It supported the � front of the intercooler as well.) �
�
�
�
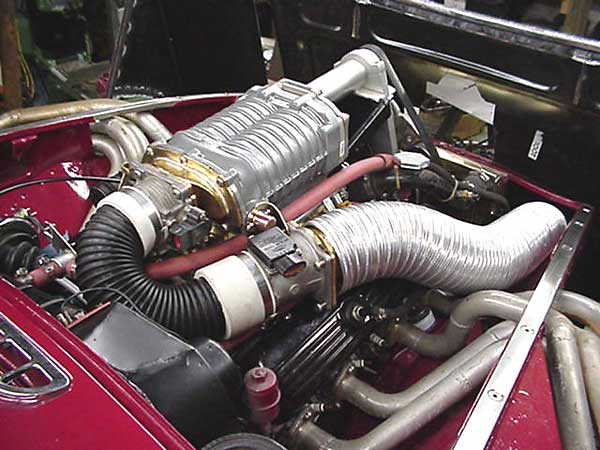
A brass plenum box was built to house that unit and raise the blower �
above the fuel rail. The fuel rail turned out to be a very tight fit, but �
there was enough room to install and remove it with everything else in �
place. I learned to cast silicone rubber in the process and have made good �
use of that skill several times since. �
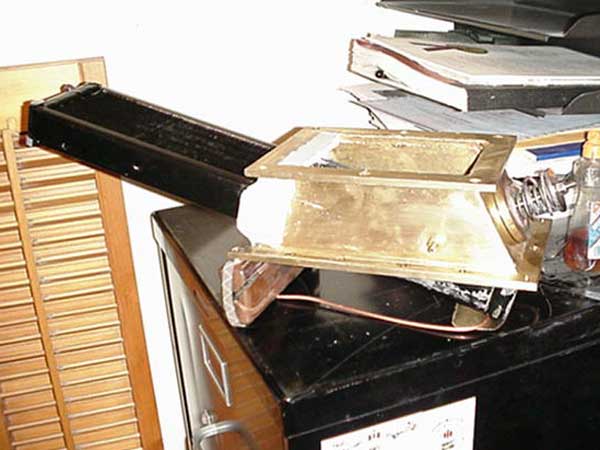
� I know some people will want to know more about that intercooler! I had a � special custom 2 row brass radiator made up, I forget the exact dimensions � but something like 4-1/2 x 18" long with a 1/16" NPT thread in each of the � end caps which were intentionally kept as small as practical. The outer cap � was fitted with a Schraeder valve and the inner with a tube connected with � another Schraeder valve through the wall of the plenum. In this way when � assembled I was able to completely fill the intercooler with ethanol thereby � determining the internal volume, and then with a vacuum pump and recovery � chamber draw out half of the volume, leaving only ethanol and ethanol vapor � in the intercooler. Set at an angle and at vapor pressure only, any heat � introduced to the liquid in the lower half immediately upsets the equilibrium, � causing production of more vapor which rapidly transfers the heat to the � cooler end where it is radiated. �
� How effective is it? I don't know yet, but I now have sensors in place � and a means of measuring it, so it's just a matter of setting up data-logging � to record the outputs. It was never my intention to try to keep the blower � concealed beneath the hood. With the already radical bodywork and extremely � wide tires it was not going to be mistaken for a stock MGB by anybody so the � cat was out of the bag. No, I *wanted* that blower to stick through the hood, � mostly because of an image from my adolescence. There was a TV commercial with � a kid who had an AMX Javelin with a GMC blower fitted and an Enderlie � intake. When his dad ragged on him for some unremembered crime, he casually � blipped the big red throttles of that Enderlie, drowning out all possibilities � of conversation. That made a statement that stuck with me through all the years � and that was what I wanted. But nobody made an Enderlie for the M-90 and the � EEC-IV was a hotwire system so that would have to wait. Nonetheless when the � time came the hood was cut to fit. A lot of details are going to be skipped in � the interest of brevity, but eventually I designed and manufactured an Enderlie � intake for the blower which would fit through the hood cutout, had three big � red butterflies, a throttle position sensor, and an internal K&N air filter. �
�
�
� The steering shaft was modified to give more room at the header location, and a � completely new forward cross-member was designed and built combining the functions � of skid plate, spoiler center section, and hinge mount into one extremely stiff � but lightweight piece. As before, the fenders were widened by adding a wedge of � sheet metal. The bumper was widened by MIG welding sections from two new bumpers � together. To avoid discoloration of the chrome (from the welding heat) I first � made a jig. Some dry ice was procured and sliced into slabs about an inch thick and � shaped to fit the bumper contour. I secured it in place with springs holding it � against the chrome side. The dry ice providing a gas shield and cooled the metal � so that the discolored zone ended up being only about a quarter inch wide, and � the weld picked up some chrome as well (making it more resistant to corrosion). � These welds were positioned behind the bumper over-riders, the new hinge geometry � allowing them to be retained. As a result, they are well hidden and most people � would mistake it for a stock bumper. �
� The end portions of an LE spoiler are bolted to the ends of the bumper and are � attached on the inside to the cross-member assembly which makes up the center � section. �
�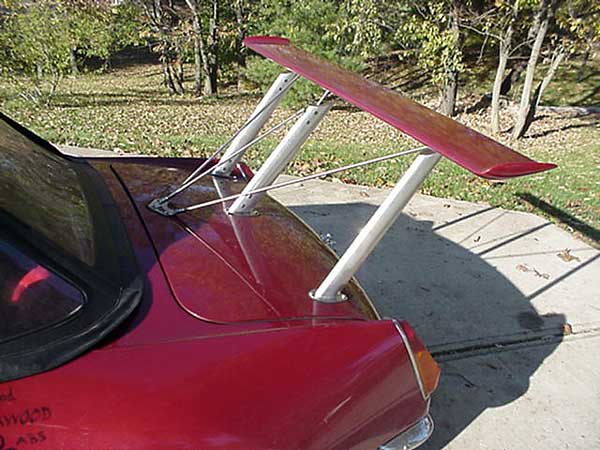
� In the rear, the right side leaf spring mount was lightly reinforced by adding a � channel section and the rear spoiler (wing) was mounted using aerodynamic struts � sourced from Aircraft Spruce and Specialty. The wing I chose to use had been with � me since 1973. While driving my 1970 Cutlass Supreme I was stopped by a 442 owner and � asked if I wanted to buy a fiberglass spoiler and hood. I kept the wing even after � the car was long gone because in the early 70's Hot Rod Magazine did a test of � spoilers on cars of the period and concluded only two were effective: the Olds � 442 and the GTO "Judge". The difference between them was in the end treatment. I � had always favored the Olds-style turned-up ends, and after buying the MG I was � constantly scheming to mount it. The struts provided the answer. I also incorporated � an idea from a college buddy's radio control racer by tying the leading edge to the � car's differential, so body movement would be offset by wing angle. The resultant � down-force holds the car to the road but decreases drag when not needed.�
� Finally, the car was ready for paint. I selected a dark red metallic after much � searching for just the right tone, hue and shade. At last it was a Ford color � that caught my eye. On the car, I highlighted it by laying out some black flames � around the blower. All this was done on a carport, with tarps on the sides to � keep out debris. The results were pretty good, but not professional. I can live � with it though, having long tolerated a hot rodder's wax job (e.g. rattle can � flat black.) �
�
� After final assembly, start-up and registration I was once more ready to drive. � Although the car ran, there was some tuning to do and my first step was to buy a � TwEEcer unit to interface the EEC-IV controller with a laptop. To say I was � overwhelmed by this experience would be a gross understatement. The learning � curve was the steepest I've ever seen anywhere, and to make it worse, with the � proprietary controls and software most of the tuning parameters were unknowns. � The sheer number of tuning settings was daunting. But I set to, and I was able � to eventually get a tune that worked well, had good power, started easily and was � generally smooth to drive except there was a surge at 2000 rpm that I � simply could not get rid of. I tried different controllers, swapping out components, � and verified every input, all to no avail. Finally, having learned of the MegaSquirt � controller, I built one, experimented with it, and I decided to get rid of � the hot-wire system. (MegaSquirt is a manifold-absolute-pressure based system.) � The hot-wire system wouldn't work with an Enderlie scoop anyway. �
�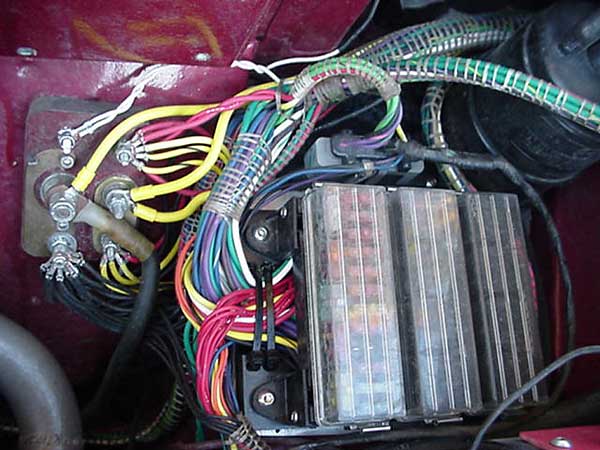
� For power distribution I chose modular snap-together fuse and relay bases with � clear o-ring sealed covers from Furneaux Riddall & Co Ltd Relays in the UK. � These are more expensive than the domestic selection but can be combined in � any order or quantity to give a neat and tidy appearance. I machined a black � nylon base to keep the wires organized and used the new LED equipped blade fuses, � another wonderful innovation. Relay selection is a bit particular as heights vary � but I found that half of my selection of stock Ford relays fit, if somewhat snugly. � This panel was located on top of the passenger side shelf for easy access. I had � previously fitted a phenolic terminal block nearby on the inner fender at the old � coil location and retained that as well as adding new ones behind the glove box � and in the trunk. �
� I used a great many ring terminals, and learned that an open barrel-crimp similar � to those used by automakers is perhaps the most secure means of terminating wires � for general connections. However there is great variation between various brands � of crimpers and terminals. AAW and others sell a crimper for automotive terminals � which does an excellent job with the matching terminals, but it does not work well � with industrial terminals. This might not be an issue if automotive open barrel � ring terminals were readily available. Practically every other type is, such as � the terminals for various EFI connectors but I had great difficulty sourcing � ring terminals and ended up with industrial ring terminals which are made of a � thicker material and require a different crimper. �
� I really like sealed connectors. Unlike the bullet type we all know and love � (NOT!) they seal out air and last indefinitely. I had a surplus of the Ford type � left over and found a source for most of the pins. Some are carried by auto � parts stores but another good source is: RJM Injection Tech. I replaced all � bullet connectors with sealed connectors, including the steering column wires. � This was a good deal of trouble, but worth it in the long run as I shouldn't � have any more connector troubles. Now I know some say all you need to do is � keep the bullet connectors clean and use good dielectric grease, but I have � just eliminated that maintenance item from my schedule and am very happy about � it. �
� At the same time I replaced the light bulb sockets with the newer blade type, � except for the dashboard lights, and had already gone to Bosch 100 watt � headlights. I should have probably done the dash lights as well, but am still � not satisfied with what is available and will wait for new developments, � hopefully in the form of durable high intensity LED type bulbs at some point. � It appears I may change to a newer type electronic speedo anyway with the � impending transmission upgrade.�
�
� Anyway, I found that commonly available lighted rockers would fit in the dash � cutout stacked three high, which gave me an additional switch for fog lights. � I also wanted a 3 speed fan on the heater so the same thing applied to the � heater switch. (Relays were in place for both.) Originally, I had epoxied the � switches together and used standard spade connectors but this meant that one � switch could not be replaced independently and making the connections was � tedious, confusing, and not terribly reliable. So putting my silicone casting � skills to use I had a solution. By now I had learned to mix copier toner (carbon � black) with the silicon resin for color, durability, and a harder cure, so I � devised molds to hold the switches with connectors in place and encase them in � silicon rubber, resulting in 9 pin connectors that the individual switches could � be plugged into, and in the process sealing out the air except for where the � blade was inserted. This was a dramatic improvement and should be very reliable. � I used the same method for the transmission reverse switch and the brake light � switch (which was a Chrysler item and a direct fit in the cover). I substituted � a toggle switch with a metallic red hinged guard for the emergency flashers. � Since I had installed an electronic cruise control unit, I used one of the � remaining console openings for a compact pushbutton package to control that, � and the other for an auxiliary back-up light switch. �
� The Marantz graphic equalizer was replaced with a more modern one, the radio � with a CD player head unit, amps front and rear, and poly cone 6x9 speakers in � the doors and rear bulkhead. The MegaSquirt harness, purchased as a semi-finished � kit also had been installed before the main harness was in place and all the wiring � bundles were laced with flat lacing twine, an old aircraft technique. A wide-band � O2 sensor from Innovative Motorsports was installed, and a knock sensor circuit � was added to the controller. �
� The rest of the gauge package consists of an exhaust gas temperature gauge, � ammeter, voltmeter, vacuum/boost gauge, '67 vintage dual water temp/oil pressure � gauge and fuel gauge, and the early MGB speedo and tach. �
�
�
� Then a roll-hoop is needed so I can play with it on the track, but of course an � off-the-shelf product just won't do and I want one that can be raised for track � days and lowered to fit under the top, and still comply with SCCA rules. �
� New carpet would be nice. �
� Finally, I hope to finish the IRS project in a few years. As planned, it will � use T-bird components and geometry, inboard brakes, and tubular lower control � arms with long suspension travel and extremely low un-sprung weight. However, � there is a relatively new GM SUV IRS that also looks promising. An � adjustable-height revision of the suspension design may be in the works as well. � If my income has increased by then I may even buy one of Ted Lathrop's fantastic � ("Fast Cars") front suspensions, though I'd probably have to modify it some. �
� The gas struts for the front clip will probably be modified into hydraulic � units to give positive control of hood movement using a Mercruiser trim pump, � which is reasonably light and compact. Most of all, I just intend to drive it!�
�
� Disclaimer: This page was researched and written by Jim Blackwood. Views expressed � are those of the author, and are provided without warrantee or guarantee. Apply at your � own risk.�
� Photos by Jim Blackwood. All rights reserved. �
�
�
� I know some people will want to know more about that intercooler! I had a � special custom 2 row brass radiator made up, I forget the exact dimensions � but something like 4-1/2 x 18" long with a 1/16" NPT thread in each of the � end caps which were intentionally kept as small as practical. The outer cap � was fitted with a Schraeder valve and the inner with a tube connected with � another Schraeder valve through the wall of the plenum. In this way when � assembled I was able to completely fill the intercooler with ethanol thereby � determining the internal volume, and then with a vacuum pump and recovery � chamber draw out half of the volume, leaving only ethanol and ethanol vapor � in the intercooler. Set at an angle and at vapor pressure only, any heat � introduced to the liquid in the lower half immediately upsets the equilibrium, � causing production of more vapor which rapidly transfers the heat to the � cooler end where it is radiated. �
� How effective is it? I don't know yet, but I now have sensors in place � and a means of measuring it, so it's just a matter of setting up data-logging � to record the outputs. It was never my intention to try to keep the blower � concealed beneath the hood. With the already radical bodywork and extremely � wide tires it was not going to be mistaken for a stock MGB by anybody so the � cat was out of the bag. No, I *wanted* that blower to stick through the hood, � mostly because of an image from my adolescence. There was a TV commercial with � a kid who had an AMX Javelin with a GMC blower fitted and an Enderlie � intake. When his dad ragged on him for some unremembered crime, he casually � blipped the big red throttles of that Enderlie, drowning out all possibilities � of conversation. That made a statement that stuck with me through all the years � and that was what I wanted. But nobody made an Enderlie for the M-90 and the � EEC-IV was a hotwire system so that would have to wait. Nonetheless when the � time came the hood was cut to fit. A lot of details are going to be skipped in � the interest of brevity, but eventually I designed and manufactured an Enderlie � intake for the blower which would fit through the hood cutout, had three big � red butterflies, a throttle position sensor, and an internal K&N air filter. �
�
�
More Bodywork
� Taking the best features of the first tilt assembly and the final prototype � hood, I made new revisions and built the front end assembly that's on the car � today. It uses a double-hinged gas-assisted mechanism, secured by the stock � latch in the stock location on a forward mounted slam panel that was installed � with the last hood. UHMW (Ultra High Molecular Weight polyethylene) "fingers" � secure the rear. Stainless steel inner fender braces to prevent cracking of the � inner fenders replace the white oak ones from my first forward-tilt hood, and � tie into the fender stubs for crash-worthiness. �� The steering shaft was modified to give more room at the header location, and a � completely new forward cross-member was designed and built combining the functions � of skid plate, spoiler center section, and hinge mount into one extremely stiff � but lightweight piece. As before, the fenders were widened by adding a wedge of � sheet metal. The bumper was widened by MIG welding sections from two new bumpers � together. To avoid discoloration of the chrome (from the welding heat) I first � made a jig. Some dry ice was procured and sliced into slabs about an inch thick and � shaped to fit the bumper contour. I secured it in place with springs holding it � against the chrome side. The dry ice providing a gas shield and cooled the metal � so that the discolored zone ended up being only about a quarter inch wide, and � the weld picked up some chrome as well (making it more resistant to corrosion). � These welds were positioned behind the bumper over-riders, the new hinge geometry � allowing them to be retained. As a result, they are well hidden and most people � would mistake it for a stock bumper. �
� The end portions of an LE spoiler are bolted to the ends of the bumper and are � attached on the inside to the cross-member assembly which makes up the center � section. �
�
� In the rear, the right side leaf spring mount was lightly reinforced by adding a � channel section and the rear spoiler (wing) was mounted using aerodynamic struts � sourced from Aircraft Spruce and Specialty. The wing I chose to use had been with � me since 1973. While driving my 1970 Cutlass Supreme I was stopped by a 442 owner and � asked if I wanted to buy a fiberglass spoiler and hood. I kept the wing even after � the car was long gone because in the early 70's Hot Rod Magazine did a test of � spoilers on cars of the period and concluded only two were effective: the Olds � 442 and the GTO "Judge". The difference between them was in the end treatment. I � had always favored the Olds-style turned-up ends, and after buying the MG I was � constantly scheming to mount it. The struts provided the answer. I also incorporated � an idea from a college buddy's radio control racer by tying the leading edge to the � car's differential, so body movement would be offset by wing angle. The resultant � down-force holds the car to the road but decreases drag when not needed.�
� Finally, the car was ready for paint. I selected a dark red metallic after much � searching for just the right tone, hue and shade. At last it was a Ford color � that caught my eye. On the car, I highlighted it by laying out some black flames � around the blower. All this was done on a carport, with tarps on the sides to � keep out debris. The results were pretty good, but not professional. I can live � with it though, having long tolerated a hot rodder's wax job (e.g. rattle can � flat black.) �
�
� After final assembly, start-up and registration I was once more ready to drive. � Although the car ran, there was some tuning to do and my first step was to buy a � TwEEcer unit to interface the EEC-IV controller with a laptop. To say I was � overwhelmed by this experience would be a gross understatement. The learning � curve was the steepest I've ever seen anywhere, and to make it worse, with the � proprietary controls and software most of the tuning parameters were unknowns. � The sheer number of tuning settings was daunting. But I set to, and I was able � to eventually get a tune that worked well, had good power, started easily and was � generally smooth to drive except there was a surge at 2000 rpm that I � simply could not get rid of. I tried different controllers, swapping out components, � and verified every input, all to no avail. Finally, having learned of the MegaSquirt � controller, I built one, experimented with it, and I decided to get rid of � the hot-wire system. (MegaSquirt is a manifold-absolute-pressure based system.) � The hot-wire system wouldn't work with an Enderlie scoop anyway. �
Wires, More Wires, and Spaghetti
� By this time, Dan Masters had developed an excellent wiring kit for the MGB and � with his son Mike had set up the company Advance Auto Wire (AAW) to sell it. One � of the distinctive features of their wiring is that they specify cross-linked � polyethylene cable insulation instead of vinyl insulation. (Editors note: this � kind of insulation is commonly available in several insulation thicknesses: "SXL" � has a very thick wall. "GXL" has a medium thick wall. "TXL" has a relatively thin � wall.) Although their kit wasn't what I wanted for my wiring harness, they agreed � to sell me bulk SXL cable. Dan and Mike continuously upgrade their kits and are � now offering a new variation with thinner insulation and lighter gage signal wires � while still retaining their signature oversized wires for load carrying conductors, � meaning it's now possible to completely rewire the car and have a more compact � wiring bundle. In my opinion this is an excellent development and greatly � simplifies the rewiring task. ��
� For power distribution I chose modular snap-together fuse and relay bases with � clear o-ring sealed covers from Furneaux Riddall & Co Ltd Relays in the UK. � These are more expensive than the domestic selection but can be combined in � any order or quantity to give a neat and tidy appearance. I machined a black � nylon base to keep the wires organized and used the new LED equipped blade fuses, � another wonderful innovation. Relay selection is a bit particular as heights vary � but I found that half of my selection of stock Ford relays fit, if somewhat snugly. � This panel was located on top of the passenger side shelf for easy access. I had � previously fitted a phenolic terminal block nearby on the inner fender at the old � coil location and retained that as well as adding new ones behind the glove box � and in the trunk. �
� I used a great many ring terminals, and learned that an open barrel-crimp similar � to those used by automakers is perhaps the most secure means of terminating wires � for general connections. However there is great variation between various brands � of crimpers and terminals. AAW and others sell a crimper for automotive terminals � which does an excellent job with the matching terminals, but it does not work well � with industrial terminals. This might not be an issue if automotive open barrel � ring terminals were readily available. Practically every other type is, such as � the terminals for various EFI connectors but I had great difficulty sourcing � ring terminals and ended up with industrial ring terminals which are made of a � thicker material and require a different crimper. �
� I really like sealed connectors. Unlike the bullet type we all know and love � (NOT!) they seal out air and last indefinitely. I had a surplus of the Ford type � left over and found a source for most of the pins. Some are carried by auto � parts stores but another good source is: RJM Injection Tech. I replaced all � bullet connectors with sealed connectors, including the steering column wires. � This was a good deal of trouble, but worth it in the long run as I shouldn't � have any more connector troubles. Now I know some say all you need to do is � keep the bullet connectors clean and use good dielectric grease, but I have � just eliminated that maintenance item from my schedule and am very happy about � it. �
� At the same time I replaced the light bulb sockets with the newer blade type, � except for the dashboard lights, and had already gone to Bosch 100 watt � headlights. I should have probably done the dash lights as well, but am still � not satisfied with what is available and will wait for new developments, � hopefully in the form of durable high intensity LED type bulbs at some point. � It appears I may change to a newer type electronic speedo anyway with the � impending transmission upgrade.�
�
Switches and Such
� I never liked the MGB headlight switch. It seems a poor design to begin with, and � it's only reliable when used to drive a headlight relay rather than powering � the lights directly. Besides, I wanted an indicator to remind me not to leave � the lights on, and I wanted to be able to switch on the headlights independently � of the running lights. (It's an old street racer thing, don't ask.)�� Anyway, I found that commonly available lighted rockers would fit in the dash � cutout stacked three high, which gave me an additional switch for fog lights. � I also wanted a 3 speed fan on the heater so the same thing applied to the � heater switch. (Relays were in place for both.) Originally, I had epoxied the � switches together and used standard spade connectors but this meant that one � switch could not be replaced independently and making the connections was � tedious, confusing, and not terribly reliable. So putting my silicone casting � skills to use I had a solution. By now I had learned to mix copier toner (carbon � black) with the silicon resin for color, durability, and a harder cure, so I � devised molds to hold the switches with connectors in place and encase them in � silicon rubber, resulting in 9 pin connectors that the individual switches could � be plugged into, and in the process sealing out the air except for where the � blade was inserted. This was a dramatic improvement and should be very reliable. � I used the same method for the transmission reverse switch and the brake light � switch (which was a Chrysler item and a direct fit in the cover). I substituted � a toggle switch with a metallic red hinged guard for the emergency flashers. � Since I had installed an electronic cruise control unit, I used one of the � remaining console openings for a compact pushbutton package to control that, � and the other for an auxiliary back-up light switch. �
� The Marantz graphic equalizer was replaced with a more modern one, the radio � with a CD player head unit, amps front and rear, and poly cone 6x9 speakers in � the doors and rear bulkhead. The MegaSquirt harness, purchased as a semi-finished � kit also had been installed before the main harness was in place and all the wiring � bundles were laced with flat lacing twine, an old aircraft technique. A wide-band � O2 sensor from Innovative Motorsports was installed, and a knock sensor circuit � was added to the controller. �
� The rest of the gauge package consists of an exhaust gas temperature gauge, � ammeter, voltmeter, vacuum/boost gauge, '67 vintage dual water temp/oil pressure � gauge and fuel gauge, and the early MGB speedo and tach. �
�
�
Upholstery
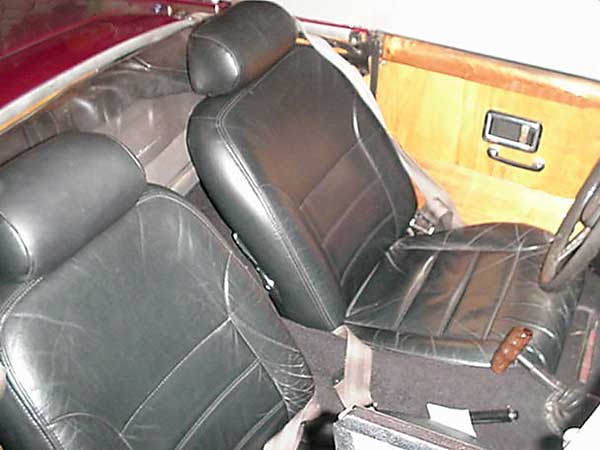
� By now the MG seats had gotten pretty ratty even with parts store slip-covers. � I wanted to re-cover them in leather and had even gotten the seat foams one year � for Christmas but buying the leather was not looking cheap and stitching them � up was going to take a lot of time. Buying custom covers would be even more � expensive. I went looking for an alternative and found it in a set of swap meet � seats from a Mercury Marauder. They're black leather with adjustable lumbar � support and electric rails, all for $100. But they wouldn't fit. I removed the � electric rails. They still wouldn't fit. What to do? Removing the covers, I � found I could combine the MG seat base and recliner mechanism with the Marauder � seat back, lumbar and head rest. Soon they were in the car and looking good. � I won't claim it was the easiest swap, and it did take significant cutting and � welding, but in the end I was satisfied and the ride was improved, to say � nothing of the appearance.�What's Next
� The immediate concern is the transmission. I have now demolished my second � T-50. (I wouldn't recommend one for an engine over 200 hp.) It's beginning to � look like the replacement may be a T-56 six speed or perhaps a TH200-4R overdrive � automatic with lock-up converter, but the details are yet to be determined. � With perhaps the most forward engine position of any MGB V8 swap, there appears � to be room for it. But it looks like a replacement T-50 may need to be fitted � in order to give me time to mate the replacement tranny to an upgraded engine, � the Buick 340. The money is an issue, as always. �� Then a roll-hoop is needed so I can play with it on the track, but of course an � off-the-shelf product just won't do and I want one that can be raised for track � days and lowered to fit under the top, and still comply with SCCA rules. �
� New carpet would be nice. �
� Finally, I hope to finish the IRS project in a few years. As planned, it will � use T-bird components and geometry, inboard brakes, and tubular lower control � arms with long suspension travel and extremely low un-sprung weight. However, � there is a relatively new GM SUV IRS that also looks promising. An � adjustable-height revision of the suspension design may be in the works as well. � If my income has increased by then I may even buy one of Ted Lathrop's fantastic � ("Fast Cars") front suspensions, though I'd probably have to modify it some. �
� The gas struts for the front clip will probably be modified into hydraulic � units to give positive control of hood movement using a Mercruiser trim pump, � which is reasonably light and compact. Most of all, I just intend to drive it!�
�
What I'd Do Differently
� If I was starting over? Everything! Possibly a normally aspirated SBC engine or � a (surprisingly lightweight for its size) early Buick 455... Everything else is � up for grabs, but I would find a way to include air conditioning, which I may � add to my '71 at some point. If re-doing a '71 padded dash, I would also � entirely discard the pillow and use other materials to build up the right side � brow before re-covering. I'd use a glove box lock that could be keyed to match � the door and trunk locks. The headlight buckets should probably have been � pointed inwards slightly as well, as I had done on the previous fenders. � Another thing I meant to do but misplaced the parts was to install the early � type air doors on the foot-well vents. Maybe some day I'll find them.�� Disclaimer: This page was researched and written by Jim Blackwood. Views expressed � are those of the author, and are provided without warrantee or guarantee. Apply at your � own risk.�
� Photos by Jim Blackwood. All rights reserved. �
