�
 �
�
�
�
�
�
�
�
�
�
� by: Greg Myer�
� Four Webers sitting on top of my Buick 215 in my MGB-GT V8. Wow, what a sight! � Fire it up and listen.... there's a nice burble at idle with no "missing". Blip � the throttle and there's instantaneous response! Slip into first gear and slide � the clutch out. Off like a shot! This is the place where I usually wake up from � my dream.�
� Real world: My 215 isn't together yet. I'll be using the stock Rochester 4GC that � came on the Buick when it left the plant in 1962. Many of us do that, at least to � get the car running. We have so many areas to spend money on, that if the carburetor � can be rebuilt on a shoestring, we'll spend the budget somewhere else. After all, � we know the carburetor fits and was intended for this motor. Good starting point.�
�
�
�
�
 �
�
How to Rebuild a Rochester 4GC Four-Barrel Carburetor
� This article appeared in The British V8 Newsletter - Volume XIII, Issue 2 - May 2005�� by: Greg Myer�
� Four Webers sitting on top of my Buick 215 in my MGB-GT V8. Wow, what a sight! � Fire it up and listen.... there's a nice burble at idle with no "missing". Blip � the throttle and there's instantaneous response! Slip into first gear and slide � the clutch out. Off like a shot! This is the place where I usually wake up from � my dream.�
� Real world: My 215 isn't together yet. I'll be using the stock Rochester 4GC that � came on the Buick when it left the plant in 1962. Many of us do that, at least to � get the car running. We have so many areas to spend money on, that if the carburetor � can be rebuilt on a shoestring, we'll spend the budget somewhere else. After all, � we know the carburetor fits and was intended for this motor. Good starting point.�
�
�
Sometimes finding the right intake manifold at the swap meet to work with a Holley �
and keep things under the hood isn't easy. The good news is that the Rochester 4GC �
is not a bad choice. Even though the carburetor is 40 years old, it can be made to �
run very well indeed. �
� As good as the Weber set up? NO! Keep dreaming! The Webers are infinitely adjustable; � from idle to an RPM range beyond the Buick's capabilities. The 4GC can provide � excellent street performance however. You will need to rebuild it first. Yes, you � will. Unless it's coming off a running engine, it will have dried up gaskets and � accelerator pump and old gas left in it. It needs cleaning!�
� Kits are available. While I was working on Larry's Ford powered MGB, he ordered a � kit from D&D for me. He also got me the Crower Cam 50232 that many British � V8'ers like to use. What a pal!�
� Cam changes, higher compression, headers, lighter car, and 5-speed transmissions � all affect the fuel requirements of any given motor. Can the 4GC handle it? Yes! � Actually, it's quite versatile, as we will see.�
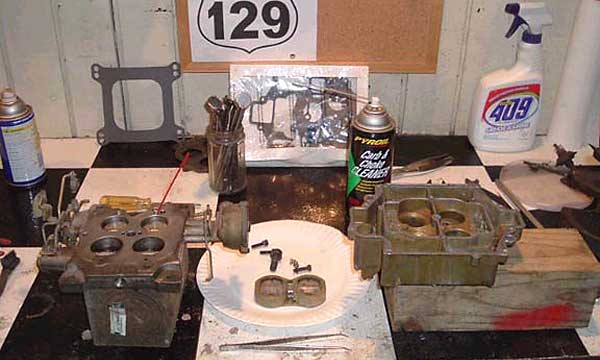
� First off, after you have the rebuild kit, you'll need 2 cans of carb cleaner. � There are many brands out there. Spend a little extra here. The cheaper ones just � don't seem to do the job. Also, when you pick them up, make sure they have the � small applicator tubes taped to them. These are important as they'll help you � clean the various passages in the carburetor. There are a bunch of these small � passages and they play major roles in how the carburetor functions. Every one of � these needs to be thoroughly cleaned for the carburetor to work right.�
��
�
� When you disassemble the carburetor, note how things are put together. If you've � never done one before, you'll be amazed when it's time to reassemble it how many � ways it's possible to do it wrong. Taking pictures first isn't a bad idea. Linkages � especially! Then: follow the instructions in the kit. This article will only hit a � few high points and a few modifications you may want to try. Unscrew the air-horn, � or top of the carburetor. Lift it off slowly so as to avoid damaging the floats. � The accelerator pump will come up with it. Set it aside.�
� �
�
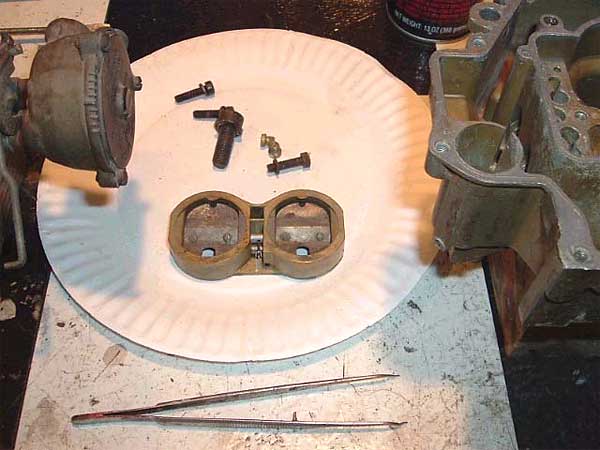
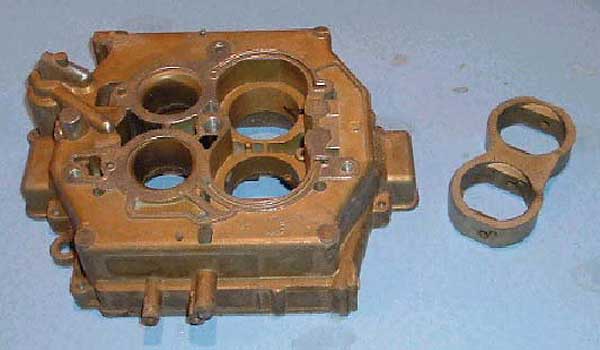
� The main body of the carburetor is now open to you. Remove the 3 screws holding � the primary venturi cluster. It may require a bit of prying. Go easy, one side � than the other. The 2 clusters appear interchangeable to the novice. In fact they � can be screwed into the wrong location. No good! The primaries have the accelerator � pump nozzles and the secondaries don't. I use an old cupcake baking tin to keep � the parts sorted from each other. Everyone has one of these. Just snoop around in � the kitchen, it's there. (I prefer to do this when I have the house to myself.)�
� Or, pick one up at Wal-Mart. While you're there in the kitchen wares, there are lots � of inexpensive tins and pans that prove useful in the shop. I keep the primary side � parts on one end and the secondary parts on the other. The jets are a fine example � here. They will screw into the other end, but really foul things up. The primary � venturis are smaller, and therefore require smaller jets. Don't mix them up. If you � do, look at them before installing. The hole in the secondary jet is larger. Get � them where they belong!�
� Don't just turn the carburetor over at this point. There's a check valve in the � bottom of the accelerator pump well. It's larger than the one on the pump discharge � passage. There are also small springs in at least 2 locations. If you turn the � carburetor over without thought to these and they bounce across the floor and out � of sight: panic! It's the natural reaction. It won't help. The valves look like ball � bearings and new ones come in the rebuild kit. There are no springs in it however, � so don't lose them. The base plate is held on by 3 small screws and one large one � in the center. The base plate has the idle set screws in it. Before removing them, � turn them in counting the turns and lightly seat them. They should be very close to � the same side to side. If they are way out, or off the carburetor, when you re-assemble � it lightly seat them and back out 1 1/2 turns. This will be close enough to start � and run and tune things up.�
�
�
�
� As good as the Weber set up? NO! Keep dreaming! The Webers are infinitely adjustable; � from idle to an RPM range beyond the Buick's capabilities. The 4GC can provide � excellent street performance however. You will need to rebuild it first. Yes, you � will. Unless it's coming off a running engine, it will have dried up gaskets and � accelerator pump and old gas left in it. It needs cleaning!�
� Kits are available. While I was working on Larry's Ford powered MGB, he ordered a � kit from D&D for me. He also got me the Crower Cam 50232 that many British � V8'ers like to use. What a pal!�
� Cam changes, higher compression, headers, lighter car, and 5-speed transmissions � all affect the fuel requirements of any given motor. Can the 4GC handle it? Yes! � Actually, it's quite versatile, as we will see.�
� First off, after you have the rebuild kit, you'll need 2 cans of carb cleaner. � There are many brands out there. Spend a little extra here. The cheaper ones just � don't seem to do the job. Also, when you pick them up, make sure they have the � small applicator tubes taped to them. These are important as they'll help you � clean the various passages in the carburetor. There are a bunch of these small � passages and they play major roles in how the carburetor functions. Every one of � these needs to be thoroughly cleaned for the carburetor to work right.�
�
| �
Enjoying this article? Our magazine is funded through the generous support of readers like you! � To contribute to our operating budget, please click here and follow the instructions. � (Suggested contribution is twenty bucks per year. Feel free to give more!)� |
� When you disassemble the carburetor, note how things are put together. If you've � never done one before, you'll be amazed when it's time to reassemble it how many � ways it's possible to do it wrong. Taking pictures first isn't a bad idea. Linkages � especially! Then: follow the instructions in the kit. This article will only hit a � few high points and a few modifications you may want to try. Unscrew the air-horn, � or top of the carburetor. Lift it off slowly so as to avoid damaging the floats. � The accelerator pump will come up with it. Set it aside.�
�
�
� The main body of the carburetor is now open to you. Remove the 3 screws holding � the primary venturi cluster. It may require a bit of prying. Go easy, one side � than the other. The 2 clusters appear interchangeable to the novice. In fact they � can be screwed into the wrong location. No good! The primaries have the accelerator � pump nozzles and the secondaries don't. I use an old cupcake baking tin to keep � the parts sorted from each other. Everyone has one of these. Just snoop around in � the kitchen, it's there. (I prefer to do this when I have the house to myself.)�
� Or, pick one up at Wal-Mart. While you're there in the kitchen wares, there are lots � of inexpensive tins and pans that prove useful in the shop. I keep the primary side � parts on one end and the secondary parts on the other. The jets are a fine example � here. They will screw into the other end, but really foul things up. The primary � venturis are smaller, and therefore require smaller jets. Don't mix them up. If you � do, look at them before installing. The hole in the secondary jet is larger. Get � them where they belong!�
� Don't just turn the carburetor over at this point. There's a check valve in the � bottom of the accelerator pump well. It's larger than the one on the pump discharge � passage. There are also small springs in at least 2 locations. If you turn the � carburetor over without thought to these and they bounce across the floor and out � of sight: panic! It's the natural reaction. It won't help. The valves look like ball � bearings and new ones come in the rebuild kit. There are no springs in it however, � so don't lose them. The base plate is held on by 3 small screws and one large one � in the center. The base plate has the idle set screws in it. Before removing them, � turn them in counting the turns and lightly seat them. They should be very close to � the same side to side. If they are way out, or off the carburetor, when you re-assemble � it lightly seat them and back out 1 1/2 turns. This will be close enough to start � and run and tune things up.�
�
�
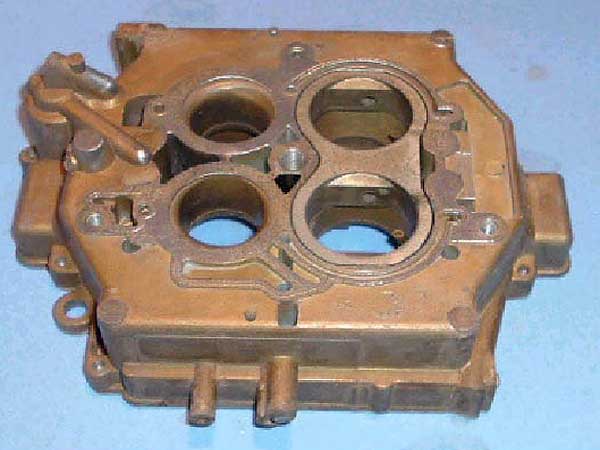
Clean everything! It can't be too clean. Use that tube on the spray can and point �
it down the various passages (wear eye protection when you do this as it�
may shoot back). �
� Make sure all the passages are open. There are 4 circuits in carburetor s like these: � Idle, off idle, accelerator and main (jets). Each is important. The idle and off idle � use the same feed passage, but the idle discharges below the throttle plate, while � the off idle discharges just above it. This passage can affect the fuel metering well � above idle.�
� With the main body inverted, the auxiliary throttle valve assembly in the secondaries � is visible. The whole unit pulls out.�
� �
�
� This is an air valve that uses the engine's need for air to push against the spring � pressure to allow more air flow into the engine: a kind of vacuum secondary � arrangement. If we leave it out do we have mechanical secondaries? Yes. I've done this � and was surprised at the difference on a Chevy 283 I had years ago. The body of this � valve assembly forms part of the venturi however. Some turbulence may result inside � the carburetor so it would be better to leave the body in without the plates and shaft. � The 283 has more pull through the venturis, and no problems resulted. Either way � quicker response is the result.�
� �
�
� Vacuum secondaries are designed to prevent too much air being available to the motor � before it needs it. This is ideal for heavy cars, or cars with automatics and high � rear gear ratios. Mild camshafts work well with vacuum secondaries, too. But we've � changed all that. We're not going to get more CFM with this modification; we'll just � get the air sooner when we crack the throttle.�
� Maybe you've heard some stories where this type of thing produced problems. I've � experienced it myself on a Rochester Quadrajet. The Q-jet has small primaries and � huge secondaries, with air doors on top. These doors are the mechanism that slowly � opens to keep the engine from bogging. Also, they are attached to metering rods � which fit in the secondary jets. Removing the doors means you must remove the rods. � This gives you a transition from the very small primaries to all the carburetor at � once. It's like flushing the toilet....but with gas, not water. Even in a car with � low gears there's a noticeable bog; then hang on because she'll go like gangbusters!� The fuel consumption suffers in this set up too. �
� The 4GC does not use the auxiliary throttle valve to meter any fuel. There are no � vacuum feeds or lines to worry over either. Just remove the plates and shaft, and � you're good to go.�
� Next, look at the base plate with the throttle plates and shafts in place. Work the � linkage. Do the secondaries open all the way? Mine didn't. They stopped well short � of vertical. That will reduce the flow capacity at wide open throttle (WOT). Why � won't they fully open? The linkage just needs adjustment. Was it built like that � on purpose, or by mistake, or did it get bent somewhere over the last 40 years? I � don't have the answer, but I do know that sometimes factories do it on purpose. At � one time I had a '68 Firebird with the 400 4bbl. This engine was rated lower in H.P. � than the 400 in a larger Pontiac. All the specs looked the same: cam, heads, � compression, and carburetor. The Firebird was lighter and for corporate reasons � couldn't match the larger car. The "fix" was to manipulate the linkage on the Q-jet � so it wouldn't allow the secondaries to fully open. Result: less H.P. �
� �
�
�
�
 �
�
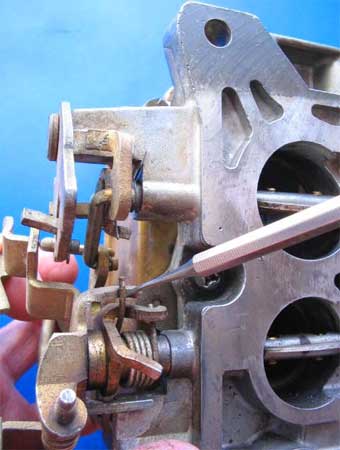
� Lesson for us: always make sure the secondaries are vertical at WOT on whatever � carburetor you're using. On the 4GC there are 2 spots to make this adjustment on the � linkage. First, be sure the choke is disengaged. Otherwise the secondaries won't open. � (Make sure the choke linkage is correctly assembled, as it can be put together wrong). � Next, invert the carburetor, and work the primary linkage. When the primaries are about � one-third open, the linkage contacts a spring coiled around the primary shaft. (See � the left-hand photo above.) Bending this up slightly initiates the secondary opening � sooner. �
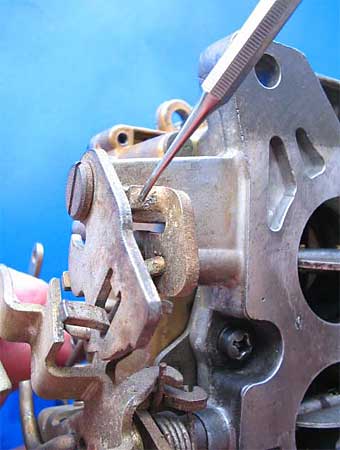
� Both primaries and secondaries should reach WOT at the same time. (See the right-hand � photo above.) If the secondaries don't open fully, bend the small tab that contacts the � base plate and prevents the shaft from going farther (as shown in the left-hand photo � below.)�
�
�
�
� Make sure all the passages are open. There are 4 circuits in carburetor s like these: � Idle, off idle, accelerator and main (jets). Each is important. The idle and off idle � use the same feed passage, but the idle discharges below the throttle plate, while � the off idle discharges just above it. This passage can affect the fuel metering well � above idle.�
� With the main body inverted, the auxiliary throttle valve assembly in the secondaries � is visible. The whole unit pulls out.�
�
�
� This is an air valve that uses the engine's need for air to push against the spring � pressure to allow more air flow into the engine: a kind of vacuum secondary � arrangement. If we leave it out do we have mechanical secondaries? Yes. I've done this � and was surprised at the difference on a Chevy 283 I had years ago. The body of this � valve assembly forms part of the venturi however. Some turbulence may result inside � the carburetor so it would be better to leave the body in without the plates and shaft. � The 283 has more pull through the venturis, and no problems resulted. Either way � quicker response is the result.�
�
�
� Vacuum secondaries are designed to prevent too much air being available to the motor � before it needs it. This is ideal for heavy cars, or cars with automatics and high � rear gear ratios. Mild camshafts work well with vacuum secondaries, too. But we've � changed all that. We're not going to get more CFM with this modification; we'll just � get the air sooner when we crack the throttle.�
� Maybe you've heard some stories where this type of thing produced problems. I've � experienced it myself on a Rochester Quadrajet. The Q-jet has small primaries and � huge secondaries, with air doors on top. These doors are the mechanism that slowly � opens to keep the engine from bogging. Also, they are attached to metering rods � which fit in the secondary jets. Removing the doors means you must remove the rods. � This gives you a transition from the very small primaries to all the carburetor at � once. It's like flushing the toilet....but with gas, not water. Even in a car with � low gears there's a noticeable bog; then hang on because she'll go like gangbusters!� The fuel consumption suffers in this set up too. �
� The 4GC does not use the auxiliary throttle valve to meter any fuel. There are no � vacuum feeds or lines to worry over either. Just remove the plates and shaft, and � you're good to go.�
� Next, look at the base plate with the throttle plates and shafts in place. Work the � linkage. Do the secondaries open all the way? Mine didn't. They stopped well short � of vertical. That will reduce the flow capacity at wide open throttle (WOT). Why � won't they fully open? The linkage just needs adjustment. Was it built like that � on purpose, or by mistake, or did it get bent somewhere over the last 40 years? I � don't have the answer, but I do know that sometimes factories do it on purpose. At � one time I had a '68 Firebird with the 400 4bbl. This engine was rated lower in H.P. � than the 400 in a larger Pontiac. All the specs looked the same: cam, heads, � compression, and carburetor. The Firebird was lighter and for corporate reasons � couldn't match the larger car. The "fix" was to manipulate the linkage on the Q-jet � so it wouldn't allow the secondaries to fully open. Result: less H.P. �
�
�
�
�
� Lesson for us: always make sure the secondaries are vertical at WOT on whatever � carburetor you're using. On the 4GC there are 2 spots to make this adjustment on the � linkage. First, be sure the choke is disengaged. Otherwise the secondaries won't open. � (Make sure the choke linkage is correctly assembled, as it can be put together wrong). � Next, invert the carburetor, and work the primary linkage. When the primaries are about � one-third open, the linkage contacts a spring coiled around the primary shaft. (See � the left-hand photo above.) Bending this up slightly initiates the secondary opening � sooner. �
� Both primaries and secondaries should reach WOT at the same time. (See the right-hand � photo above.) If the secondaries don't open fully, bend the small tab that contacts the � base plate and prevents the shaft from going farther (as shown in the left-hand photo � below.)�
�
�
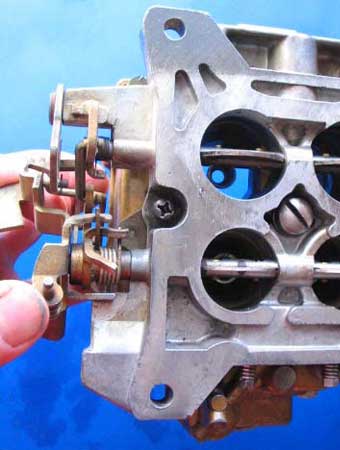
There's no need to go beyond vertical as that only creates problems. To complement this �
modification, be sure the accelerator pump rod is in the hole closest to the pump (there �
are 3 choices, as shown in the right-hand photo below.) This position will give the �
longest stroke, and thus the most fuel. Should you remove the choke? That is a race-only �
modification, and unless you live in Miami you will find the choke comes in very handy. �
Leave it automatic or change it to manual, whichever you prefer. �
� �
�
�
�
 �
�
� Don't forget the fuel filter. There are small screens in the needle and seat assemblies. � The original seats have a boss machined to hold them in place. The replacement ones in � the kit do not. I did not put them in because of this. I'm not sure they will stay in � place. I use a large filter between the tank and the electric fuel pump. Then I insert � a small in-line filter just before the carburetor. �
� Remember, the idle set screws are to be adjusted out 1 1/2 turns for the beginning point. � The primary plates are adjusted with the spring-pressured screw at the front of the � carburetor, on the driver's side. Use these two screws and the distributor's initial � advance setting to obtain a low, smooth idle. If you open the throttle plate setting � to increase the idle RPM, you will most likely need to open the set screws to smooth � things out.�
� At this point we might add that engines with a performance cam tend to like quicker � advance mechanisms in the distributor. Not necessarily at idle, but soon thereafter. � There are kits available for both the mechanical and vacuum advance in either points � or HEI-type distributors. If anyone out there wants to lend me their Weber set up for � a few weeks, I'd be glad to test it. I'm hoping make it into at least third gear the � next time I have that dream.�
� Disclaimer: This page was researched and written by Greg Myer. Views expressed � are those of the author, and are provided without warrantee or guarantee. Apply at your � own risk.�
� Photographs by Brandon Myer at Brightside Photography � and Greg Myer for BritishV8. All rights reserved.�
� �
�
�
�
�
�
�
�
� Don't forget the fuel filter. There are small screens in the needle and seat assemblies. � The original seats have a boss machined to hold them in place. The replacement ones in � the kit do not. I did not put them in because of this. I'm not sure they will stay in � place. I use a large filter between the tank and the electric fuel pump. Then I insert � a small in-line filter just before the carburetor. �
� Remember, the idle set screws are to be adjusted out 1 1/2 turns for the beginning point. � The primary plates are adjusted with the spring-pressured screw at the front of the � carburetor, on the driver's side. Use these two screws and the distributor's initial � advance setting to obtain a low, smooth idle. If you open the throttle plate setting � to increase the idle RPM, you will most likely need to open the set screws to smooth � things out.�
� At this point we might add that engines with a performance cam tend to like quicker � advance mechanisms in the distributor. Not necessarily at idle, but soon thereafter. � There are kits available for both the mechanical and vacuum advance in either points � or HEI-type distributors. If anyone out there wants to lend me their Weber set up for � a few weeks, I'd be glad to test it. I'm hoping make it into at least third gear the � next time I have that dream.�
� Disclaimer: This page was researched and written by Greg Myer. Views expressed � are those of the author, and are provided without warrantee or guarantee. Apply at your � own risk.�
� Photographs by Brandon Myer at Brightside Photography � and Greg Myer for BritishV8. All rights reserved.�
�
�
