 �
�
�
�
How to: Make Your Own Muffler Heat Shields (for just $4 each)
��
as published in British V8 Magazine, Volume XVI Issue 1, May 2008�
�
by: Curtis Jacobson�
�
Notice: It will take more time to read this article then to do the project herein described. �
Call it "entertainment."�
�
Overview
��
Muffler heat shields are often used to keep the car's interior comfortable. In some �
cases, heat shields are used to protect parts of the fuel, electrical, brake, or �
suspension systems. In some cases they also help to reduce noise transmission.�
�
Three basic physical properties determine how well heat shields function: reflectivity, �
emissivity, and conductivity. Heat shields work primarily by reflecting heat downward �
and away from (or back into) the exhaust system. Since heat shields aren't perfect reflectors, �
and since air conducts some heat (i.e. we don't live in a vacuum,) they inevitably get �
hot with the rest of the exhaust system. Emissivity and conductivity properties determine �
how much heat is transferred through an air gap or through physical contact respectively. �
Ideally, there should be an air gap between the muffler and the heat shield, and also a �
second air gap between the heat shield and whatever it's protecting - and these air gaps �
should be as large as feasible. Usually it's also preferable to mount heat shields to �
the exhaust system because this reduces or eliminates metal-to-metal conduction of heat �
and noise into the body of the car. When retrofitting heat shields onto older cars, we �
usually have to make compromises due to space and cost constraints. This article is �
intended to help you select a heat shield, or to help you construct your own. �
�
�
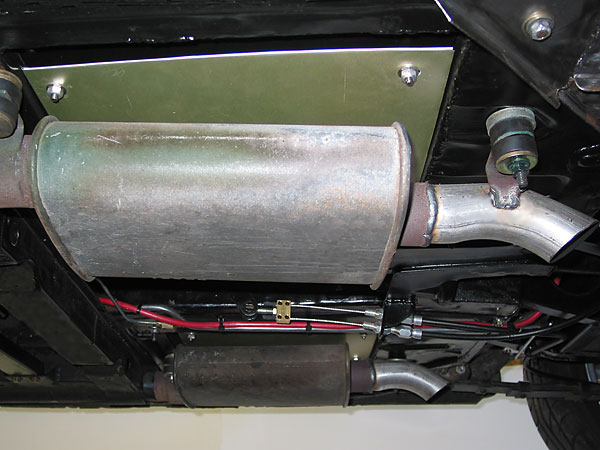
These new muffler heat shields are mounted right under my seats.�
The Test Vehicle
�� This spring, I decided to fit muffler heat shields on my MGB GT V8. However, I couldn't � find a suitable "store bought" solution. The options all seemed extravagantly priced, � and most of them wouldn't work well with my small mufflers or restricted packaging. � Okay, honestly, I just thought it might be entertaining to design and construct heat � shields from scratch. I budgeted ten dollars and three hours to the job - and I came � in under budget on both counts. It was a satisfying experience, so I thought I'd pass � along a report about it. �
��
My little beast was converted to V8 power almost twenty years ago. Back then, I wasn't �
remotely concerned about heat shields. When we started the conversion, my �
design objectives were more directly performance related: light weight, low ride height,�
low polar moment of inertia (i.e. heavy things like mufflers should be as close to centered �
as feasible), etc. I didn't worry at the time that driver comfort might �
negatively affect driver performance or fatigue. �
�
The design we came up with involved pocketing the mufflers up under the seats. As part of �
the conversion, we mounted the seats further back than the stock rails would go, and �
strengthened their mountings. The seats were mounted on ladder frames constructed of �
1" x 1" x 0.06" steel tubing with the ladder ends welded to the "heel-board" and the �
under-floor crossmember respectively. The ladders were skinned with 0.030" steel. �
Reinforced cut-outs in the under-floor crossmember facilitated getting the exhaust system �
right up under the floorboards. The exhaust and tail pipes were cut short for a �
significant weight savings. (This made more room for a Panhard rod, etc.) Since cost �
and weight were important considerations, I picked the smallest, lightest, cheapest �
performance mufflers I could find: "Thrush Turbo" mufflers at about $19 each. I actually �
like the way they sound; it makes me feel 16 again.�
�
My only complaint has been that the seats get uncomfortably hot on long trips. �
How Do Heat Shields Work?
��
A very thin piece of aluminum can make a pretty good heat shield because (a) �
it reflects thermal radiation very well and also because (b) it emits (or �
"gives off") heat very inefficiently. �
�
Remember how your momma covered the Thanksgiving turkey with aluminum foil? �
Foil reflected the oven's thermal radiation, and the turkey cooked evenly from �
top to bottom. As a radiant barrier, aluminum foil performs so well that it �
actually needs to be removed, briefly, for the turkey's skin to brown nicely. �
Used as a radiant barrier (i.e. a "reflector"), a cut or tear isn't a big deal �
so long as it doesn't turn into a gaping hole. After letting the turkey's skin �
brown, your mom probably removed the bird from the oven and replaced the loose �
foil covering. Since aluminum doesn't emit much heat, the turkey stayed hot until �
her praline sweet potatoes and delicious butter rolls were also ready. �
�
As a reflector, it shouldn't surprise you that a shiny surface outperforms an �
unpolished surface and that a clean surface vastly outperforms a dirty one. �
Anodized aluminum generally outperforms painted aluminum.�
�
The concept of high reflectivity is more intuitive than the concept of low emissivity. �
To understand emissivity, think of a light bulb. When turned "on", a light bulb emits �
light. If you paint the bulb black, there's no light emission. You can put your hand �
relatively near a black-painted light bulb and you'll feel relatively little heat on �
your skin. Just don't touch the painted light bulb, or you'll get a hard lesson in �
thermal conductivity! That's a different physical property.�
�
Like most metals (and light bulb glass) aluminum is a very good thermal conductor. �
In other words, heat travels easily from one surface of a bare aluminum heat shield �
to the other. It's highly preferable to have an air gap on both sides of the heat �
shield because dry air isn't a very good thermal conductor. To the extent that air �
does heat up along the surfaces of the heat shield, we rely on airflow to carry it �
away. Whenever heat travels with airflow - and particularly when hot air naturally �
rises - we call the resulting dissipation "convection". If the air around the heat �
shield is stagnant or if there are air leaks into the car's interior, heat will �
eventually travel to where we don't want it. A fan, duct, louver or vent might be �
helpful in some exceptional cases. However, there's an alternative strategy to �
consider first: insulation.�
�
By laminating a less thermally conductive material (i.e. "insulation") to a muffler heat �
shield, or by sandwiching insulation between layers, it's feasible to achieve a �
significant temperature drop from one outside surface of the shield to the other. �
Various insulation materials are appropriate for this purpose, including especially �
fiberglass and ceramic fiber mats or batting. (To be thorough, it should be pointed �
out that "fiberglass" is a family of materials of various chemical compositions. �
Fiberglass materials have a range of physical properties. Some fiberglass media may �
decompose into powder if subjected to heat and vibration.) Regardless of the �
insulation material, air pockets entrapped by the media actually contribute quite a �
lot to its efficacy as insulation. �
�
Enjoying this article? Our magazine is funded through the generous support of readers like you!
�
To contribute to our operating budget, please click here and follow the instructions.
�
(Suggested contribution is twenty bucks per year. Feel free to give more!)�
Ready-Made Alternatives
��
When I became interested in installing muffler heat shields, I started my research by �
looking through my scrap-metal bin. I found what I was looking for: a nifty "double �
corrugated" aluminum heat shield that I removed years ago from a large truck's diesel �
engine. The big selling point of double corrugated aluminum for heat shields is it's�
easy to form into elaborate shapes. It's perfect, for example if you want to wrap your �
shield neatly around a turbocharger or follow the contours of your firewall. The �
corrugations also add rigidity and make the shield less likely to reverberate or �
rattle. This piece might have made a good muffler heat shield, but it wasn't a big �
enough scrap to divide over both my mufflers. Not finding anything more suitable, �
I continued by poking around online for ready-made heat shield materials. �
�
An Australian company called "ACL" makes similarly double corrugated aluminum material, �
and you can buy it on eBay. One 27.5" by 11.4" (700mm by 290mm) rectangle of "Race Series �
HR140-GTR" material costs $48.50 (Australian) plus shipping and handling from Australia. �
(The seller writes: "Send me a postcode for an accurate freight cost to your area." How �
quaint!) If you have a turbo to gift-wrap ACL's material might be a good deal.�
�
Flowmaster sells simple heat shield for their "50 series" mufflers (part number 51017, �
typical price $37.76 per heat shield plus shipping). The Flowmaster muffler heat �
shields are stamped out of plain aluminum sheet, and they mount to the muffler with �
stainless steel tie straps. Even if their price wasn't ridiculous, since they measure �
17" by 10" the Flowmaster shields are too large for my little turbo mufflers. �
Trimming them down isn't a viable option because of how they're grooved for tie strap �
installation. �
�
A company called "Heatshield Products" makes several interesting products for muffler �
heat shielding. Their "Reflect-a-Shield" product consists of a 1/4" thick ceramic fiber �
pad sandwiched between heavy duty aluminum foil and bound together with a stainless �
steel mesh tape at the edges. The company claims that stainless steel mesh bound edges �
provide greater flexibility for a more rugged product. They're rated for 400°F contact �
and 1000°F continuous. They further explain: "As with any aluminum insulation �
product, it is not designed for direct contact with exhaust systems. This heat shield �
is intended for wrapping around electrical boxes, air conditioning components, or �
used as a catalytic converter and muffler heat shield. For my purpose however,�
Reflect-a-Shield doesn't seem appropriate because it isn't rigid and therefore can't �
easily be installed with an air gap on both sides. Reflect-a-Shield comes in several sizes;�
for reference, part number 100614 is a single 6" by 14" piece costing $18.52 plus shipping. �
�
Heatshield Products makes another product called "Inferno-Shield" which uses a thicker �
layer of metal on the outside so that it can be bent or formed into shape. Inferno-Shield �
comes in three grades: aluminum (900°F continuous), stainless steel (1800°F �
continuous) and inconel (2200°F continuous). All three types have an inner ceramic �
fiber pad. For reference, part number 110614 is a single 6" by 14" aluminum-based shield�
that costs $22.31 plus shipping.�
�
If that's not exotic enough for you, a company named "D & H Heat Technology, Inc."�
offers "Koolmat Heat Master Shields" which consist of "NASA insulation" sandwiched �
between two textured inconel panels grommeted for easy installation with stainless �
steel tie straps. Three sizes are available... but they all cost $1.08 per square inch �
plus shipping. If you have NASA's budget, go for it! Instead, I went to my local home center �
store to look for something (much) more economical. �
How to Make Your Own Muffler Heat Shields
��
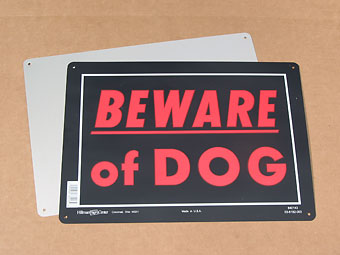
My local big-box home center store sells 8" by 18" by 0.025" thick aluminum �
rectangles for $17.27 each, and 12" by 18" by 0.025" rectangles for $21.86. I �
shouldn't have to tell you this, but that's highway robbery. Maybe it's my Scottish �
heritage showing, but I just don't think a heat shield should cost as much as a �
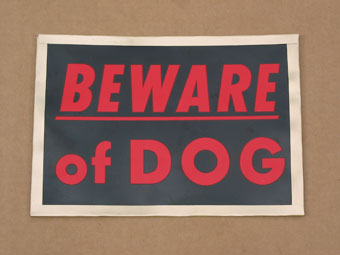
muffler. However, I found something I think will actually perform better just �
two aisles away. 10" x 14" aluminum "Beware of Dog" signs for just $1.47 each. �
Now that's more like it! �
�
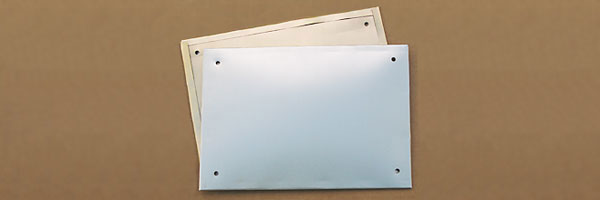
Now admittedly, a 0.0125" thick Beware of Dog sign isn't as rigid as we'd like �
for a muffler heat shield - but we can easily fix that by folding over the edges �
and by laminating two layers together, preferably with insulation sandwiched �
in between. Our laminated heat shield will be more effective than a single-layer �
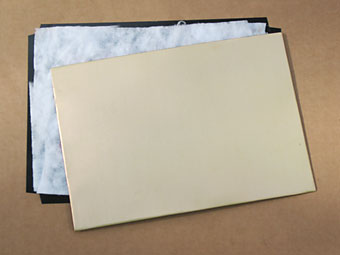
metal heat shield and it will be sufficiently rigid. The back sides of the signs �
are anodized, which will help both top and bottom of the fabricated assembly �
stay clean and bright over time. Bonus: the flanged edges and the insulation �
will help with sound attenuation. �
�
 �
�
 �
�
�
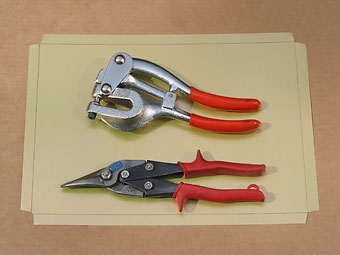
Aluminum this thin is very easy to work with. You could probably cut it with scissors �
or a razor knife. I used aviation snips, and a Roper-Whitney style hand punch for �
internal radii. I bought my actual Roper-Whitney punch used and its larger dies were �
missing, so for this project I used an old Taiwanese-made knock-off, as shown here. The �
real deal is a nicer tool, of course. I strongly prefer to punch radiused inside corners �
because they're neat and far less likely to ever crack, which is always "good form" even �
though stress ("fatigue") cracks aren't a real big concern with this �
project. �
�
Thin aluminum is also easy to bend. I bent the four 90-degree flanges shown at left (below) �
over the straight edge of my welding table. After each bend, I flipped the sign over and �
folded the flange down flat. This completed the "top" of the (first) muffler shield. �
�
The center layer of my low-buck muffler heat shield is fiberglass. I had several kinds �
to choose from in my supply cabinet. Non-woven fiberglass mat, like you'd use to repair �
a boat, is perfect. Fiberglass cloth, or even home insulation would work too. (The�
aluminum cover will compress bat-type insulation down.) As mentioned above, all these �
"glasses" actually have different physical properties, and their fibers are treated �
with different "sizing" chemicals that affect how they behave (e.g. how easily "wettable" �
they are by resins), but I believe that will have minimal effect here. The aluminum �
housing will support the fiberglass, keep it clean and dry, and help it resist breaking �
down over time. If you have any doubt at all about your insulation material's composition, �
try to ignite it. If it burns, it isn't fiberglass. If it melts easily or smokes, find a �
different source of fiberglass. �
�
Incidentally, as an afterthought, I went back out to my garage and applied a blowtorch �
flame to both a spare painted-aluminum sign and also to some fiberglass insulation. A �
blowtorch flame reaches about 2375°F (1300°C) - which is WAY HOTTER than �
an automotive muffler. In the direct flow of the flame, paint on the sign didn't smoke �
or ignite. The fiberglass mat appeared undamaged except where loose fibers protruded - �
and they simply curled up as they melted.�
�
 �
�
 �
�
�
Now we're ready to make the aluminum "bottom" of the heat shield. A word here about bend�
radius: whenever you bend any sheetmetal you should make sure to include a generous internal �
radius to avoid stress cracks. Honestly, I didn't worry about this when making the "top" �
of the heat shield, but my design did make a simple provision for a radiused bend for �
the flanges on the "bottom" layer. I simply bent the bottom layer's flanges over and around �
the top layer's flanges! �
�
If you're following along and making your own heat shields as you read this, I hope you �
didn't put away your handy hole punch. Now is the time to punch mounting holes in the �
heat shields. Your punch will have no problem at all cutting right through the whole �
lamination neatly. �
�
Although it's technically better to mount the heat shield to the exhaust system instead �
of to the floorboard, so heat and sound aren't conducted into the cabin through the �
fixings, I decided my design would be a little more serviceable with the heat shields �
mounted to the flat sheetmetal of my "muffler pockets". Instead of drilling holes in the �
floor for bolts though, I welded bolt heads to the bottom surface of the steel. I put �
short spacer tubes above the heat shields to space them away from the floor, and secured �
them in place with four quarter inch nuts. �
�
Done! And in far less time than it's taken to type this article. �
How Well Do They Work?
��
I'm embarassed to say that I don't have a quantitative answer yet. Actually, I might not �
even have a qualitative answer until I take my next road trip - to attend the �
British V8 2008 meet. Ask me when you see me! I've already turned my attention to �
completing installation of new parking brake cables, revised brake lines, new rear �
suspension bushings... and of course to completing this edition of British V8. �
�
Perhaps I'll revisit this article later and add an addendum. A hand-held infrared-sensing �
non-contact thermometer would do a good job of measuring floorboard temperature (above the �
mufflers) and a reasonably scientific test procedure could be designed by simply temporarily �
removing one heat shield to facilitate simultaneous evaluation of with-and-without �
conditions. �
�
I'd be particularly curious to do A-B comparisons to determine how much advantage insulated �
heat shields provides over solid metal or hollow-core heat shields of similar geometry. �
Measuring the temperature of the heat shields themselves, front and back, would be interesting �
too. �
