 �
�
�
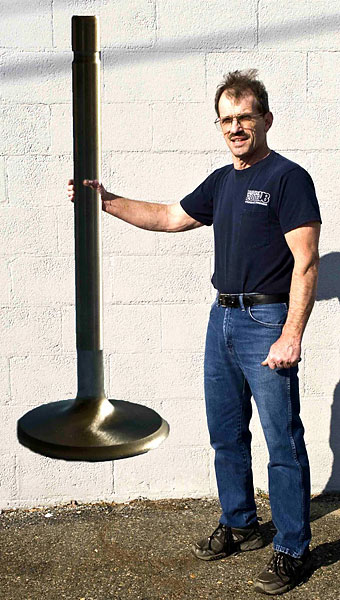
Big Valves!� as published in BritishV8 Magazine,� Volume XVI Issue 2, October 2008� � by: Greg Myer� � "If some is good, and more is better, than too much is just enough!" Cubic � inches, camshaft lift and duration, and valve sizes, right? Well, not exactly. � What? Bigger isn't better? Humm... Not always.� � Example: Ford's 1969 & 1970 BOSS 302. It was a great race motor and � they won the manufacturers' championship in SCCA's Trams Am division in � 1970 with it. The race motor was designed to make horsepower in the upper � RPM range and was rated at 470 HP @ 9,000 RPM The street version was not � as radical, but the huge valves and ports made the motor a 'dog' below � 4,000 RPM. Around town it wasn't tractable.� � Rare example? Maybe, but it does prove you can run ports and valves that are � too big for street use. In fact the Ford boys who swap Cleveland style heads � onto their 302's now have the option of special head gaskets with smaller � openings and plates that go down into the intake port that effectively � narrows the port reducing the port volume for more efficient flow in a � streetable package.� � "But I want bigger valves! Mine are too small!" OK, larger valves can help � performance and if done right, volumetric efficiency... which helps everything. � HP and mileage can both gain from this modification. Even with everything else � the same, intake manifold, carburetor (or fuel-injection), cam specs - larger � valves make it easier for the engine to breathe. That would require less � throttle opening at highway speeds or it can take in more air/fuel mixture at � wide open throttle.� | �
� |  | �
� What's needed? Bigger valves and a machinist to open up the seats, right? � Well, that's a start but more is needed. If that was all you did and left � the throat (i.e. the area between the bowl and the valve) the same, you'd � create turbulence and possibly reduce the overall flow as there is now a � larger obstruction in the airflow's path. To realize any advantage with � larger valves this area must be opened up. This is quite a common operation � in most machine shops. Many valve seat machines have an optional "Bowl Hog" � tool that does just that. Often times someone will want their "2 barrel" � heads opened up to the "4 barrel" size. For example a small block Chevy � with 1.94 inch intake and 1.5 exhaust valves can be easily upgraded to 2.02 � inch intakes and 1.6 exhausts. These larger valves are readily available � at affordable prices.�
��
�
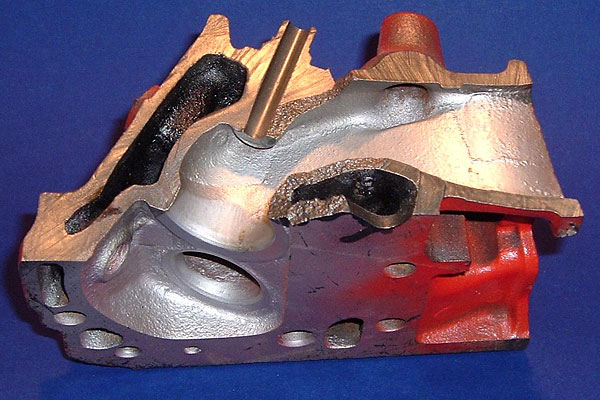
A Cross-Sectioned Chevy Cylinder Head
�
�
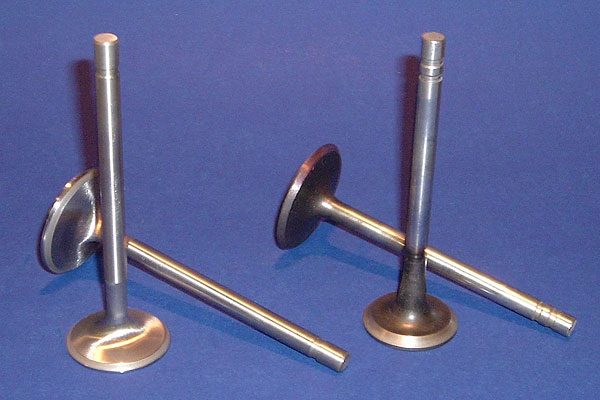
Undercut and swirl polished valve stems (left) provide a performance advantage.
�
� Readily available stainless steel valves will be just fine for a high � performance street motor. Want just a little more? Opt for valves that � are undercut and swirl polished. Having a stem that is undercut at the � lower portion of the stem, where it protrudes into the port, allows a � little more air to flow past. The swirl polish of this area and the back � side of the valve has been shown to be of benefit too.�
��
 �
�
�
�
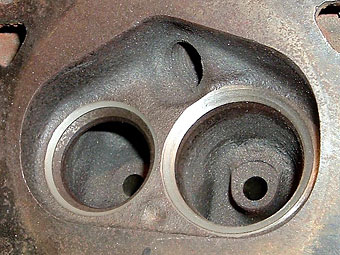
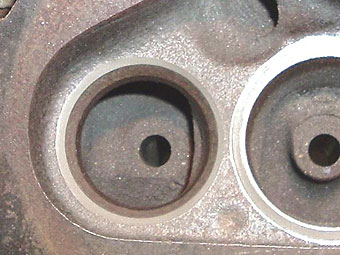
In these two photos you can see where the small original exhaust valve has �
worn away the seat. It's the area inside the newly cut seat for GT40 valves. �
These heads, 1969 Ford 302 DOOE with 1.45 inch exhaust valves could not be �
rebuilt without new seats or larger valves. The newly cut seat needs to �
have the old seat / throat area opened up so that the flow potential can be �
utilized. �
�
First, the seats are roughed in with a 45 degree stone. This is done as wide �
as the valve head itself. Measuring is important. Hand lapping the valve face �
with compound can also give you an easy read as to how things are mating up. �
After this step, be careful to keep your valves matched to specific seats. �
(I number them.) Once the seat is established, the 30 degree top cut can be �
made. After which a 60 degree throat cut is done. This aids the air to make �
the transition of turning to enter the chamber past the seat area. Some head �
machines make 3 cuts at once, but with my old trusty Black & Decker �
grinder I can only do one at a time. I need to be careful not to go too far, �
so I check several times. �
�
Enjoying this article? Our magazine is funded through the generous support of readers like you!
�
To contribute to our operating budget, please click here and follow the instructions.
�
(Suggested contribution is twenty bucks per year. Feel free to give more!)�
� The seats need to be toward the outside of the valve face. Once everything � checks out good, the valve face can be back cut. This removes material from � the inside area of the valve face that will not need to make contact with the � seat. Again, aiding airflow transition, and has been found to especially aid � low lift flow, and that helps across the board, no matter what cam you are using.� Caution: take only what is needed. Going too far here can leave a seat area � that is too small to last any length of time on the street. (Race motors use � narrow seats, but they're also rebuilt frequently.)�
�About Titanium Valves
��
Quite often I see used titanium valves available on eBay for a ridiculously �
cheap price. These are used race valves. They may have plenty of life left �
for a street motor. Very tempting when new ones can run $100.00 each. �
NASCAR boys use them with good reason. They're light, and thus they put �
less stress on the springs at the 8,000+ rpm they run for hours at a time. �
They're very strong, which is very important to these guys. A valve failure �
at 8,000 rpm has catastrophic results for your motor, car and a long string �
of cars behind you. (The fact that the whole valve train lasts 500 miles at �
8,000 RPM impresses me more than anything else about these cars.) So, �
what's wrong? They aren't standard! The valve stem will be longer, requiring �
a different spring set-up and longer pushrods to start with. Setting up the �
proper geometry afterwards can be tricky. Also they usually have smaller �
diameter stems, thus requiring your guides to be drilled or pressed out, new �
ones pressed in and then reamed to the appropriate size. Titanium also requires �
different tooling on many machines, as it is very hard. �
�
Titanium valves may also require different seats pressed into your heads �
because titanium doesn't transfer heat very well. Beryllium/copper alloy �
valve seats are favored in race motors with titanium valves, but they're �
expensive because beryllium is a rare metallic element. (It's lighter than �
any other metal, it has a high melting point, and it's very strong, stiff �
and hard.) In a street motor environment, cast iron seats have been tried �
and usually have been found to work okay with titanium valves. �
Four Cylinder Heads Benefit Too
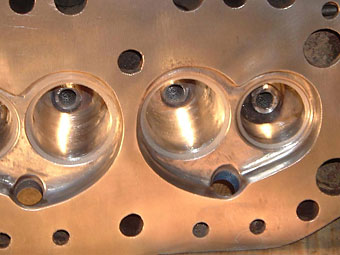
�� When MG had to add the larger bumpers to the "B" in 1972 and increase the ride � height to conform to Federal bumper height requirements, the whole car weighed � more. One little thing they did to regain some performance was enlarge the � exhaust valve and bowl area. These larger valves can be installed in earlier � heads for better breathing. That's what we see in the next picture. �
��
 �
�
�
The stock MGB ("B-series") cylinder head can be opened up for better airflow too!
�
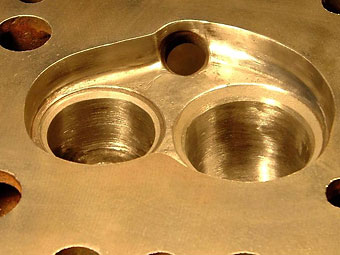
� In the second picture, the close-up shows how far the bowl was opened up � to make the transition to the larger diameter seat easier for the air/fuel � mixture. Notice also that the intake bowl was opened-up even though the valve � size remained the same. This is a critical area in most wedge type heads. � Look again at the way the port narrows as it approaches the seat in the � cutaway picture above.�
�� Can you do some of this in your home workshop? The answer is a definite maybe. � You'll need a variety of tools. First, to access the area you'll need a valve � spring compressor. Not all compressors work on all heads. Check that the � one you buy fits your application. Next, if the machine shop did a decent � job with the seats, you'll need a die grinder (electric or pneumatic) and � carbide points, mounted grinding stones and sanding rolls with mandrels for � finishing. If you use a pneumatic die grinder, you'll need a large capacity � air compressor! (These things use a lot of air.) A less expensive air die � grinder can work just fine for the home enthusiast. I have several so I � don't need to change the bits, leaving a stone in one, carbide bit in another � and a mandrel for sanding rolls in a third. The reason for this is that it's � the chucks on these grinders that wear out. �
��

�
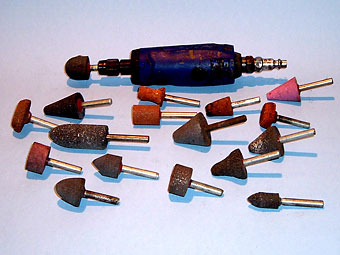
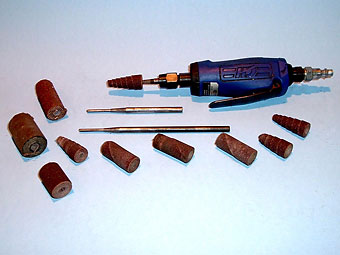
A pneumatic die grinder and carbide cutting points.
�
 �
�
�
A pneumatic die grinder and abrasive cutting tools: grinding stones (at left) and sanding rolls (at right).
�
�
If you're brave enough to try it, go slowly. The carbide bits cut well and �
the mounted grinding stones are very useful, but wear down quickly. Start �
with a larger diameter stone. It contacts a wider area and won't cut in deep �
as quickly - helping you to avoid mistakes. Grind down into the throat to �
blend the transitional area. Finish the area adjacent to the lower 60 degree �
cut with a large diameter sanding roll. Be careful! If you touch the finished �
seat, you'll need to take the head back to the machine shop to have it �
touched up. (Hint: it might be best to finish both heads before returning!) �
Don't cut into the seat areas, or the valve will have nothing to contact �
and seal to, and you'll need the whole seat area cut out and a new seat pressed-in.�
�
This work will help almost any head. As cast and machined from the factory, �
most heads leave plenty of leeway for machine misalignment, etc. We can �
improve on that.�
�
I have installed larger valves for many friends by using this approach, and �
they've all come back with positive reports. More power, and even improved �
fuel mileage in cases where that was a concern... The way things are going, �
it'll be a big concern now and for the foreseeable future. �
� Disclaimer: This page was researched and written by Greg Myer. Views expressed � are those of the author, and are provided without warrantee or guarantee. Apply at your � own risk.�
� Photos by Greg Myer for British V8 Magazine. All rights reserved. �
