�
 �
�
�
�
�
�
�
�
�
�
� by: Greg Myer�
� Many of us are aware that the B.O.P.R aluminum block V8 can use some help in the lubrication � department. It's not that the factory arrangement is bad, it's just that we often want to do � more with our cars than the factory ever intended. High RPM's, hard cornering forces, high � compression, and higher temperatures are commonplace in British V8 conversions. Hey! That's � why we do the swap in the first place.�
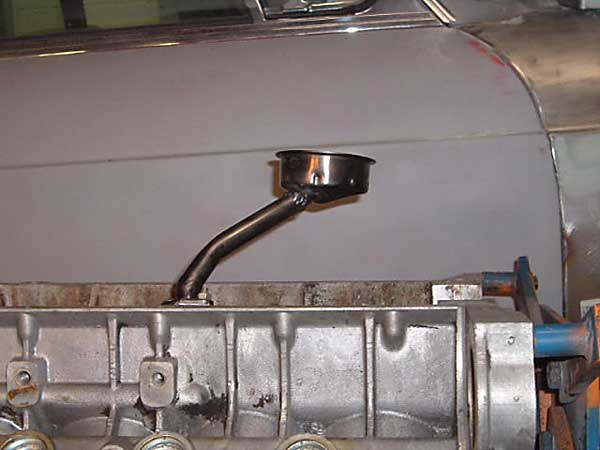
� There are high-volume oil pumps available and it's a good idea to use one. Getting more oil � to the pump is next. Drilling out the oil galley from the pickup tube to the front cover is � an accepted practice. You will need a 12 inch long 1/2 inch drill bit to do this. The hole � from there to the pickup needs enlarging, as it is also 7/16 of an inch. Many of us use the � Buick V6 pickup tube, as the stock V8 tube is 1/2 inch I.D. and the V6 unit is 19/32 I.D. � These are available from several sources. I know D&D has them, for one. In the photo below � you can see these 2 pickups, the V6 unit is bolted to the block and the stock V8 one is � leaning against it. They are the same length when bolted in. The only difference is the � diameter.�
�
�
�
�
�
Photo 1: V6 (left) and V8 (right) oil pickup tubes�
Buick/Olds/Rover Oil Pan Options
� This article appeared in The British V8 Newsletter - Volume XIV, Issue 1 - January 2006�� by: Greg Myer�
� Many of us are aware that the B.O.P.R aluminum block V8 can use some help in the lubrication � department. It's not that the factory arrangement is bad, it's just that we often want to do � more with our cars than the factory ever intended. High RPM's, hard cornering forces, high � compression, and higher temperatures are commonplace in British V8 conversions. Hey! That's � why we do the swap in the first place.�
� There are high-volume oil pumps available and it's a good idea to use one. Getting more oil � to the pump is next. Drilling out the oil galley from the pickup tube to the front cover is � an accepted practice. You will need a 12 inch long 1/2 inch drill bit to do this. The hole � from there to the pickup needs enlarging, as it is also 7/16 of an inch. Many of us use the � Buick V6 pickup tube, as the stock V8 tube is 1/2 inch I.D. and the V6 unit is 19/32 I.D. � These are available from several sources. I know D&D has them, for one. In the photo below � you can see these 2 pickups, the V6 unit is bolted to the block and the stock V8 one is � leaning against it. They are the same length when bolted in. The only difference is the � diameter.�
�
�
Why is all of this important? Go get a good milkshake, and I'll explain. I hope you got a �
"milkshake straw" with that. A standard straw is thinner and it's very difficult to suck �
your thick milkshake through it. Has anyone ever determined the viscosity of their milkshake? �
Me neither, but you can see the analogy. Opening the oil passages up allows the oil pump to �
do its job with less effort, less stress on the distributor gear, etc. After that we just �
don't want to run out of milkshake.....I hate that slurping sound. Oh, and we don't want to �
suck the oil pan dry either....it'll create an even worse sound.�
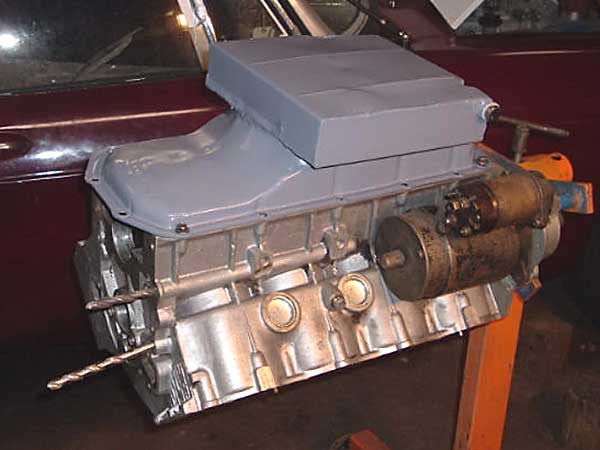
� How 'bout the pan? All of these mods work with the stock pan and it fits in the MGB just fine. � Want more capacity? Hang a dual remote filter setup on the inner fender. That will add 1 quart. � Any time we have more oil in the system, it has more time to cool off before being pumped � under pressure again. Another option with the pan is to deepen it. This adds capacity, but � don't forget that the pickup tube needs to be lengthened too! Maybe run the oil 1 quart low � on the dipstick. The oil will be farther from the spinning crankshaft (less windage effects) � and we'll still have the same oil capacity as before the mod. �
��
�
� Another alternative is to fabricate a "racy" pan. I've always liked the idea of a wide, � baffled, gated pan. I've run deep sump pans on the street. I had a drag race type on my � Malibu years ago. It held 7 quarts without even being up to the 'add' line on the dipstick.� One day I bottomed it out. The drain plug was on the left and hung down ever so slightly. � It spun out on contact and I lost all my "Racing Oil" in a matter of seconds. The "idiot" � light came on (be careful with what you're thinking) and I saw it and shut off the motor. � I changed back to the stock pan the same day. (Side note: I had installed a 'T' on the � oil pressure sending unit so I had both a gauge and an idiot light - I still do this as � you can't watch the gauge all the time.) �
�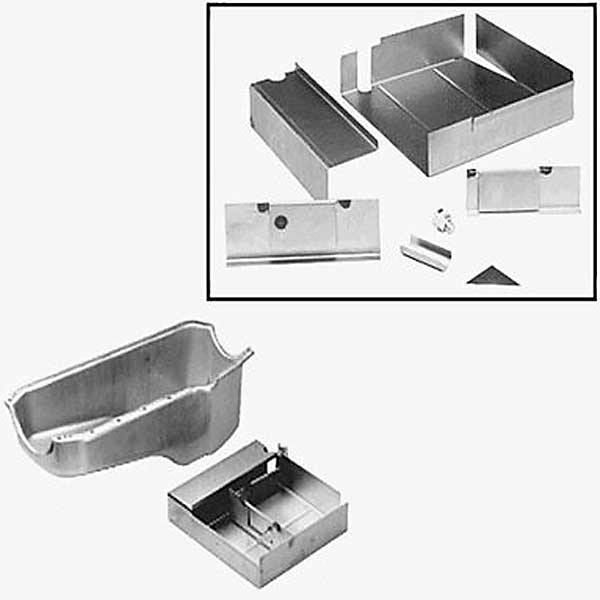
� Photo 2: Speedway Motors Oil Pan Kit (oil-pan not included, of course)�
� Anyhow, a wide, gated pan solves many of the areas of concern. It holds more oil, keeps � it cooler, controls where it sloshes, keeps more of it around the pickup, and shouldn't � contact the pavement. I found an oil pan kit through Speedway Motors. (See picture.) It's � about $15.00, which I think is a steal! It's made for a Chevy small block pan, and so � requires a bit of fabrication to work on the Buick. It's a 'claimer' pan kit. Meaning � it's for circle track. DON'T STOP READING NOW! The circle track boys may not turn right � as often as we do, but they have developed some great parts over the years that can be � very useful to us sporty car types ("Circle Track & Racing Technology" magazine has � some of the best engine build articles anywhere).�
�
�
�
� How 'bout the pan? All of these mods work with the stock pan and it fits in the MGB just fine. � Want more capacity? Hang a dual remote filter setup on the inner fender. That will add 1 quart. � Any time we have more oil in the system, it has more time to cool off before being pumped � under pressure again. Another option with the pan is to deepen it. This adds capacity, but � don't forget that the pickup tube needs to be lengthened too! Maybe run the oil 1 quart low � on the dipstick. The oil will be farther from the spinning crankshaft (less windage effects) � and we'll still have the same oil capacity as before the mod. �
�
| �
Enjoying this article? Our magazine is funded through the generous support of readers like you! � To contribute to our operating budget, please click here and follow the instructions. � (Suggested contribution is twenty bucks per year. Feel free to give more!)� |
� Another alternative is to fabricate a "racy" pan. I've always liked the idea of a wide, � baffled, gated pan. I've run deep sump pans on the street. I had a drag race type on my � Malibu years ago. It held 7 quarts without even being up to the 'add' line on the dipstick.� One day I bottomed it out. The drain plug was on the left and hung down ever so slightly. � It spun out on contact and I lost all my "Racing Oil" in a matter of seconds. The "idiot" � light came on (be careful with what you're thinking) and I saw it and shut off the motor. � I changed back to the stock pan the same day. (Side note: I had installed a 'T' on the � oil pressure sending unit so I had both a gauge and an idiot light - I still do this as � you can't watch the gauge all the time.) �
�
� Photo 2: Speedway Motors Oil Pan Kit (oil-pan not included, of course)�
� Anyhow, a wide, gated pan solves many of the areas of concern. It holds more oil, keeps � it cooler, controls where it sloshes, keeps more of it around the pickup, and shouldn't � contact the pavement. I found an oil pan kit through Speedway Motors. (See picture.) It's � about $15.00, which I think is a steal! It's made for a Chevy small block pan, and so � requires a bit of fabrication to work on the Buick. It's a 'claimer' pan kit. Meaning � it's for circle track. DON'T STOP READING NOW! The circle track boys may not turn right � as often as we do, but they have developed some great parts over the years that can be � very useful to us sporty car types ("Circle Track & Racing Technology" magazine has � some of the best engine build articles anywhere).�
�
�
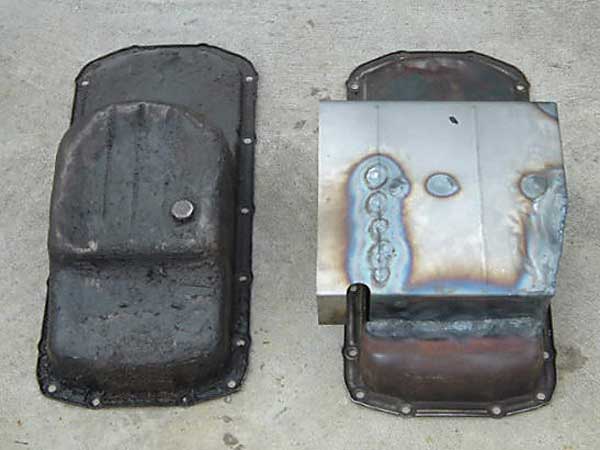
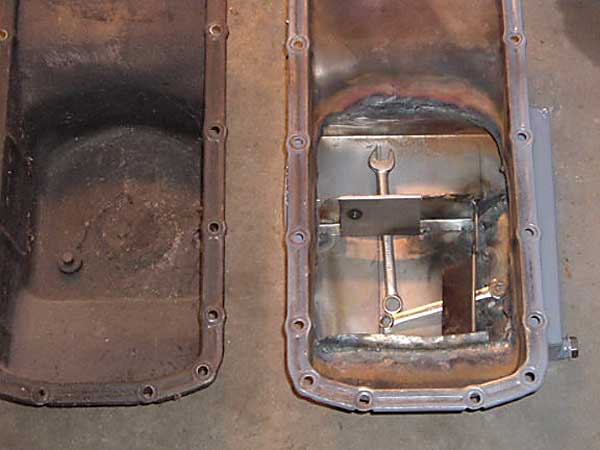
� Photo 3: Stock (left) vs. Modified Pan (right) - Thin Metal Requires Delicate Welding�
� I had a dented pan from a Buick, so I did some calculating. With a block and pan in my � MGBGT that was up on jack stands already, I could easily see that I had plenty of clearance � (I have fender-well exit headers - block hugger types may not work with this pan). The � biggest change I made was to move the sump to the left, as it's designed to extend under � the starter only. I had to fabricate a roof section where the sump hung out to the left, � and shorten the roof on the right. I needed to move the pickup, even though the pan � remained about the same depth. I moved it back in the pan so it would clear the baffle. �
�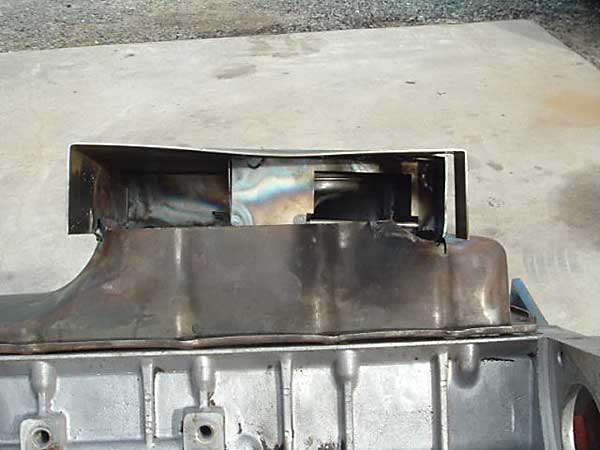
� Photo 4: With one side of the new sump left open, pickup position can be visibly optimized�
� The instructions suggest angling the pickup so that it's not parallel with the floor of � the pan, in case it gets hit and shoved up. That way the pickup won't be blocked. So I � did that too. I tack welded the bottom on the pan, but left the side off so I could see � where the pickup needed to be positioned. Measuring twice before welding is a good idea. �
�
� Photo 5: Modified Ford Oil Pickup�
� I then cut an old Ford pickup that I had laying around, to use as the 'race' pickup. � It also has a larger opening and 19/32 tube. I positioned it exactly where it needed � to be with 2x4's and some clay. The clay allows the thickness to be changed to whatever � is needed easily and the unit can be angled too. I then cut the tubing several times � until I had it where I wanted it (Hint: Start by cutting the tubing too long and work � shorter until you hit your target). �
�
� Photo 6: Finished Pan Mounted on Bare Block (notice new position of oil drain plug at right)�
�
�
�
� Photo 3: Stock (left) vs. Modified Pan (right) - Thin Metal Requires Delicate Welding�
� I had a dented pan from a Buick, so I did some calculating. With a block and pan in my � MGBGT that was up on jack stands already, I could easily see that I had plenty of clearance � (I have fender-well exit headers - block hugger types may not work with this pan). The � biggest change I made was to move the sump to the left, as it's designed to extend under � the starter only. I had to fabricate a roof section where the sump hung out to the left, � and shorten the roof on the right. I needed to move the pickup, even though the pan � remained about the same depth. I moved it back in the pan so it would clear the baffle. �
�
� Photo 4: With one side of the new sump left open, pickup position can be visibly optimized�
� The instructions suggest angling the pickup so that it's not parallel with the floor of � the pan, in case it gets hit and shoved up. That way the pickup won't be blocked. So I � did that too. I tack welded the bottom on the pan, but left the side off so I could see � where the pickup needed to be positioned. Measuring twice before welding is a good idea. �
�
� Photo 5: Modified Ford Oil Pickup�
� I then cut an old Ford pickup that I had laying around, to use as the 'race' pickup. � It also has a larger opening and 19/32 tube. I positioned it exactly where it needed � to be with 2x4's and some clay. The clay allows the thickness to be changed to whatever � is needed easily and the unit can be angled too. I then cut the tubing several times � until I had it where I wanted it (Hint: Start by cutting the tubing too long and work � shorter until you hit your target). �
�
� Photo 6: Finished Pan Mounted on Bare Block (notice new position of oil drain plug at right)�
�
�
The stock pan holds 4 quarts. The Buick dipstick says so. It's also marked ADD 1 and �
ADD 2 - That's a scary thought. With the new pan bolted to the block on the engine �
stand, 4 quarts came up to the ADD 2 line. 5 quarts to the ADD 1 line and 6 quarts made �
it FULL. Running 5 quarts may be a good option here as it adds oil capacity and keeps �
it farther from the crank. I still need a windage tray and maybe a scraper, but until �
then I'll still have plenty of oil and ground clearance. �
�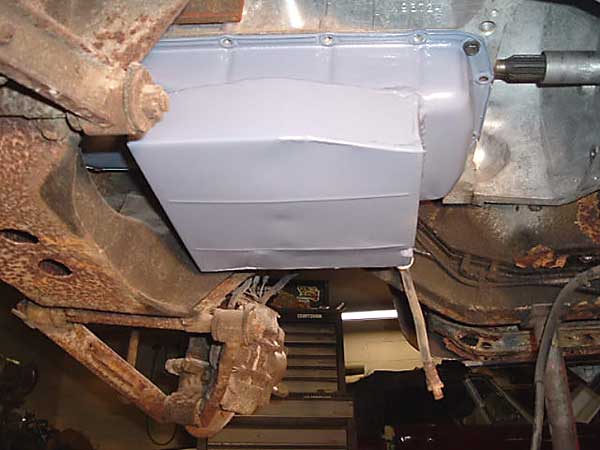
� Photo 7: Finished Pan and Block Mounted in Car - Plenty of Room!�
� The photos tell the story. In one of them I have a wrench sticking through the trap � door to make it more visible. In others the warping is evident, but that was straightened � out before final welding. The pickup is about 3/8 inch off the floor of the pan. There � is room all around the pan when it's in the car. The price is right and it's a good � upgrade. If you don't weld, take it some where and have it done. I'm not aware of a � similar pan available at any price for this motor - so, build your own!�
�
� Photo 8: Wrenches are Used to Show the Reader the Baffles and Trap Doors�
� Disclaimer: This page was researched and written by Greg Myer. Views expressed � are those of the author, and are provided without warrantee or guarantee. Apply at your � own risk.�
�
�
�
� Photo 7: Finished Pan and Block Mounted in Car - Plenty of Room!�
� The photos tell the story. In one of them I have a wrench sticking through the trap � door to make it more visible. In others the warping is evident, but that was straightened � out before final welding. The pickup is about 3/8 inch off the floor of the pan. There � is room all around the pan when it's in the car. The price is right and it's a good � upgrade. If you don't weld, take it some where and have it done. I'm not aware of a � similar pan available at any price for this motor - so, build your own!�
�
� Photo 8: Wrenches are Used to Show the Reader the Baffles and Trap Doors�
� Disclaimer: This page was researched and written by Greg Myer. Views expressed � are those of the author, and are provided without warrantee or guarantee. Apply at your � own risk.�
