�
 �
�
�
�
�
�
�
�
�
�
�
� by: Bill Young�
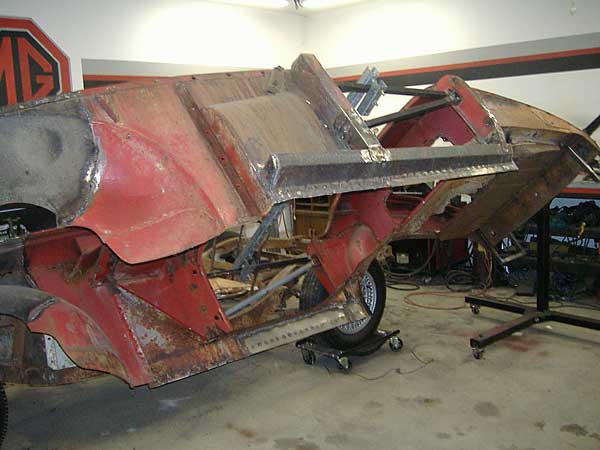
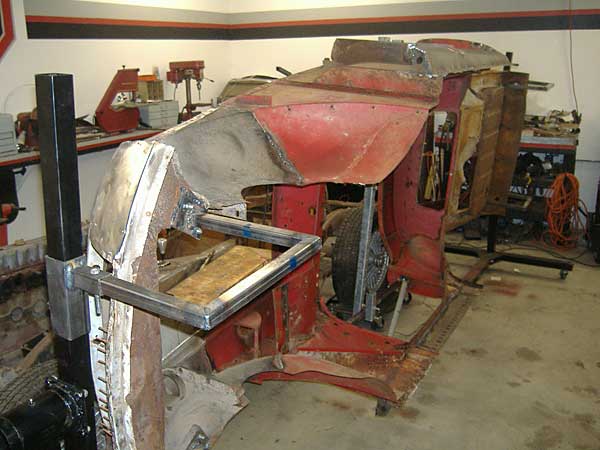
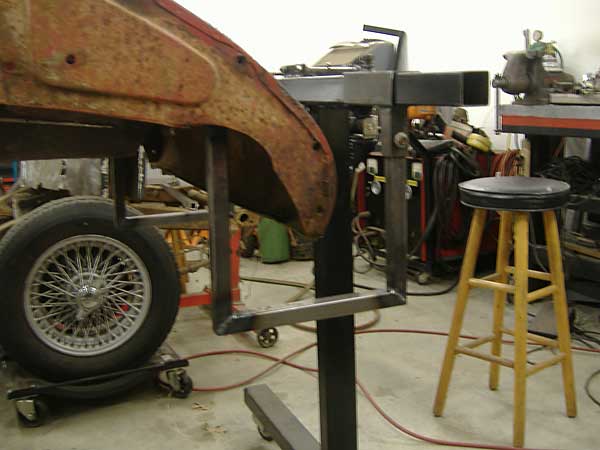
� This rotisserie design is adaptable to a variety of different chassis and bodies by � altering the design of the adaptor arms. Owning both an MGA and a Midget, I wanted � something that would work for both yet break down into reasonably small pieces for � storage when not in use. The photos show the rotisserie in use during restoration of � my MGA, but different arms would enable use with almost any small car body, frame, � or chassis.�
��
� �
�
�
�
Instructions for Building an Auto Body Rotisserie
� The British V8 Newsletter, Volume XV Issue 1�� by: Bill Young�
� This rotisserie design is adaptable to a variety of different chassis and bodies by � altering the design of the adaptor arms. Owning both an MGA and a Midget, I wanted � something that would work for both yet break down into reasonably small pieces for � storage when not in use. The photos show the rotisserie in use during restoration of � my MGA, but different arms would enable use with almost any small car body, frame, � or chassis.�
�
�
�
�
I'm not an engineer, and I won't guarantee the weight capacity of this design, but �
it works well for my MGA and I believe that it would be suitable for any lightweight �
automobile - certainly any British sports car.�
� As far as designing an 'offset' for the arms in order to get the best balance for � the body, unless you have unusually heavy chassis components installed the center of � gravity will usually be located fairly close to the actual physical center of the � body. Simply measure the height of the body and make arms that will offset the � mounting points one half that amount from the center of rotation. �
��
�
�
�
�
� As far as designing an 'offset' for the arms in order to get the best balance for � the body, unless you have unusually heavy chassis components installed the center of � gravity will usually be located fairly close to the actual physical center of the � body. Simply measure the height of the body and make arms that will offset the � mounting points one half that amount from the center of rotation. �
�
�
�
�
 �
�
�
�
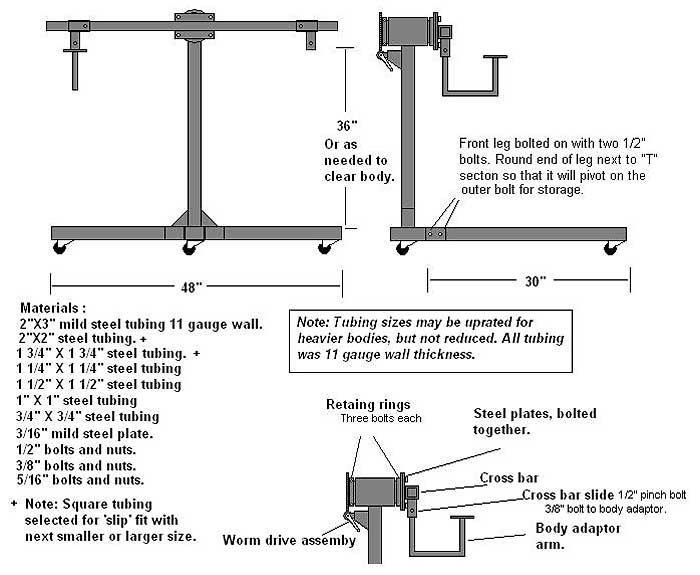
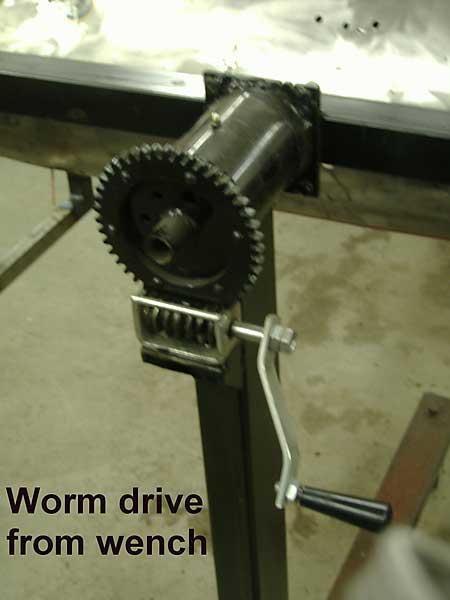
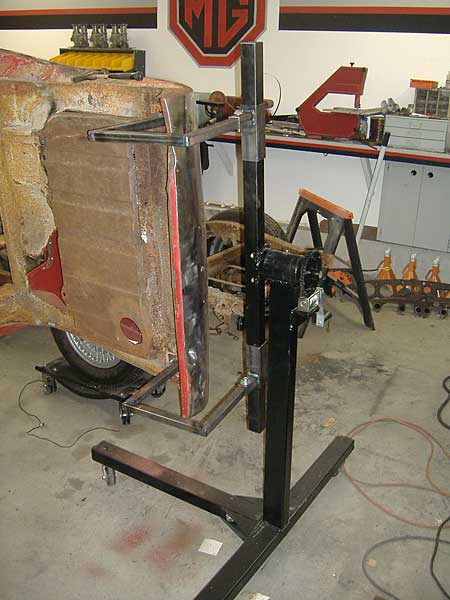
� Rotation is controlled by a worm drive from a hand winch purchased from Harbor � Freight. The worm drive components were removed from the winch and adapted for use � on the rotisserie. This type of drive allows for complete rotation without the need � for a 'pinch bolt'. The reduction ratio is 40:1 and effort is very reasonable to � rotate the body. Only one drive is necessary; the other end of the rotisserie doesn't � require anything but a pivot. �
��
 �
�
�
� I am using the term pinch bolt to indicate a nut welded to the tubing or pipe and a � bolt which threads through that to contact an inner piece of tubing or pipe. This � effectively acts as a positive lock to prevent movement between the two pieces.�
��
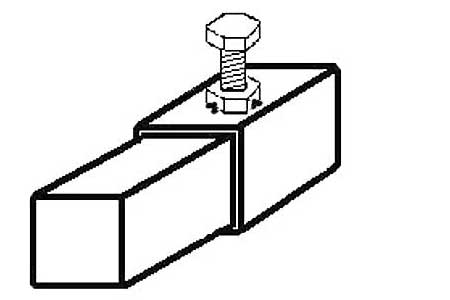
� One piece of box tubing slides within another larger one, and then
� is locked into position when the bolt tip is tightened against it.
� (A hex nut has been welded onto the larger piece of tubing.)� �
� The rotary heads on each stand were made from steel tubing or pipe. I did have to � reduce the size of the larger pieces to make a nice fit with the inner parts. This � required splitting one side of the tubing, removing some material and reforming using � a hammer and vise until a good fit was achieved, then welding. I added a grease � Zerk to each head for lubrication. The inner sections of the rotary heads are � removable for maintenance. They are retained by rings with three 5/16" bolts � drilled and taped into the inner pieces. The large gear for the worm drive is � welded to one of these rings for the drive end.�
��
�
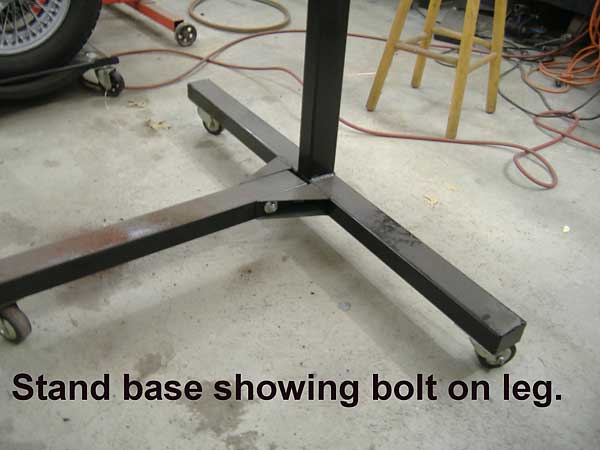
� The unit is designed to break down into pieces for storage or transport. The � largest piece will be approximately 4' X 4' X 10". The cross pieces to which the � adaptor arms are mounted are removable. They are welded to rectangular pieces of � steel plate which are bolted to matching pieces on the rotating head. The adaptor � arms are of a two piece design consisting of cross bar mounts and the actual body adaptor � arms. The cross bar mounts are designed to slide on the cross bar and be held � in place by half inch pinch bolts. This allow for use on different width bodies, � or if necessary, offsetting the body on the rotisserie. The body mount arms are � designed to give as much body clearance as possible in order to facilitate access � to the body for repairs or even painting. The body mount arms are bolted to the � cross bar slides for ease of assembly and making changing adaptors easier. �
�
�
�
�
�
� Rotation is controlled by a worm drive from a hand winch purchased from Harbor � Freight. The worm drive components were removed from the winch and adapted for use � on the rotisserie. This type of drive allows for complete rotation without the need � for a 'pinch bolt'. The reduction ratio is 40:1 and effort is very reasonable to � rotate the body. Only one drive is necessary; the other end of the rotisserie doesn't � require anything but a pivot. �
�
�
� I am using the term pinch bolt to indicate a nut welded to the tubing or pipe and a � bolt which threads through that to contact an inner piece of tubing or pipe. This � effectively acts as a positive lock to prevent movement between the two pieces.�
�
� One piece of box tubing slides within another larger one, and then
� is locked into position when the bolt tip is tightened against it.
� (A hex nut has been welded onto the larger piece of tubing.)�
� The rotary heads on each stand were made from steel tubing or pipe. I did have to � reduce the size of the larger pieces to make a nice fit with the inner parts. This � required splitting one side of the tubing, removing some material and reforming using � a hammer and vise until a good fit was achieved, then welding. I added a grease � Zerk to each head for lubrication. The inner sections of the rotary heads are � removable for maintenance. They are retained by rings with three 5/16" bolts � drilled and taped into the inner pieces. The large gear for the worm drive is � welded to one of these rings for the drive end.�
�
| �
Enjoying this article? Our magazine is funded through the generous support of readers like you! � To contribute to our operating budget, please click here and follow the instructions. � (Suggested contribution is twenty bucks per year. Feel free to give more!)� |
� The unit is designed to break down into pieces for storage or transport. The � largest piece will be approximately 4' X 4' X 10". The cross pieces to which the � adaptor arms are mounted are removable. They are welded to rectangular pieces of � steel plate which are bolted to matching pieces on the rotating head. The adaptor � arms are of a two piece design consisting of cross bar mounts and the actual body adaptor � arms. The cross bar mounts are designed to slide on the cross bar and be held � in place by half inch pinch bolts. This allow for use on different width bodies, � or if necessary, offsetting the body on the rotisserie. The body mount arms are � designed to give as much body clearance as possible in order to facilitate access � to the body for repairs or even painting. The body mount arms are bolted to the � cross bar slides for ease of assembly and making changing adaptors easier. �
�
�
�
�
� �
�
�
� Disclaimer: This page was researched and written by Bill Young. Views expressed � are those of the author, and are provided without warrantee or guarantee. Apply at your � own risk.�
� Photos by Bill Young. All rights reserved.�
�
�
�
�
�
� Disclaimer: This page was researched and written by Bill Young. Views expressed � are those of the author, and are provided without warrantee or guarantee. Apply at your � own risk.�
� Photos by Bill Young. All rights reserved.�
