 �
�
�
�
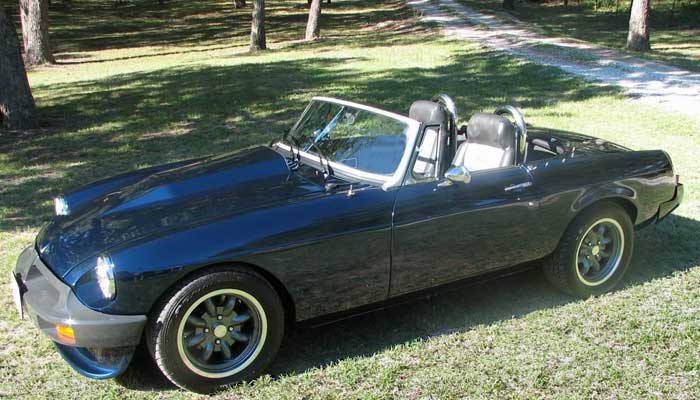
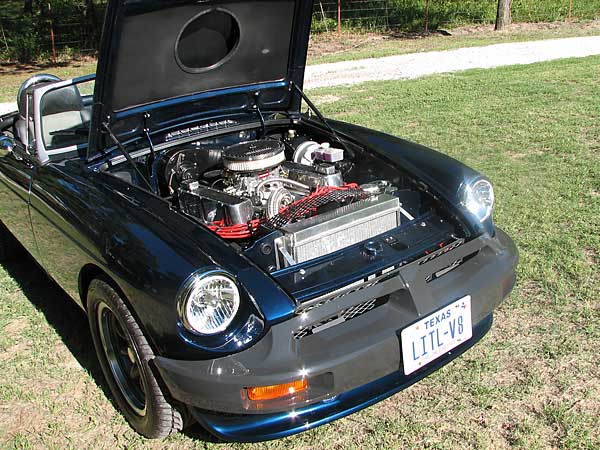
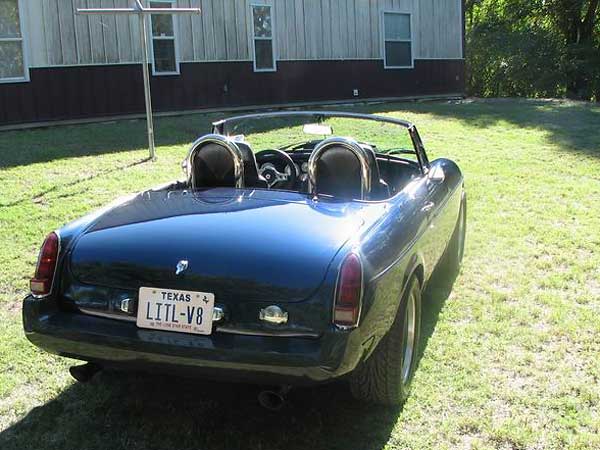
Mark Trosper's 1979 MGB Roadster with Rover 3.5L V8 engine
� as published in British V8 Newsletter, Volume XV Issue 1, April 2007�� Owner: Mark Trosper
� � City: McKinney TX
� Model: 1979 MGB Roadster
� Engine: Rover 3.5 V8 (from a Triumph TR8)
� Conversion completed by: Mark Trosper and Wayne Kube of 2nd Chance Garage
�
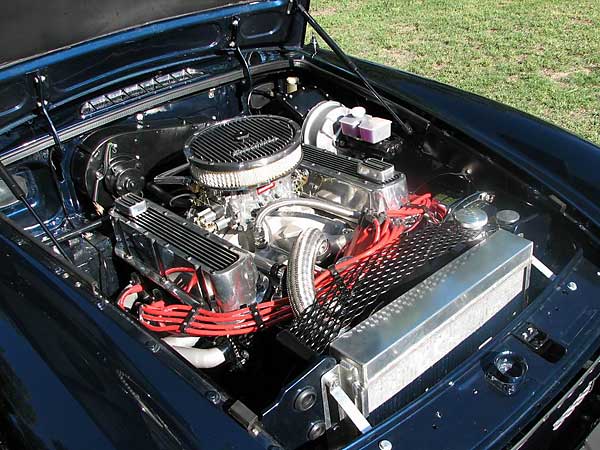
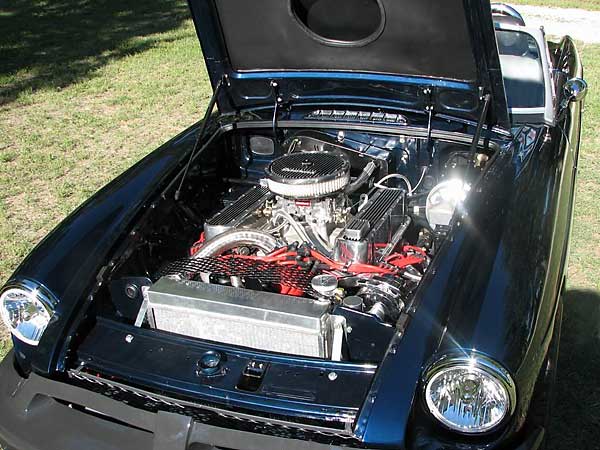
| Engine: | �Rover 3.5 V8 (from a Triumph TR8), bored 0.010" over. | �
| Intake: | �Edelbrock 2198 Performer intake manifold and 1404 carb. | �
| Cam: | �Crower 276 degree, 488 lift. | �
| Ignition: | �Delco distributor fitted with a Pertronix conversion kit. �
40,000 Volt Pertronix coil. NGK plugs. | �
| Cooling: | �Aluminum 18" x 16" (with 2 rows of 1" tubes). | �
�
 �  � | �
|
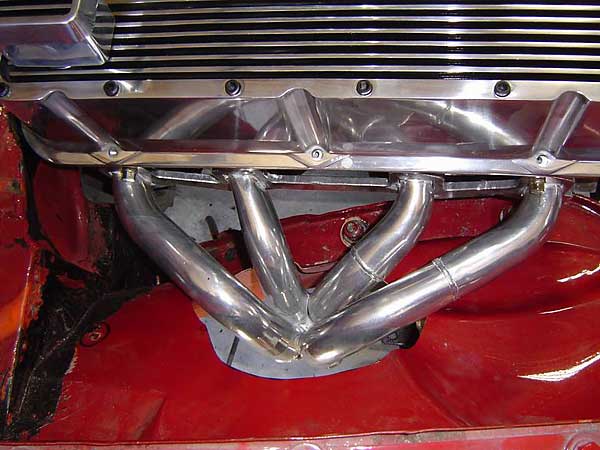
| Exhaust: | �RV8-style headers with 1.5" primaries into 2" collector, and with �
ceramic coating. Dual exhaust with crossover pipe. Turbo Pro mufflers. | �
| Transmission: | �Borg-Warner T-5 (0.63:1 5th). Driveshaft is from an S10. (2.5" diameter�
and shortened to fit.) | �
| Clutch: | �10.4" heavy duty 26-spline. Hydraulic throw-out bearing. | �
| Rear Axle: | �Chevy S10 with 3.42:1 ratio, Eaton locking differential, �
S10 parking brake with cable modified to work with MGB lever. | �
| Front Susp.: | �1 inch lowered coil springs. Spax gas tube shocks. | �
| Rear Susp.: | �1 inch lowered new leaf springs. Spax gas tube shocks. Panhard bar. | �
| Brakes: | �(Front) standard MGB with V8 pads and slotted rotors. �
(Rear) standard Chevy S10. | �
| Wheels/Tires: | �Minilite (15x7) diamond-cut lip wheels with Anthracite finish. �
Dunlop 225/50 Z-rated tires. | �
�
 �  � | �
|
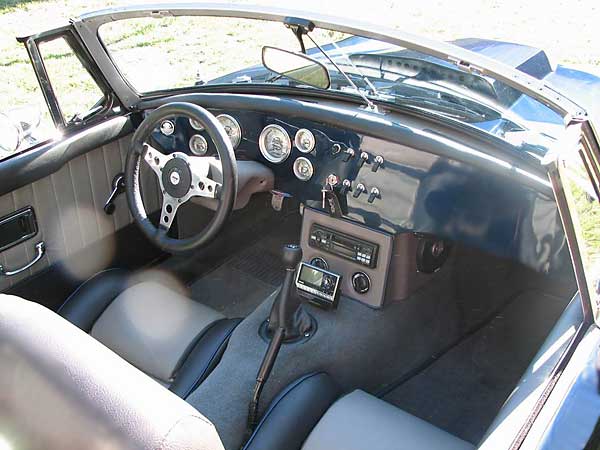
| Electrical: | �Painless wiring harness. Classic Instruments "All American" 6-gauge set. | �
| Completed: | �September 1, 2006. | �
| Miles Driven: | �Approx. 750 (as 1/15/2007.) | �
| Other mods: | �chrome side trim and side marker lights removed. Rear wheel wells�
arched and flared. Back-up lamps removed and taillights customized �
to include back-up lamp functions in lieu of reflectors. Fully �
functional cowl-induction hood scoop. Custom dashboard (with Jaguar �
toggle switches.) Custom center console. Fiero seats. Roll hoop. �
Removeable convertible top.�
| �
| Comments: | �Thanks to Texas Auto Tops for their custom interior work (leather, �
carpet and vinyl.) Thanks to Concours Restoration Services for the �
custom paint job. The paint color is a 1993 Ford color called �
"Twilight Blue Metallic" (basecoat/clearcoat). �
| �
�
�
In-Process Photos
�

�
�
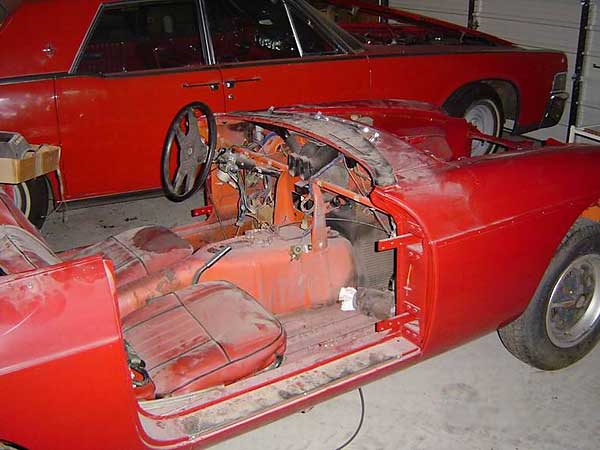
This is the way Darla looked when I bought her from a paint & body shop. �
She had no engine but did have an overdrive tranny (which I sold later to �
reduce my investment cost). She was a rust free car with a fresh paint job, �
but that was all to change... There were several boxes of parts that came �
with her: some we used and a lot we replaced.
�
�
�
�
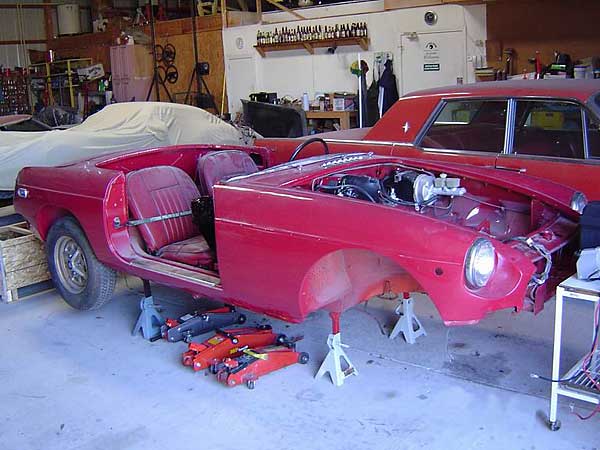
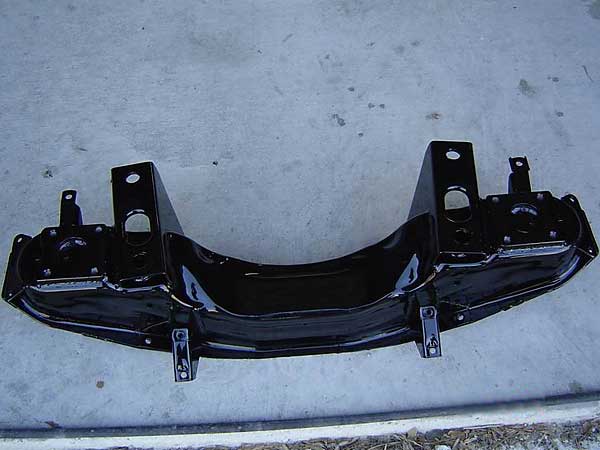
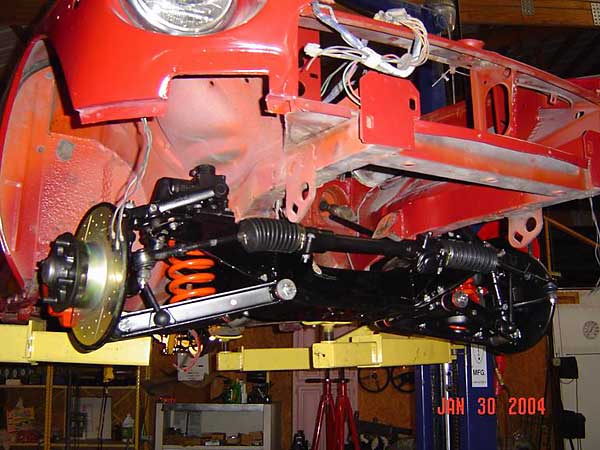
We removed the front cross-member and had it powdercoated, and then we �
reinstalled it with all new bushings. We rebuilt the calipers and put in �
V8 pads. We put on drilled and slotted rotors, and new steel braided brake �
lines to handle DOT-5 fluid. At this time we had reconditioned stock �
lever shocks on the front. Also had new coil springs to lower to �
chrome-bumper height.
�

�
This is a box of goodies from the ever helpful D&D Fabrications Inc. in �
Almont Michigan. This crate contains an S10 rear end, a T-5 transmission, �
a special bell housing to fit T-5 to TR8 engine, a custom made cross-member �
for the tranny, a shortened S10 drive shaft, and assorted other stuff.
�
�
�
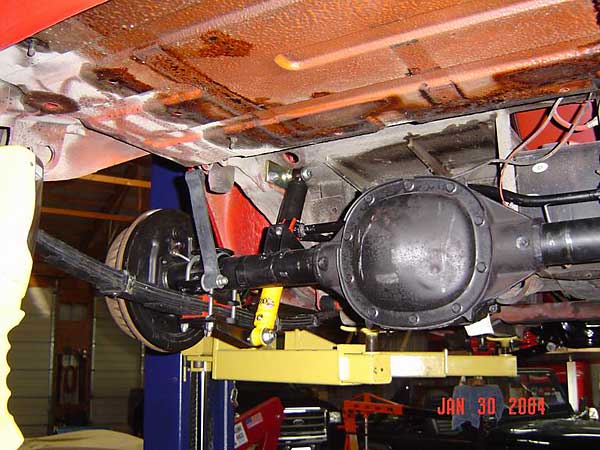
This is the S10 rear end installed. It was narrowed and converted to four �
lug. It has a 3.43:1 gear ratio and a Posi-traction differential. D&D �
furnished an emergency brake set up that is easy to install and works well. �
Not shown here, but also installed is a Panhard bar setup which works well �
but required some modification to work with S10 axle diameter.
�
�
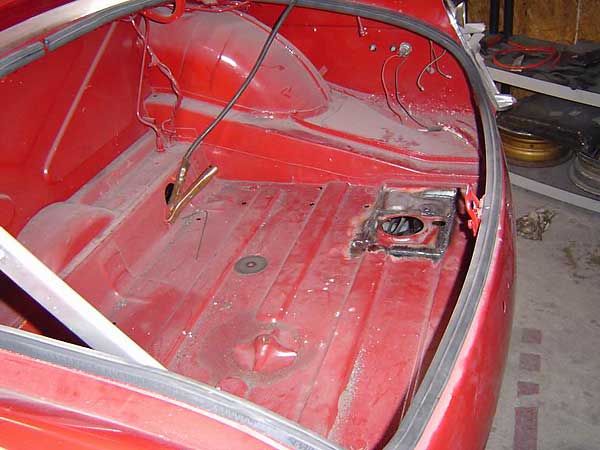
We centered the gas tank to facilitate dual exhaust. Cutting out the filler �
tube hole, moving it over, and inserting a replacement piece, and re-drilling �
the holes to mount the tank is all pretty straightforward. Also, the sending �
unit in the gas tank has to be moved from the side to the front to allow room �
for the exhaust pipe. The job of cutting out the sending unit ring and moving �
it is a little more delicate of a welding job, so I had that done by a more �
experienced welder.
�
�
�
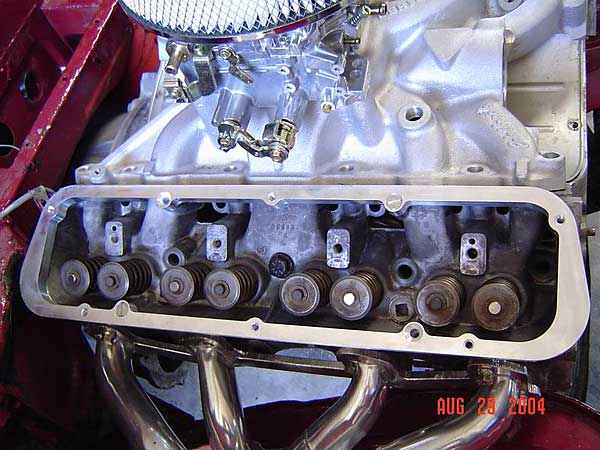
This is the first fitting of the engine & tranny. Also a look at our �
conversion from stock valve covers to much better looking Edelbrock "Ford" �
valve covers. Picture of head without valve cover show the adapters we had �
made (it ended up being very costly, but it's only money!) The adapter �
allows you to put the four bolts in the TR8/Rover head and then put the �
six bolts on Ford cover.
�
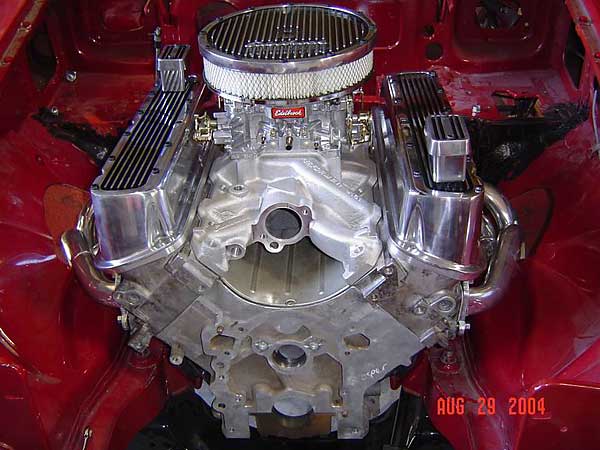
�
Close tolerances abound, but we made it fit! A large hammer was required �
here and in the tranny well, just below the firewall.
�
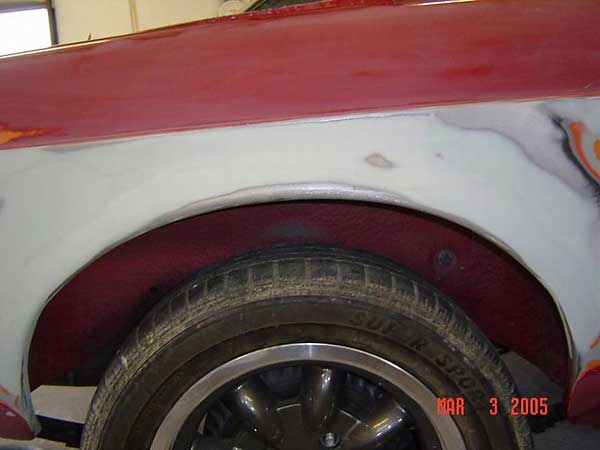
�
This is a picture of the holes we cut in the fenderwells for the RV8 headers. �
We had a spare late model MGB that we did all the trial & error fitting �
& cutting to locate the holes final position. Then we made a fiberglass �
mold/template on each side. With the unique shape of each fender well, it was �
easy to make the template. Once they hardened, the hole was cut out of the �
center of the template and could be placed in any late model MGB and correct �
size holes in the correct location could be cut.
�

�
�
�
These are some pictures taken at the paint & body shop: "Concours Restoration �
Services". It shows the functional cowl induction hood scoop being built. Once �
again we made a template out of an old hood by determining the correct location �
for the hole needed to allow room for Edelbrock 2198 Performer Intake & �
Edelbrock 1404 Carb. We also fabricated and tack-welded, a rough design of the �
style scoop we wanted. Also shown is the cutting, arching and flaring of the rear �
fenders to accommodate the Dunlop 225/50Z R15 tires we chose.
�
�
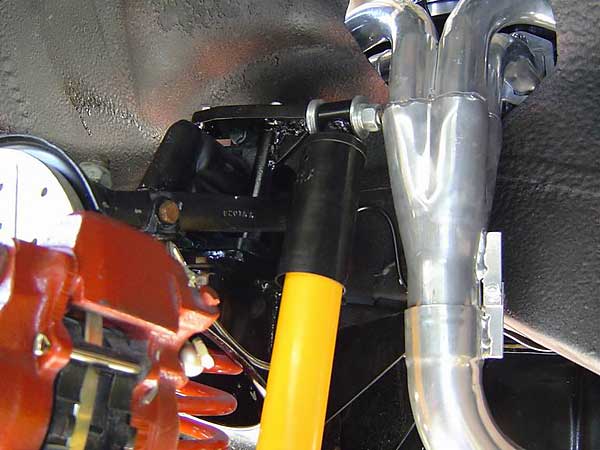
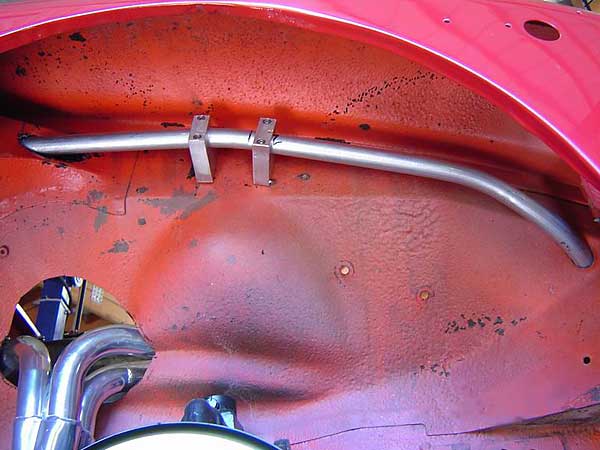
This is a shot of the front mount bracket for the Spax Gas Shocks. The bracket �
that comes with the shocks will not work with RV8 style headers. There just �
is not enough clearance. Needless to say we were in a quandary because we �
wanted Spax on all four corners. After considerable research & many �
phone calls we located an old MGB that had tube shocks on the front and �
the brackets were totally different design from current one offered by Spax. �
As you can see there is barely enough clearance with these brackets. Also, �
the old lever shocks are used as stabilizers with fluid removed of course.
�
�

�
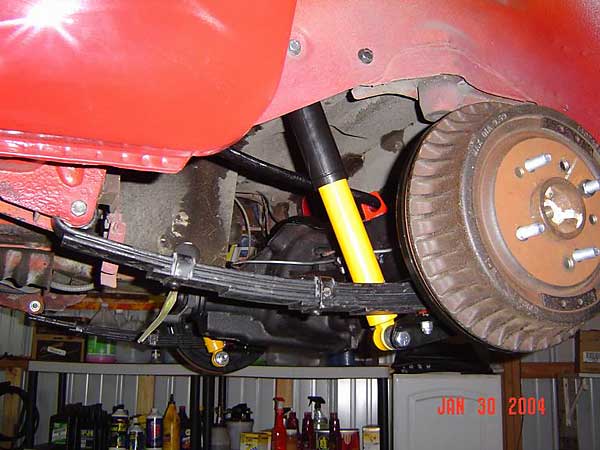
This picture shows the dual exhaust which now has an "H" (crossover) pipe �
installed just before the body cross-member. Also, the emergency brake �
cable routing and fuel pump can be seen.
�
�
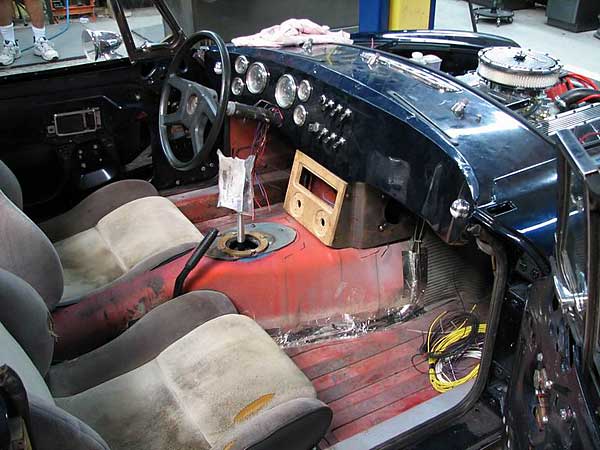
We replaced all wiring with a Painless Wiring Kit. My friend and partner �
Wayne Kube did all the wiring. Given the new dash and its set-up, this was �
a major undertaking. We went with Classic Instruments "American Six Gauge" �
package. We also moved the headlight controls, wiper controls, and ignition �
key from the steering column to the dash. There is a key switch to turn on �
power and a push-button to turn the starter. The rest of the controls are �
old Jaguar toggle switches. The dash itself is a regular MGB dash with all �
the foam padding removed and an 18 gauge piece of sheet metal skin tack �
welded on the dash frame. Also, between the speedo & tach are three �
little holes with fiber-optic lines in them. The outer two are green to �
show turn signal use and the center one is blue to show headlight high beam. �
The center console had to be fabricated because of the change in the shape �
of the dash. It holds the radio, heater & fan controls and also has �
two speakers to balance the speakers in the Fiero seats.
�
�
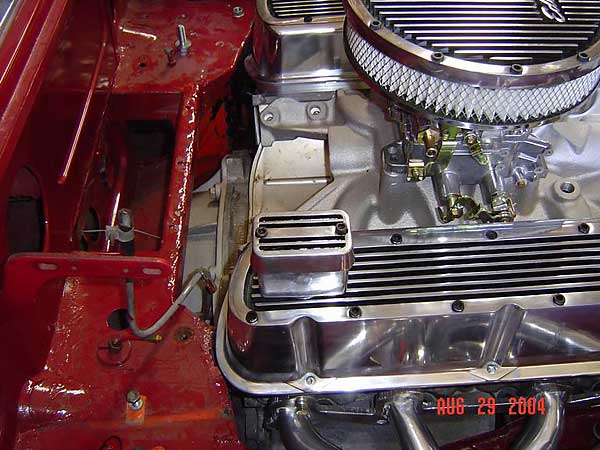
We wanted to make the engine bay as neat and clean as possible. One way �
was to route all the wiring for front-of-car (lights, horns, driving lights, �
and fan) though conduit in the fender well. We also used conduit in the �
engine bay for all wiring except spark plug wires.
�

�
We decided to come up with something different regarding backup lights. �
We removed the factory lights and filled in the holes. We chose the early �
model MGB taillights because they have a more unique shape and were better �
suited for our idea. We cut out the square reflector area in the lens and �
replaced it with an off-white opaque lens. A lot of Dremel tool work here! �
We drilled a hole in the base for the bulb and fabricated a box out of �
tin to fit around the bulb to keep the whole lens from lighting when in �
reverse. We wired it up and it works and looks rather nice and different. �
We also fabricated some filler material in the bumpers just under the �
lights to fill in the void left when using the older lenses.
�
�
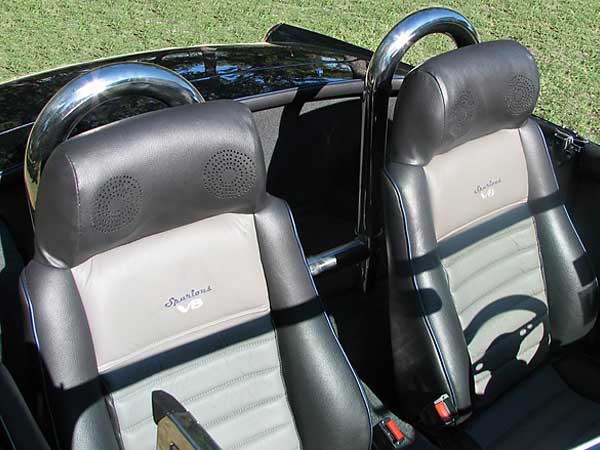
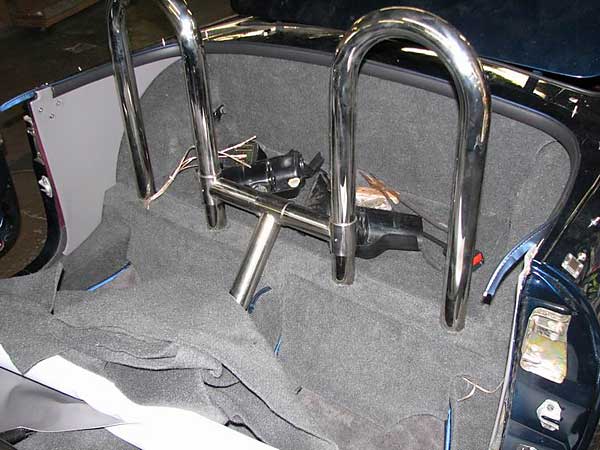
This is a picture of the roll bar. We purchased it off eBay. These are �
still for sale occasionally. They are designed to fit an MGB as you can �
see it will bolt right in on the deck behind the seat. A few modifications �
were necessary to allow access to the battery the same old way but not a �
big problem. They are by no means SCCA approved but they look good and �
would help a little if needed. We also converted the car to the removable �
top style of the earlier MGB's.
�
�
This project took a long time to complete, but it was well worth it. �
The exciting part of building this car was dreaming up ideas of how to �
make something a little different than the stock MGB and then designing, �
creating and fabricating the many parts of this car that make it unique. �
Another great thing about a project like this is the camaraderie of working �
with friends. This car could never have been built without the long term �
help and commitment of my two very good friends: Wayne Kube and Nick Pappas.�
