
"How It Was Done" - the second time!
��
(originally published in British V8 Newsletter, Volume 10 Issue 2)�
�
By Keith Childs�
�
I would like to thank Dan for carrying on with the "British V8 Newsletter" �
from Kurt. I believe it crucial to keep this lifeline for wannabe V8'ers �
and veterans to provide the rare information and list of material suppliers �
available. Without this, conversions are a very daunting task. I intend to �
download the new newsletter for the color photos but will subscribe to �
hard copy as well to support The Newsletter.�
�
I provided a "How It Was Done" in Vol. III Issue II as an account of �
my conversion. As I said then, in 1993 my choices were made on limited �
information available since there was no newsletter.�
�
Using the V8 Conversion Co. DIY kit I re-powered my '75 roadster with a �
3.5 Liter engine and kept the MG O/D transmission and 3.9:1 rear end. �
Like everything in life, things change with time.�
�
�
The first area of concern was the rear end. I was tired of having a �
bulldog low first gear like a truck. Went like hell in the 1/4 mile, �
but driving on the highway for any time is not pleasant. I replaced �
it with a shortened Ford 8" using 2.79 gears. In a previous Newsletter �
(Vol. VII Issue 1), I read how Jack Emery (Maine) had done the same �
thing and had a cheap and dirty fix for emergency brakes. I contacted �
Jack and he told me "How It Was Done". Works great! I shortened the �
rear end one half inch more on each side than the stock MG to allow �
wider tires (195x60). After a year I finally found a set of 3.00:1 �
gears, which I installed. This really is a nice configuration. If I �
come across a set of 3:25 to 3.40's I will install them and do a �
comparison.�
�
Over the years I had planned on improving the performance of my wee V8. �
The 8.13 compression ratio had to go. Last year I acquired 3 like-new �
3.9 L engines with 9.35:1 compression. (1 long and 2 short blocks) with �
extremely low mileage. I didn't feel like altering another block to use �
the MG transmission. It had performed flawlessly and I think they get �
a lot of undeserved negative criticism. Having said that, I sold the�
MG transmission after I found a Rover 5 speed.�
�
This past summer I stripped the interior completely and that provided �
the golden opportunity to weld in an extension on top of the tunnel �
(required for Rover 5 speed.) The upholstery was replaced with Moss �
panels, carpet and seat foams. The seat covers are custom made with rolled �
and pleated velour centre sections. Much cooler for summer driving! �
The 3.9 engine was sent it in to be degreased, honed, rod-ends resized, �
crank polished and the entire engine balanced and the heads done. I �
discarded the truck cam that was in the engine and replaced it with a �
Crane performance cam. To resolve the dilemma of starter solenoid �
location I'm using a gear reduction hi-torque starter from TSI. Even �
though I generously applied assembly lube, I still pre-oiled the engine �
using a tool (modified for the Rover engine) I made from a tip I read in �
"The MG V-8 Newsletter" (Vol. II Issue 2.)�
�
To test the transmission oil pump, I drove the input shaft of the �
transmission using my impact gun. This tests the oil pump and makes �
sure it works before installing it. Another trick I found in The Newsletter �
(Vol. VI Issue 2)! The transmission mount obviously requires some attention. �
In the The MG V-8 Newsletter (Vol. VIII Issue 3), Jeff Foote shows a �
very easy method using a GM350 Turbo automatic transmission mount. It �
required very little crossmember alteration and the best part; it only �
cost $20.00 complete.�
�
The driveshaft was the next problem. I couldn't find any detailed description �
of a Rover transmission to Ford differential. Some years ago I met Glenn �
Towery. I vaguely remembered he mentioned the TR6 driveshaft. I bought the �
front half of a TR6 shaft from a wrecker's yard. A quick trip to the machine �
shop and driveshaft was ready and balanced. I dropped 3 plumb-lines, one from �
the center of the front of the crankshaft, the second centered on the �
transmission output shaft, and the third with the center of the rear axle at �
the differential U-joint. I ran a string from the front to the back just �
touching all 3 plumbs and adjusted the transmission sideways until all 3 �
lined-up. �
�
�
I then checked the phasing and flange angles similar to the description �
in Vol.VI Issue III and all was OK. I was using "London Stainless Exhaust" �
block-hugger stainless headers and custom 2 in. stainless dual exhaust. I �
replaced the headers with stainless RV8 headers. They are larger diameter, �
have fewer bends, and are less restricting under the bonnet than the block-huggers. �
They did require re-routing of the front brake lines to the front of the master �
cylinder to the radiator and then under to the front of the wheel to offer �
better heat clearance.�
�
I completed my conversion in early December and test drove it. There is a �
definite power increase over the 3.5 L engine and the Rover transmission �
ratios are more suited to the engine. The lower first gear is really noticeable. �
My wife saw the grin from ear to ear after the test drive. Something I insisted �
on doing every day till the first snow and conclude it was a complete success. �
I parked it for the winter but am installing a torque rod to the engine, a new �
hi-volume fuel pump and pressure regulator and I'm lowering the rear of the car. �
I am also installing extra fuse boxes and relays with larger gauge wires in the �
engine bay and trunk to handle the extra loads like cooling fans, driving lights, �
fuel pump and stereo amp.�
�
Well I had no plans for any other major updates, but I've become interested in �
the 300+ hp Ford 302 installation in a B GT!!! I may try to sell this car this �
summer and start again. I do all my own work (except engine machining) and I �
have purchased all the recommended books. I have found no greater source of �
information either directly from "How It Was Done" or indirectly through people �
I contacted from the "British V8 Newsletter".�
�
Keep it Safe, Keep it Fast, & Keep Printing!�
�
� �
�
(as originally featured in British V8 Newsletter, Volume 3 Issue 2)�
�
How It Was Done
� �
By: Keith Childs
�
City: Hamilton, Ontario, Canada
�
�
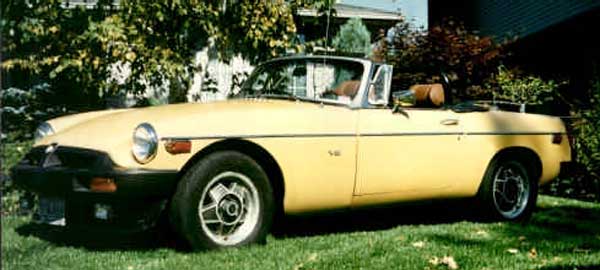
Well, after a few teething problems what my neighbors felt would never run is on the road again�
and being driven regularly. My MG is a '75 roadster that I purchased in 1982. At the 1992 MG�
gathering in Peterborough, Ontario I saw several converted MG V-8's and my course was set. I�
purchased a 1980 Rover SD1 for the 3500 cc engine and parted out the rest of the car.�
| Engine: | �Rover 215 cid (3500cc) V8.�
1961 Buick 4 bbl intake manifold, machined for 4-barrel Holley carburetor by Towery Foreign Cars.�
Holley 390 cfm 4 bbl carburetor.�
Early Rover oil pump cap installed to allow remote oil filter base to clear steering rack.�
(This late model engine already has the upgraded oil pump.)�
Remote oil filter with stainless steel hoses.�
1964 Buick 300 water pump.�
(Inlet is sloped down approximately 30 degrees, aiding in hook-up to radiator.)�
Aftermarket chrome water pump pulley.�
1961 Buick crankshaft pulley and harmonic balancer.�
80 amp Delco alternator with home made mounting bracket and tension arm.�
Crankshaft adapter and pilot bushing supplied by The V8 Conversion Co.�
(Bolts the MG flywheel to the Rover crankshaft.)�
Starter mount removed.�
(MG starter bolts to adapter plate.)�
Torque restraint arm between block and firewall.�
| �
| Transmission and Bellhousing: | �1975 MGB 4-speed with overdrive.�
V8 Conversion Co. adapter plate.�
(Bolts engine block to bellhousing.)�
Shortened first motion shaft by 1/2".�
Cut out bellhousing for new starter location. | �
| Clutch Slave Cylinder: | �original 1975 MGB. | �
| Flywheel: | �'75 MGB.�
Machined approxumately 1/8" off face to remove original annular ring.�
Undercut centre of flywheel to make clearance for damper springs on driven plate.�
Drilled to accept larger clutch pressure plate.�
Balanced.�
| �
| Clutch: | �MG V8 clutch.�
MGC clutch cover plate. | �
| Exhaust: | �stainless steel headers from London Stainless Exhaust Ltd., London England.�
Custom made dual exhaust pipes.�
| �
| Wheels/Tires: | �Rostyle wheels. P195/60R14 tires. | �
| Suspension: | �tube shocks on rear.�
3/4" anti-roll bar. (1975 MGB had no anti-roll bar.)�
MGB/GT coil front springs.�
Moss Motors anti-tramp bars.�
MGB V8 bushings.�
New kingpins. | �
| Radiator: | �1980 MGB, recored.�
Tanks reversed and outlets moved.�
Two Rover AC conditioner fans in front of radiator.�
12" stainless flex fan on the water pump.�
Stainless steel braid on radiator and heater hoses.�
| �
| Rear End: | �'75 MGB.�
Waiting for Ken Costello 3.07:1 gears on an MGC differential. | �
| Instruments: | �tachometer altered for V-8 by Glen Towery.�
Speedometer will be modified with new gears. | �
�
The conversion aside from machine work was done by myself. Major suppliers were The MG V8 Conversion�
Co. (England). providing the adapter plate and crankshaft adapter, and Glen Towery of Towery Foreign�
Cars. Not only was Glen a parts supplier, but he was also of great technical assistance. Additional�
pieces were supplied by M & G International (England).
�
