 �
�
�
�
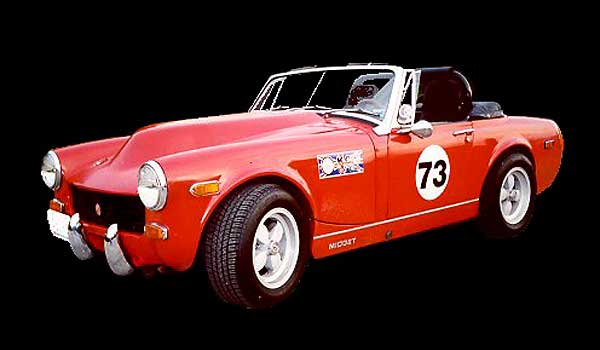
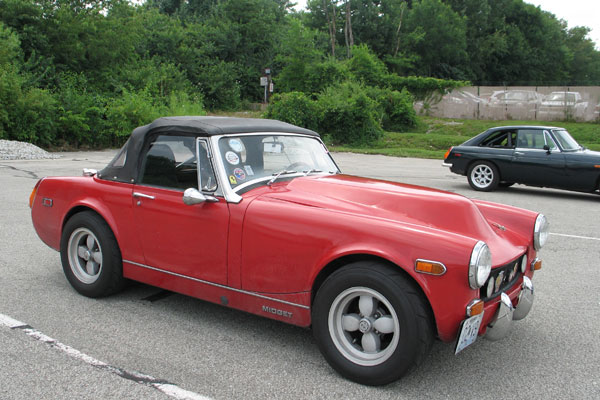
Bill Young's 1973 MG Midget with 1987 Chevy 2.8L V6 MPFI
� as published in British V8 Newsletter, Volume XV Issue 1, April 2007�� Owner: Bill Young
� BritishV8 UserID: Bill Young
� � City: Kansas City, MO
� Conversion completed by: Bill Young at Service-Garage
�
"Project Half Asp"
� Summary of Specs and Features�
| Car: | 1973 MG Midget |
| Engine: | 1987 Chevy 2.8L V6 MPFI (with all emission controls) |
| Exhaust: | custon fabricated headers and exhaust system |
| Transmission: | Borg-Warner T5 5-speed manual transmission |
| Rear Axle: | Chevy Monza (narrowed), with 3.43:1 gears |
| Front Suspension: | nylon bushings, heavy duty springs, up-rated anti-roll bar |
| Rear Suspension: | anti-tramp bars, Panhard rod, tube shocks, anti-roll bar, polyurethane bushes |
| Brakes: | front disc brakes cross-drilled and with cooling air ducted from front valance |
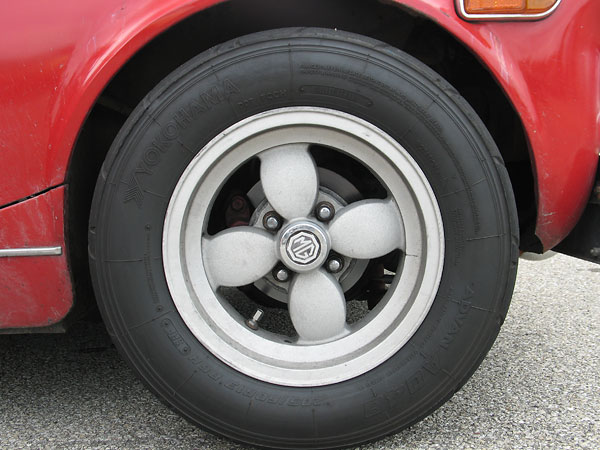
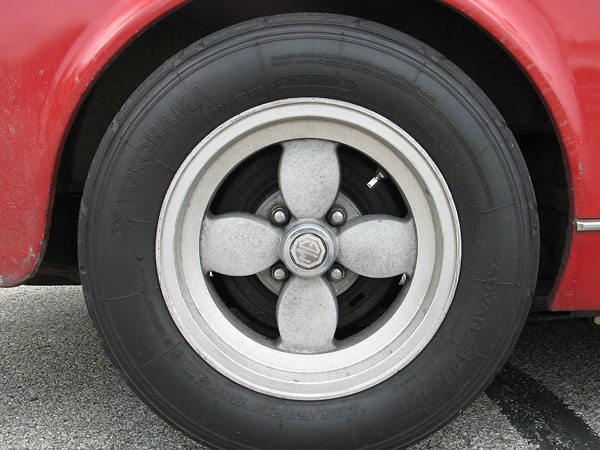
| Wheels: | 13x7 American "Libre" wheels |
| Tires: | 205-60R13 directional "H" speed-rated |
| Interior: | GM three-speed heater blower. Custom fabricated dashboard (with additional gauges/switches). � Nissan seats with 5-point safety harness for driver. |
| Body: | relocated fuel filler with vintage racing filler cap. |
| Other: | oil cooler with custom formed air intake and oil temperature thermostat |
Please support the sponsoring companies who make BritishV8 possible, including:
�
 �
�
�
Project Half Asp began life as an unassuming 1973 MG Midget with original �
1275cc engine and drive train. This was my second British car, the first �
being a Bug Eye Sprite I bought almost 40 years before when I was a young �
sailor in San Diego. That Bug Eye had a 283 Chevy stuffed in the front by �
a previous owner and didn't prove to be very reliable, but loads of fun. �
Unfortunately the need for a reliable car for the new wife dictated �
something more mundane, so it went on to another owner. �
�
Fast forward 37 years filled with various street rods and muscle cars to 1995 �
and a move to Kansas City. I needed a new toy. An MG Midget seemed just the �
ticket. I drove the car for almost a year and was gradually �
beginning to feel that it needed some serious performance enhancements to �
be able to joust with the semi's out on the interstate when a minor traffic �
accident resulted in the need for a new front clip and radiator. �
�
The 'hot-rodder' in me took over. I decided that as long as the car was down,�
now was the time for that performance boost! A lot of research and some �
measurements at the local salvage yard convinced me that a GM 60 degree V6 and �
5 speed transmission would fit. I also found that they'd give me the power I �
wanted at about the same cost as building the 1275 and installing �
a Datsun 5 speed conversion. I had owned a Fiero GT a few years before, �
and I liked the performance from the GM 2.8L V6 engine. �
�
I figure I did wind up spending a little more, but not too much and I'm �
very happy with the finished product. �
�
The name "Project Half Asp" is a play on words as well as a description �
of the performance of the car. Not a Cobra or Viper, just 'half asp' and �
some folks think it was a 'half a**ed' thing to do to a Midget.�
�
�
�
�
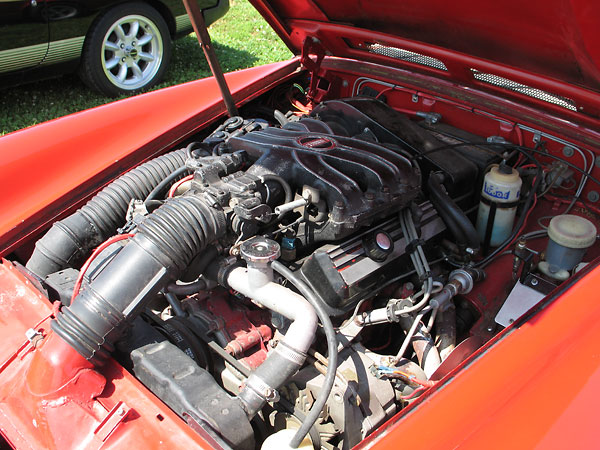
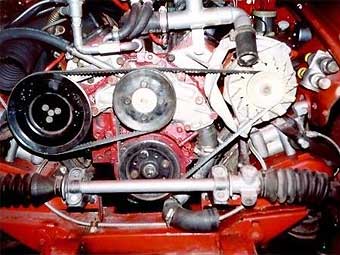
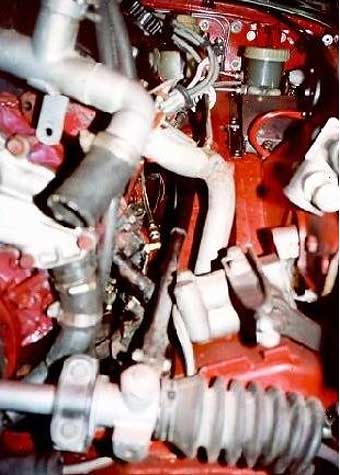
The engine and transmission were from an '87 Camaro which I found at a local �
auto repair shop with a lien against the car. The body was rough, but the car �
ran and I was able to drive it and check out the engine and transmission. �
Both seemed great. I must be lucky, I installed both without any changes �
and the only failures I've had in 7 years have been a water pump and a �
starter. I also replaced the timing chain. Not bad for a $950 car which �
also provided the radio, speakers, engine wiring harness, computer, fuel �
pump, and a variety of other small parts to the project.�
�
�
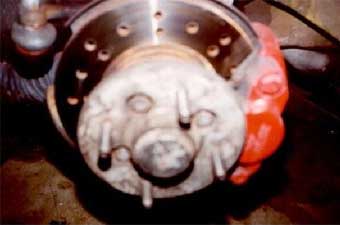 � To improve braking at the front I cross drilled the stock � rotors and added cooling ducting from the dust shields to � the front valance.� | �
�
 � | �
�
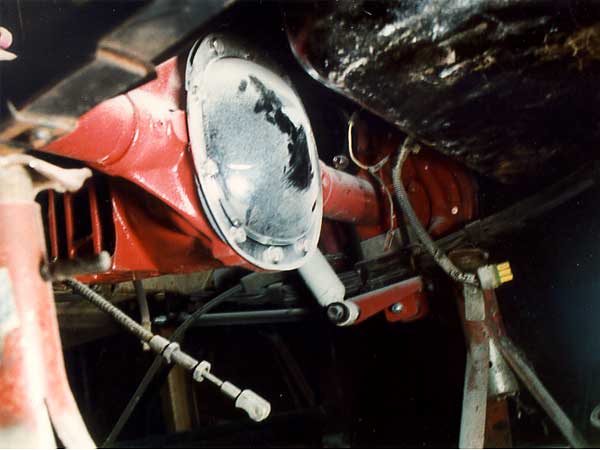
I already had installed larger aluminum wheels on the Midget before the wreck, �
so I wanted to keep the lug pattern the same. I found that the GM 10 bolt used �
in the Chevy Monza and other mid 70's small cars had the same 4 x 4" pattern, �
so a rear axle from a Monza was narrowed to fit the Midget.�
�
I changed from the Monza 2.73 gears to a set of 3.43 gears from a Camaro later �
on for a bit better acceleration and better rpm range at cruising speeds. The �
only drawback so far is that the slightly larger bore wheel cylinders at the �
rear require a bit more brake pedal travel than before so keeping up with the �
adjustment is required. (Something often overlooked when swapping axles and �
brakes is cylinder size)�
�
I made my own spring mounts for the rear axle and added mounts for a Panhard �
rod and rear sway bar at the same time. I did upgrade to the stiffer 1500 Midget �
rear springs and used lowering blocks to set the final ride height. The rear �
sway bar was created from the rear bar off of a Toyota which I heated and �
reformed to fit. I then had it re-tempered by a local spring shop. Combined �
with a large 7/8" front bar from a Healey, the handling is nearly neutral, tending �
slightly towards understeer with oversteer available at a touch of the accelerator �
pedal.�
�
�
�
�
I added a tube shock conversion, using VW rear shocks, but these seem a little �
harsh and the original lever action shocks would have probably served just as �
well. I added traction bars below the front spring half using Midget rear spring �
shackle bushings. (Using parts that were on the shelf in the garage) These allow �
enough compliance to give a good ride while still retaining the axle to prevent �
wheel hop. �
�
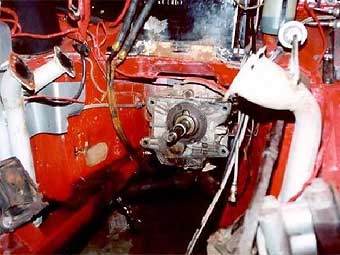
Installing the engine and transmission proved fairly easy. A lot of time spent �
measuring did pay off as there was minimal interference around the bell housing �
and firewall. The transmission tunnel did require enlargement and a new rear �
mount had to be formed. If you pay careful attention to the bell housing �
diameter, block length from bell housing flange to end of front pulley, and �
height from crank centerline to the top of the induction you will save yourself �
a load of headaches in the long run. Try to pick an engine that will fit rather �
than the largest thing available and then trying to modify the chassis to fit. �
It's a lot more work. The 60 degree V6 will fit the Midget chassis and use the �
stock steering shaft if custom headers are used.�
�
�
 �
�
�
�
The heater air duct required some slight reshaping on the underside to clear the �
bell housing and the right foot well required about a half inch dent from a hammer to �
clear the starter.�
�
The steering rack mount did have to have the center removed similar to the way �
a 1500cc engine Midget mount is made. I made front motor mounts from quarter inch �
steel plate and mounts from a Chevy pickup. I made an adaptor plate which bolts �
to the original motor mounting points on the Midget chassis and from these mounted �
the Chevy rubber mounts and block adaptors which I fabricated. These are simple �
steel plate with a piece of 1" steel tubing welded between. This gave more �
clearance around the sides of the engine for oil cooler lines etc. �
�
I wanted to keep the fuel injection on this engine, so I realized that significant �
modification would be required to the bonnet. I think that if you decided to use �
a carb on a low profile manifold you could get by with only a small scoop on the �
bonnet. The hood was modified using panels cut from an old hood I picked up at a �
local swap meet. It took a bit of time to form and weld, and a lot of filler due �
to my poor welding ability and warpage, but it seals out the weather and doesn't �
look too bad to me. After seeing the hood on EX186, I guess I can claim some �
'factory' influence. �
�
�
 �
�
�
�
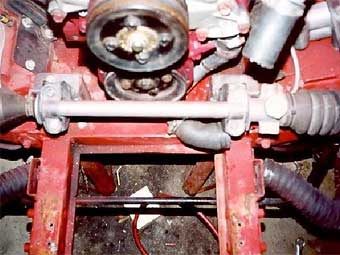
The clutch linkage proved to be a problem at first. The original linkage protruded �
from the side of the bell housing enough to interfere with the driver's side frame �
rail and foot well. I was able to shorten the lever about 1" and mount the slave �
cylinder push-rod through the existing bulge for a starter motor on the driver's �
side that is used on other applications of this engine. I replaced the sheet metal �
dust shield on the bottom of the bell housing with one made from 3/16" steel plate �
and welded studs to that to mount a slave cylinder from a 1500cc Midget. This made �
for a little higher clutch effort, but still not uncomfortably harsh and eliminated �
any need to cut the foot well or frame.�
�
In the Camaro and Firebird chassis the T-5 transmission is tilted at about a 17 �
degree angle from vertical. To make transmission tunnel mods far easier I returned �
the transmission to a vertical mounting. The bosses are already cast into the bell �
housing but needed drilling and tapping. I also removed any protrusions from the �
transmission that were not necessary such as mounting ears for assembly line �
fixtures, etc. I modified an angle drive from an MGB to take the mounting ring for �
the T-5 speedometer gear and used an MGB overdrive cable to the speedometer. �
�
The tunnel still required the top to be raised about 1.5" and the profile widened �
slightly above about 2.5" from the floor pan. The shifter wound up about 3.5" �
further to the rear, but is not in an uncomfortable position even for a large driver �
(I stand 6'4"). I removed the original shifter and straightened the lever, shortened �
and welded on a 5/16" fine thread bolt for the original MG shift knob. I reused the �
mount for the shifter boot from the original tunnel and reused the original boot and �
retaining ring. �
�
�
�
�
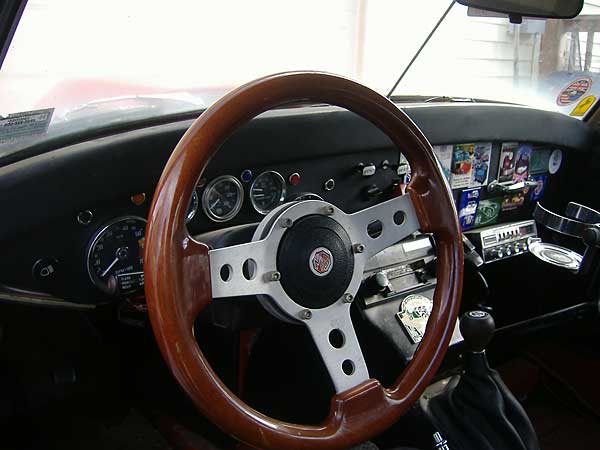
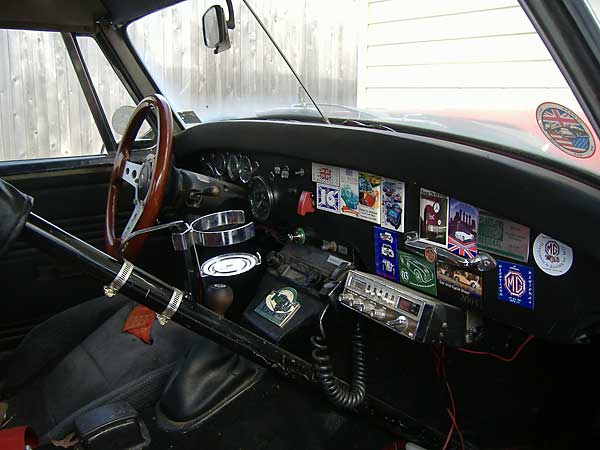
The dash uses mostly GM switchgear off of the Camaro which provided the engine. �
I added an oil temp gauge and a lamp for the "service engine" indication from the �
computer.�
�
�
�
�
I wanted to retain the fuel injection and associated computer, so I felt that I �
would have to keep all the factory emissions equipment in order for the computer �
to get the correct signals. I also wanted the car to be as 'clean' as possible �
to avoid any future problems with the state. In order to keep this equipment I had �
to design and fabricate new mounts for the air pump and alternator. �
�
I tried various exhaust manifolds from several applications of this engine in various �
FWD and RWD chassis, but could not find one that would fit on the driver's side and �
clear the steering, so I built headers from U-bends and flanges purchased from �
J.C. Whitney. �
�
�
 �
�
 �
�
�
�
The headers on each side dump into a 2.25" Y pipe where the oxygen sensor is mounted �
and then to a catalytic converter then on rearward to a glass-pack muffler and Monza �
exhaust tip. I did make a heat shield for the top and bottom of the catalytic �
converter to both reduce heat in the passenger compartment and reduce the chance of �
setting grass or leaves on fire. �
�
The fuel injection requires a high pressure pump and a return line to the tank �
for unused fuel. I modified the original tank to mount the Camaro fuel pump/pick up �
assembly and return line. I reused the steel fuel and return lines from the Camaro �
with some re-bending and used braze-on AN ends and AN fittings throughout the fuel �
system.�
�
�
�
�
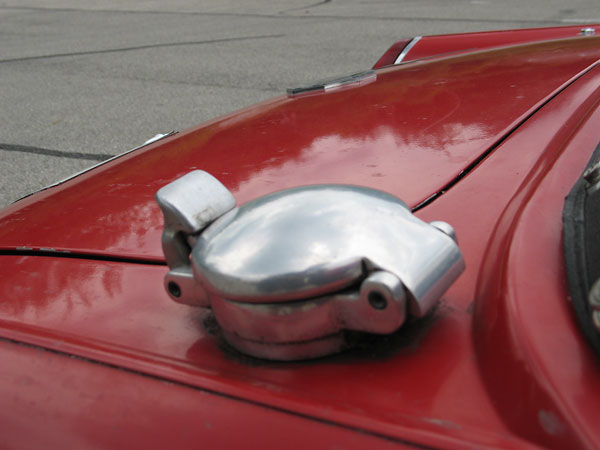
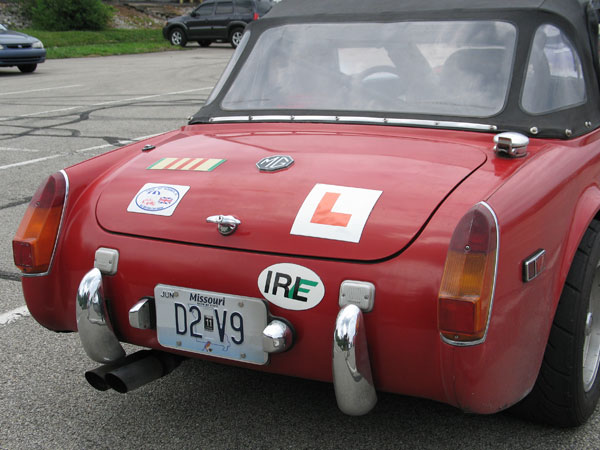
For a change of style and to make the car look a little more competition-oriented, �
I moved the fuel filler up to the top of the rear deck and mounted an Aston-Martin �
style flip-top filler. �
�
�
�
�
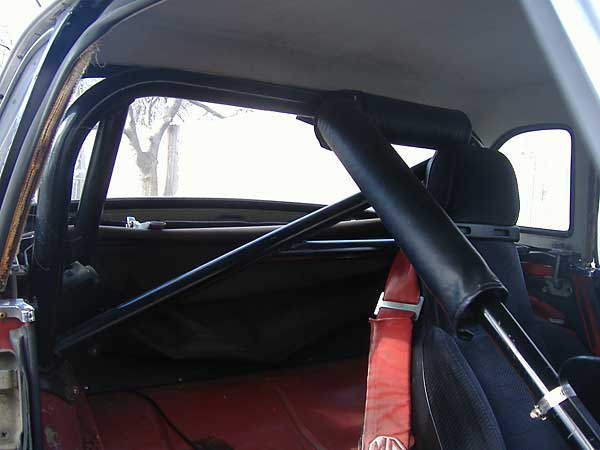
I also bent up a roll hoop with extra bracing to add to the competition flavor and �
to strengthen the chassis a bit. A cross bar provides a mounting point for the �
shoulder straps of the 5-point racing seat belts.�
�
�
�
�
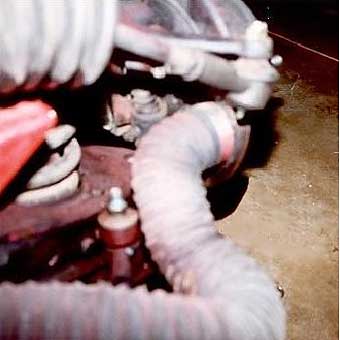
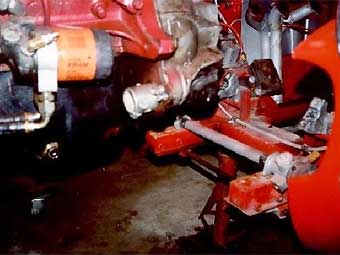
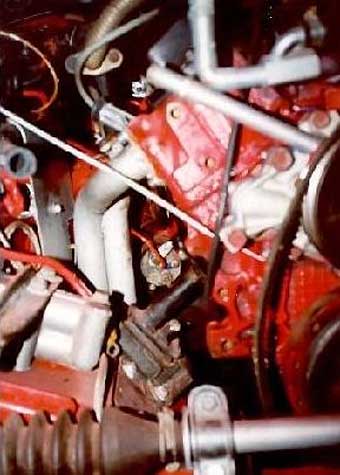
I added an oil cooler from a MGB with a thermostat using a 'sandwich' adaptor. �
The original oil filter is accessible, but just barely. If I were to do this again �
I'd use a remote filter mount. I also mounted an oil temperature gauge; you can see �
the fitting for the sending unit in the oil pan in the photo.�
�
The radiator came from an early MGB which I picked up at a local swap meet for �
about $15. I reversed the side brackets and modified the inlet and outlet fittings �
using copper plumbing fittings. I found an electric fan from a BMW at the local �
salvage yard and mounted it in front of the radiator. It's controlled by a relay �
and a sensor in the right cylinder head. The computer can also control the fan if �
it senses an over-temp condition. I've had no cooling problems even in heavy �
traffic on 90+ degree days. Since the fan will run anytime the ignition is on �
and the engine temperature is high enough, I added a bypass switch which will cut �
power to the fan in those circumstances to give more power to the starter. �
�
>�
�
�
�
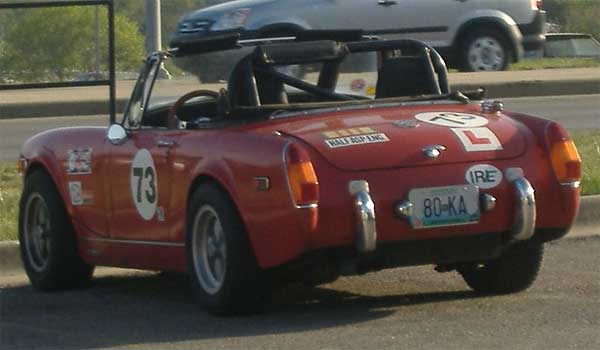
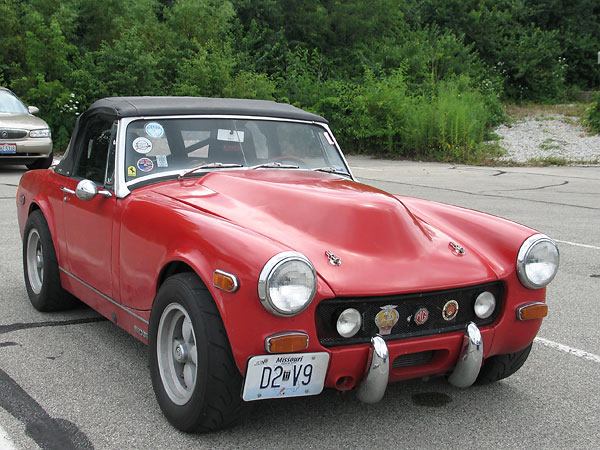
I added ducts for the oil cooler and brake vents to the valance and mounted �
bumperettes from a bugeye Sprite, both front and rear, inverting them for a little �
different look. A later addition was driving lights in the front grille, which �
definitely aid night vision. �
�
�
�
�
I've had the car on the road for 7 years now and have thoroughly enjoyed it. It's �
been on one of our FAT runs (Fall Alternative Tour) which covered over 500 miles in �
two days of good high speed driving on the twisty back roads of southern Missouri �
and down to Oklahoma for the MG Vintage Races last year which was an 800 mile weekend �
without a problem. The car is reasonably comfortable to drive for long distances �
considering my size at 6'4" and 230 pounds. Ground clearance is minimal, but then �
that's the same with any Midget so speed bumps are to be avoided. �
�
As far as measured performance goes, it clocked 95 mph in a standing start 5/8 mile �
at the Chanute Chute Out a couple of years ago. Fast enough for me. It cruises �
effortlessly at 70-75 mph with loads of power in reserve to pass if required. �
Mileage continues to average around 25mpg overall on longer trips. �
�
�
�
�
�
