
�
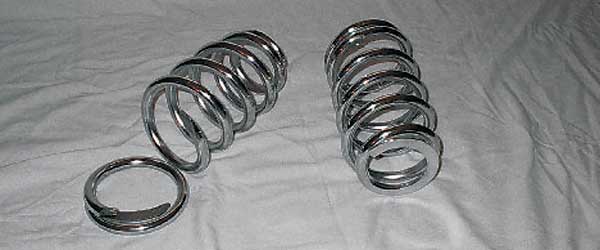
� New coil over springs before and after cutting.
� by: Les Shockey�
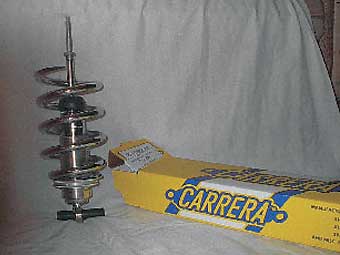
� The first thing to do is to decide on what coil over kit to buy. I chose the Carrera kit shown in. � I found that Summit and Jegs both sell the kit for about $450, but with a little web surfing at � http://www.heidts.com/heip28.htm, I managed to save $50. I chose part number MP-041 for the 375# � spring rate. They also come in 500#, 600#, etc. but the 375 is right for my TR6 with a Ford 351� Windsor. The coil-over kit may be used as is, but to get more adjustment out of it, you should � modify the spring length as shown.�
�
�
�
� New coil over springs before and after cutting.
Coil-Over Shocks for Mustang II Suspension - Converted for TR6!
� (originally published in British V8 Newsletter, Volume XI Issue 1, January 2003)�� by: Les Shockey�
� The first thing to do is to decide on what coil over kit to buy. I chose the Carrera kit shown in. � I found that Summit and Jegs both sell the kit for about $450, but with a little web surfing at � http://www.heidts.com/heip28.htm, I managed to save $50. I chose part number MP-041 for the 375# � spring rate. They also come in 500#, 600#, etc. but the 375 is right for my TR6 with a Ford 351� Windsor. The coil-over kit may be used as is, but to get more adjustment out of it, you should � modify the spring length as shown.�
�
�
�
� The coils on the kit are 8.25 inches tall at free length. For the TR6 application the length should � be 7 inches so no pre-load is required. As you can see above, I cut 1.25 inches off the top. This � will allow an adjustment up to four inches of load, which means the car can be adjusted from its � lowest point of about two inches off the ground to about 6 inches. Be sure to cut with a saw, to � avoid overheating. The installation was fairly easy. Just remove the old shock and coil. Screw � the new adjustable shock in from the bottom holding the bottom spring support and spring in place � by hand. Bolt the shock in place and then adjust the bottom spring support up about 1 inch to � pre-load the spring. This is a good starting point. Now you can have complete control of road � height, spring rate and camber adjustment.�
��
�
�
�
�
�
 � Carrera coil-overs after modifications.� | �
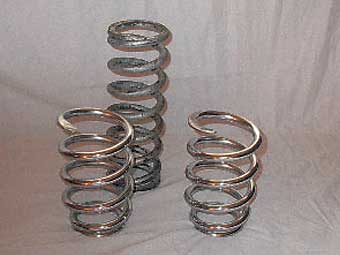 � Stock springs compared to the cut-down coil overs.� |
� The coils on the kit are 8.25 inches tall at free length. For the TR6 application the length should � be 7 inches so no pre-load is required. As you can see above, I cut 1.25 inches off the top. This � will allow an adjustment up to four inches of load, which means the car can be adjusted from its � lowest point of about two inches off the ground to about 6 inches. Be sure to cut with a saw, to � avoid overheating. The installation was fairly easy. Just remove the old shock and coil. Screw � the new adjustable shock in from the bottom holding the bottom spring support and spring in place � by hand. Bolt the shock in place and then adjust the bottom spring support up about 1 inch to � pre-load the spring. This is a good starting point. Now you can have complete control of road � height, spring rate and camber adjustment.�
�
| �
Enjoying this article? Our magazine is funded through the generous support of readers like you! � To contribute to our operating budget, please click here and follow the instructions. � (Suggested contribution is twenty bucks per year. Feel free to give more!)� |
�
�
�
� Disclaimer: This page was researched and written by Les Shockey. Views expressed are those of � the author, and are provided without warrantee or guarantee. Apply at your own risk.�
�
�
�
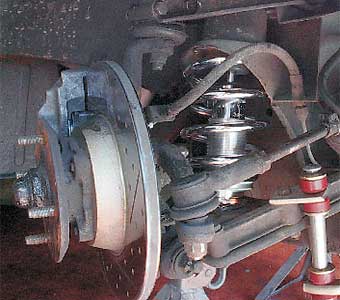
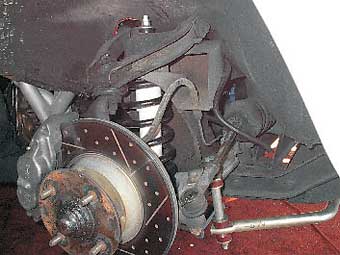 � The stock TR6 installation.� | �
 � The completed installation.� |
� Disclaimer: This page was researched and written by Les Shockey. Views expressed are those of � the author, and are provided without warrantee or guarantee. Apply at your own risk.�
