
�
� by: Jean Monfort�
� If you fit SUs and a stock cam on your Rover/Buick V8, you will have a large choice of � distributors. Does a Lucas work very well? Are the high power ones, coming from a Range � Rover, the best?�
� First, some info about the Lucas. Most are oldies, and must be checked to see if the � mechanical and vacuum advance units are in good working order. You should check the � condition of the shaft, too. �
�
�
�
�
�
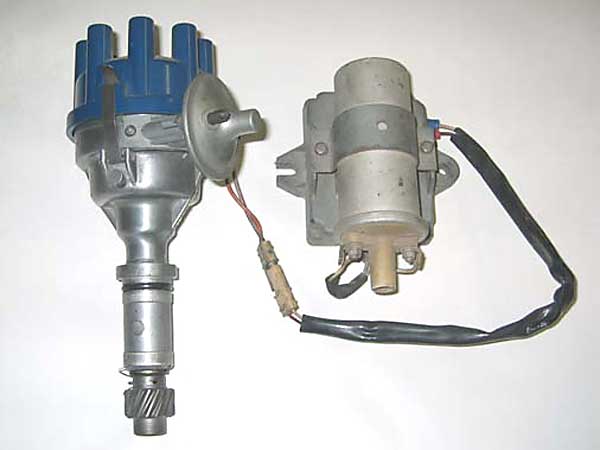
Photo 1: 35DM8. Notice amplifier behind coil, making it less susceptible to engine heat�
3, 2, 1, Ignition! (Selecting a Rover Distributor)
� This article appeared in The British V8 Newsletter - Volume IV, Issue 1 - January 2006�� by: Jean Monfort�
� If you fit SUs and a stock cam on your Rover/Buick V8, you will have a large choice of � distributors. Does a Lucas work very well? Are the high power ones, coming from a Range � Rover, the best?�
� First, some info about the Lucas. Most are oldies, and must be checked to see if the � mechanical and vacuum advance units are in good working order. You should check the � condition of the shaft, too. �
�
�
Lucas made four types of distributors. The serial number is stamped on the body, close �
to the vacuum unit. �
� 1 - The early single point (serial number 35D8): Most come from a 3500 P6 and can � produce erratic spark timing and poor power, but no more than any other old single � point. The vacuum systems often suffer from wear (the rubber diaphragm can degrade) � and must be changed. If the mechanical portion is not tired, they may be reliably � upgraded with one of the many add-on electronic ignition kits.�
� 2 - About 1976 to 1982 (serial number 35DE8): This one is the bad boy of the company; � he is internally amplified and is impossible to repair, or to upgrade. In addition, � he's very sensitive to temperature changes. If you have tachometer problems, this � distributor is probably responsible.�
� 3 - 1983 to 1984 (serial number 35DM8): These were fitted onto SD1 and some Range � Rovers. They have the amplifier and coil fitted together on the fender-well and will � never suffer from overheating. They are probably the best system coming from a � carbureted donor car.�
� 4- 1985 and later Range Rover (serial number 35DLM8): Has a black amplifier fixed � onto the outside of the distributor body. Better than the 35DE8, but the "black box" � is not well ventilated and is temperature sensitive.�
� These different types were fitted to carbureted engines, to injected engines, to 3.5, � to 3.9. Having said that, it's easy to understand that Lucas offered a lot more than � just 9 specific curve settings. Which is the right one? Some "rules" to follow:�
� 1 - Avoid those models calibrated for injected engines. They have a very large curve. � So, to get the 32/34 required degrees over 3000-4000 rpm, the advance at idle must be � clamped at 0 to 3 degrees!�
� 2 - Never fit a "points" coil to an electronic distributor and vice-versa.�
� 3 - Always check the height of the rotor in its working position. The rotors all seem � to be the same size, but Lucas made two types of wells. Consequently, the rotors can � sit high or low. It is imperative to match shallow caps with lowered rotors (deepest � wells), and the deepest caps with shallow wells.�
��
�
� So, it is not easy to select the best distributor, and the worries really start with � an upgraded camshaft. A higher vacuum inside the inlet manifold changes the vacuum � advance unit's reactions. That is the reason why the Edelbrock-Weber comes in one of � two ways: a timed vacuum port and a full time vacuum port. On a Rover, equipped with � a 50232 cam, the vacuum can exceed 10'' Hg, which is enough to damage the unit! Timed � or not, my vacuum Lucas never liked my four barrel Weber.�
�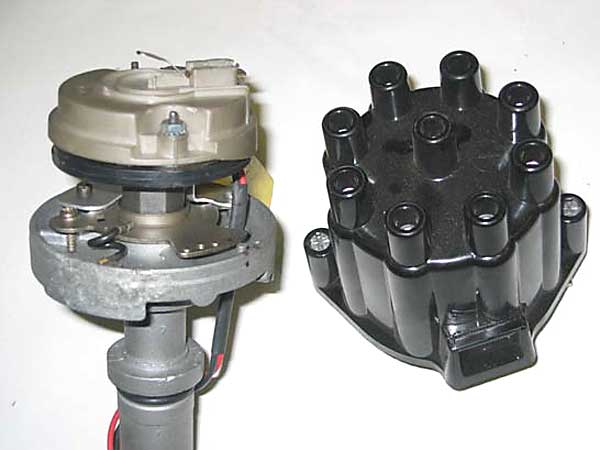
� Photo 2: Buick distributor fitted with Pertronix ignition module �
�
�
�
� 1 - The early single point (serial number 35D8): Most come from a 3500 P6 and can � produce erratic spark timing and poor power, but no more than any other old single � point. The vacuum systems often suffer from wear (the rubber diaphragm can degrade) � and must be changed. If the mechanical portion is not tired, they may be reliably � upgraded with one of the many add-on electronic ignition kits.�
� 2 - About 1976 to 1982 (serial number 35DE8): This one is the bad boy of the company; � he is internally amplified and is impossible to repair, or to upgrade. In addition, � he's very sensitive to temperature changes. If you have tachometer problems, this � distributor is probably responsible.�
� 3 - 1983 to 1984 (serial number 35DM8): These were fitted onto SD1 and some Range � Rovers. They have the amplifier and coil fitted together on the fender-well and will � never suffer from overheating. They are probably the best system coming from a � carbureted donor car.�
� 4- 1985 and later Range Rover (serial number 35DLM8): Has a black amplifier fixed � onto the outside of the distributor body. Better than the 35DE8, but the "black box" � is not well ventilated and is temperature sensitive.�
� These different types were fitted to carbureted engines, to injected engines, to 3.5, � to 3.9. Having said that, it's easy to understand that Lucas offered a lot more than � just 9 specific curve settings. Which is the right one? Some "rules" to follow:�
� 1 - Avoid those models calibrated for injected engines. They have a very large curve. � So, to get the 32/34 required degrees over 3000-4000 rpm, the advance at idle must be � clamped at 0 to 3 degrees!�
� 2 - Never fit a "points" coil to an electronic distributor and vice-versa.�
� 3 - Always check the height of the rotor in its working position. The rotors all seem � to be the same size, but Lucas made two types of wells. Consequently, the rotors can � sit high or low. It is imperative to match shallow caps with lowered rotors (deepest � wells), and the deepest caps with shallow wells.�
�
| �
Enjoying this article? Our magazine is funded through the generous support of readers like you! � To contribute to our operating budget, please click here and follow the instructions. � (Suggested contribution is twenty bucks per year. Feel free to give more!)� |
� So, it is not easy to select the best distributor, and the worries really start with � an upgraded camshaft. A higher vacuum inside the inlet manifold changes the vacuum � advance unit's reactions. That is the reason why the Edelbrock-Weber comes in one of � two ways: a timed vacuum port and a full time vacuum port. On a Rover, equipped with � a 50232 cam, the vacuum can exceed 10'' Hg, which is enough to damage the unit! Timed � or not, my vacuum Lucas never liked my four barrel Weber.�
�
� Photo 2: Buick distributor fitted with Pertronix ignition module �
�
�
Later on, I decided to fit 4 x 45 DCOE Webers to a 4.0 Rover. One more time the question �
of appropriate advance came up. And the challenge really began with the installation of �
a mechanical, dual point Mallory. Poor performance, points troubles, 3 burned condensers �
a week! Some observation and tuning and as result, I got something like a so-so Lucas. �
No more. A new Buick-Pertronix from D&D was a must. Simple and efficient? Yes it is! �
But fitted without any vacuum (removed) I encountered a new difficulty. The Rover �
engine advance curve needs a 24 degree range of advance: from 6 degrees at 600rpm and �
8 to 12 degrees at 1000RPM to 30-34 degrees at 4000RPM and over, according to the needs �
of the camshaft, compression ratio etc. My new Pertronix-converted Delco only gave a �
range of 15 degrees!�
�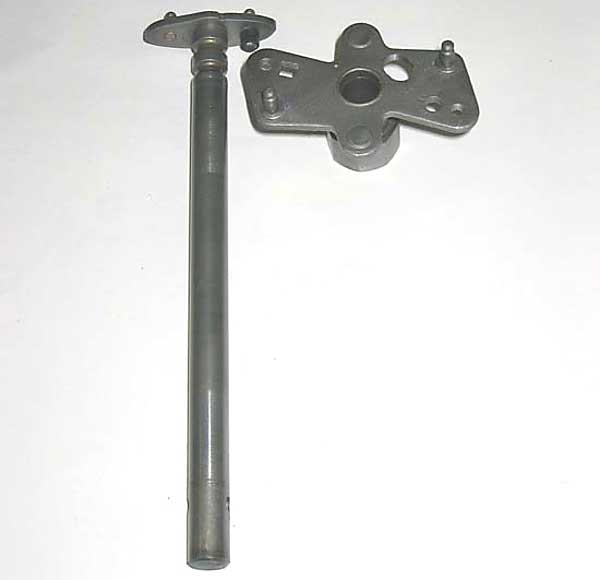
� Photo 3: Axle and Butterfly Plate�
�
�
�
�
� Photo 3: Axle and Butterfly Plate�
�
�
The answer to the problem is easy:�
� 1 - Remove the distributor and all internal components to get the main axle in your hand. � The travel of the "butterfly" plate is restricted with a rubber protected dowel which � consequently reduces the ignition timing range. Note: The rubber protection is the first � thing to check on any old distributor.�
� 2 - The axle is topped by a removable plate.�
� 3 - Have a look at the oval hole drilled in the small plate.�
� 4 - This hole must be lengthened by .020", probably a little bit more. Be careful: � if you mill too much, you will be obliged to braze a drop of copper to reduce the � incision's length.�
� 5 - Having carefully performed the above surgery, reassemble and check your advance � using a timing lamp. If there is not enough advance gain, remove all the parts and � mill again. It's empirical, but the only way without expensive tools.�
� 6 - In the quest of the best advance management, it may be advisable to buy a cheap � Summit G5212 kit. �
� Disclaimer: This page was researched and written by Jean Monford. Views expressed � are those of the author, and are provided without warrantee or guarantee. Apply at your � own risk.�
�
�
� 1 - Remove the distributor and all internal components to get the main axle in your hand. � The travel of the "butterfly" plate is restricted with a rubber protected dowel which � consequently reduces the ignition timing range. Note: The rubber protection is the first � thing to check on any old distributor.�
� 2 - The axle is topped by a removable plate.�
� 3 - Have a look at the oval hole drilled in the small plate.�
� 4 - This hole must be lengthened by .020", probably a little bit more. Be careful: � if you mill too much, you will be obliged to braze a drop of copper to reduce the � incision's length.�
� 5 - Having carefully performed the above surgery, reassemble and check your advance � using a timing lamp. If there is not enough advance gain, remove all the parts and � mill again. It's empirical, but the only way without expensive tools.�
� 6 - In the quest of the best advance management, it may be advisable to buy a cheap � Summit G5212 kit. �
� Disclaimer: This page was researched and written by Jean Monford. Views expressed � are those of the author, and are provided without warrantee or guarantee. Apply at your � own risk.�
