
�
� by: Dale Spooner�
� Time to get those Rover heads reconditioned? An essential part of any valve job is to replace � worn guides and there is an option to replacing the OE guides that you may not be aware of. � And for several reasons it is a much more desirable alternative. This is certainly not a new � process but one that definitely results in a better product, particularly on Rover heads. Most � multivalve foreign heads and, oddly enough, Rover, employ manufacturing techniques that make � guide replacement an adventure for automotive machinists, me being one of them.�
�
�
�
�
�
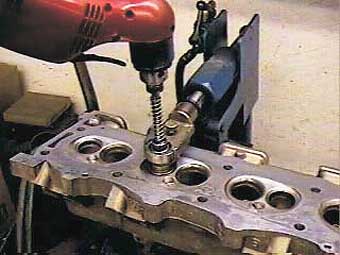
Rover head set up in the K-Line valve guide boring machine.�
Rover Valve Guide Options
� This article appeared in The British V8 Newsletter - Volume XII, Issue 1 - January 2004�� by: Dale Spooner�
� Time to get those Rover heads reconditioned? An essential part of any valve job is to replace � worn guides and there is an option to replacing the OE guides that you may not be aware of. � And for several reasons it is a much more desirable alternative. This is certainly not a new � process but one that definitely results in a better product, particularly on Rover heads. Most � multivalve foreign heads and, oddly enough, Rover, employ manufacturing techniques that make � guide replacement an adventure for automotive machinists, me being one of them.�
�
�
When the heads are produced, the guides are installed in the heads with an unfinished ID. �
The guide is then finish bored or reamed in the heads and the valve seat is cut in one �
machining operation. The problem with this process is that you now have a valve guide with �
an ID that is not necessarily on the same centerline as the OD. This matters not until the �
day some poor unsuspecting machinist drives out the old guides and replaces them with �
concentric finished ID guides. When he comes to machine the valve seats he discover that the �
guide/seat alignment has been drastically affected. His only choice now is to sink the seats �
until they clean up (highly undesirable) or machine for oversize seats and start over (highly �
expensive). All heads that are produced with this method experience this problem when the �
guides are replaced. The fix for this is to leave the OE guides in place and reline them �
with a thin wall bronze liner. Besides giving the benefit of a better bearing surface for �
the valve, the valve seat alignment is unaffected because the liner is installed using the �
valve seat and the original guide ID of the guide as a centering reference. This is realized �
only if the heads are done on equipment designed for this purpose.�
� The company that has the best setup for this is K-Line and their system works very well. � Photo 1 shows a Rover head set up in their fixture. A bronze liner, a boring/reaming tool and a � sizing broach are shown in Photo 2. �
��
�
� After a seat centering adapter is air clamped in the fixture the boring/reaming tool is run � through the guide, machining it to 0.030" oversize so as to accept the liner. The liner is then � installed and the appropriate sizing broach is driven through the liner, burnishing the guide � ID and bringing it close to finish size. A valve guide bore gauge (Photo 3) should be used to � measure the actual valve stem clearance. I always finish guide ID's with a Sunnen guide hone � (Photo 4). Leaving 0.0005" of material to hone gives a perfectly round and straight hole with a � superior finish. Now that the guides have been renewed by this method the seat alignment has � not changed and machining the seats will result in minimal material removal. �
��
�
Photo 5 shows a seat touched by just a 45 degree stone (shiny area) and you can see how the valve �
seat location did not change. By not lowering the seat depths the valves remain unshrouded, no �
loss of spring installed height and no negative effect on rocker geometry. I do machine work for �
the local Rover dealer and was replacing many valve guides and valves supplied by them. They were �
experiencing a valve seizing problem, even on low mileage cars. The OE replacement guides that were �
being sent were 0.030" under on the ID. This was my first clue that the heads were produced using �
the aforementioned method. �
� I did a couple sets of heads with their parts but then after considerable protest by me I convinced � the rep to let me reline them instead to save them money and to save me time and frustration. I am � not a Rover/Buick/Olds expert by any stretch so I do not know which heads are affected by this new � process of manufacture. I suspect it is mostly late model Rovers and not any GM heads.�
�
�
�
� The company that has the best setup for this is K-Line and their system works very well. � Photo 1 shows a Rover head set up in their fixture. A bronze liner, a boring/reaming tool and a � sizing broach are shown in Photo 2. �
�
| �
Enjoying this article? Our magazine is funded through the generous support of readers like you! � To contribute to our operating budget, please click here and follow the instructions. � (Suggested contribution is twenty bucks per year. Feel free to give more!)� |
� After a seat centering adapter is air clamped in the fixture the boring/reaming tool is run � through the guide, machining it to 0.030" oversize so as to accept the liner. The liner is then � installed and the appropriate sizing broach is driven through the liner, burnishing the guide � ID and bringing it close to finish size. A valve guide bore gauge (Photo 3) should be used to � measure the actual valve stem clearance. I always finish guide ID's with a Sunnen guide hone � (Photo 4). Leaving 0.0005" of material to hone gives a perfectly round and straight hole with a � superior finish. Now that the guides have been renewed by this method the seat alignment has � not changed and machining the seats will result in minimal material removal. �
�
�
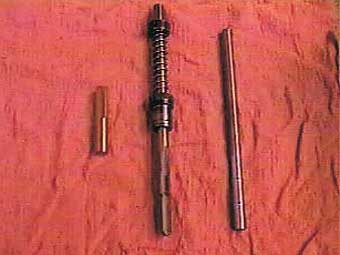 � K-Line boring/reaming tool, sizing broach, shown alongside a bronze liner. � | �
� | �
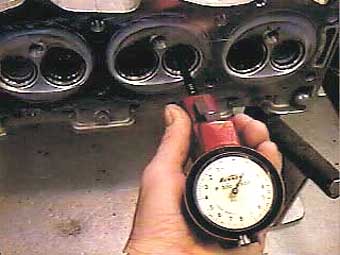 � Measuring valve guide/valve stem clearance using a valve guide bore gauge. � | �
�
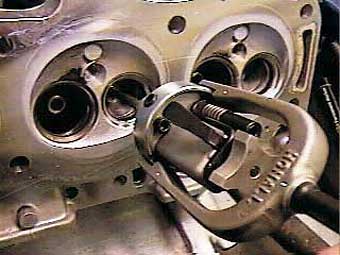 � Finishing the valve guide ID using a Sunnen valve guide hone. � | �
� | �
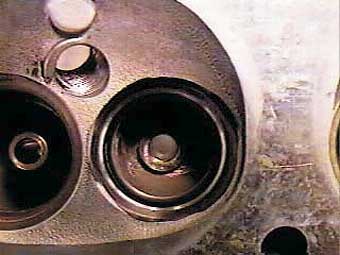 � This valve seat has been just touched with a 45 degree stone. The shiny area shows that the seat hasn't changed. � | �
� I did a couple sets of heads with their parts but then after considerable protest by me I convinced � the rep to let me reline them instead to save them money and to save me time and frustration. I am � not a Rover/Buick/Olds expert by any stretch so I do not know which heads are affected by this new � process of manufacture. I suspect it is mostly late model Rovers and not any GM heads.�
�
�
On a related topic, Rover also had problems in the mid '90's with valve seals losing their press fit �
on the guides and coming off, allowing excess oil down the guides. Once again my local Rover dealer �
would send me heads with all new replacement guides to remedy the problem. Obviously I was motivated �
to not change any guides if at all possible, so after a little research I discovered that the problem �
was actually that the diameter of the guide where the seal goes was machined too big, not too small �
as they suspected. The Rover spec is .495", the defective guides averaged about .510", providing too �
much press fit and distorting the seals on installation.�
� After some more research I found that the seal Rover uses is the exact seal that Comp Cams also sells � (a German seal, go figure). However Comp calls for a guide diameter of 0.485", not 0.495". The easy � fix on these heads is to leave the defective guides in the heads and cut them with Comps 0.485" cutter, � again saving me time and Rover warranty money. This seal problem was limited to a small number of heads � (I did 4 sets I think) so it is unlikely that most people would ever see it, but I thought it worth � mentioning.�
�
�
�
� After some more research I found that the seal Rover uses is the exact seal that Comp Cams also sells � (a German seal, go figure). However Comp calls for a guide diameter of 0.485", not 0.495". The easy � fix on these heads is to leave the defective guides in the heads and cut them with Comps 0.485" cutter, � again saving me time and Rover warranty money. This seal problem was limited to a small number of heads � (I did 4 sets I think) so it is unlikely that most people would ever see it, but I thought it worth � mentioning.�
�
�
So when the time comes to freshen your heads talk to your local shops and find one that understands �
the problem and has the right equipment to do the job. Like I always say sometimes, do it right or �
do it twice, do it right or do it right-away, and tight ain't right.�
� Disclaimer: This page was researched and written by Dale Spooner. Views expressed � are those of the author, and are provided without warrantee or guarantee. Apply at your � own risk.�
�
�
� Disclaimer: This page was researched and written by Dale Spooner. Views expressed � are those of the author, and are provided without warrantee or guarantee. Apply at your � own risk.�
