
 �
�
�
Rob Ficalora's MGB V8 Project - Progress Report
� The British V8 Newsletter, Volume XV Issue 3, December 2007�� by: Rob Ficalora�
�
�
I've been working on this project for about 18 months now, and I thought I'd share �
where I am. You might think I'd be further along, but a typical work pattern is a �
few hours work one day, then none or maybe an hour here or there for a few weeks �
due to work and family focus.�
�
The basics - my project is a Ford 302 (5.0L) / T5 swap into a rubber bumper ('76) MGB. �
�
Additional features include:�

- �
- Fast Cars IFS (by Ted Lathrop) �
- Todd Budde IRS �
- A/C (with evaporator hidden behind the dash) �
- Early style metal dash conversion �
- Chrome bumper conversion on the front �
- Sebring valance and early style tail lights on the rear �
- Dodge Omni fender flares, front and rear �
�
Engine - Ford Racing 302 Crate motor (M-6007-XB3) purchased via eBay but from �
a local Houston body shop (so I was able to go look at it before bidding on it). The motor �
was purchased for a T-Bird project they had, but the customer ran out of money so they were �
selling off all the stuff they'd not used already.�
�
Getting the engine set up was the most difficult part of the project so far - not �
because there wasn't a proven solution, but because I screwed up when placing the �
motor. A "normal" 302 installation requires modifying the front suspension crossmember �
but no firewall modifications. Doing it that way, which I did initially, didn't leave �
enough room for the alternator and A/C brackets I wanted to use, and I couldn't find �
any suitable alternative brackets (suitable to me meant chrome or polished with the �
accessories positioned where they'd fit). So, I moved the motor back and modified the �
firewall as follows:�
 �
�
�
�
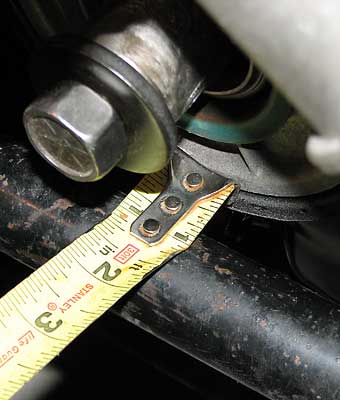
I got the clearance I needed for the accessories at the front, but I mis-measured and �
the net result was that the harmonic balancer landed in interference with the steering �
rack, rather than slightly behind the rack where I wanted it. I didn't want to move �
the motor any further back (didn't want to eat up driver side pedal space in particular). �
I researched modifying the cross member to move the steering rack, but wasn't confident �
enough that I wouldn't introduce bump steer or other problems, so I punted and bought �
Ted's front end. I'll admit it is very nice, but was also way more money than I wanted �
to spend.�
�
Transmission - T5 from a SN95 ('94/95) V8 Mustang. This tranny is about an inch �
longer than the normal Mustang T5 which helps align the shifter right at the stock MG �
hole. The shift fork is also rotated lower so there's more room to mount and get at the �
slave cylinder. Gears are as follows:�
| 1st | 2nd | 3rd | 4th | 5th |
| 3.35 | 1.99 | 1.33 | 1.00 | 0.68 |
�
 �
�
�
�
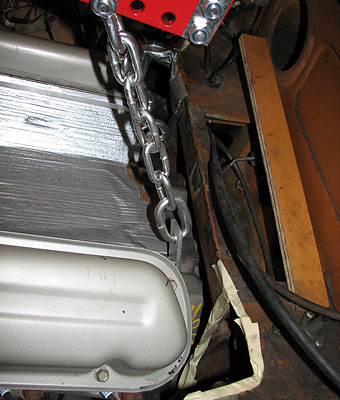
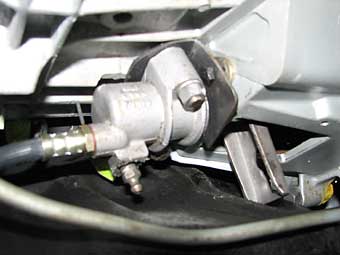
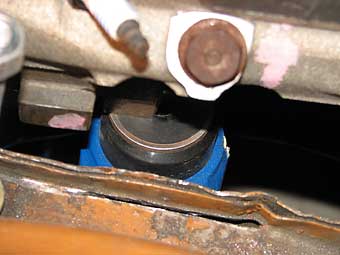
The first picture above is from Leonard Marshall's car (with a regular T5), but it shows how �
the slave mounts. Once verified to be working, the fork is cut off and a simple plate is �
mounted over the access hole as a dirt shield. (Note: Leonard didn't mention any problem �
bleeding his clutch, but I think I'll try to mount mine with the bleeder valve pointed more �
upwards).�
�
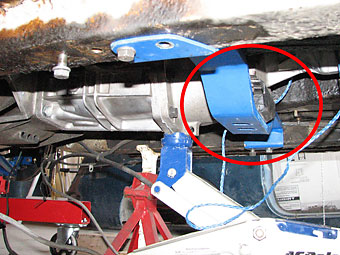
As shown in the second picture, I'll have to modify the transmission crossmember that I got �
from Ted with the 302 mount option on his IFS. Because my tranny is a bit longer than what �
he uses, I'll need to weld some metal on at the edge and lengthen the holes. I haven't done �
it yet, but it should be an easy fix, although looking at the picture I think I'll cut off �
the flanges that mount to the rails and replace them with longer ones rather than modifying �
the area where the transmission mount is.�
 �
�
�
�
Rear end - Once again, I opted for the hard way. Spending time on this slowed my project, �
but it will add "cool factor" if nothing else. Rear end is a custom developed unit designed and �
built by Todd Budde of Custom Rod Works. I have what Todd calls his "Generation II" unit, and �
Todd worked with me to modify his basic design to support the wider track and 5 x 4.75" lug �
pattern I preferred. (Custom Rod Works is now offering a Gen-III design. Custom work is their �
specialty, so special versions of their IRS are no problem.)�
�
Here are some of the specifics:�
- �
- JDM (Japanese Domestic Market) 1996 Nissan Skyline limited slip differential � (3.31:1 gears, although I may swap this for a differential with 3.54 gears; � we'll see.) Note that this solution uses the same CV joints as a 1994 Infinity � J30, and that it's also compatible with any Nissan R200S differential. �
- Halfshafts are from the Nissan Skyline, re-splined at outer end to match '88-97 S-10 4x4. �
- Outer CV yokes and hubs are '88-97 S-10 4x4 (non-ABS version). �
- Rotors are from an '88 Corvette. �
- Calipers/outer brake parts are '94 Camaro Z28. �
- Bushings are "Pete & Jakes" heavy-duty black urethane. �
- Hub-to-hub width is 54 1/4", which is quite wide (probably an inch or two � wider than I should've had them make it.) �
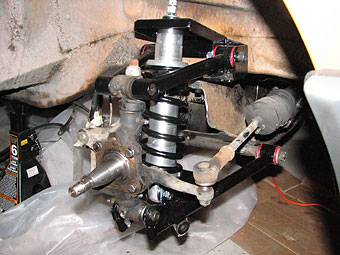
� The picture above is from one of the test fittings. The unit bolts into the stock MGB � shock mount points at the top and the front MGB spring perches at the front. Todd modified � the upper shock mount and added a battery holder after this photo was taken. The second � picture shows those changes. Final product was powder coated and is ready for installation.�
�
�
 �
�
�
�
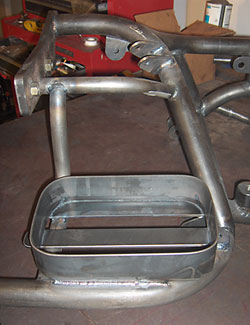
Front End - I started with Bill Guzman's coil over and Wilwood "big brake" kit, �
which I really liked. Here are some pictures showing that kit installed on my 302 �
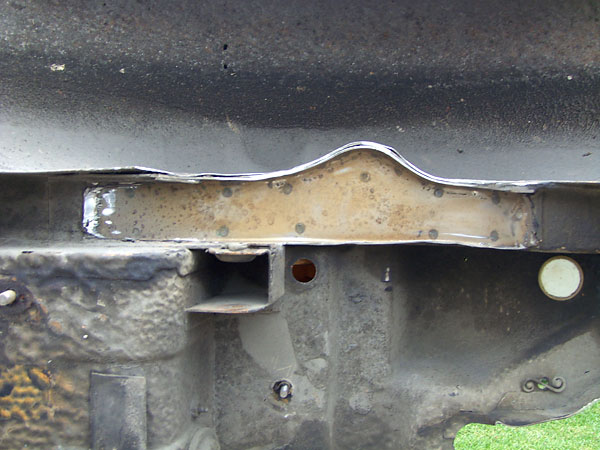
modified cross member. The first picture shows the cross member modification to clear �
the Ford 302 oil pan. �
�
Essentially, the section shown above is cut out; about 1 1/2" has been cut off the �
bottom of the removed piece, then it's welded back in with 1/4" plate on the sides. �
My brother-in-law is a professional welder and he did this welding for me since it �
is an important structural piece. �
�
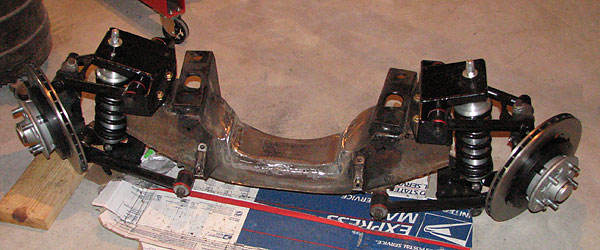
Second picture shows Bill's kit installed on the cross member; �
�
As noted above, after getting this suspension completed (even cleaned and painted it), �
I moved the motor further back and ran into clearance problems with the steering rack. �
I got great advice for how to modify the rack mounting location down, flip the tie rod �
mounts over, etc., but frankly, that intimidated me, so I punted at that point and �
bought Ted's front end. I've since sold Bill's coil over and brake kits, but I'd �
recommend them to anyone. They were very well thought out and had excellent fit and �
finish. I do still have the modified cross member if anyone is interested.�
 �
�
�
�
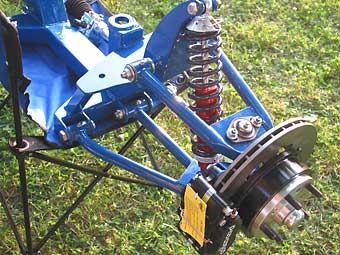
Here's what Ted's IFS looks like. I decided to bite the bullet and get the optional �
Ford motor mount option. At the time I was thinking that I'd have time to finish the �
car pretty quickly. �
�
Body Mods - I've done a bunch of body mods - none of them required for the �
engine swap but driven by my choices around the following:�
- �
- where to place the motor and radiator to make room for polished front engine � accessories (alternator, A/C compressor, etc.) �
- swapping the front bumper for a chrome one. (There's plenty published on that, � so I haven't included it here, plus I apparently don't have any pictures of what I did � there.) �
- swapping the dash for an early metal one, and putting the A/C evaporator behind it. �
 �
�
�
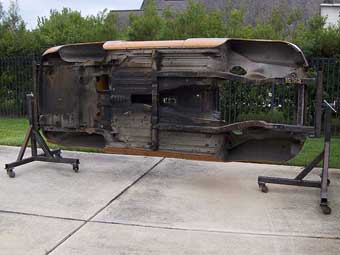
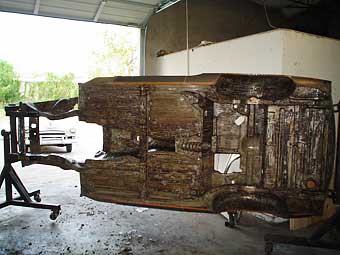
� Before starting the extensive body mods though... I built a rotisserie. It's a really simple one, � but it works just fine, and it was a project my 11 year old could help with which really excited � him. He did about half of the welds on it! I used the rotisserie to flip the car over to weld up � the under side of things I'd not been able to easily do with the car on stands. �
��
Enjoying this article? Our magazine is funded through the generous support of readers like you!
�
To contribute to our operating budget, please click here and follow the instructions.
�
(Suggested contribution is twenty bucks per year. Feel free to give more!)�
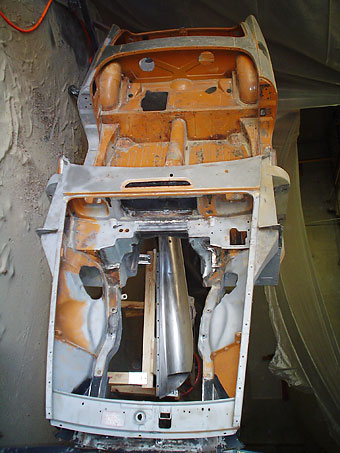
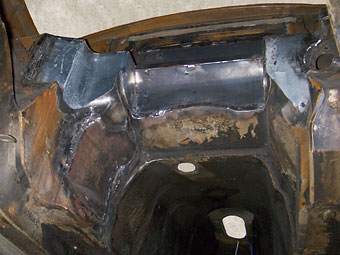
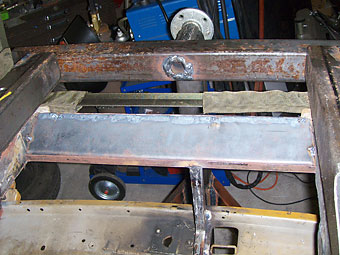
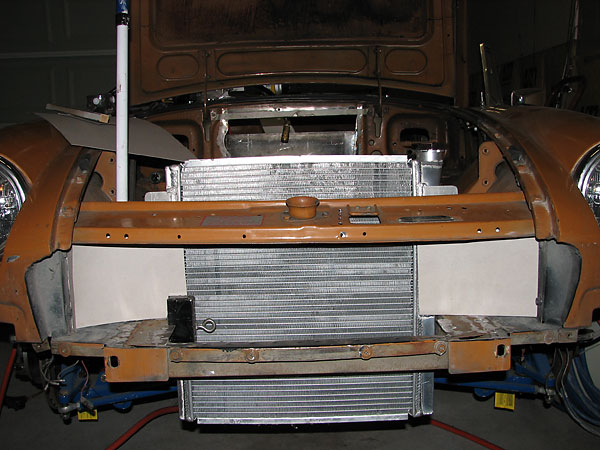
� The changes to the engine bay were the most extensive. I modified the firewall as noted � above. I also modified the panel that the oil cooler normally goes on and made a new � support for the slam panel so the radiator could go right up against the slam panel with � the A/C condensor in front of it. �
� �
�
�
� This shows the firewall modifications while "in progress". The changes on the left/right � are to provide clearance for the cylinder heads with the motor moved back. The heater shelf � mod is not required for the motor to fit. I did it simply to provide a bit of an air gap at � the back of the motor to help get hot air out of the engine bay. I also did a mod to the � frame rails that gives a little room on each side of the motor block. Again, this is only � needed if you push the motor back and down a little compared to where it goes with early � Comet motor mounts.�
� �
�
�
 �
�
�
�
� And, here are the oil cooler shelf and slam panel support changes for the radiator. I used � 16 gauge for this to help ensure rigidity.�
�
�
�
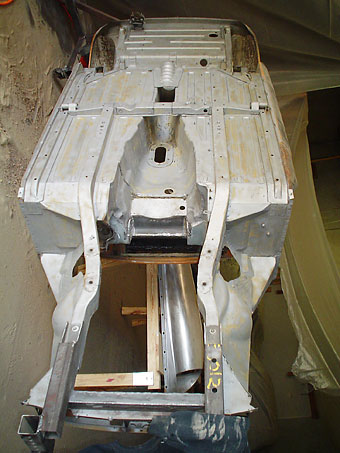
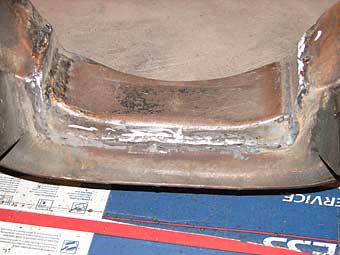
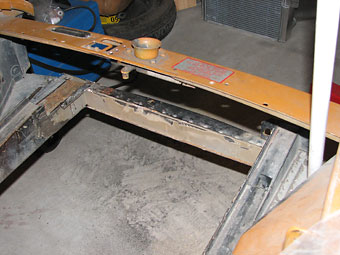
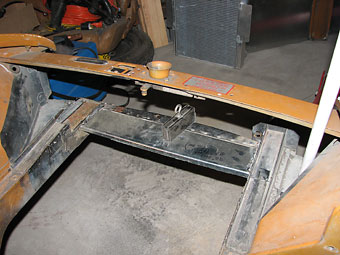
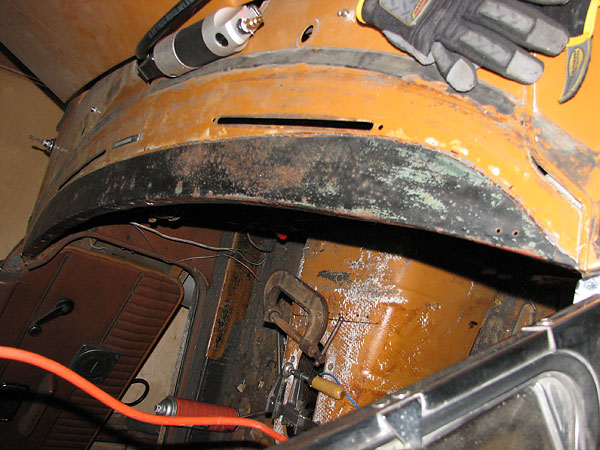
At the rear suspension, I made two modifications. First, I cut out the extra inch or so �
where the bump stops are. MG added that piece when the rubber bumper cars were raised up. �
Since my car will be at CB height, removing that piece gives the rear suspension the full �
travel. I'm going to weld up the seams to keep moisture out and still have to put the �
bump stops back on but the picture above shows the current status. �
�
The 2nd change is to make changing the shocks on the IRS possible. Todd used his GT as �
the development mule, and he didn't realize that the shelf behind the seats on the �
roadster is lower than the shelf on a GT. The upper shock mounts are too close to the �
bottom of that shelf for the bolt to come out unless they're installed with the head �
down and even then, there's precious little room to get a wrench on the nut. To accommodate �
this, I'm making access holes (and covers) for access from above.�
�
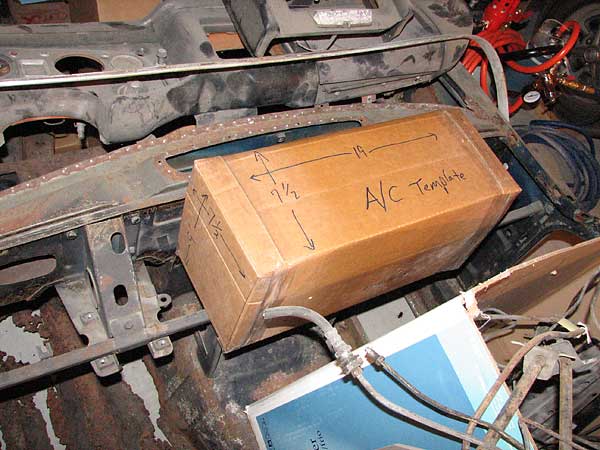
Dash swap and A/C evaporator - I started trying to figure out how to fit an �
A/C evaporator behind the dash. I did a bunch of research on the various aftermarket �
evaporator boxes and on boxes from some small cars too. A couple of production cars �
probably have boxes that would fit, but I couldn't find dimensions published anywhere �
and I didn't have the time to search salvage yards. VintageAir, SouthernAir, and HotrodAir �
all publish dimensions of their products so I focused on them. I ultimately selected �
VintageAir because everyone I talked with that used them was happy. Their Gen-II Mini �
looked like it'd fit a hair better than either of the other two company's equivalent �
sizes. (It's longer, but a hair narrower). It still wouldn't fit completely! �
�
�
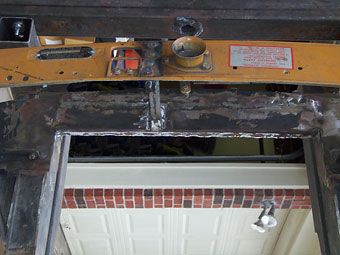
Here's a picture of a box I made to do initial mock-up using a rusted out body shell I have. �
�
The cowl is proud of the firewall by about an inch, but the evaporator box is still �
about 3/4" to 1" too wide. Plus, the '76 dash curves so that area isn't as deep as it �
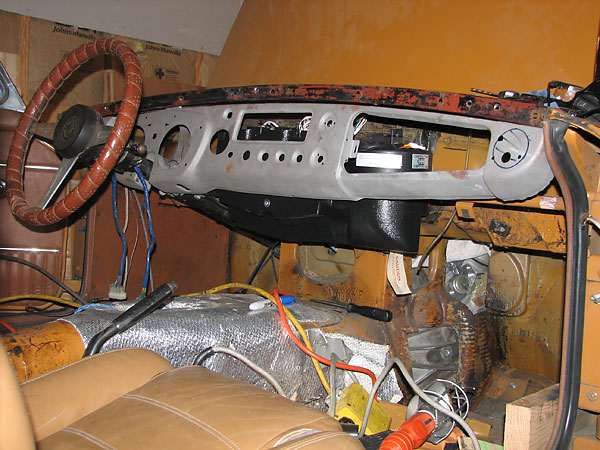
could be. About that time I came across an early metal dashboard. I used to have a '67 �
roadster and I've always liked the metal dash look. I also noticed that the metal dash �
is straighter across than the padded ones, so it gives about an extra 2" of clearance �
behind it. I decided to swap the dash over killing two birds with one stone (albeit a �
heavy "stone" as far as mods go). �
 �
�
�
�
�
If you look close, I have a new panel in the firewall behind the evaporator box. I �
initially cut that piece out, intending to install the evaporator box like Ted Lathrop �
does. Later I changed my mind for two reasons. One reason was that I decided I prefer �
to have the evaporator box better insulated from engine compartment heat. Secondly, I �
may decide to use the cowl vent for cowl induction at a later point.�
�
I still have some fabrication work to do on the body shell:�
- �
- Finish grafting in the metal dash cowl (I didn't weld it in before taking � the car to the media blaster) �
- Install some reinforcing pieces like the typical one that runs from the � forward rear spring hanger to the "frame" structure and some pieces that will help � reduce any twist, plus probably a piece or two to make jacking the side of the car � easier (I never liked the MG style jack). �
- Install the Omni flares. I was able to find a few Omni's around me and got � all the flares I could from them. This will be a big job - especially the rears which � need to be tied into the tubs. �
 �
�
�
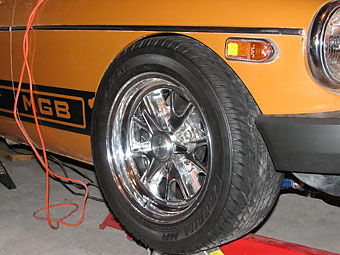
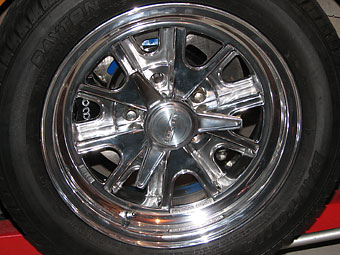
� Wheels and Tires�
�- �
- Front - 15x7, 3 1/2" backspace American Racing 427P wheels; 205/55/15 tires. � I probably could have fit 215's and they'd line up a bit better I think, but decided � to go narrower because I know they'll work (they're what Ted used on the red car on � his web site). �
- Rear - 15x8, 4 1/2" backspace American Racing 427P wheels; 225/50/15 tires. � I would really have liked 245/50/15's, but I had Todd make the IRS too wide. As it � is, I'm probably going to have to modify the Omni flares to make them about 3/4" � wider than they are - Doh! - (this is a reason to start with a tube axle that's � way easier to modify until you're sure how things are going to line up.) �
�
Then I loaded the shell on a trailer and took it to a media blaster (sand for the bottom; soda for the rest). �
�
That's it for now. Lots to do still, but I'm making progress. My goal is to have it done in time for British V8 2008 in Wisconsin!�
� Photos by Rob Ficalora for the British V8 Newsletter. All rights reserved. �
