
�
� by: Kurt Schley�
� When I built my '74 chrome bumper MGB V8 conversion about 10 years ago, it was � on even less than a shoe-string budget. I assembled the least expensive cooling � system that I believed would still do the job. The goal was to use a stock MG � radiator, without modifications. This would both keep the original installation � costs down, and would also make replacement easily available if a mishap occurred � on a trip. Somewhat to my surprise, the system has afforded excellent performance � for all these years. I have never experienced an overheated engine, even during � a sweltering summer afternoon stranded in a Washington DC traffic jam when other � MG V-8's were dropping by the wayside. The engine mounted fan keeps the � temperature in the correct range over most operating conditions, with the � electric back-ups only kicking on in traffic jams or if the motor is left � idling for extended periods.�
�
�
�
Kurt Schley's MGB V8 Cooling System
� This article appeared in The British V8 Newsletter - Volume X, Issue 2 - May 2002�� by: Kurt Schley�
� When I built my '74 chrome bumper MGB V8 conversion about 10 years ago, it was � on even less than a shoe-string budget. I assembled the least expensive cooling � system that I believed would still do the job. The goal was to use a stock MG � radiator, without modifications. This would both keep the original installation � costs down, and would also make replacement easily available if a mishap occurred � on a trip. Somewhat to my surprise, the system has afforded excellent performance � for all these years. I have never experienced an overheated engine, even during � a sweltering summer afternoon stranded in a Washington DC traffic jam when other � MG V-8's were dropping by the wayside. The engine mounted fan keeps the � temperature in the correct range over most operating conditions, with the � electric back-ups only kicking on in traffic jams or if the motor is left � idling for extended periods.�
�
�
�
 �
�
�
� Here is the system:�
� Radiator - Stock 1975 MGB. Was cleaned, pressure checked and the tanks painted � before installation. There were no modifications.�
� Water Pump - Stock Buick/Olds 215, short nose A/C version�
� Thermostat Housing - Stock Buick/Olds 215�
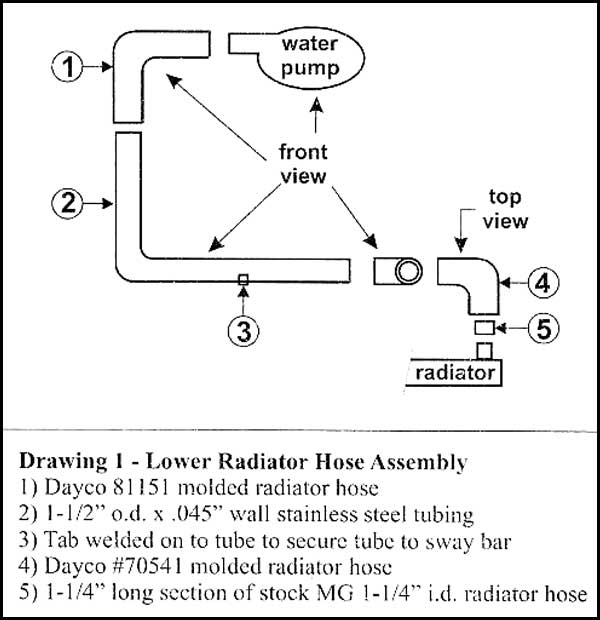
� Hoses - 1.5" molded radiator hoses per drawing 1. Where the 1.5" i.d. hoses � were fitted over the MG radiator's 1.25" o.d. inlet and outlet necks, a 1.25" � long piece of stock MG radiator hose was installed over the necks to bush them � up to match the molded hose i.d.�
� �
�
 �
�
�
�
�
�
� Here is the system:�
� Radiator - Stock 1975 MGB. Was cleaned, pressure checked and the tanks painted � before installation. There were no modifications.�
� Water Pump - Stock Buick/Olds 215, short nose A/C version�
� Thermostat Housing - Stock Buick/Olds 215�
� Hoses - 1.5" molded radiator hoses per drawing 1. Where the 1.5" i.d. hoses � were fitted over the MG radiator's 1.25" o.d. inlet and outlet necks, a 1.25" � long piece of stock MG radiator hose was installed over the necks to bush them � up to match the molded hose i.d.�
�
�
�
�
�
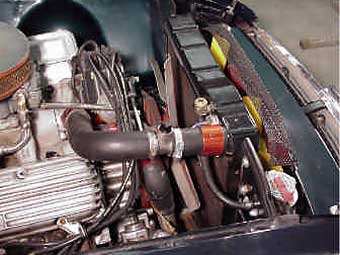
Filler Tee - To avoid air locks and to prevent air entrapment in the cooling system, �
the fill point has to be the highest point in the system. If the top of the �
radiator tank happens to be higher than the thermostat housing, a filler bung �
installed in the tank will work well. However, in my installation, the upper �
radiator hose was the highest point in the cooling system. I fabricated a �
filler tee by drilling a 0.5" diameter hole in the side of a 1.5" o.d. long �
section of stainless tubing. A stainless half coupling (female threaded pipe �
section) was then welded over the hole and a pipe plug wrapped with Teflon tape �
and installed. To fill the system I merely removed the pipe plug and slowly �
poured in the antifreeze. An easy alternative to the fabricated tee is a Moroso �
P/N 63730 top radiator hose tee with capper Photo2.�
��
 �
�
�
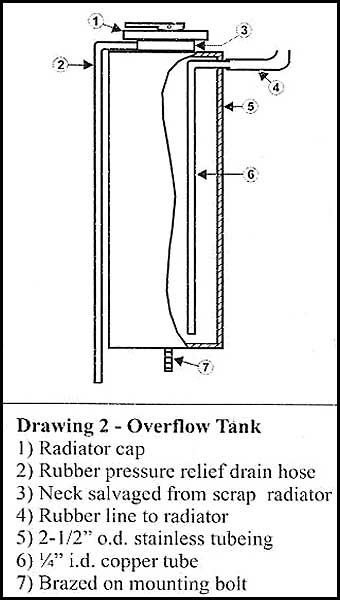
� Overflow Tank - I have a fetish about keeping the engine bay as uncluttered as possible. � Therefore I did not want to hang an overflow tank anywhere where it could be � easily seen. The solution was another fabrication per drawing 2. The tank was � installed on the passenger side and in front of the radiator support panel. � The cap is easily accessed, but the tank is pretty well hidden from view.�
� Mechanical Fan - From a swap meet, I obtained a generic aluminum aftermarket fan. The � fan diameter was a couple of inches too large and the blades interfered with � the radiator necks and the hood. After a quick measurement, a compass was used � to draw a smaller diameter on the blades. A three inch pneumatic cut-off wheel � made short work of reducing the blade length. When performing this operation, � it is imperative that the cuts are concentric and centered on the fan hub. An � out-of-round blade will quickly chew up the water pump bearings.�
��
�
� Electrical Fan - I mounted two stock late model MGB electric fans in their normal � position under the slam panel and installed an OEM mesh guard over the blades. � The fans were wired into the MG thermostatic switch mounted in the top radiator � tank using a late model MG wiring diagram and relay. The only alteration was � the addition of a toggle switch on the dash so that the fans could be turned � on manually. This was to allow triggering the fans ahead of time if a traffic � jam loomed ahead.�
� Air Ducting - When converting a chrome bumper MGB, it is usually necessary to dish � the inner fender panels to allow for header or exhaust manifold clearance. � This dishing was provided by the factory in all the rubber bumper cars. � Despite careful application of a bodyman's dishing hammer and hours of tapping, � I ended up with the proper dish depth and configuration. However, the metal � was criss-crossed with wrinkles and creases. I was afraid of laying in a � layer of Bondo, as the heat and vibration would quickly cause it to crack � and fall away.�
��
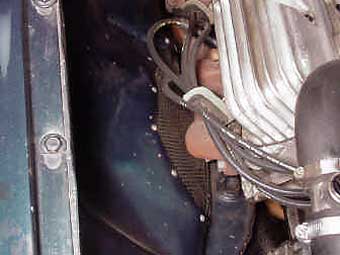
� Vented MGB Inner Fender� �
� The solution was to cut out the dish section completely, furnishing a large � duct on either side, vented into the wheel. For cosmetics and to keep small � animals from being flung onto the exhaust by the tires, I covered the openings � with flat black painted expanded aluminum grid. (Actually gutter screen!) The � grid was held in place by about 15 equally spaced aluminum pop rivets. In � actuality, the ducts appear to have been intentionally installed. (Photo3)�
�
�
�
�
�
� Overflow Tank - I have a fetish about keeping the engine bay as uncluttered as possible. � Therefore I did not want to hang an overflow tank anywhere where it could be � easily seen. The solution was another fabrication per drawing 2. The tank was � installed on the passenger side and in front of the radiator support panel. � The cap is easily accessed, but the tank is pretty well hidden from view.�
� Mechanical Fan - From a swap meet, I obtained a generic aluminum aftermarket fan. The � fan diameter was a couple of inches too large and the blades interfered with � the radiator necks and the hood. After a quick measurement, a compass was used � to draw a smaller diameter on the blades. A three inch pneumatic cut-off wheel � made short work of reducing the blade length. When performing this operation, � it is imperative that the cuts are concentric and centered on the fan hub. An � out-of-round blade will quickly chew up the water pump bearings.�
�
| �
Enjoying this article? Our magazine is funded through the generous support of readers like you! � To contribute to our operating budget, please click here and follow the instructions. � (Suggested contribution is twenty bucks per year. Feel free to give more!)� |
� Electrical Fan - I mounted two stock late model MGB electric fans in their normal � position under the slam panel and installed an OEM mesh guard over the blades. � The fans were wired into the MG thermostatic switch mounted in the top radiator � tank using a late model MG wiring diagram and relay. The only alteration was � the addition of a toggle switch on the dash so that the fans could be turned � on manually. This was to allow triggering the fans ahead of time if a traffic � jam loomed ahead.�
� Air Ducting - When converting a chrome bumper MGB, it is usually necessary to dish � the inner fender panels to allow for header or exhaust manifold clearance. � This dishing was provided by the factory in all the rubber bumper cars. � Despite careful application of a bodyman's dishing hammer and hours of tapping, � I ended up with the proper dish depth and configuration. However, the metal � was criss-crossed with wrinkles and creases. I was afraid of laying in a � layer of Bondo, as the heat and vibration would quickly cause it to crack � and fall away.�
�
� Vented MGB Inner Fender�
� The solution was to cut out the dish section completely, furnishing a large � duct on either side, vented into the wheel. For cosmetics and to keep small � animals from being flung onto the exhaust by the tires, I covered the openings � with flat black painted expanded aluminum grid. (Actually gutter screen!) The � grid was held in place by about 15 equally spaced aluminum pop rivets. In � actuality, the ducts appear to have been intentionally installed. (Photo3)�
�
�
I firmly believe that these ducts are one of the largest reasons for the �
engine running cool. With the relatively large V8, steering gear and exhaust �
headers, there is an easy flowpath for hot air to exit the engine bay. The �
ducts help considerably in allowing air to move quickly out from under the �
hood. In addition, the wheel wells are actually low pressure areas when the �
MG is underway.�
� This condition actually "vacuums" the hot under hood air through the ducts � and out of the engine bay. Several other MG V-8'ers have ducted their engine � bays in a similar manner and report significantly cooler running.�
� Disclaimer: This page was researched and written by Kurt Schley. Views expressed � are those of the author, and are provided without warrantee or guarantee. Apply at your � own risk.�
�
�
� This condition actually "vacuums" the hot under hood air through the ducts � and out of the engine bay. Several other MG V-8'ers have ducted their engine � bays in a similar manner and report significantly cooler running.�
� Disclaimer: This page was researched and written by Kurt Schley. Views expressed � are those of the author, and are provided without warrantee or guarantee. Apply at your � own risk.�
