
�
� by: Greg Myer�
� "The best laid plans of mice and men oft times go astray" A famous quote from... who was that? � Mickey Thompson? Carroll Shelby? Hmm, maybe not, it sounds olde British. Aha! Must be Cecil � Kimber! It's reassuring when the olde gray matter kicks in and comes up with the answer. �
� The phrase describes this situation, and my reasoning shows why. Just because something seems � logical, doesn't mean it's right. Take wiring, for example. Larry laid plans to come work on � his car several times. It didn't work out that way. When he finally got here, what seemed � reasonable wasn't right.�
�
�
�
BRITISH LIT. 306: Larry's '64 MGB V8, part 3
� as published in British V8 Newsletter, Volume XIII Issue 1, January 2005�� by: Greg Myer�
� "The best laid plans of mice and men oft times go astray" A famous quote from... who was that? � Mickey Thompson? Carroll Shelby? Hmm, maybe not, it sounds olde British. Aha! Must be Cecil � Kimber! It's reassuring when the olde gray matter kicks in and comes up with the answer. �
� The phrase describes this situation, and my reasoning shows why. Just because something seems � logical, doesn't mean it's right. Take wiring, for example. Larry laid plans to come work on � his car several times. It didn't work out that way. When he finally got here, what seemed � reasonable wasn't right.�
�
�
Since I'm handling the mechanical end of the swap, Larry was assigned the electrical duties. �
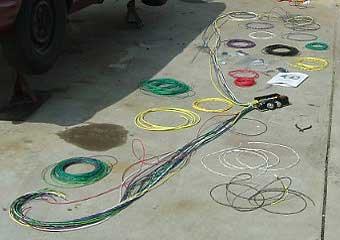
It seems his '64 MGB roadster was in dire need of a wiring update. He purchased a complete �
harness from Dan Masters in Maryville, Tenn. What he got was a beautiful work of art. The �
power board had everything you could possibly need: fuses, relays, flashers, etc. It comes �
with more than enough color coded wire to reach the far corners of the car and extra wire �
and fittings. It's just a fantastic package. It also comes with an 18 page instruction booklet.�
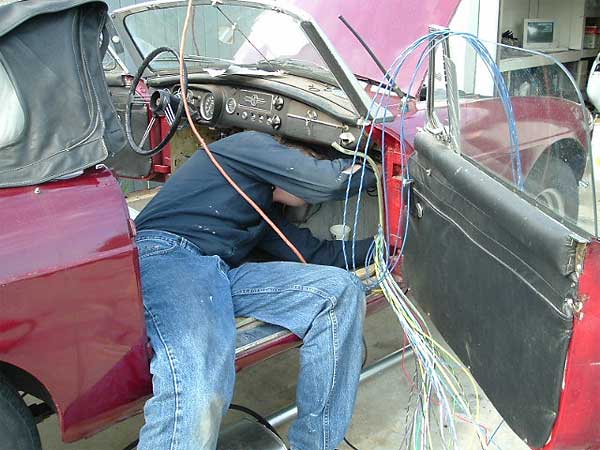
� Neither Larry nor I are electrical engineers. That being said, we're not dummies either. We � have both done some wiring in our homes and added electrical items to cars and have had no � problems. This, however, is a whole lot more! All the wiring in the car had to come out. � That's the easy part. Larry chose the passenger side kick panel as the location to hang � the power block. Good choice. It's out of harm's way and still accessible. Unfortunately, � Larry is 6' 1" tall and doesn't fit down there easily, but he's doing it. The booklet has � suggestions for several British sports cars. Reading the ENTIRE booklet takes some time. � Do it anyway! �
�
�
�
�
� Neither Larry nor I are electrical engineers. That being said, we're not dummies either. We � have both done some wiring in our homes and added electrical items to cars and have had no � problems. This, however, is a whole lot more! All the wiring in the car had to come out. � That's the easy part. Larry chose the passenger side kick panel as the location to hang � the power block. Good choice. It's out of harm's way and still accessible. Unfortunately, � Larry is 6' 1" tall and doesn't fit down there easily, but he's doing it. The booklet has � suggestions for several British sports cars. Reading the ENTIRE booklet takes some time. � Do it anyway! �
�
�
�
You need to be familiar with the wiring diagrams as well. The instructions are complete, �
but you may have some questions. Larry did. Much of the wiring was straightforward, but �
switches and relays were the sticking point. Much of the 'olde' MGB equipment has no markings �
describing what it does. The ignition switch, for example; three connections, but which one �
is for Power, ON, and Accessories? We thought we knew. We didn't. The B&M Quicksilver �
shifter has a neutral safety switch in it that needs to be wired too. �
� When we finally got that squared away and had power to the fuel pump, coil and starter...� well, you know what we had to try next. She fired right up and idled smoothly - big grins � all around! We don't have the gauges here yet, so I had an old oil pressure gauge in the � engine compartment, hooked up so we knew what was going on: 50 PSI at idle cold. It'll � drop with heat and besides, the oil we used was a bit on the heavy side for the day's � temperature. It sure was great to get the 306 lit in that little Brit.�
��
�
� The home built headers sealed fine. The wrapping and paint smoked as they heated up. The � DYNOMAX turbo mufflers controlled the sound nicely too. They are small enough to fit under � the car and still do the job. They are throaty, but not loud at idle as they are wrapped � internally with fiberglass. Larry didn't want it too loud, as the exhaust exits three and � a half feet from your ears when you are sitting in the car with the top down.�
� There was a bit more smoke than there needed to be though. The oil pressure gauge had its � plastic tube wrapped around here and there. "There" being on the wrapped header. That's � not enough insulation to keep the plastic from melting. I noticed a loss of pressure first, � but Larry saw why. Two sets of eyes when first firing an engine is a good idea. The test � session lasted about 15 minutes. Long enough to warm up the engine, look for leaks, etc. � Now we really can't wait!�
� All of this was possible because some other things had been finished up in the meantime. � I pulled the front suspension out of the car and rebuilt it. Pulling the crossmember isn't � really necessary to do this, but I had cut and welded it to allow the Ford sump to fit, � and it needed sanding and painting. Besides, when I primed the oil pump, I didn't get � consistent pressure. I use an old distributor, with the cam driven gear removed and the � top cut off, turned by a 1/2 inch drill to spin the pump to prime the motor. I was drawing � a bit of air into the system from somewhere. With the crossmember off, it was easy to pull � the pan. I had brazed the pickup tube to its flange so that it would never move. This � caused a slight warp. A few seconds with a flat file and it was good to go.�
�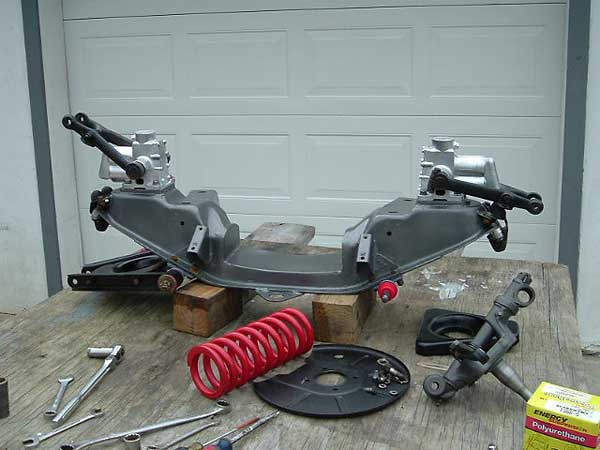
� The suspension itself was another story. It had seen 40 years of use, and more than a few � of them had passed without the proper care. One king pin was great but the other was bad. � Since I have several parts cars out behind the fence, I rounded up enough good parts to � finish the job. It also needed 2 lower A-arms as the bolt holes had become elongated. �
� Prior to this discovery, Larry had been blaming the wire wheels for the funny feeling in � the front end (and they may have been part of the problem, too). Just remember, before � you get rid of your wire wheels, rebuild the suspension first. In our case, since the � wires wouldn't take the torque of the Ford, we had already upgraded to steel wheels. Who � knows, maybe aluminum wheels are in the near future.�
� I used polyurethane bushings during the rebuild as the will help the suspension do its � job more precisely, and have the added benefit of lasting longer. The coil springs? Well � we made some calculations and still weren't exactly sure what was needed. The originals � sagged badly and would never hold the weight of the Ford. Just then, however, Barrie � Robinson in Canada advertised on the MGB-V8 e-mail list (mgb-v8@autox.team.net) that he � had a pair of springs that were too strong for his aluminum V8 project. He listed the � part # and in checking, they looked like a good place to start. (If you're not on the � list, you're missing a lot.) New Zerk fittings were installed where needed so everything � could be lubed properly. Then everything was painted and reassembled. �
� Since the car is a chrome-bumper model and sits low to start with, I installed 3/8 inch � steel shims between the frame and crossmember. This uses all the length of the bolts, but � gives us that little extra height. The rack still had to be angled down some more as the � shaft was too close to the rear spark plug. All of that is back together, but the column � isn't quite finished.�
�
�
�
� When we finally got that squared away and had power to the fuel pump, coil and starter...� well, you know what we had to try next. She fired right up and idled smoothly - big grins � all around! We don't have the gauges here yet, so I had an old oil pressure gauge in the � engine compartment, hooked up so we knew what was going on: 50 PSI at idle cold. It'll � drop with heat and besides, the oil we used was a bit on the heavy side for the day's � temperature. It sure was great to get the 306 lit in that little Brit.�
�
| �
Enjoying this article? Our magazine is funded through the generous support of readers like you! � To contribute to our operating budget, please click here and follow the instructions. � (Suggested contribution is twenty bucks per year. Feel free to give more!)� |
� The home built headers sealed fine. The wrapping and paint smoked as they heated up. The � DYNOMAX turbo mufflers controlled the sound nicely too. They are small enough to fit under � the car and still do the job. They are throaty, but not loud at idle as they are wrapped � internally with fiberglass. Larry didn't want it too loud, as the exhaust exits three and � a half feet from your ears when you are sitting in the car with the top down.�
� There was a bit more smoke than there needed to be though. The oil pressure gauge had its � plastic tube wrapped around here and there. "There" being on the wrapped header. That's � not enough insulation to keep the plastic from melting. I noticed a loss of pressure first, � but Larry saw why. Two sets of eyes when first firing an engine is a good idea. The test � session lasted about 15 minutes. Long enough to warm up the engine, look for leaks, etc. � Now we really can't wait!�
� All of this was possible because some other things had been finished up in the meantime. � I pulled the front suspension out of the car and rebuilt it. Pulling the crossmember isn't � really necessary to do this, but I had cut and welded it to allow the Ford sump to fit, � and it needed sanding and painting. Besides, when I primed the oil pump, I didn't get � consistent pressure. I use an old distributor, with the cam driven gear removed and the � top cut off, turned by a 1/2 inch drill to spin the pump to prime the motor. I was drawing � a bit of air into the system from somewhere. With the crossmember off, it was easy to pull � the pan. I had brazed the pickup tube to its flange so that it would never move. This � caused a slight warp. A few seconds with a flat file and it was good to go.�
�
� The suspension itself was another story. It had seen 40 years of use, and more than a few � of them had passed without the proper care. One king pin was great but the other was bad. � Since I have several parts cars out behind the fence, I rounded up enough good parts to � finish the job. It also needed 2 lower A-arms as the bolt holes had become elongated. �
� Prior to this discovery, Larry had been blaming the wire wheels for the funny feeling in � the front end (and they may have been part of the problem, too). Just remember, before � you get rid of your wire wheels, rebuild the suspension first. In our case, since the � wires wouldn't take the torque of the Ford, we had already upgraded to steel wheels. Who � knows, maybe aluminum wheels are in the near future.�
� I used polyurethane bushings during the rebuild as the will help the suspension do its � job more precisely, and have the added benefit of lasting longer. The coil springs? Well � we made some calculations and still weren't exactly sure what was needed. The originals � sagged badly and would never hold the weight of the Ford. Just then, however, Barrie � Robinson in Canada advertised on the MGB-V8 e-mail list (mgb-v8@autox.team.net) that he � had a pair of springs that were too strong for his aluminum V8 project. He listed the � part # and in checking, they looked like a good place to start. (If you're not on the � list, you're missing a lot.) New Zerk fittings were installed where needed so everything � could be lubed properly. Then everything was painted and reassembled. �
� Since the car is a chrome-bumper model and sits low to start with, I installed 3/8 inch � steel shims between the frame and crossmember. This uses all the length of the bolts, but � gives us that little extra height. The rack still had to be angled down some more as the � shaft was too close to the rear spark plug. All of that is back together, but the column � isn't quite finished.�
�
�
Having the front back in was a good feeling. Wanting to start the engine was working on �
me now. We needed fuel to the carburetor next. The gas tank was rusty and had holes in it. �
Not good. We thought of using a fuel cell. After searching high and low, we couldn't come �
up with one that would hold as much as the stock tank, without having to cut something to �
make it fit. A new replacement tank was ordered and it worked perfectly! The new fuel pump �
was hung and new steel lines run to the front. With power to the pump, gas filled the �
carburetor and overflowed. What? The carb had just been rebuilt and the lines were new. �
I pulled the top off the Edelbrock 750 to find one needle off its seat. Just a small piece �
of gunk, and I have no idea where it came from. After that everything was fine. �
�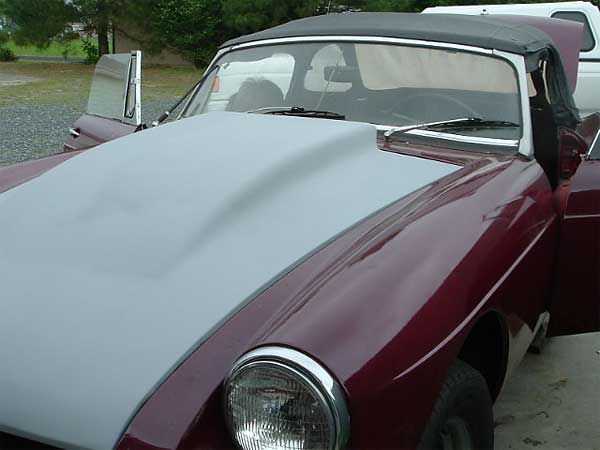
� One other item of note: the hood. The air filter wouldn't fit. Not even close! So a scoop � was obtained from Unlimited Products. It was determined that we needed one with a curve in � it. They have several. The ones for the Chevy S-10 seemed to fit the bill. We ordered # � SC-404, which is 43 inches long, 24 wide, 2 3/4 high with an inch and 5/8 curve. That � curve was a bit much. It fit perfectly at the front of the hood, but not where we needed � it. (# SC-402 might be a better fit) It was modified slightly and bonded, and then molded � in. A hole was cut in the hood for clearance first. �
�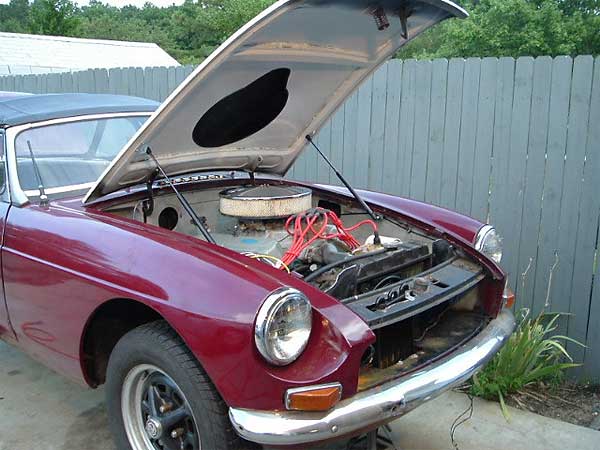
� Around the edges of the hole I used NAPA car door molding. It's quite flexible and cleans � up the sheetmetal edges nicely. It also protects the plug's wires from abrasion as they � come up rather high. Ian Pender's gas hood struts were installed and lift the hood in a � fine fashion. So that about wraps it up for another issue. The engine lit right up and � there was dancing in the driveway, but the wiring proved more difficult than expected and � a return trip with an ohm-meter is needed. "It was the best of times, it was the worst of � times." Hey, that's another British quote. Let's see....who said that? Ken Costello? Syd � Enever? I don't know, beats the Dickens out of me!�
� Disclaimer: This page was researched and written by Greg Myer. Views expressed � are those of the author, and are provided without warrantee or guarantee. Apply at your � own risk.�
�
�
�
� One other item of note: the hood. The air filter wouldn't fit. Not even close! So a scoop � was obtained from Unlimited Products. It was determined that we needed one with a curve in � it. They have several. The ones for the Chevy S-10 seemed to fit the bill. We ordered # � SC-404, which is 43 inches long, 24 wide, 2 3/4 high with an inch and 5/8 curve. That � curve was a bit much. It fit perfectly at the front of the hood, but not where we needed � it. (# SC-402 might be a better fit) It was modified slightly and bonded, and then molded � in. A hole was cut in the hood for clearance first. �
�
� Around the edges of the hole I used NAPA car door molding. It's quite flexible and cleans � up the sheetmetal edges nicely. It also protects the plug's wires from abrasion as they � come up rather high. Ian Pender's gas hood struts were installed and lift the hood in a � fine fashion. So that about wraps it up for another issue. The engine lit right up and � there was dancing in the driveway, but the wiring proved more difficult than expected and � a return trip with an ohm-meter is needed. "It was the best of times, it was the worst of � times." Hey, that's another British quote. Let's see....who said that? Ken Costello? Syd � Enever? I don't know, beats the Dickens out of me!�
� Disclaimer: This page was researched and written by Greg Myer. Views expressed � are those of the author, and are provided without warrantee or guarantee. Apply at your � own risk.�
