
�
 �
�
�
�
 �
�
� by: Greg Myer�
� Several years ago, my wife and I were entertaining friends for the weekend: Larry � and Cheri Nicholas, and their daughter Katlin. As I was working on an MGB at the � time, Larry wanted to help. He took a keen interest in my car and even more so in � one I had just traded for: A '64 MGB -- Complete! It even had the original engine, � as far as we could tell. He wanted it, so we worked out a deal. It was given a � quick paint job and a tune up. The carbs were rebuilt too. When finished, they came � to retrieve it, and he drove off into the sunset. (Literally: they live below D.C. � and we're here on the Eastern Shore.)�
� That might have been the end of the story, except that the old car kept letting � them down - often at very inopportune times. Cheri and Katlin soon tired of pushing � Larry and his little car home. Many adjustments and fixes were tried and made, but � something else always popped up. On another visit we discussed an engine swap. I � am in the process of swapping a Buick into my MGB-GT. Larry liked that and I have � an extra one under the bench. �
�
�
�
�
�
�
Larry Nicholas' '64 MGB V8, part 1
� as published in British V8 Newsletter, Volume XII Issue 2, May 2004�� by: Greg Myer�
� Several years ago, my wife and I were entertaining friends for the weekend: Larry � and Cheri Nicholas, and their daughter Katlin. As I was working on an MGB at the � time, Larry wanted to help. He took a keen interest in my car and even more so in � one I had just traded for: A '64 MGB -- Complete! It even had the original engine, � as far as we could tell. He wanted it, so we worked out a deal. It was given a � quick paint job and a tune up. The carbs were rebuilt too. When finished, they came � to retrieve it, and he drove off into the sunset. (Literally: they live below D.C. � and we're here on the Eastern Shore.)�
� That might have been the end of the story, except that the old car kept letting � them down - often at very inopportune times. Cheri and Katlin soon tired of pushing � Larry and his little car home. Many adjustments and fixes were tried and made, but � something else always popped up. On another visit we discussed an engine swap. I � am in the process of swapping a Buick into my MGB-GT. Larry liked that and I have � an extra one under the bench. �
�
�
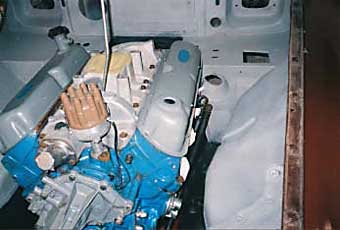
In the end he really wanted a Ford smallblock. He's a Mustang man at heart and �
always loved Cobras too. But he didn't want anything radical. Just a fresh 302 �
that would always start and keep running: easy on the ears and low maintenance, �
too. We plotted our course. We used what was at hand. I had a rebuildable 302 and �
C4 from a pickup. The car is not finished yet. It won't be for several more months. �
Larry is determined not to make this project a burden on the family. What with a �
mortgage and other family obligations, this sort of thing takes time. They come �
over and we party on the car whenever we can. In the meantime I've been getting �
lots of work done on it myself. (His car will be finished before mine. Rats!) �
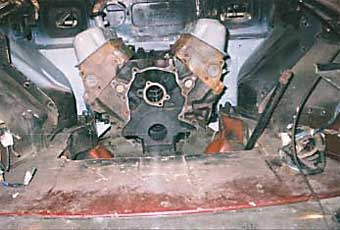
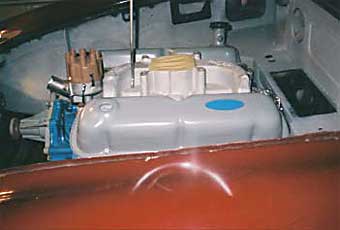
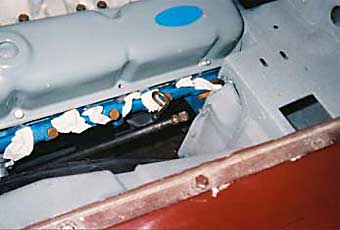
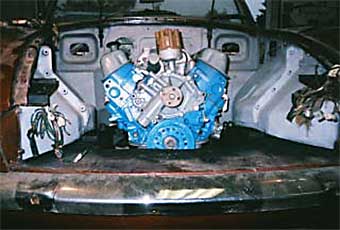
� While the motor was apart for rebuilding, I used a spare, bare block to mock up � what would be needed as far as motor mounts and clearances around the firewall and � transmission tunnel. The truck bellhousing is larger than the space available in � the car. We used it anyway. I wouldn't recommend it. Besides that, the early MGB � is much tighter in the transmission tunnel and firewall area. A lot of sheetmetal � had to be relocated. The motor mounts I chose to use are '57 Chevy units. They are � 2.25 inches in diameter and 7/8 inch thick with a 3/8 fine thread stud on each side � (NAPA p.n. 602-1061.) They cost $7.34 each. They are easy to use, and small enough � to be out of the way. I welded mounts to the frame for them. Slightly low, so I � would have space to shim one or both sides up to get the correct final fit. (How � do things change after they are welded?) The transmission mount is the stock C4 � type. I cut the MG crossmember so the mount would sit in the bottom of it.�
��
�
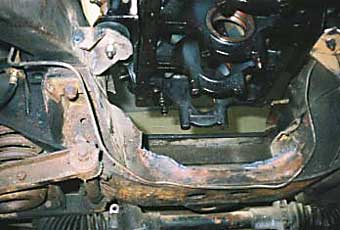
� I slotted two holes to get side to side adjustability. I bolted it back up in the � stock MGB location. This worked fine! The engine needed room at the firewall and in � the tunnel, but sits far enough forward to allow the heater to remain. The front � suspension crossmember needed massaging. A large notch was taken out and plate steel � welded in to maintain strength. This is needed to clear the oil pan. It's a Ford � rear sump unit, but since the oil pump is driven by the distributor, it's all the � way forward and can create space concerns. �
� �
�
�
�
 �
�
� �
�
�
�
 �
�
�
�
�
� While the motor was apart for rebuilding, I used a spare, bare block to mock up � what would be needed as far as motor mounts and clearances around the firewall and � transmission tunnel. The truck bellhousing is larger than the space available in � the car. We used it anyway. I wouldn't recommend it. Besides that, the early MGB � is much tighter in the transmission tunnel and firewall area. A lot of sheetmetal � had to be relocated. The motor mounts I chose to use are '57 Chevy units. They are � 2.25 inches in diameter and 7/8 inch thick with a 3/8 fine thread stud on each side � (NAPA p.n. 602-1061.) They cost $7.34 each. They are easy to use, and small enough � to be out of the way. I welded mounts to the frame for them. Slightly low, so I � would have space to shim one or both sides up to get the correct final fit. (How � do things change after they are welded?) The transmission mount is the stock C4 � type. I cut the MG crossmember so the mount would sit in the bottom of it.�
�
| �
Enjoying this article? Our magazine is funded through the generous support of readers like you! � To contribute to our operating budget, please click here and follow the instructions. � (Suggested contribution is twenty bucks per year. Feel free to give more!)� |
� I slotted two holes to get side to side adjustability. I bolted it back up in the � stock MGB location. This worked fine! The engine needed room at the firewall and in � the tunnel, but sits far enough forward to allow the heater to remain. The front � suspension crossmember needed massaging. A large notch was taken out and plate steel � welded in to maintain strength. This is needed to clear the oil pan. It's a Ford � rear sump unit, but since the oil pump is driven by the distributor, it's all the � way forward and can create space concerns. �
�
�
�
�
�
�
�
�
�
�
After several fittings, it was determined that the crossmember needed to be lowered �
slightly. This was done with 1/4 inch steel plate. There's enough extra length on �
the 4 bolts that secure the crossmember to allow for this. This had to do with the �
steering and spark plug clearance. I'm not done with it yet. All this "in and out" �
of the engine and transmission was facilitated by taking a note from Jim Stuart's �
page. I cut the slam panel out and made it removable. Jim leaves a few inches on �
each side and bolts another whole panel over it. I, however, welded tabs on the �
bottom of it and drilled some holes in the end pieces (see pictures). Both ways �
work, and can be a real time and back saver.�
� �
�
�
�
 �
�
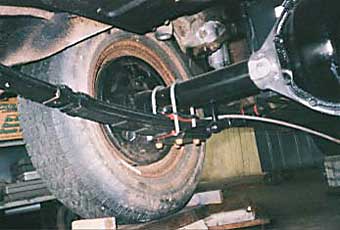
� Turning to the rear, it was quickly decided to swap out the MGB unit. It's a wire � wheel rear with 3.90 gears. Wires, with the kind of torque we're hoping to make, � won't last long. A DANA 44 from a Postal Jeep was found. It's 52 inches wide and � comes with 3.07 gears and a Posi unit. Just what the Doctor ordered, considering � the mild hydraulic cam and automatic transmission.�
� �
�
� The MG spring pads were salvaged and welded in place. The whole unit was installed � with MGB-GT 7-leaf springs on polyurethane bushings. For the time being, the stock � shocks are being used.�
�
�
�
�
�
�
�
� Turning to the rear, it was quickly decided to swap out the MGB unit. It's a wire � wheel rear with 3.90 gears. Wires, with the kind of torque we're hoping to make, � won't last long. A DANA 44 from a Postal Jeep was found. It's 52 inches wide and � comes with 3.07 gears and a Posi unit. Just what the Doctor ordered, considering � the mild hydraulic cam and automatic transmission.�
�
�
� The MG spring pads were salvaged and welded in place. The whole unit was installed � with MGB-GT 7-leaf springs on polyurethane bushings. For the time being, the stock � shocks are being used.�
�
�
This is an ongoing project. We'll document it as much as possible and keep the �
Newsletter posted. Future plans include wiring the whole car with a Dan Masters �
harness, deciding on a bolt pattern for the wheels (4 bolts in front and 5 in the �
rear right now). Front suspension rebuild and choosing springs for the increased �
weight up there. Brakes brought up to the new demands. A roll bar, and whatever else �
we find that we had no idea would need to be done.�
� The MG V-8 Newsletter, now The British V8 Newsletter, has been a great source of � information and ideas for this project. It's far more than a simple swap, but the � answers I've received from E-mail requests for more information from featured cars � has been a big help. The web-site (www.britishv8.org) with more photos and � also the mgb-v8@autox.team.net mailing list have been very helpful, too. All � this help makes this project possible. There's always an answer to whatever problem � arises.�
� The second photo shows the angle iron welded in place. As you can see, six (6) pieces � of iron were used to follow the contours of the cross-member, as opposed to the two � pieces shown in the simplified drawing. The second diagram shows the end-pieces, one � of which is welded on each end of the notch to close up the remaining gaps and help � keep the unit rigid. The third photo shows the end-pieces welded in place, all welds � ground flush with the base metal, and a coat of primer applied. So now that you have � no more excuses, get out there and start experimenting with all those cool new engines! �
� Disclaimer: This page was researched and written by Greg Myer. Views expressed � are those of the author, and are provided without warrantee or guarantee. Apply at your � own risk.�
�
�
� The MG V-8 Newsletter, now The British V8 Newsletter, has been a great source of � information and ideas for this project. It's far more than a simple swap, but the � answers I've received from E-mail requests for more information from featured cars � has been a big help. The web-site (www.britishv8.org) with more photos and � also the mgb-v8@autox.team.net mailing list have been very helpful, too. All � this help makes this project possible. There's always an answer to whatever problem � arises.�
� The second photo shows the angle iron welded in place. As you can see, six (6) pieces � of iron were used to follow the contours of the cross-member, as opposed to the two � pieces shown in the simplified drawing. The second diagram shows the end-pieces, one � of which is welded on each end of the notch to close up the remaining gaps and help � keep the unit rigid. The third photo shows the end-pieces welded in place, all welds � ground flush with the base metal, and a coat of primer applied. So now that you have � no more excuses, get out there and start experimenting with all those cool new engines! �
� Disclaimer: This page was researched and written by Greg Myer. Views expressed � are those of the author, and are provided without warrantee or guarantee. Apply at your � own risk.�
