
�
 �
�
�
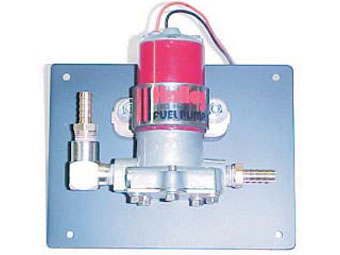
16 gauge steel fuel pump mounting bracket with rubber insulating washers (both sides) for noise reduction.�
Fuel Pump Installation
� This article appeared in The British V8 Newsletter - Volume X, Issue 1 - January 2002�� by: Dan Masters�
�
Depending on the power level of your new engine, you may be able to get by with the �
stock fuel pump. Chances are, you will want to move up to a higher capacity pump - �
what good are all those horses if you can't keep them fed?�
�
The fuel pump on my bone stock MGB GT failed last month, so I decided to replace it �
with the Holley I had on hand, which I had been saving to use when I finally got �
around to doing the V8 swap. I could have installed the new pump in the same location, �
using the same mounting details, as the factory installation, but I really didn't �
like that option. After a little head scratching, I came up with the scheme shown �
in the photos below.�
�
When I finally get around to doing the engine swap, I will also redo the fuel tank �
location (to allow dual exhaust), and reroute the fuel lines. For now, though, this �
installation required no modifications at all to the fuel lines - just slipped new �
fuel lines over the old hard lines, routed them to the new pump, and clamped the �
lines in place using standard hose clamps. I'm not saying this is the best way to �
install a pump, but it works for me.�

�
If you use a larger pump, I think this method will have definite advantages over �
most other locations. There is plenty of room for a large pump and all the fittings �
required to feed larger diameter fuel lines.�
�
If you have the rear suspension out of the car, and have the car up on jack-stands, �
installing the pump is about as easy as it gets. If you're installing it the way I �
did, with everything in place (except the rear wheel, which I did remove), here are �
a couple of tips you might find useful:�
�
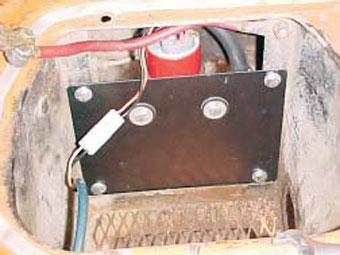
1) Make the holes in the battery box first, then hold the mounting plate up to the �
box and scribe locating marks for the matching holes in the plate. It is hard to get �
to the battery box brackets, so it is very easy to wind up with the holes slightly �
off from where you intended. The mounting plate can be drilled on your workbench, �
with a much higher degree of accuracy. By making the bracket holes first, you can �
ensure a perfect match.�
�
2) If you can, use a hole punch, rather than a drill to make the holes in the battery �
box. There isn't a lot of room for an electric drill. I have a Roper-Whitney hand �
punch that works very well for this. In fact, this punch works so well that I use it �
to punch holes in sheet metal even when I do have perfect access for a drill. The punch �
makes a clean, round hole with no burrs.�
| �
Enjoying this article? Our magazine is funded through the generous support of readers like you! � To contribute to our operating budget, please click here and follow the instructions. � (Suggested contribution is twenty bucks per year. Feel free to give more!)� |
�
3) Carefully check the location of the pump and the routing of the new fuel lines, �
to ensure there is no interference with the rear suspension. You certainly don't �
want to wear a hole in a fuel line, or crack the pump housing.�
�
There are a few options for wiring the pump: The first option is to just wire the �
pump to the existing wires. I used a two-pin connector, but that isn't necessary. �
Simple splices will do, but it will be harder to remove the pump for repairs if needed.�
�
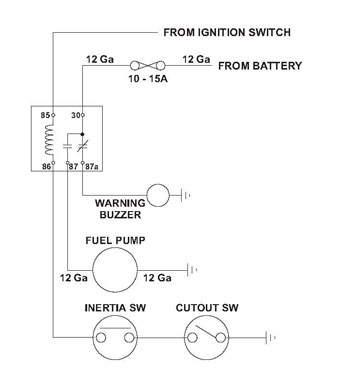
A second option is to use a relay, wired as described in the May issue article on a �
custom wiring system. A revised schematic for this is shown below, modified to work �
without the relay panel as described in that article. See the May issue for a �
description of the circuit operation.�
�
 �
�
�
�
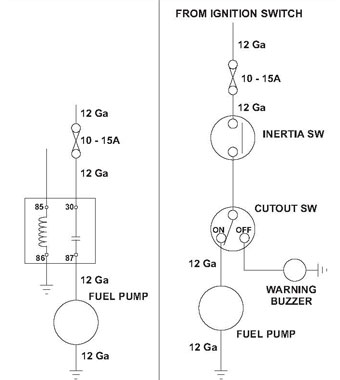
Two other options are shown in the diagrams above. The diagram in the center uses a �
relay, but has no provision for manual switching. Any time the ignition switch is �
on, the fuel pump is also on. Missing from this circuit is the inertia switch. I �
strongly recommend using an inertia switch because without one the fuel pump might �
continue to operate following an accident, and could pump a lot of gas onto the �
ground if a fuel line ruptures.�
�
The circuit on the right describes the use of an "ON - OFF" control switch, along �
with an inertia switch, but no relay. When the switch is in the "ON" position, the �
pump turns on and off with the ignition key. When the switch is in the "OFF" �
position, the pump will not operate, but the warning buzzer will sound to remind �
you that the switch is off. This switch provides a bit of theft protection. If you �
use this switch, it should be mounted out of sight, but within easy reach of the �
driver. The buzzer serves to remind you to reset the switch before driving off �
and running out of fuel. If the switch is off, the buzzer will sound as soon as �
you turn on the ignition (don't ask me how many times I've heard the buzzer in my �
car - I'm more than just a bit forgetful). �
� Except as shown, the wiring should be 14 gauge. You could probably get by with � using 14 gauge wire for all of the wiring, but you should use a pump that draws � no more than a 10 amps if you use the smaller wire. The inertia switch should � also be mounted where it's easy to reach by the driver, as you want to be able � to reset it without stopping, should it operated from the shock of hitting a � pothole in the road. In general, these inertia switched are not prone to mis-operation, � but why take a chance. If you use the wiring scheme presented on the previous page, � the warning will sound if the inertia switch should operate. If the switch is in � easy reach, you can simply reset it on the run, and not miss a lick.�
� Disclaimer: This page was researched and written by Dan Masters. Views expressed � are those of the author, and are provided without warrantee or guarantee. Apply at your � own risk.�