
�
 �
�
�
Installing an In-Tank Fuel Pump
� as published in BritishV8 Magazine, Volume XVI Issue 2, October 2008�� by: Kelly Stevenson�
�
� In this article I'll describe how we installed an in-tank fuel-pump in my MGB. � The conversion of my 1978 MGB tourer to Ford 5.0L V8 power was initially � completed in May 2005. From the beginning, my conversion featured electronic � fuel injection, but the initial installation featured an external fuel pump. � That external fuel pump worked, but there are significant advantages to moving � the fuel pump into the fuel tank. Most modern OEM installations have in-tank � fuel pumps because they're quieter. They're also usually less susceptible to � supply problems when the fuel level is low and when fuel is sloshing around � during spirited driving.�
�
�
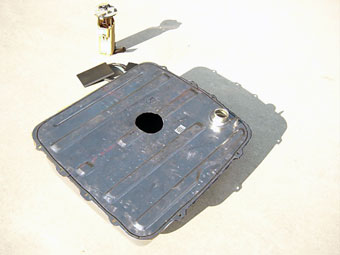
Obviously, fitting an in-tank fuel pump requires cutting into the tank. �
I suppose the traditional approach might be to cut and weld, but I believe �
it's best to start with a brand-new tank and to preserve its modern, �
corrosion-inhibiting coatings by soldering instead of by welding. �
�
After shopping around, I ordered a new "Spectra Premium" 1977-80 spec �
MGB fuel tank from an eBay merchant. The cost for the tank, including �
shipping, is about $189. (Note: 1977-80 fuel tanks are most easily �
identified by their short, straight-up, fuel-fuller inlet.) �
�
 �
�
�
�
Editor's Notes: Spectra Premium Industries' MGB fuel tanks are made in Canada �
from U.S. Steel's "Ni-Terne" material. The annealed cold-rolled steel sheet is �
first processed to apply a thin flash coating of electrodeposited nickel, �
and then it's given a hot-dip lead-tin alloy coating. The nickel base coat �
gives Ni-Terne steel an extra measure of corrosion resistance compared to U.S. �
Steel's regular "Terne" steel sheet and also compared to traditional�
galvanizing, which isn't readily available anymore. It should also be pointed �
out that the Ni-Terne coating protects both interior and exterior surfaces of �
the fuel tank from surface corrosion. �
�
Spectra Premium tanks are available directly from Moss Motors and Moss distributors. �
Moss also sells British Motor Heritage brand fuel tanks, which are more�
appropriate to use for concours restorations because they're made in England �
on original MG tooling from plain steel sheet. British Motor Heritage fuel tanks �
arrive painted black. �
�
Painting the Spectra Premium fuel tanks isn't required or even recommended. �
Per Kelvin Dodd at Moss Motors, for best paint adhesion you must clean the �
tank very, very carefully to remove the oily film that covers it. �
�
Notice: we have not measured or compared a Spectra Premium MGB fuel tank to�
determine if they provide the same or more mounting depth for an in-tank fuel �
pump as compared to original OEM or other aftermarket MGB fuel tanks. You should �
measure before cutting... �
�
 �
�
�
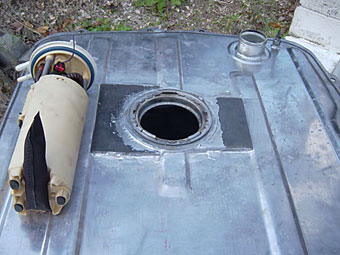
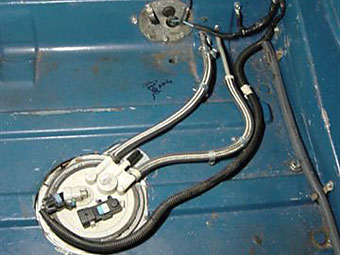
After the flange is soldered in, the module just drops in... but that's not the end of the job.
�
�
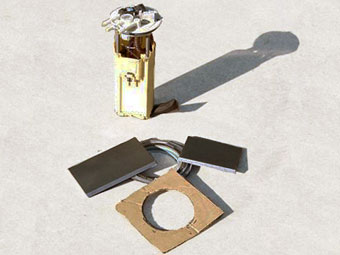
What about the fuel pump? I selected a modular fuel pump from a 1999 Chevrolet �
Malibu. This fuel pump is convenient to use because it mates to a relatively �
simple round flange in the horizontal top surface of a fuel tank. The Malibu �
fuel pump module has more features than I chose to use - specifically it has �
a built-in fuel level sensor. I won't be using this feature, so I removed the �
float. I believe this pump's flow capacity is about 30 gallons per hour. �
�
The Malibu fuel pump produces 60 psi. That's a lot more than I needed or wanted, �
(probably too much for Ford's OEM fuel pressure regulator), but I'd already �
invested in a Kirban (aftermarket) adjustable fuel pressure regulator which is �
easily set to the appropriate 38-39 psi for my fuel injectors. �
�
Actually, the fuel pump I used came with a complete Malibu fuel tank - from �
the junk yard. The reason to start with a junk yard fuel pump is that you �
need to cut the mounting flange from a donor tank. We used a pneumatic �
reciprocating saw to cut out the flange. Once removed, we neatly marked a �
circle around the flange, took it to a friend's shop, and used his belt sander �
to trim the flange down to that marked line. This left a round flange lip that �
looked good. �
�
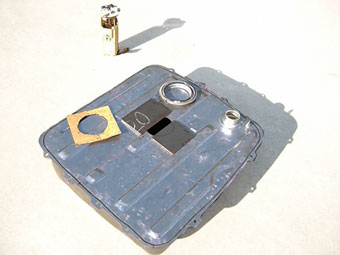
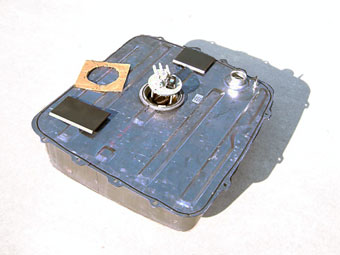
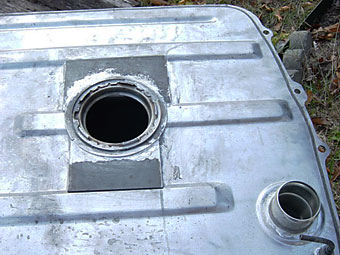
The top surface of an MGB fuel tank has embossed ribs, and we decided to �
center the new fuel pump module over one of them. This embossment provided us �
with a challenge, but we met it by soldering spacers to the tank to create a �
flat mating plane. Specifically, we soldered two quarter-inch thick steel �
plates to level the mounting surface. The edges of the steel filler plates �
were radiused to match the tank's embossment. After the plates were soldered �
onto the tank, the flange was soldered onto the plates and tank rib. �
�
Enjoying this article? Our magazine is funded through the generous support of readers like you!
�
To contribute to our operating budget, please click here and follow the instructions.
�
(Suggested contribution is twenty bucks per year. Feel free to give more!)�
�
 �
�
�
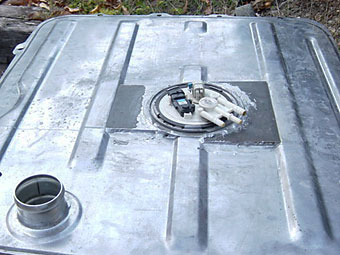
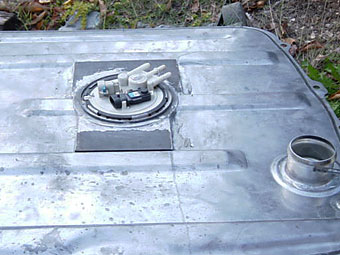
� As you can see in the photos, there are three ports on the Malibu fuel pump assembly.� The center port is a vapor vent. Since it's redundant with the vent port that the � MGB tank already has (next to the fuel filler inlet), we capped the pump's vapor port.� The other two ports are for inlet and for return. In some modern fuel injection systems � the fuel injectors are provided more pressurized fuel than they can possibly use, and � excess fuel is pumped right past the injector inlets and returned to the fuel tank. �
��
 �
�
�
�
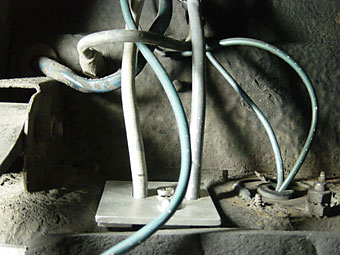
When it comes to wiring, we recommend that the fuel pump should be supplied from �
a relay. Pumps are very sensitive to voltage; they don't perform their best when �
they're operated at reduced power. A relay avoids this issue by eliminating �
electrical resistance and subsequent voltage-drop in the fuel pump circuit. Power �
is provided by a new lead, with an inline fuse, which is routed over from the battery.�
�
A "signal" is still required from the ignition switch to turn the relay "on" and �
"off". We used MG's original fuel pump lead for this purpose. �
�
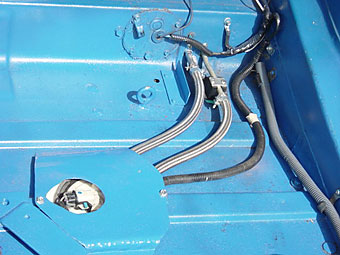
The Malibu fuel pump can move a great deal of fuel at relatively high pressure, �
so in the event of an accident it needs to be turned "off" promptly and reliably. �
For this reason, we also installed a new Ford fuel cut-off inertia switch on the �
12V supply circuit. (Note: 1975-80 MGB's came with a white inertia switch on the �
extreme righthand end of the firewall, cabin-side, but we chose to replace and �
relocate this function on my car.)�
�
 �
�
�
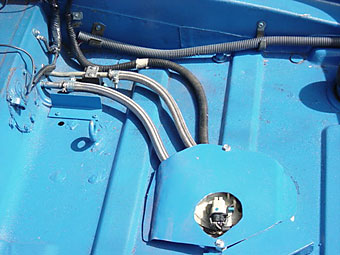
� A final aspect of the installation was fitment of a sheetmetal shield to protect � the module, fuel lines and wiring. My spare tire will still fit in the boot, over � top this metal shield.�
�� Disclaimer: This page was researched and written by Kelly Stevenson. Views expressed � are those of the author, and are provided without warrantee or guarantee. Apply at your � own risk.�
� Photos by Kelly Stevenson for British V8 Magazine. All rights reserved. �
