
�
�
Basic Valve Job
� as published in BritishV8 Magazine, Volume XVII Issue 1, July 2009�� by: Greg Myer�
�
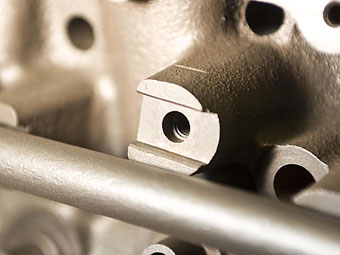
� The head is one of the most important areas of an engine in terms of performance. � A good valve job is critical for whatever you want out of your motor, whether it's � better fuel economy, power, or just plain reliability. After years of use, for � the valves to work at their designed capacity or better, a good bit of work must � be done. There are a number of steps that must be taken, and several ways to do � each of them. Some ways are better than others and some heads require � special treatment.�
��
 �
�
�
� After removing the heads, they need to be disassembled. You can do this in your � garage if you have a valve spring compressor. You'll need a compressor designed � for the type of head you're working on. An inexpensive lever style or a C-clamp � style will work on many standard V8's: Ford, Chevy, Buick, or Rover. Late model � overhead cam heads require something different. If you like, the machine shop of � your choice can remove the valves and also reassemble your heads after machine� work is complete; all you'll need to do is torque them back on.�
��
 �
�
�
�
After dissassembly, the next order of business is cleaning the heads. Cast iron �
heads can be put in a hot tank of strong chemicals. Tanks for aluminum are available �
in some shops. They use less heat and different chemicals, so as not to damage�
anything. Other types of cleaning can be done too. Cleaning machines that throw�
shot on the head seems to work very well.�
�
Next comes checking the heads for cracks. Again there are various ways of proceeding. �
Cast iron heads can be magnafluxed: a strong magnetic field is created and will cause �
the powder to collect in any crack, making it quite visible. Neat! Aluminum can be �
checked with one of several methods. There are usually three or four steps involved. �
First a special cleaner is used, then a penetrating dye is applied, and next a �
developer. Some of these will produce results in plain room light, while most require �
a black light, or ultra-violet.�
�
If a crack is found, find out your options. Most cracks extend from one valve �
seat to the next. Will a new set of hardened seats fix it? If not, and you are �
working on a set of standard, easy to obtain heads, it may be prudent to start �
over. Ford and Chevy heads fall into this category, unless they are specialty, �
aftermarket heads. Aluminum heads can be welded and remachined. This could, �
however, get expensive depending on the proper way to proceed. Many cast iron �
heads will need to heated in an oven first and welded while hot. This can be �
tricky, and while I've had it done, I would only let someone with plenty of �
experience attempt it. In my case it was for a heavily ported 4 cylinder head �
that was from a factory turbocharged application. Not easily replaced. We had �
excellent results. If you are unsure of any area of your heads, have them pressure �
tested. Better to find out now than after they are installed and the motor is �
in the car.�
�
Now on to the machining process... Before the seats are touched, the guides must �
be established as correct. They must be both the proper inside dimension, centered �
and not out of round at either end. The latter is sometimes the case as the �
rockers have a tendency to push the valve stem away when acting on it. Guides �
with a little wear can be knurled and reamed to size. Guides may also be pressed �
out or drilled out, depending on type, and new ones pressed in and reamed to size. �
The reaming is critical as quite often the guide is made out of round by the press. �
Several materials are available for the new guides; however bronze is far and away �
the favorite. If you have decided to use smaller stemmed racing valves, the �
machinist needs to know as the guides he puts in must have the smaller diameter. �
These valves weigh less and are under-cut and swirl polished allowing better �
breathing through the port. Less weight here means valve springs will not be �
stressed as much and can contribute to higher RPM's as well. Very well indeed, �
but be prepared to foot a higher bill for the parts.�
�
�
�
The reason the guides are established before other machine work is done is because �
most valve seat work is centered on the guides. If they're not right the seats may �
be off center or otherwise inaccurate.�
�
Cutting the seats is critical to the whole job! There are various types of cutters �
and valve grinders. The key is the man who does the job. He must make sure of each �
step and check that everything fits and matches. �
�
 �
�
�
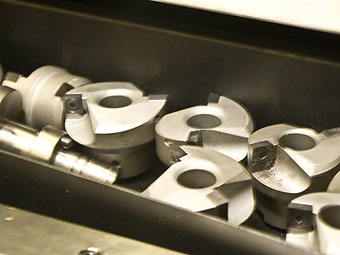
� I have an older Black & Decker unit that uses cutting stones. I need a number of � stones to cover all the diameters of valves as larger stones won't fit in the � combustion chamber of a smaller head. Also, there are several types of stones � manufactured to cope with the materials that need to be ground. Cast iron use the � standard, relatively less expensive stones whereas the stones to cut stellite seat � inserts require a tougher composition and are therefore more expensive. I also � need one each of three cutting angles for all diameters of valves. OK, I need a � bunch of stones! �
��
 �
�
�
�
Newer head machines can do a multitude of tasks within a short period of time, �
so turn around on jobs is quicker. These machines vary in design, some even being �
controlled by computers, making repeatable results easy to obtain. How fast are �
they?�
�
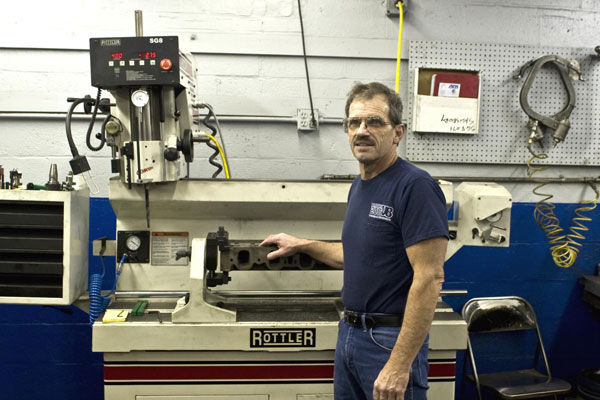
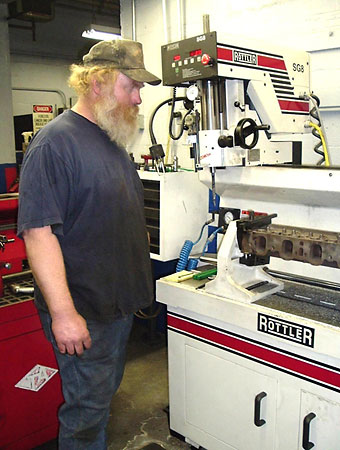
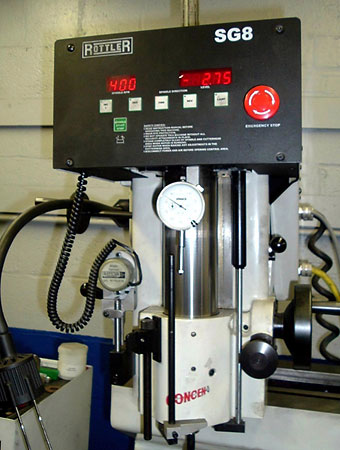
This Rottler machine (above), as demonstrated by Harry Clark at the Salisbury, �
Maryland NAPA machine shop, can grind 3 angles on all the seats in a set of V8 �
heads and pressure test them in 10 minutes! Why isn't it finishing these �
Cleveland heads right now? They are waiting on a few guides to be delivered. �
Even great machines depend on many other factors. This machine can also drill �
the guides so new ones can be pressed in and then cut the tops of the guides �
for whatever type of seal you prefer. It can tap the rocker stud bore for �
screw-in studs as well as cut it shorter. To do this requires speed control �
of the drill head. This can be lowered to 40 RPM for tapping. It cuts seats �
for standard inserts and then cuts the angles. All of this is controlled by �
the operator after the machine's electronic leveler establishes positioning. �
This particular machine has a "Bowl Hog" attachment for opening up the throat �
of the port when larger valves are being installed.�
�
Want one for your garage? I sure do, but at about $ 30,000, depending on �
attachments, it's going to have to wait.�
�
 �
�
�
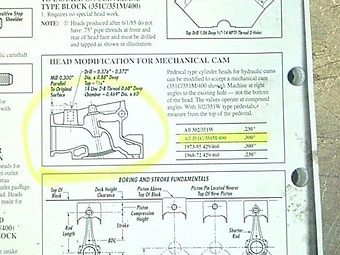
� When you take your heads in for work, if you bought special parts, take them � along as well as any printed instructions that came with them. The machinist � needs to know any special requirements to make these pieces fit and function � properly. This example (at right) sitting on the bench at NAPA is from Ford � Racing. It provides specs for cutting and tapping the rocker stud bores on a � Cleveland style head.�
��
Enjoying this article? Our magazine is funded through the generous support of readers like you!
�
To contribute to our operating budget, please click here and follow the instructions.
�
(Suggested contribution is twenty bucks per year. Feel free to give more!)�
�
 �
�

�
�
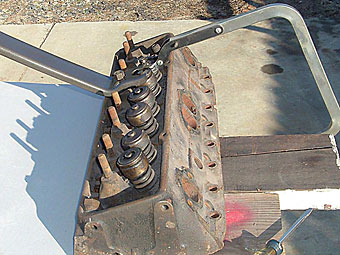
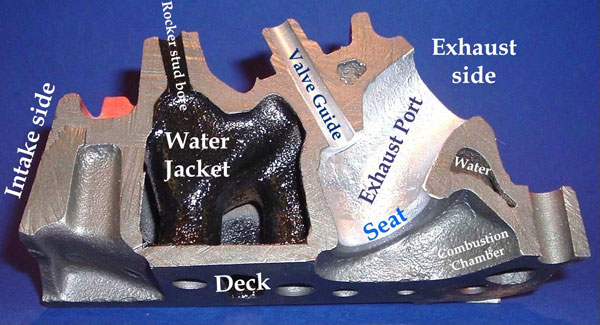
This head (at left) on Bill Cannon's head table shows Dykem Blue dye used to keep close �
track of the various machining operations. Dye is available in various colors �
and in spray or brush on depending on what is being done and which material is �
being machined. Note also the gasket surface. These may corrode or gall. A �
cleanup pass on the surfacer is called for. To raise compression, at times, �
more material is removed the decrease the size of the combustion chamber. This �
is an effective way of gaining compression if your engine doesn't have a wide �
selection of pistons available or you are a half point lower then your targeted �
ratio. If the heads are surfaced more than a small amount the intake manifold �
gasket surfaces will need to be surfaced as well because the you have lowered �
the overall height and the manifold won't match up. Quite possibly there will �
be a serious vacuum leak. The amount will not be the same as taken off the �
deck. It can be determined by a graph that the machine shop has. When �
assembling your engine it's always good to check the manifold to head match.�
�
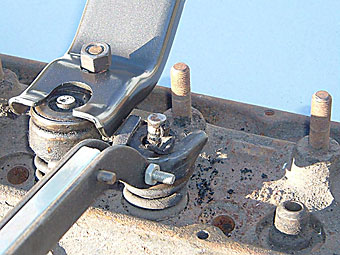
At this time the tops of the valve guides may be machined for Teflon seals �
if they are to be used. The rocker arm stud boss may also be machined and �
tapped for screw-in studs, if applicable. In the picture, in the rear, there �
is a guide cutting tool. It has the diameter and depth established so the �
machinist can't mess this up. The tool is on the right, a freshly machined �
guide top is to its left and a Teflon seal is sitting between them.�
�
Closer to us is the rocker stud cutting tool. Again, the depth is set. The �
studs need to be pulled first, as the stock one laying there has been. After �
machining the boss down, the hole must be tapped and then the new heavy duty �
stud screwed in. If the hole goes into the water jacket a sealant MUST be �
used. The pushrod slot may need to be lengthened if a high lift cam and/or �
rocker arms of great than stock ratio are part of your game plan. In fact, �
it's wise to spend the time and a few extra dollars now so it's easy to �
upgrade later. Playing with various ratio rockers can be eye-opening, both �
for power and mileage, although not at the same time.�
�
 �
�
�
� Next are the valves themselves. The diameter of the stem must be within specs � as well as the length. Some valves will wear on top due the lack of oil � between them and the rocker arm. This affects the geometry of the valve � train. Some valves use lash caps which can be easily replaced if worn. � Once these dimensions are established the surface that mates to the seats � needs to be ground smooth at exactly the right angle. This usually is the � same as the seat. Most are 45°; however some manufacturers specify a one � degree interference cut. Others indicate different angles depending on � their research with flow benches or for longevity concerns. For example, � for years Pontiac specified a 45° face on their exhaust valves but a 30° � on all intakes. Starting in 1964, that changed to 44° and 29° respectively. � Don't ask me why; just be sure to check the book. Aluminum Buicks all called � for 45° on both intakes and exhausts.�
��
 �
�
�
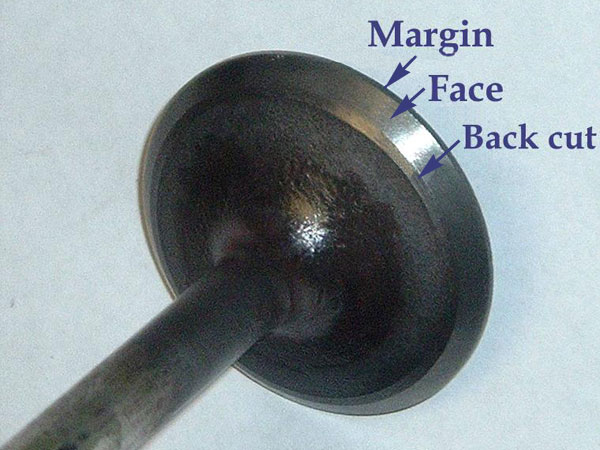
� Used valves that are "burned" are not usable. This can show up to the naked � eye as pie-slice splits in the valve. If you have any like this, toss them. � Some burned valves can be more difficult to detect. The face area may be � badly burned and it will take turning it in the valve face machine before � it shows up. The valve will cut on part of the face, but not all. The � machinist may try to continue cutting, but that will reduce the margin � too much. The margin is a major concern. This is the area on the outside � circumference of the valve head, parallel to the stem. Cutting the face � will reduce this measurement. If the margin is too small, the valve will � burn in short order. If your machinist is concerned with this area you � would be well advised to replace the valve or valves in question.�
�� The 45° cut on the valve face affects the overall installed height of the � valve too. This is usually minor, and with hydraulic lifters and / or � adjustable rocker arms you need not be concerned. When everything is � machined, and the valves assembled in the head a straight edge can be � laid across the tops of the valves to check that they are level. As � mentioned, slight differences are common and easily tolerated. If your � engine has solid lifters and shaft mounted rockers the valve height needs � to be right. Even then an adjustable valve train will be to your advantage.�
��
�
� With the valve seat in the head machined and the valve face done, the two � can be mated. I like to use lapping compound for this. Years ago it was � used to match the surfaces, much like the lid on a glass apothecary jar. � It worked very well too. Today's equipment however leaves the two surfaces � in such a nice condition that it's no longer needed. I use it to identify � the contact area between the two. For street motors that will see 100,000 � miles before the next rebuild, a wide seat is the ticket. Race motors � however like narrow seats as this facilitates more flow at all lift heights. �
��
�
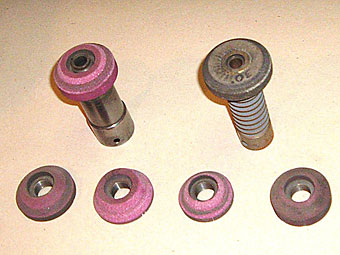
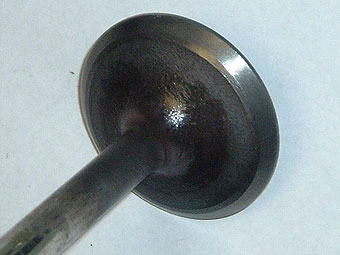
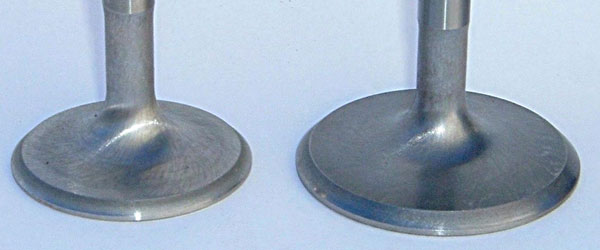
� With the face cut made and measured, the valve can be back cut. Perhaps � a 30° cut just above the 45° cut. This narrows the face to the needed � width and helps flow on both intake and exhaust valves. The illustrations � above show a warped, burned valve that would not cut and one with a 45° � face, a red dyed 30° back cut and a 15° back cut above that for comparison. � Notice how this cut removes the inner lip on the back of the valve. That � lip has been shown to cause turbulence, disturbing the air flow both into � and out of the chamber. �
��

�
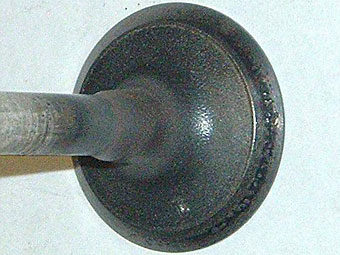
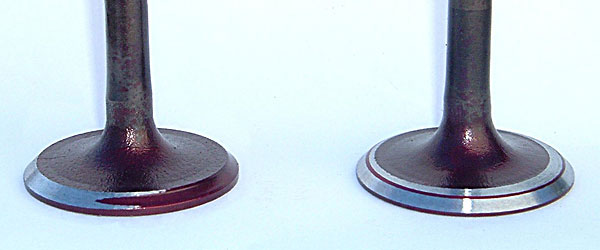
� Another machine operation to consider is a front cut. This process cuts a � slight angle on the chamber side of the valve and also reduces the margin. � Again it's been demonstrated to help flow on both intake and exhaust valves.� I took an old valve and put red dye on it, cut the face 45° and put a 15° � front cut on it to demonstrate. The margin is still clearly visible, but � you can see how it is reduced.�
� | �
� | �
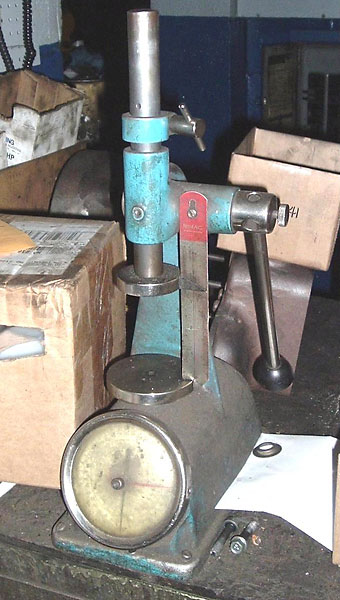
The installed spring height needs to be checked next. This can be measured �
with a special tool designed for the task. If there are differences shims �
can be use to even out the gaps. Note: aluminum heads have spring cups. �
Never install springs directly on the aluminum as the soft aluminum will �
take a beating and you can even destroy the head.�
� The spring pressure at the installed height can be measured too.� � Seals are next. There are a wide variety of seals available. The O-ring � type was the Chevy standard for decades. High performance engine builders � like Teflon seals. These require cutting the top of the valve guide to � press the seals onto. These are the standard of performance engines today. � Use them on both the intake and exhaust. It's a good idea to use new keepers � and retainers too.� � 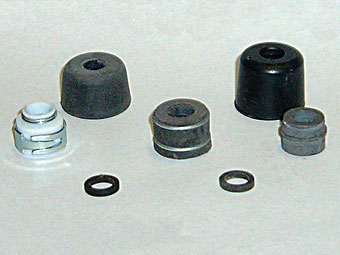 � �
| �
�

�
�
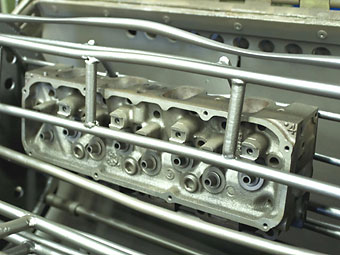
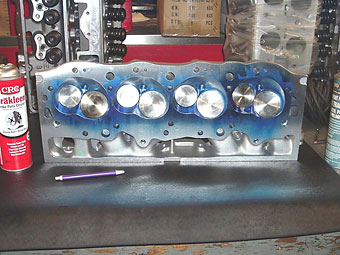
This assembled BB Chevy aluminum head at Bill Cannon's Awesome Engines �
shows how it all comes together.�
�
When the engine is assembled proper rocker arm geometry should be verified. �
If things are not where they are designed to work, the life expectancy of �
your motor will be greatly reduced.�
�
Please keep in mind that these are basic operations and we have not touched �
on port matching, porting, and matching head cavity volumes ("CC-ing"), or �
other high performance and racing modifications. We'll save that for another�
time.�
�
At least with this information you will know what the machinist is talking �
about, and you should be able to answer his questions. You'll know what �
you need to speed your heads on their way. �
� Disclaimer: This page was researched and written by Greg Myer. Views expressed � are those of the author, and are provided without warrantee or guarantee. Apply at your � own risk.�
� Photographs by Brandon Myer at Brightside Photography � and Greg Myer for BritishV8. All rights reserved.�
