
�
� presented by: Jim Stuart
� coverage by: Curtis Jacobson�
� Jim Stuart has a lot of experience with MGB V8 conversions. Boy, now there's an � understatement! He's built four MGB conversions for himself, plus two for friends, and � Jim's cars see very tough service because he uses them to commute daily into the District � of Columbia. DC is easily one of loveliest cities in the world - but it gets REALLY � HOT AND HUMID in the summer, and its traffic is a bear. I met Jim for the first time � on a sweltering hot July day in 1998 when the V8 meet was in nearby Annapolis, and � I realized immediately how generous and kind Jim is about sharing his knowledge and � experience. �
�
�
�
�
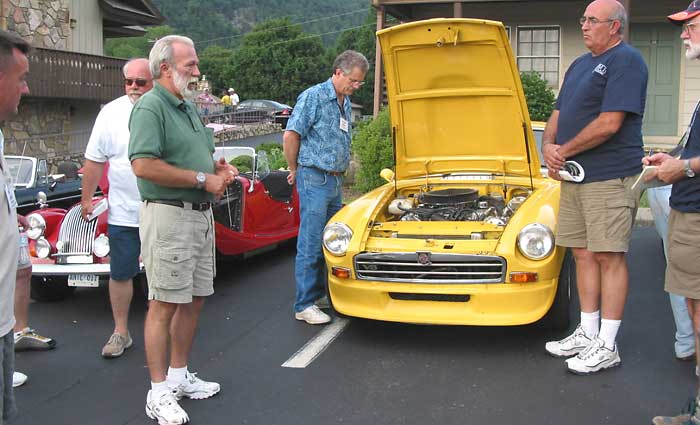
Jim Stuart (green shirt) explains installation of air conditioning in MGB sports cars�
British V8 2006 Tech Session: Air Conditioning Installation in MGB's
� as published in British V8 Newsletter, Volume XIV Issue 2, August 2006�� presented by: Jim Stuart
� coverage by: Curtis Jacobson�
� Jim Stuart has a lot of experience with MGB V8 conversions. Boy, now there's an � understatement! He's built four MGB conversions for himself, plus two for friends, and � Jim's cars see very tough service because he uses them to commute daily into the District � of Columbia. DC is easily one of loveliest cities in the world - but it gets REALLY � HOT AND HUMID in the summer, and its traffic is a bear. I met Jim for the first time � on a sweltering hot July day in 1998 when the V8 meet was in nearby Annapolis, and � I realized immediately how generous and kind Jim is about sharing his knowledge and � experience. �
�
Jim's tech session was our fourth on Monday afternoon, and for it we moved out of �
the classroom and down to the parking lot. It was good to stretch our legs, and it �
was great to be able to look over Jim's car as he presented the components one-by-one.�
� In his preliminary remarks, Jim noted that there are at least four competitive companies � in the aftermarket a/c kit business, and he doesn't have a strong preference between them. � "Vintage Air" and "HotRod Air" are the two companies whose products Jim has used, and he � recommends them both. They sell very similar products, and in many cases use the exact � same major components. �
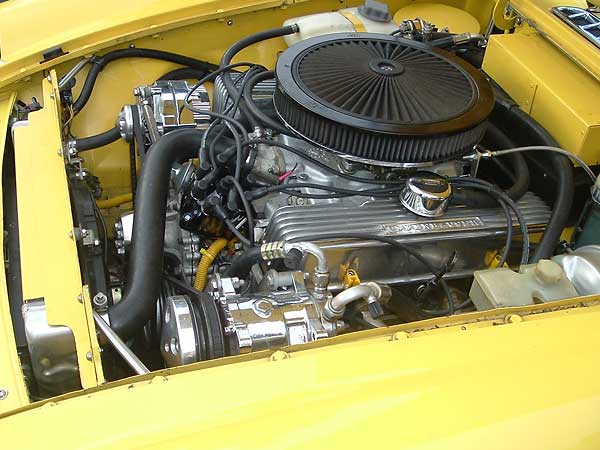
� Jim started with the compressor first. Jim uses and recommends Sanden's model "508". � The 508 designation denotes that it has five pistons and a displacement of 8.4 cubic inches. � Sanden air conditioning compressors are cylindrical, aluminum-bodied and mount like an � alternator, so it may not be obvious how they're constructed: the five pistons are � all parallel, and they're actuated by a wobble plate instead of a crankshaft. One � characteristic of Sanden compressors is that the pistons have a very short stroke and � low displacement per cycle. This design characteristically requires very low horsepower � (especially at low speeds, compared to competitive compressors) and it's almost � vibration free. Jim also noted that the compressor can be purchased with a V-belt or � serpentine-belt drive, and it can be purchased in a polished or unpolished version. �
� (Editor's note: I'm going to insert a quasi-testimonial here. In my previous career as an � engineer for Volvo Truck I overheard a lot about Sanden compressors because an engineer � down the row from me was responsible for the decision to change to Sanden. Decisions like � that aren't taken lightly by OEMs; the testing program was lengthy. The changed proved a � huge success because compressor-related warranty claims seemed to drop immediately as � the Sanden compressors went into production. I believe Sanden has become the most commonly � used compressor on North American heavy trucks. Trucks use a larger model, of course.) �
�
�
�
� In his preliminary remarks, Jim noted that there are at least four competitive companies � in the aftermarket a/c kit business, and he doesn't have a strong preference between them. � "Vintage Air" and "HotRod Air" are the two companies whose products Jim has used, and he � recommends them both. They sell very similar products, and in many cases use the exact � same major components. �
� Jim started with the compressor first. Jim uses and recommends Sanden's model "508". � The 508 designation denotes that it has five pistons and a displacement of 8.4 cubic inches. � Sanden air conditioning compressors are cylindrical, aluminum-bodied and mount like an � alternator, so it may not be obvious how they're constructed: the five pistons are � all parallel, and they're actuated by a wobble plate instead of a crankshaft. One � characteristic of Sanden compressors is that the pistons have a very short stroke and � low displacement per cycle. This design characteristically requires very low horsepower � (especially at low speeds, compared to competitive compressors) and it's almost � vibration free. Jim also noted that the compressor can be purchased with a V-belt or � serpentine-belt drive, and it can be purchased in a polished or unpolished version. �
� (Editor's note: I'm going to insert a quasi-testimonial here. In my previous career as an � engineer for Volvo Truck I overheard a lot about Sanden compressors because an engineer � down the row from me was responsible for the decision to change to Sanden. Decisions like � that aren't taken lightly by OEMs; the testing program was lengthy. The changed proved a � huge success because compressor-related warranty claims seemed to drop immediately as � the Sanden compressors went into production. I believe Sanden has become the most commonly � used compressor on North American heavy trucks. Trucks use a larger model, of course.) �
�
�
From the compressor we followed the hoses. Jim made special note of them because hoses are �
very important. Two different types of hose fittings are available: "barb" fittings or �
"beadlock" fittings. Until a few years ago barb fittings were the industry standard, but �
now the OEM's have switched to beadlock so they're the new standard. You can buy either, �
and Jim has used both, but he definitely recommends the newer-style beadlock fittings. �
"They're so much easier!" �
� Whichever fitting type you use, you need a special crimping tool to secure the hose ends. � Don't even think about using a crimper that's made for hydraulic fittings because it's very � easy to over-crimp the hose-ends and split the barrier lining of the hose. (What barrier � lining? Modern A/C hoses have a lining that keeps the refrigerant from leaking out. R134a � refrigerant molecules are smaller than old, obsolete, ozone-depleting R12 refrigerant � molecules so one must be even more vigilant to avoid leakage.)�
� A/C hose comes in three sizes. The smallest, #6 hose (5/16" inside diameter), is used � for the liquid lines that travel from the condenser to drier to evaporator. Number 8 � hose (13/32" ID) is used from the discharge line that travels from the compressor to the � condenser. Number 10 hose (1/2" ID) is used for the suction line that travels from the� evaporator to the compressor.�
�
� Along the pressure line from the compressor Jim pointed out the "trinary" switch. This is � a very, very important part of the system because it protects the compressor from damage. � You need this, and it must function properly. The trinary switch monitors pressure on the � high pressure line from the compressor. If the pressure goes too high it opens the compressor � clutch's electrical control circuit until pressure returns to normal. It also turns on an � electric fan on the condenser to bring the pressure down. Its third function is to cut � off the compressor in the event of a refrigerant leak, which is indicated by a too-low � line pressure. (Note: some people elect to fit a "binary" switch in lieu of a trinary switch.� A binary switch doesn't turn on a condenser fan, so the system just waits for pressure � to come down whenever.) �
��
�
� The next part of the system Jim discussed was the evaporator. The evaporator assembly � is nominally available in either "in dash" or "under dash" models, but these terms may � be a little confusing in MGB application. Jim explained: "The units I have installed are � designed for behind the dash (i.e. in dash), but the MG's do not have enough room behind � the dash, hence I had to cut through the double fire wall to install the evaporator, barely � having room for ducts behind the dash." �
� Under dash evaporator installations can potentially be much easier and more efficient, if � not as discrete, but they do require maintaining the original heater/defrost unit. Jim � indicated that this is what he'll probably try for his next installation. �
� Jim focused on two aspects of evaporator installation. The evaporator assembly's � outlets must be ducted properly to louvers or vents. Air flow through ducts is a black � art, but as a first rule of thumb duct walls should be smooth. (Flexible hose ducting � really robs performance.) Ideally the ducts should be sculpted to maximize flow-rate � and optimize cooling. �
� A second area of concern is insulation and sealing. Engine compartment and exhaust heat � is obviously counter-productive to cooling. Insulation of the firewall and footbox area � is critical, but so is the upper firewall. Sealing around anything that breaches the � firewall (including evaporator lines, etc.) is critically important. �
� Regrettably I had to excuse myself at that point, so I missed the conclusion of the � tech session.�
� Disclaimer: This page was researched and written by Curtis Jacobson. Views expressed � are those of the author, and are provided without warrantee or guarantee. Apply at your � own risk.�
� Photos by Curtis Jacobson. All rights reserved. �
�
�
� Whichever fitting type you use, you need a special crimping tool to secure the hose ends. � Don't even think about using a crimper that's made for hydraulic fittings because it's very � easy to over-crimp the hose-ends and split the barrier lining of the hose. (What barrier � lining? Modern A/C hoses have a lining that keeps the refrigerant from leaking out. R134a � refrigerant molecules are smaller than old, obsolete, ozone-depleting R12 refrigerant � molecules so one must be even more vigilant to avoid leakage.)�
� A/C hose comes in three sizes. The smallest, #6 hose (5/16" inside diameter), is used � for the liquid lines that travel from the condenser to drier to evaporator. Number 8 � hose (13/32" ID) is used from the discharge line that travels from the compressor to the � condenser. Number 10 hose (1/2" ID) is used for the suction line that travels from the� evaporator to the compressor.�
�
� Along the pressure line from the compressor Jim pointed out the "trinary" switch. This is � a very, very important part of the system because it protects the compressor from damage. � You need this, and it must function properly. The trinary switch monitors pressure on the � high pressure line from the compressor. If the pressure goes too high it opens the compressor � clutch's electrical control circuit until pressure returns to normal. It also turns on an � electric fan on the condenser to bring the pressure down. Its third function is to cut � off the compressor in the event of a refrigerant leak, which is indicated by a too-low � line pressure. (Note: some people elect to fit a "binary" switch in lieu of a trinary switch.� A binary switch doesn't turn on a condenser fan, so the system just waits for pressure � to come down whenever.) �
�
| �
Enjoying this article? Our magazine is funded through the generous support of readers like you! � To contribute to our operating budget, please click here and follow the instructions. � (Suggested contribution is twenty bucks per year. Feel free to give more!)� |
� The next part of the system Jim discussed was the evaporator. The evaporator assembly � is nominally available in either "in dash" or "under dash" models, but these terms may � be a little confusing in MGB application. Jim explained: "The units I have installed are � designed for behind the dash (i.e. in dash), but the MG's do not have enough room behind � the dash, hence I had to cut through the double fire wall to install the evaporator, barely � having room for ducts behind the dash." �
� Under dash evaporator installations can potentially be much easier and more efficient, if � not as discrete, but they do require maintaining the original heater/defrost unit. Jim � indicated that this is what he'll probably try for his next installation. �
� Jim focused on two aspects of evaporator installation. The evaporator assembly's � outlets must be ducted properly to louvers or vents. Air flow through ducts is a black � art, but as a first rule of thumb duct walls should be smooth. (Flexible hose ducting � really robs performance.) Ideally the ducts should be sculpted to maximize flow-rate � and optimize cooling. �
� A second area of concern is insulation and sealing. Engine compartment and exhaust heat � is obviously counter-productive to cooling. Insulation of the firewall and footbox area � is critical, but so is the upper firewall. Sealing around anything that breaches the � firewall (including evaporator lines, etc.) is critically important. �
� Regrettably I had to excuse myself at that point, so I missed the conclusion of the � tech session.�
� Disclaimer: This page was researched and written by Curtis Jacobson. Views expressed � are those of the author, and are provided without warrantee or guarantee. Apply at your � own risk.�
� Photos by Curtis Jacobson. All rights reserved. �
