
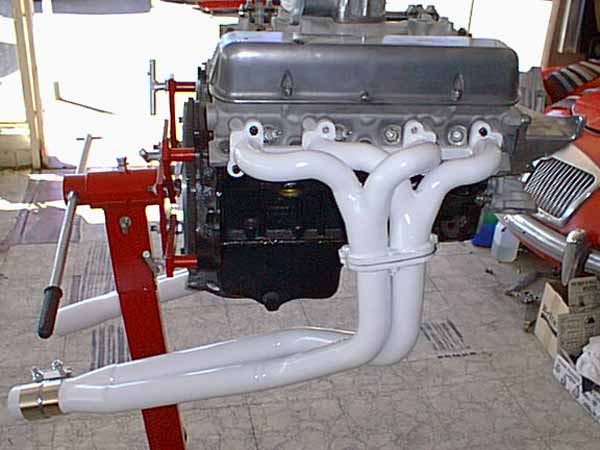
Are These Big Enough? Exotic Big-Tube Tri-Y Headers for the Rover V8
Headers and Exhaust Manifolds for the V8 Conversion
(Originally published in MG V-8 Newsletter, Volume 8 Issue 3, September 2000. New photos added January 2007.)by: Kurt Schley
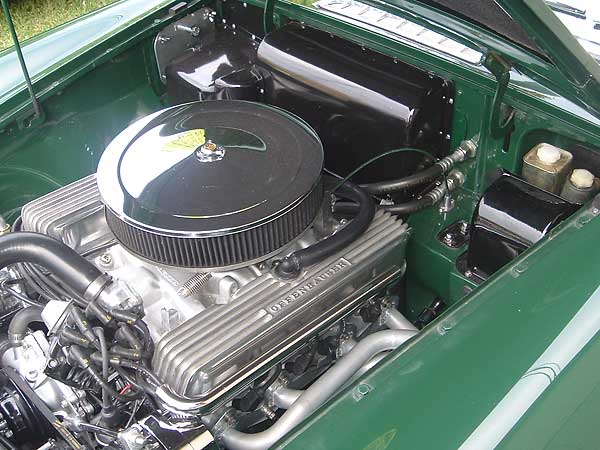
One of the challenges of an MGB V8 conversion is routing the exhaust out of the close confines of the engine bay. There is simply not much available room between the engine block and the body frame rails. Then the exhaust has to share this very limited space with the two engine mounts, a bulky starter and the steering gear. In the pioneering days of V8 conversions, the choices were simple, either use the stock cast iron manifolds or fabricate one's own headers from bits of steel tubing. A few conversion exhaust systems were configured by merely reversing stock Buick/Olds 215 exhaust manifolds so that they dumped at the front of the engine compartment, then coupled to two sections of exhaust pipe bent into "J" shapes to pass down and back under the engine. Crude by today's standards but is was cheap and easy to do. Other early DIY conversion builders purchased a stack of pre-bent "U" shaped header tubing sections from the hot rod suppliers or firms like Headers by Ed. A few days of hack-sawing tubing and breathing oxy-acetylene or arc welding fumes and a set of headers would be in place. Depending on the skill and luck of the fabricator, a few of these homebuilt headers were works of art while many others leaked more exhaust gases into the engine bay than they passed to the mufflers.
Fortunately, the skyrocketing popularity of the MG V-8's has drawn more header
manufacturers and distributors into the market and now afford the converter a couple
of off-the-shelf header choices. To get the burned gas from the engine exhaust ports
and pointed toward the mufflers there are basically four options:
1) Traditional block-hugger tubular exhaust headers
2) Thru-the-fenderwell, or RV8, style tubular exhaust headers
3) Cast iron manifolds
4) Custom built tubular exhaust headers
Block-Hugger Headers
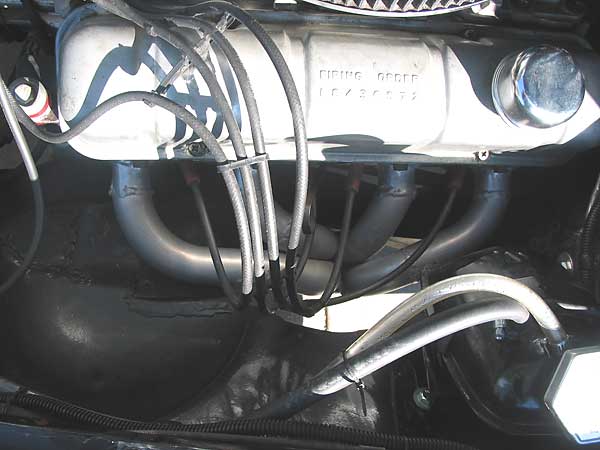
Block-Hugger Headers - In the U.K., a few specialty exhaust parts manufacturers began to offer tubular headers for the offspring of the original Costello conversions. The V8 hobby in England was beginning to stir and the "block-hugger" headers were developed. Block huggers are built such that the tubes are routed sharply downward from their attachments to the engine exhaust ports. The four individual tubes closely follow, or hug, the side of the block and are gathered into a collector positioned between the engine and the body frame rail.
The early (and some current) block hugger header designs commonly experienced cracking of the welded joints at the collectors and at the port flanges. The tops of the header tubes were not connected by a common flange, rather each tube had it's own two bolt flange which attached to individual exhaust ports on the engine heads. The problem arises when the aluminum engine attains operating temperature then cools. Aluminum has twice the coefficient of expansion as steel. This means that distance between the exhaust ports grows a fair amount when the engine is warmed up. The expansion of the head in turn forces the ends of the individual header tubes away from one another, flexing the tubes at their common joint at the collector and inducing considerable tensile stress on the header welds and cracking them. It is not uncommon to see one or more repair welds on some block hugger tube headers. Unfortunately, the fractured weld surfaces have been well contaminated with carbon from the leaking exhaust, making good repair welds very difficult.
Common Flange Spanning All Four Exhaust Ports
The header manufacturers have generally resolved the header weld cracking by one or a combination of methods. One is to join all the tube ends onto one common flange spanning all four exhaust ports. Secondly was to improve the quality of the tubing and lastly, most have upgraded their welding techniques and filler rods to provide a stronger tube to collector joint. The stainless steel headers rarely crack. (A tip from Dan Lagrou at "D&D Fabrications": if ordering block hugger headers with a common flange, be sure and advise the supplier if they are to be used on an Oldsmobile 215. The common flange must be relieved for the spark plugs and oil dip stick on that engine.) If you are offered a set of used block bugger headers, carefully wire brush all of the welded joints and examine them closely for cracks. If there is even a hairline fracture, tell the seller thanks anyway and walk away.
Block-hugger headers offer one challenge to the chrome bumper MG V-8 converter. The driver side header selfishly uses the space once occupied by the steering shaft and/or the steering universal joint. The shaft or U-joint must be moved or angled to clear the header, the engine positioned fairly high, or a later, rubber bumper crossmember installed.
Another concern with the block huggers is that they are fairly restrictive to exhaust flow. The exhaust stream is forced to make a sharp bend immediately upon exiting the heads, slowing the gases and creating backpressure. Most block hugger styles have approximately 1-3/8" O.D. primary tubes and a 1-5/8" down pipe. The advantages of the block hugger headers are that they are very readily available, relatively inexpensive and easy to install once any steering shaft issue is resolved.

RV8 Style Headers
1) Traditional block-hugger tubular exhaust headers
2) Thru-the-fenderwell, or RV8, style tubular exhaust headers
3) Cast iron manifolds
4) Custom built tubular exhaust headers
Block-Hugger Headers
Block-Hugger Headers - In the U.K., a few specialty exhaust parts manufacturers began to offer tubular headers for the offspring of the original Costello conversions. The V8 hobby in England was beginning to stir and the "block-hugger" headers were developed. Block huggers are built such that the tubes are routed sharply downward from their attachments to the engine exhaust ports. The four individual tubes closely follow, or hug, the side of the block and are gathered into a collector positioned between the engine and the body frame rail.
|
Enjoying this article? Our magazine is funded through the generous support of readers like you! To contribute to our operating budget, please click here and follow the instructions. (Suggested contribution is twenty bucks per year. Feel free to give more!) |
The early (and some current) block hugger header designs commonly experienced cracking of the welded joints at the collectors and at the port flanges. The tops of the header tubes were not connected by a common flange, rather each tube had it's own two bolt flange which attached to individual exhaust ports on the engine heads. The problem arises when the aluminum engine attains operating temperature then cools. Aluminum has twice the coefficient of expansion as steel. This means that distance between the exhaust ports grows a fair amount when the engine is warmed up. The expansion of the head in turn forces the ends of the individual header tubes away from one another, flexing the tubes at their common joint at the collector and inducing considerable tensile stress on the header welds and cracking them. It is not uncommon to see one or more repair welds on some block hugger tube headers. Unfortunately, the fractured weld surfaces have been well contaminated with carbon from the leaking exhaust, making good repair welds very difficult.
Common Flange Spanning All Four Exhaust Ports
The header manufacturers have generally resolved the header weld cracking by one or a combination of methods. One is to join all the tube ends onto one common flange spanning all four exhaust ports. Secondly was to improve the quality of the tubing and lastly, most have upgraded their welding techniques and filler rods to provide a stronger tube to collector joint. The stainless steel headers rarely crack. (A tip from Dan Lagrou at "D&D Fabrications": if ordering block hugger headers with a common flange, be sure and advise the supplier if they are to be used on an Oldsmobile 215. The common flange must be relieved for the spark plugs and oil dip stick on that engine.) If you are offered a set of used block bugger headers, carefully wire brush all of the welded joints and examine them closely for cracks. If there is even a hairline fracture, tell the seller thanks anyway and walk away.
Block-hugger headers offer one challenge to the chrome bumper MG V-8 converter. The driver side header selfishly uses the space once occupied by the steering shaft and/or the steering universal joint. The shaft or U-joint must be moved or angled to clear the header, the engine positioned fairly high, or a later, rubber bumper crossmember installed.
Another concern with the block huggers is that they are fairly restrictive to exhaust flow. The exhaust stream is forced to make a sharp bend immediately upon exiting the heads, slowing the gases and creating backpressure. Most block hugger styles have approximately 1-3/8" O.D. primary tubes and a 1-5/8" down pipe. The advantages of the block hugger headers are that they are very readily available, relatively inexpensive and easy to install once any steering shaft issue is resolved.
RV8 Style Headers
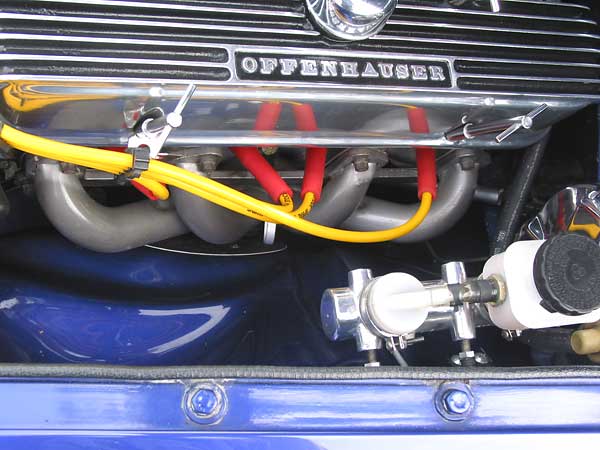
RV8 Style Headers - In 1992 Rover revived the MG brand with the introduction of
the MG RV8, an MGB with updated body style, suspension, braking, and most importantly
a 3.9L fuel-injected V-8 engine. The exhaust manifolds for the new MG were efficient
tubular headers which exit the heads horizontally for good exhaust gas flow. The 1-1/2"
O.D. individual tubes then converge and bend down and through openings in the inner
fender panels. The tubes are gathered into a collector and a 2" O.D. single down tube.
(Editor's note: RV8 style headers are now available with 1 5/8" primaries.)
There are four significant advantages to the new design. First is that the flow path for the exhaust is much less restrictive and convoluted than that of the block hugger style, resulting in horsepower gains. Secondly, the up-and-over routing of the header tubes easily clears the steering shaft so that no modifications to the steering are usually needed, even if using a chrome bumper crossmember and steering rack. The third advantage is that the openings which are required in the fender-wells, for the headers to exit the engine compartment not only provide a passageway for the headers but also furnish a route by which the hot air trapped in the compartment may exit. A very important and often overlooked factor in the cooling of an MG V-8 conversion is getting the hot air being forced through the radiator, as well as the radiated heat from the engine itself, out of the engine compartment. The wheel-wells are a low pressure area when the car is in motion, actually sucking the hot air out though the header cut-outs and from under the hood. Finally, the hot exhaust tubes are not routed along the block like a block hugger configuration, avoiding the radiation of a tremendous amount of heat back into the block (and also the starter!)
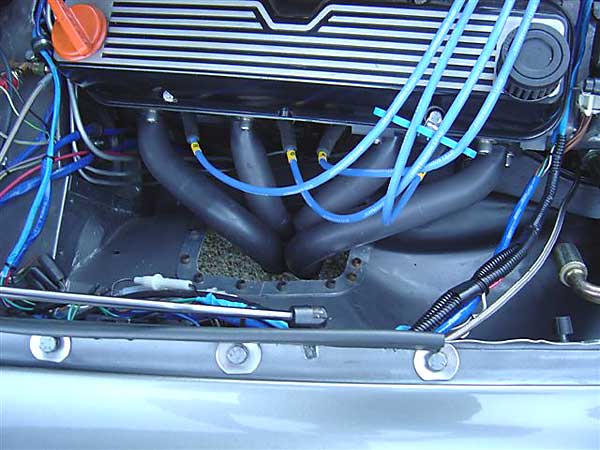
For RV8 Headers Some Cutting of the Inner Fender-Well Opening is Required
The disadvantages of the RV8 style headers are: 1) The higher cost (though this has dropped significantly over the last couple of years as domestically manufactured copy-cat models have become available) and 2) The fact that some cutting and fabrication of inner fender-well opening is required. However, this can be accomplished in a very short time. In order to maintain the stiffness of the inner fender-wells, the RV8 had a sheetmetal reinforcement ring spot-welded around the header openings. Again these are easily fabricated and welded or brazed into the fender-wells.
Cast Iron O.E.M. Manifolds - The stock Buick/Olds 215 exhaust manifolds cannot feasibly be used in an MG V8 conversion in their normal mounting position. The Buick/Olds manifold exhaust flanges are angled so that they do not dump directly to the rear, pointing slightly outward instead... right into the frame rails. As mentioned earlier, the manifolds can be reversed to exit toward the front of the car. This requires exhaust pipe to be bent end down and back past the engine - a cheap and easy way to go, but it looks butt-ugly!
Another low-buck alternative is to use the exhaust manifolds from a 1964 - '67 Buick 300 engine. These manifolds dump close to the block and are angled better than the 215 versions. These manifolds still require a lot of footwell massaging to route the exhaust pipes. Other advantage to the Buick 300 manifolds are that they are approximately 1/8" larger in cross-section which helps with exhaust flow, and also iron manifolds are inherently quieter than tubular headers.
The OEM cast iron exhaust manifolds from the Rover sedans and Land Rovers cannot be used for an MG V-8 conversion. They either have a central dump location, right into the top of the frame rails, or they dump to the rear and outward toward the inner fender wells similar to the stock 215 manifolds. Newer Land Rovers have very nice stainless steel tubular headers with integral corrugated flex joints and a sheet metal heat cover. With the heat cover removed, the headers may have some possibility of use in an MG V8 conversion.
The factory MGB/GT V8's were equipped with elaborate cast-iron exhaust manifolds, but they were prone to cracking and intact examples are extremely rare. If you happen across a pair in good, or repairable condition, sell them to a restorer. Then use the money to purchase a set of RV8 type headers and use the rest of the profits for a high performance exhaust system and a case of Old Speckled Hen.
Custom Built Tubular Headers
Custom Built Tubular Headers - Hand built headers can be made up by anyone with a hacksaw, a tape measure, a welding set-up and lots of patience. Usually the DIY builder will purchase a quantity of "U" shaped tubing bends and cut/segment multiple sections together to make the headers. Plasma or laser cut flanges for mating the header tubes to the heads are available from various suppliers... or the builder can easily make his own with a milling machine. The advantages of a hand-built header set is that will almost always cost less than a set of purchased headers or ones custom made by an exhaust/header shop. Secondly is the satisfaction of showing them off as your own work. The obvious disadvantage is the complexity of the job and the requirement of skill and equipment.
There are four significant advantages to the new design. First is that the flow path for the exhaust is much less restrictive and convoluted than that of the block hugger style, resulting in horsepower gains. Secondly, the up-and-over routing of the header tubes easily clears the steering shaft so that no modifications to the steering are usually needed, even if using a chrome bumper crossmember and steering rack. The third advantage is that the openings which are required in the fender-wells, for the headers to exit the engine compartment not only provide a passageway for the headers but also furnish a route by which the hot air trapped in the compartment may exit. A very important and often overlooked factor in the cooling of an MG V-8 conversion is getting the hot air being forced through the radiator, as well as the radiated heat from the engine itself, out of the engine compartment. The wheel-wells are a low pressure area when the car is in motion, actually sucking the hot air out though the header cut-outs and from under the hood. Finally, the hot exhaust tubes are not routed along the block like a block hugger configuration, avoiding the radiation of a tremendous amount of heat back into the block (and also the starter!)
For RV8 Headers Some Cutting of the Inner Fender-Well Opening is Required
The disadvantages of the RV8 style headers are: 1) The higher cost (though this has dropped significantly over the last couple of years as domestically manufactured copy-cat models have become available) and 2) The fact that some cutting and fabrication of inner fender-well opening is required. However, this can be accomplished in a very short time. In order to maintain the stiffness of the inner fender-wells, the RV8 had a sheetmetal reinforcement ring spot-welded around the header openings. Again these are easily fabricated and welded or brazed into the fender-wells.
Cast Iron O.E.M. Manifolds - The stock Buick/Olds 215 exhaust manifolds cannot feasibly be used in an MG V8 conversion in their normal mounting position. The Buick/Olds manifold exhaust flanges are angled so that they do not dump directly to the rear, pointing slightly outward instead... right into the frame rails. As mentioned earlier, the manifolds can be reversed to exit toward the front of the car. This requires exhaust pipe to be bent end down and back past the engine - a cheap and easy way to go, but it looks butt-ugly!
Another low-buck alternative is to use the exhaust manifolds from a 1964 - '67 Buick 300 engine. These manifolds dump close to the block and are angled better than the 215 versions. These manifolds still require a lot of footwell massaging to route the exhaust pipes. Other advantage to the Buick 300 manifolds are that they are approximately 1/8" larger in cross-section which helps with exhaust flow, and also iron manifolds are inherently quieter than tubular headers.
The OEM cast iron exhaust manifolds from the Rover sedans and Land Rovers cannot be used for an MG V-8 conversion. They either have a central dump location, right into the top of the frame rails, or they dump to the rear and outward toward the inner fender wells similar to the stock 215 manifolds. Newer Land Rovers have very nice stainless steel tubular headers with integral corrugated flex joints and a sheet metal heat cover. With the heat cover removed, the headers may have some possibility of use in an MG V8 conversion.
The factory MGB/GT V8's were equipped with elaborate cast-iron exhaust manifolds, but they were prone to cracking and intact examples are extremely rare. If you happen across a pair in good, or repairable condition, sell them to a restorer. Then use the money to purchase a set of RV8 type headers and use the rest of the profits for a high performance exhaust system and a case of Old Speckled Hen.
Custom Built Tubular Headers
Custom Built Tubular Headers - Hand built headers can be made up by anyone with a hacksaw, a tape measure, a welding set-up and lots of patience. Usually the DIY builder will purchase a quantity of "U" shaped tubing bends and cut/segment multiple sections together to make the headers. Plasma or laser cut flanges for mating the header tubes to the heads are available from various suppliers... or the builder can easily make his own with a milling machine. The advantages of a hand-built header set is that will almost always cost less than a set of purchased headers or ones custom made by an exhaust/header shop. Secondly is the satisfaction of showing them off as your own work. The obvious disadvantage is the complexity of the job and the requirement of skill and equipment.
(Editor's note: from a performance standpoint, all exhaust system designs are a
compromise. There are many, many variables involved. The length and diameter of
"primary" tubes has an especially big effect on the performance of the system, as
does craftsmanship details such as the smoothness of port and collector transitions.
Good or bad, making ones own headers gives control of these variables to the builder.)
DIY Header Building is Fun!
To build your own headers requires three components: The flanges to bolt onto the heads, a big selection of pre-bent tubing from which to cut angles and bends, and some straight tubing. The tubing can be either plain mild steel (e.g. 1080) or stainless steel. (Aluminized or galvanized steel shouldn't be used! When heated to welding temperature they produce dangerous fumes. Zinc fumes in particular can KILL YOU DEAD!)
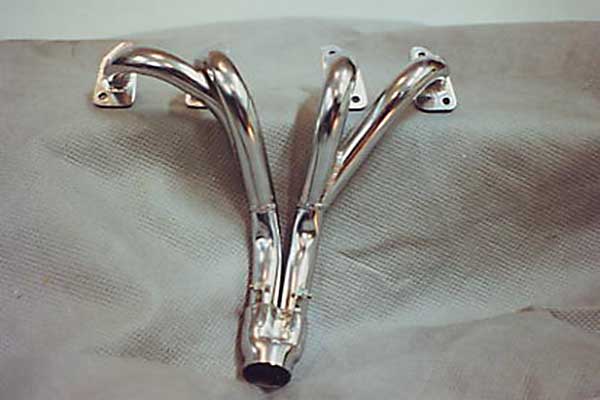
Sand-Bent Tri-Y Headers With Slip-Joints at the Secondary Collector
(Editors note: An alternative to buying pre-bent tubing sections is to make your own! One traditional approach to "sand bend" them. This is done by packing sand into sections of tubing, and then welding caps onto the sections. Once capped, the sections are heated to a dark cherry red with an oxy-acetylene torch, and then bent around some conveniently sized pipe, tree trunk, or whatever. This takes practice, but it's really fun! Other advantages are the potential reduction of welded joints an the facilitation of smooth compound curves.)
A popular source for both pre-bent tubing sections and for DIY header building information is "Headers by Ed". Ed has been supplying complete headers as well as components to the hot rod hobby since 1962. Contact them for a catalog, or a copy of their 85 minute audio cassette on header and exhaust system design, at Headers by Ed Inc. Box 7494 , Minneapolis, MN 55407 (612) 729-2802 (or www.headersbyed.com). "U" bends and straight tube sections can also be purchased from J.C. Whitney.
Disclaimer: This page was researched and written by Kurt Schley. Views expressed are those of the author, and are provided without warrantee or guarantee. Apply at your own risk.
DIY Header Building is Fun!
To build your own headers requires three components: The flanges to bolt onto the heads, a big selection of pre-bent tubing from which to cut angles and bends, and some straight tubing. The tubing can be either plain mild steel (e.g. 1080) or stainless steel. (Aluminized or galvanized steel shouldn't be used! When heated to welding temperature they produce dangerous fumes. Zinc fumes in particular can KILL YOU DEAD!)
Sand-Bent Tri-Y Headers With Slip-Joints at the Secondary Collector
(Editors note: An alternative to buying pre-bent tubing sections is to make your own! One traditional approach to "sand bend" them. This is done by packing sand into sections of tubing, and then welding caps onto the sections. Once capped, the sections are heated to a dark cherry red with an oxy-acetylene torch, and then bent around some conveniently sized pipe, tree trunk, or whatever. This takes practice, but it's really fun! Other advantages are the potential reduction of welded joints an the facilitation of smooth compound curves.)
A popular source for both pre-bent tubing sections and for DIY header building information is "Headers by Ed". Ed has been supplying complete headers as well as components to the hot rod hobby since 1962. Contact them for a catalog, or a copy of their 85 minute audio cassette on header and exhaust system design, at Headers by Ed Inc. Box 7494 , Minneapolis, MN 55407 (612) 729-2802 (or www.headersbyed.com). "U" bends and straight tube sections can also be purchased from J.C. Whitney.
Disclaimer: This page was researched and written by Kurt Schley. Views expressed are those of the author, and are provided without warrantee or guarantee. Apply at your own risk.
